Maintain invoice options
You can set defaults and configure certain behaviors on the Invoice tab of the AR Invoice window in order to improve efficiency when entering AR invoices.
Tip
Use saved answers to create and name a variety of configurations of form options. Saved answers make it easy to change from one invoice entry mode to another.
Maintain AR invoice options
- In the Navigation pane, highlight the Accounts Receivable > Invoices folder.
- In the HD view, double-click a record to open it. The AR Invoice window opens.
- Click
 (next to the Options dropdown) or select
  > Tools > Options > Maintain Options. The Options dialog box opens.
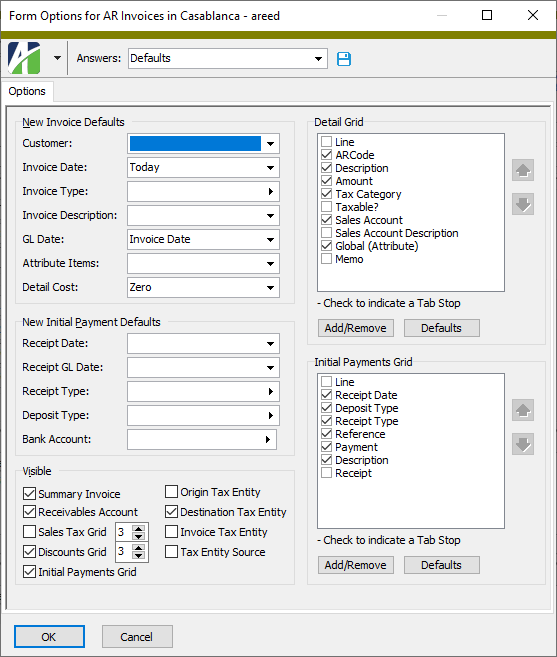
- In the New Invoice Defaults section from the Customer drop-down list, select the default customer code to load on new invoices. Your options are:
- <blank>. Do not use a default customer code. You will need to enter a customer code on each invoice.
- Previous. Default to the last customer code entered on an invoice. This is useful when you are entering several invoices for the same customer in a single session.
- From the Invoice Date drop-down list, select the default date to load on new invoices. Your options are:
- <blank>. Do not default the invoice date. You will need to enter the invoice date on each new invoice.
- Previous. Default to the invoice date on the last invoice entered.
- Today. Default to the current system date.
- In the Invoice Type field, select the default invoice type to load on each new invoice. Leave the field blank if you want to select the invoice type on each new invoice.
- From the Invoice Description drop-down list, select the default invoice description to load on new invoices. Your options are:
- <blank>. Do not default the invoice description. You will need to enter a description on each new invoice.
- Previous. Default to the invoice description from the last invoice entered. This is useful when you are entering several invoices with the same description in a single session.
- From the GL Date drop-down list, select the date to load as the default GL date on new invoices. Your options are:
- <blank>. Do not default the GL date. You will need to enter a GL date on each new invoice.
- Previous. Default to the GL date on the last invoice entered.
- Today. Default to the current system date.
- Invoice Date. Default the GL date to the date entered for the invoice date.
Period End (Invoice Date). Default the GL date to the last day of the period that contains the invoice date.
Note
The GL calendar used to determine the period end date is derived from one of the following sources:
- If one of the segments in your account numbers is set to require a calendar, that segment's segment item from the receivables account on the invoice is used to determine the GL calendar and thus the period end date for the period that contains the invoice date.
- If none of the account segments requires a calendar, the company's default calendar is used.
- If none of the account segments requires a calendar and no default calendar is defined for the company, ActivityHD cannot derive the period end date. You must provide a GL date when you enter an invoice.
- From the Attribute Items drop-down list, select which attribute items to include by default on new invoices. Your options are:
- <blank>. If default attribute item(s) are assigned on the customer, those attribute items load. Otherwise, you will need to enter any applicable attribute items on new invoices.
- Previous. Default to the attribute item(s) from the last invoice entered. This is useful when multiple invoices with the same attribute item entries are entered in a single data entry session.
- From the Detail Cost drop-down list, select the value to load as a default for the cost on each invoice detail line. Your options are:
<blank>. Do not default the cost on detail lines. You will need to enter the cost on each invoice detail line.
Note
If you select this option, be sure to show the Cost field in the Detail table.
- Zero. Default the cost on each invoice detail line to zero. Since the cost is required on each detail line, defaulting to zero is useful when you make entries which have no cost of sales/inventory effect.
- In the New Initial Payment Defaults section from the Receipt Date drop-down list, select the date to use as the default receipt date on initial payments entered at invoice entry time. Your options are:
- <blank>. The receipt date initially defaults to the invoice date from the associated invoice. Subsequent changes to the invoice date do not affect the receipt date.
- Previous. The receipt date defaults from the last initial payment entered.
- Today. The receipt date defaults to the current system date.
- Invoice Date. The receipt date defaults to the invoice date from the associated invoice. If the invoice date changes, the receipt date changes accordingly.
- Invoice GL Date. The receipt date defaults to the invoice GL date from the associated invoice. If the invoice GL date changes, the receipt date changes accordingly.
- From the Receipt GL Date drop-down list, select the date to use as the default GL receipt date on initial payments entered at invoice entry time. Your options are:
- <blank>. The GL receipt date initially defaults to the invoice GL date from the associated invoice. Subsequent changes to the invoice GL date do not affect the GL receipt date.
- Previous. The GL receipt date defaults from the last initial payment entered.
- Today. The GL receipt date defaults to the current system date.
- Receipt Date. The GL receipt date defaults to the receipt date on the initial payment. If the receipt date changes, the GL receipt date changes accordingly.
- Invoice GL Date. The GL receipt date defaults to the invoice GL date from the associated invoice. If the invoice GL date changes, the GL receipt date changes accordingly.
-
In the Receipt Type field, select the default receipt type to assign to new initial payments. Leave this field blank to require a receipt type to be entered on each initial payment.
Note
If you leave this field blank but a default deposit type is specified below that is associated with only one receipt type, then that receipt type serves as the default receipt type on initial payments.
-
In the Deposit Type field, select the default deposit type to assign to new initial payments. Leave this field blank to require a deposit type to be entered on each initial payment.
Note
If a default receipt type was entered in the previous field and only one deposit type is associated with that receipt type, then the deposit type from the receipt type is used as the default on initial payments regardless of what you enter here.
Also, if a default receipt type was entered in the previous field but the deposit type you entered here is not associated with that receipt type, the default deposit type is not used.
- In the Bank Account field, select the default bank account to use on initial payments when a deposit type is not specified. (Otherwise, the bank account is the account assigned to the deposit type.)
- In the Visible section, ensure the checkbox is marked next to each field or table you want to make visible and available for data input in the invoice entry window. ActivityHD lets you remove controls in order to simplify invoice entry. For any required fields among these controls, if you choose not to show the control you need to ensure that the entry is handled by default values. The following controls can be hidden or shown:
- Summary Invoice. Shows the Summary Type and Summary Invoice fields so that you can associate an invoice you are entering with a summary invoice and summarization style. This field only applies if you have the Summary Invoice interface enabled.
Receivables Account. Shows the AR Account field.
The receivables account can be constructed automatically from the account masks defined on invoice type, attribute items (in reverse display order), customer, and customer class, in that order. If account masks are defined so that the correct receivables accounts can be constructed on invoices, it is safe to remove this field from the AR Invoice window. In fact, even if an invalid account is constructed, you can still save the invoice; however, the account must be changed to a valid receivables account before the invoice can be merged.
- Sales Tax Grid. Shows the Sales Tax Detail table. If you select this option, enter the number of rows to show in the table. The table shows one line per tax jurisdiction for the tax entity on the invoice. Each detail line shows the tax amount and tax liability account for the corresponding tax jurisdiction.
- Discounts Grid. Shows the Discounts table. Each row in the table shows the discount date, discount percent, and discount amount. Typically, the discount information defaults from the payment terms on the invoice. If you select this option, enter the number of rows to show in the table. If discounts do not apply or if payment terms always determine discounts, it is safe to remove the Discounts table from the AR Invoice window.
- Initial Payments Grid. Shows the Initial Payment(s) table. If you hide this table, you will be unable to enter initial payments against invoices. If the invoice type requires a zero balance and this table is not visible, you will be unable to enter an initial payment to arrive at a zero balance.
- Origin Tax Entity. Shows the origin tax entity in the Origin field in the Sales Tax section of the AR Invoice window. The origin tax entity defaults from the tax entity that is designated as the default tax entity. As long as you do not need to change the tax entity, it is safe to remove the field from the AR Invoice window.
- Destination Tax Entity. Shows the destination tax entity in the Destination field in the Sales Tax section of the AR Invoice window. The destination tax entity defaults from the tax entity assigned to the customer location specified on the invoice. If a tax entity is assigned on the customer location and you do not need to change it, it is safe to remove the field from the AR Invoice window.
- Invoice Tax Entity. Shows the tax entity that is applied to the invoice in the Tax Entity field in the Sales Tax section of the AR Invoice window. This field is display-only. The tax entity source determines whether the origin or destination entity is used to calculate taxes on the invoice.
- Tax Entity Source. Shows whether the origin tax entity or destination tax entity is the source for calculating tax on the invoice. The tax entity source is based on the In-State Source and Out-of-State Source settings on the tax entity. If the state (province) portion of the origin and destination are the same, the In-State Source setting is used. If the state (province) portion of the origin and destination are different, the Out-of-State Source setting is used. If these settings are not specified, you will need to select the tax entity source at invoice entry time. If the settings are defined appropriately for all tax entities, it is safe to remove the field from the AR Invoice window.
- In the Detail Grid section, configure the Detail table to streamline invoice entry. You can do one or more of the following:
- Add columns. To do so:
- Click Add/Remove. The Column Selection dialog box opens.
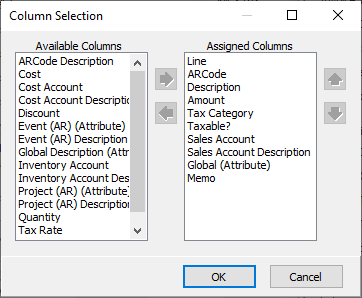
- In the Available Columns list box, highlight the columns to add to the table, then click
 to move your selections to the Assigned Columns list box.
 - Click OK.
- Click Add/Remove. The Column Selection dialog box opens.
- Remove columns. To do so:
- Click Add/Remove. The Column Selection dialog box opens.
- In the Assigned Columns list box, highlight the columns to remove from the table, then click
 to move your selections to the Available Columns list box.
 - Click OK.
- Click Add/Remove. The Column Selection dialog box opens.
- Reorder columns. To do so:
- Highlight a column name in the Detail Grid list box.
- Use
 and
and  to move the column to the desired position.
 - Repeat the last step for other columns you need to move.
- Set tab stops. To do so:
- In the Detail Grid list box, ensure the checkbox for the columns that need a tab stop are marked.
- Clear the checkbox for the columns that do not need a tab stop.
- Add columns. To do so:
- In the Initial Payments Grid section, configure the Initial Payment(s) table to streamline invoice entry. Use the same techniques as described above for the Detail table.
-
When you finish, click OK. If you started from the "Defaults" profile, you are prompted to save the settings profile.
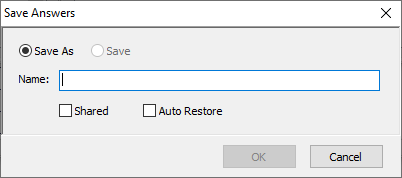
Provide a Name for the profile, mark the Shared and Auto Restore options as appropriate, and click OK.
If you started from an existing profile, you are prompted whether to save the changes. Click Yes.
