![]() Maintain Accounts Receivable options
Maintain Accounts Receivable options
Maintain Accounts Receivable options
- In the Navigation pane, highlight the Accounts Receivable folder.
- Right-click the Accounts Receivable folder and select Options from the shortcut menu. The Options dialog box opens with the Accounts Receivable branch selected.
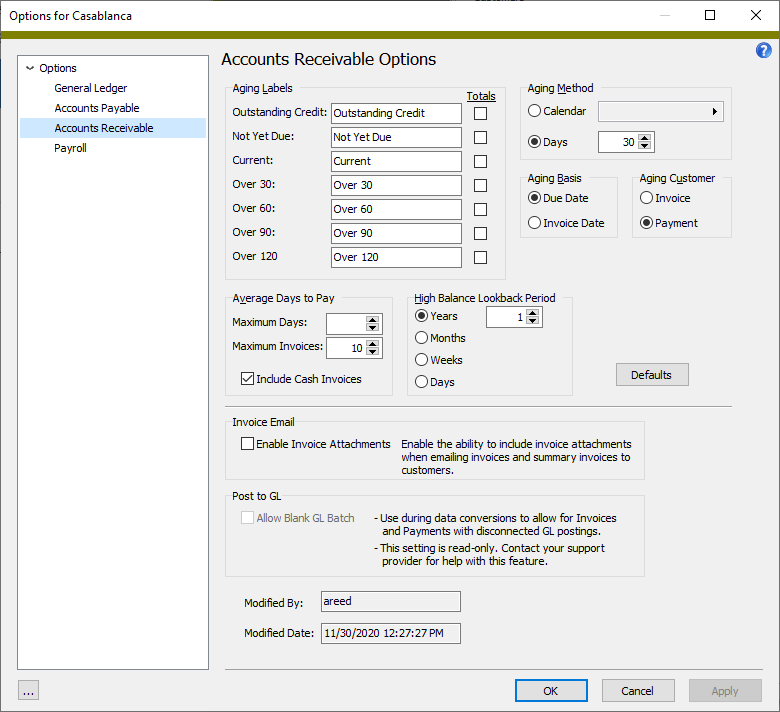
- In the Aging Labels section, modify the aging labels to match your actual aging periods. These labels appear in the Customers HD view as column headings and as headings in the Aged Invoice Analysis. The following table shows the default aging categories and what each means.
- In the Totals column in the Aging Labels section, mark the checkbox for each aging category to show subtotals for in the view. When an aging category that is flagged to show totals is shown in the view, the total for the selected rows is shown at the bottom of the view.
- In the Aging Method field, select how to determine aging periods. Aging periods are used to calculate aging amounts such as those shown in the Customers HD view. Your options are:
- Calendar. If you select this option, select the GL calendar to use to determine aging periods. This allows you, for example, to use actual months as aging periods. The current aging period is the calendar period that contains today's date. Other aging periods are relative to the current period.
- Days. If you select this option, enter the fixed number of days in each aging period. Aging periods are relative to today's date.
- In the Aging Basis field, select the type of date to use as the basis for determining the aging period. Your options are:
- Due Date. Use the invoice due date as the basis for the aging period.
- Invoice Date. Use the original invoice date as the basis for the aging period.
- In the Aging Customer field, select which customer to age balances for. Your options are:
- Invoice. Calculate aging totals based on the outstanding invoices for the invoice customer. Payment customers who have outstanding invoices for other customers who bill to them will NOT have the other invoices included in the aging totals.
- Payment. Include invoice customers who bill to a payment customer when calculating aging totals for payment customers. In this case, an invoice customer who bills to a different payment customer will always show zero aging totals.
- In the Average Days to Pay section in the Maximum Days field, enter the number of days before today within which an invoice must have been paid to be included in the average days to pay calculation. Invoices paid before this moving date are excluded from the calculation. To include invoices regardless of the final payment date, leave this field blank.
- In the Maximum Invoices field, select or enter the maximum number of invoices to include in the average days to pay calculation. Only the most recently paid invoices are included based on the maximum invoice number. If you do not want to limit the number of invoices used in the calculation, leave this field blank.
- To include invoices which are completely paid on the same day as the invoice date in the average days to pay calculation, mark the Include Cash Invoices checkbox. To exclude these invoices, ensure the checkbox is cleared.
- In the High Balance Lookback Period section, select the type of lookback period to use to determine a customer's high balance totals. Your options are:
- Years
- Months
- Weeks
- Days
When you select an option, a spinner field becomes available to its right. Enter the number of years/months/weeks/days in the lookback period. To include all previous customer history in the lookback period, leave this field blank.
Example
To provide high balance totals for the last three years, select "Years" and enter "3" in the adjacent field.
- If you need to be able to include invoice attachments when emailing invoices and summary invoices to customers, mark the Enable Invoice Attachments checkbox.
- Click OK.
| Aging Category | Description |
|---|---|
| Outstanding Credit | Total of all credit-balance invoices |
| Not Yet Due | Total of unpaid invoices due after the current aging period |
| Current | Total of unpaid invoices due in the current period |
| Over 30 | Total of unpaid invoices due in the first past due period |
| Over 60 | Total of unpaid invoices due in the second past due period |
| Over 90 | Total of unpaid invoices due in the third past due period |
| Over 120 | Total of unpaid invoices due before the oldest past due period |
Note
High balance totals are available by invoice customer and by payment customer. The high balance totals are calculated by looking back over the time period specified in the High Balance Lookback Period section. The end of day balance for each day in the lookback period is evaluated to determine the highest balance at any point in time during the lookback period. All invoices and receipts for a customer during the lookback period, both merged and unmerged, are evaluated. The lookback period always starts with the current date. Invoices or receipts with future dates are not included.
The High Balance (Invoice Customer) and High Balance (Payment Customer) columns are available to be added to the Customers HD view. If you include activity totals when you run the Customers Listing, high balances are included on the report.
![]() Reset customer options to the original defaults
Reset customer options to the original defaults
If changes have been made to settings on the Accounts Receivable Options tab of the Options dialog box but you decide you need to revert to the original settings from when Accounts Receivable was installed, you can recall the system defaults.
- In the Navigation pane, highlight the Accounts Receivable folder.
- Right-click the Accounts Receivable folder and select Options from the shortcut menu. The Options dialog box opens with the Accounts Receivable branch selected.
- Click Defaults. ActivityHD resets the options.
- Click OK.
Accounts Receivable Options tab
Select how to determine aging periods. Your options are:
-
Calendar. If you select this option, the adjacent field is enabled. Select the GL calendar to use to determine aging periods. This allows you, for example, to use actual months as aging periods. The current aging period is the calendar period that contains today's date. Other aging periods are relative to the current period.
Press F3 to look up the value.
If a value is already selected, you can press F4 to open the record in its native editor.
- Days. If you select this option, the adjacent field is enabled. Enter the fixed number of days in each aging period. Aging periods are relative to today's date.
Select the type of date to use as the basis for the aging period. Your options are:
- Due Date. Use the invoice due date as the basis for the aging period.
- Invoice Date. Use the original invoice date as the basis for the aging period.
Select which customer to age balances for. Your options are:
- Invoice. Calculate aging totals based on the outstanding invoices for the invoice customer. Payment customers who have outstanding invoices for other customers who bill to them will NOT have the other invoices included in the aging totals.
- Payment. Include invoice customers who bill to a payment customer when calculating aging totals for payment customers. In this case, an invoice customer who bills to a different payment customer will always show zero aging totals.
Select the type of lookback period to use to determine a customer's high balance totals. Your options are:
- Years
- Months
- Weeks
- Days
When you select an option, a field adjacent to the option becomes visible. Enter the number of years/months/week/days in the lookback period. To include all previous customer history in the lookback period, leave this field blank.
Example
To provide high balance totals for the last three years, select "Years" and enter "3" in the adjacent field.
Note
High balance totals are available by invoice customer and by payment customer. The high balance totals are calculated by looking back over the time period specified in the High Balance Lookback Period section. The end of day balance for each day in the lookback period is evaluated to determine the highest balance at any point in time during the lookback period. All invoices and receipts for a customer during the lookback period, both merged and unmerged, are evaluated. The lookback period always starts with the current date. Invoices or receipts with future dates are not included.
The High Balance (Invoice Customer) and High Balance (Payment Customer) columns are available to be added to the Customers HD view. If you include activity totals when you run the Customers Listing, high balances are included on the report.
|
5225 S Loop 289, #207 Lubbock, TX 79424 806.687.8500 | 800.354.7152 |
© 2025 AccountingWare, LLC All rights reserved. |