Receipts are used in Accounts Receivable to record the receipt of funds from customers and to apply the funds to invoices as payments. Receipts can be grouped into deposits to automate the bank deposit process, to document the deposit's sources, and to create bank transactions in Bank Reconciliation that can be easily reconciled later.
ActivityHD's receipting can handle regular payments, miscellaneous payments, and unapplied payments. A miscellaneous receipt automatically creates an invoice for an amount that matches the payment amount. The invoice is merged and fully paid when the receipt is merged. As a result, it never contributes to outstanding accounts receivable. Creating an invoice to record sales information allows revenue and inventory to be consistently tracked, whether a miscellaneous receipt was used to record a cash sale or if the sale was accrued and paid out over time.
An unapplied payment also creates an invoice that is automatically merged when the receipt is merged. The original amount of an unapplied invoice is zero; its initial outstanding balance is the negative of the payment amount. This credit balance allows it to be applied as a payment on other invoices in a future receipt.
Create a receipt
- In the Navigation pane, highlight the Accounts Receivable > Receipts folder.
- Click
 . The New Receipt window opens.
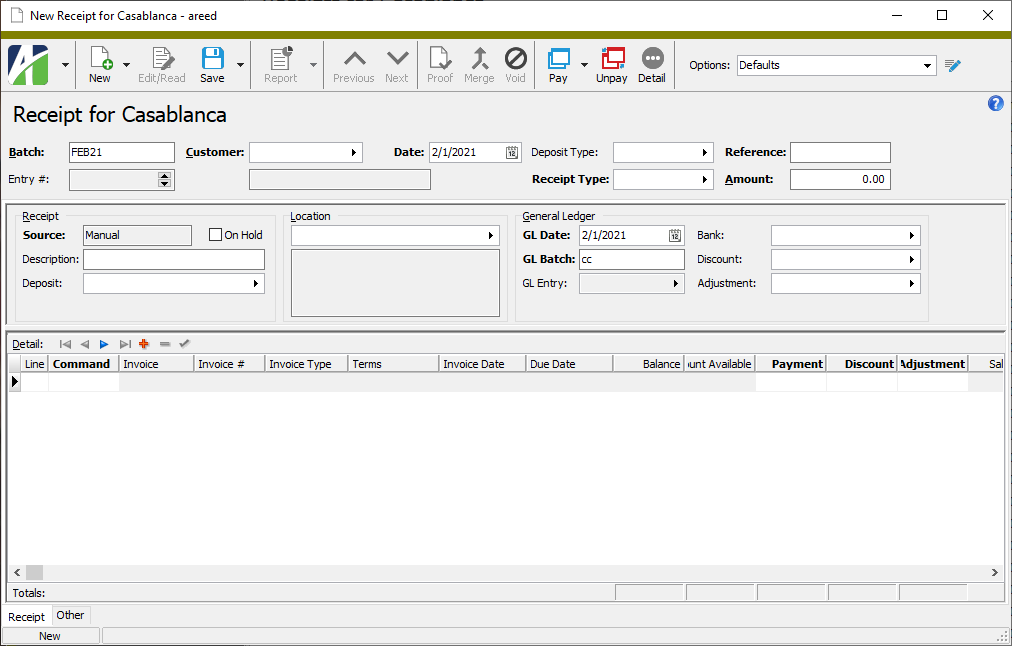
- Enter the name of the Batch to include the receipt in. The default batch name is the batch name from the last receipt you entered. Batches allow you to group multiple receipts for proofing and reporting.
- In the Customer field, select the customer to credit for this receipt. The customer must be a valid "payment customer".
- In the Date field, enter the date to post the receipt to the customer's account. The default date is the deposit date. The receipt date is used to calculate available discounts. This date is also used as the invoice date on invoices created when you enter an unapplied payment or miscellaneous receipt.
-
In the Deposit Type field, select the deposit type to associate with the receipt.
If the receipt is associated with a deposit, the deposit type helps ActivityHD determine the applicable deposit based on the deposit type and GL receipt date. If a deposit with "New" status already exists for the combination of deposit type and GL receipt date, that deposit is used on the receipt. If a deposit does not yet exist, ActivityHD creates it.
If, however, a deposit was created and assigned to the receipt, the deposit type defaults from the deposit record.
Note
If the deposit type is associated with only one receipt type, the Receipt Type field automatically loads that receipt type.
If you leave this field blank and specify a receipt type that has only one deposit type associated with it, this field automatically loads that deposit type.
If you enter a receipt type and subsequently enter a deposit type that is not associated with it, the Receipt Type field is blanked out and you will need to enter a compatible receipt type.
-
In the Receipt Type field, select the receipt type to associate with the receipt.
Note
If you select a "Zero Receipt" receipt type, the receipt must have a zero receipt amount before it can be saved.
-
In the Reference field, enter a note to help you identify the receipt. You can use up to 20 characters. If a default reference was specified on the receipt type you selected, this field defaults to that reference value.
Examples
For a check, you can use the check number as the reference.
For a cash payment, you might simply enter "CASH".
-
The Amount field can be automatically calculated by letting ActivityHD total the payment amounts from the Detail table. If this is what you want to do, accept the 0.00 entry.
Note
If both credit and debit invoices are selected for payment, the Pay and Pay Any commands pay all selected credit invoices first, then pay debit invoices up to the receipt amount entered.
If you enter a manual amount here and click the Pay button to select and pay multiple outstanding invoices, ActivityHD pays the invoices until the amount is exhausted, making a partial payment on the "last" invoice processed if need be, and leaving any remaining invoices unpaid.
If you leave the amount at 0.00 and click the Pay button to select and pay multiple outstanding invoices, ActivityHD pays all the selected invoices in full and updates this amount accordingly.
Note
You can save a receipt where the Amount field does not equal the total payments in the Detail table. ActivityHD issues a warning but allows you to save the receipt. However, you are not allowed to merge the receipt until the conflict is resolved.
- In the Receipt section, enter a Description of the receipt.
- You can assign a Deposit to a receipt in a couple of ways:
- Let ActivityHD assign the deposit based on the combination of deposit type and GL receipt date. If a deposit with a status of "New" exists that satisfies the deposit type-GL receipt date combination, ActivityHD assigns the receipt to that deposit. If such a deposit does not exist, ActivityHD creates one when you save the receipt.
- Create a deposit record first, then assign the receipt to the deposit by selecting it in the Deposit field.
- If you need to prevent the receipt from being merged immediately, mark the On Hold checkbox. If you are entering an unapplied payment or miscellaneous receipt, the resulting invoice is also flagged as "On Hold".
- The Location field defaults to the customer's default statement location. If you need to change the location, select a different location.
-
In the General Ledger section in the GL Date field, enter the date to post the receipt to the general ledger. If you selected a deposit to associate with the receipt, this field defaults to the GL date on the deposit. If you change the GL date here, the Deposit field is blanked out and ActivityHD assigns or creates a different deposit when the receipt is saved.
If the receipt does not have a deposit, this field defaults to the receipt date. The date can be changed until the receipt's GL entry is merged.
Note
"GL Date" access to the Receipts resource is required to access this field.
- If you did not specify a deposit type and did not specify a deposit, the GL Batch field is enabled. Enter the name of the batch to use for the GL entry when the receipt is merged. Receipts are summarized into different GL entries based on the batch name.
- If you did not specify a deposit type and did not specify a deposit, the Bank field is enabled. Enter the bank account to debit for the amount of the receipt.
- In the Discount field, select the account to debit with the total discount given. If none of the lines in the Detail table has a discount, this account is not needed. This field defaults to the discount account (if any) specified in the Options dialog box.
- In the Adjustment field, select the account to debit with the total adjustment amount. If none of the lines in the Detail table has an adjustment, this account is not needed. This field defaults to the adjustment account (if any) specified in the Options dialog box.
- In the Detail table, perform the steps for the type of transaction you need to record.
To enter a payment:
Tip
To quickly record payments in full for one or more invoices, click
 to open the Find dialog box for invoices, select the invoices to pay, and click OK. The detail lines for the selected invoices load in the Detail table.
- From the Command drop-down list, select "Payment".
- In the Invoice column, select the invoice that is being paid on the receipt.
- The Payment column defaults to the full amount of the invoice less any available discounts up to any amount entered in the Amount field. If you need to record a partial payment, enter that amount here.
- The Discount column defaults to the discount available on the invoice. If you need to override this amount, enter the discount amount to credit to the customer's account for the invoice.
If you need to credit the customer's account for an adjustment, enter the amount of the adjustment in the Adjustment column. To adjust the invoice balance down, enter a positive adjustment amount. To adjust the balance up, enter a negative adjustment amount.
Note
You might want to adjust the balance up if the payment amount exceeds the invoice balance by a nominal amount.
To enter an unapplied payment:
- From the Command drop-down list, select "Unapplied".
- The Invoice # defaults to a number of the format U-yyyymmdd unless the invoice scheme for the invoice type you select overrides it. If you need to enter a different invoice number, enter the number in this column.
- In the Invoice Type column, select the invoice type to assign to the unapplied payment.
- The Invoice Date defaults to the receipt date. If you need to override the default invoice date, enter the date in this column.
- The Due Date defaults from the invoice date. If you need to override the default due date, enter the date in this column.
- In the Payment column, enter the amount of the unapplied payment.
- The default Invoice Description is set in the Options dialog box. If it was not or if you need to override the default description, enter the invoice description in this column.
To enter a miscellaneous receipt:
- From the Command drop-down list, select "Miscellaneous".
- The Invoice # defaults to a number of the format M-yyyymmdd unless the invoice scheme for the invoice type you select overrides it. If you need to enter a different invoice number, enter the number in this column.
- In the Invoice Type column, select the invoice type to assign to the miscellaneous payment.
- The Invoice Date defaults to the receipt date. If you need to override the default invoice date, enter the date in this column.
- In the Payment column, enter the amount of the miscellaneous payment including any sales tax amount.
ActivityHD calculates the Sales Tax amount based on the aggregate tax rate in effect for the invoice tax entity on the invoice date. If the amount of tax collected from the customer is different from the calculated amount, enter the actual amount collected in this column.
Note
The sales tax amount is backed off the payment amount. If you enter a payment amount of $500.00 and the aggregate tax rate is 7%, the effective payment amount is $467.29 with a tax of $32.71.
- The default ARCode can be set in the Options dialog box. If it was not or if you need to override the default ARCode, select it in this column. The ARCode categorizes this detail line for reporting purposes and provides information for determining GL accounts and for sales tax calculations.
- The default Invoice Description is set in the Options dialog box. If it was not or if you need to override the default description, enter the invoice description in this column.
- The default Sales Account is derived from masks on the ARCode, attribute items, the invoice customer, the invoice customer class, and from the sales account mask specified in the Options dialog box. The sales account is credited with the invoice amount for this detail line when the receipt is merged to GL. If you need to override the default account number or fill in missing digits, select the account number in this column. Manual entries display in purple.
- Repeat step 19 for each detail line you need to enter.
- When you finish, save the receipt.
In the instructions which follow, steps for controls which may be hidden due to settings in the Options dialog box appear in green.
| Field | Description |
|---|---|
| Batch |
The name of the receipt entry batch. The batch allows you to group multiple receipts for proofing and reporting. The batch name defaults from your last saved receipt. |
| Entry # | The system-assigned entry number for the receipt. The entry number on an unmerged receipt can be changed to match source documents if needed. The entry number must be unique for the batch and the combination of batch and entry number must be unique across ALL receipts (unmerged and merged). To open the field for editing, press Ctrl+Alt+U or select |
| Customer | The customer credited with the receipt. If you use the Pay option, all outstanding invoices with this customer assigned as the payment customer are available to select for payment. You can only select customers who are valid payment customers. You can change the customer until the receipt is merged. |
| Customer name | The customer's name displays here to help you verify that the customer code is correct. |
| Date | The date to post the receipt to the customer's account. The receipt date is used to calculate the available discount and it becomes the invoice date for miscellaneous and unapplied payment invoices. The receipt date defaults from the deposit date. |
| Deposit Type |
The deposit type assigned to the receipt. If you associate a deposit type with a receipt, ActivityHD determines the appropriate deposit to use based on the deposit type and the GL receipt date. If a new deposit with the appropriate deposit type and GL receipt date exists, it is assigned to the receipt. If it does not exist, ActivityHD creates it and assigns it to the receipt. If, instead, you create and assign a deposit to the receipt, the deposit type is determined from the deposit. |
| Receipt Type | The receipt type assigned to the receipt. The receipt type can be changed on unmerged and merged receipts as long as it does not violate any of the restrictions on the deposit. |
| Reference | A brief note to help you identify the receipt. The default reference is the reference specified on the receipt type. The reference can be changed until the receipt's GL entry is merged. |
| Amount |
The receipt amount. If you leave this field alone, ActivityHD calculates the receipt amount as you apply payments to invoices in the Detail table. You can use the Pay function to select and pay multiple invoices. If you leave this field alone and select multiple invoices, ActivityHD fully pays all selected invoices and updates the amount accordingly. Alternatively, if you enter an amount here and select multiple invoices, ActivityHD limits payments to that amount. So, ActivityHD pays as many invoices as it can in full, pays the "last" invoice partially if necessary, and pays no other invoices. ActivityHD warns you if you save a receipt while the receipt amount does not equal the total payment from the detail lines. You can save the receipt, but you are not able to merge the receipt until the amounts are equal. You can change the amount until the receipt is merged. |
| Remaining Payment | The remaining payment amount to be distributed. This field is visible only when a manual receipt amount has been entered. |
| Source | The system-assigned receipt source. Valid values are:
|
| Description | The receipt description. The description can be modified even after the receipt is merged. |
| Deposit |
The deposit associated with the receipt. If you change the deposit after it has been assigned to receipts, the "Invalid GL" flag appears on the receipts and they cannot be merged. Furthermore, the GL entry for any merged receipt that references the deposit cannot be merged until the GL information is corrected. There are two ways to correct the GL information on receipts which reference a changed deposit:
You can change the deposit until the receipt's GL entry is merged as long as the deposit status is "New". |
| On Hold |
If this checkbox is marked, the receipt cannot be merged. Mark the checkbox if a receipt requires further attention before it can be processed. Once any problems are resolved, clear the checkbox to allow the receipt to be merged. The hold setting on a receipt is shared by any miscellaneous and unapplied payment invoices it creates. This way, both the receipt and its invoice(s) are excluded from reports which exclude "on hold" items. |
| Location | The receipt location code. This field defaults to the customer's statement location. |
| Location details | The address for the receipt location. |
| GL Date |
The date the receipt is posted to the general ledger. The initial default value is based on your options settings. If a deposit is specified on the receipt, this date changes to the deposit date. If you change this date, the Deposit field blanks out and a new deposit is assigned or created based on the deposit type and GL date. If the receipt is not assigned to a deposit, this date defaults to the receipt date. This date can be changed until the associated GL entry is merged. |
| GL Batch |
The name of the GL batch that contains the GL entry that is created when the receipt is merged. If the receipt is assigned to a deposit, the deposit provides the GL batch name and it cannot be changed without changing the deposit assigned to the receipt. If the receipt is not assigned to a deposit, you can specify different GL batch names on different receipts in order to summarize them into different GL entries. In this case, the GL batch can be changed until the GL entry is merged and the receipt's GL detail is moved to the newly designated GL entry. |
| Bank |
The bank account that is debited with the receipt amount in the GL entry that is created when the receipt is merged. The default bank account, if one, is determined by options settings. If the receipt is assigned to a deposit, the bank account is set to the bank account on the deposit type and cannot be changed. If the receipt is not assigned to a deposit, you must enter a valid bank account before the receipt can be merged. You can save the receipt with an invalid bank account; however, the receipt is flagged as having "Invalid GL" and must be corrected before merging. The bank account can be changed until the GL entry is merged. |
| Discount |
The account that is debited with the total discount given. The default discount account, if one, is determined by options settings. If no detail lines have a discount, this account is unnecessary. Otherwise, if any detail line has a discount, the receipt cannot be merged until a valid discount account is specified. The discount account can be changed until the GL entry is merged. |
| Adjustment |
The account that is debited with the total adjustment amount. The default adjustment account, if one, is determined by options settings. If no detail lines have an adjustment, this account is unnecessary. Otherwise, if any detail line has an adjustment, the receipt cannot be merged until a valid adjustment account is specified. The adjustment account can be changed until the GL entry is merged. |
| Detail table |
This table shows the receipt detail lines. The columns that show in the table and the columns which have tab stops are controlled by options settings. In the following descriptions of the columns that may be included in the table, columns in the default configuration are noted by an asterisk (*).
|
![]() Create a receipt when you don't know the customer name
Create a receipt when you don't know the customer name
Note
You must have "Pay Any" security access on receipts to use this feature.
If you need to enter a receipt and have the invoice number but not the customer name, you can use the Pay Any feature to look up the customer by invoice number.
- In the Navigation pane, highlight the Accounts Receivable > Receipts folder.
- Click
 . The New Receipt window opens.
- In the toolbar, click the drop-down arrow next to the Pay button.
- From the drop-down menu, select Pay Any. The Find dialog box for invoices opens.
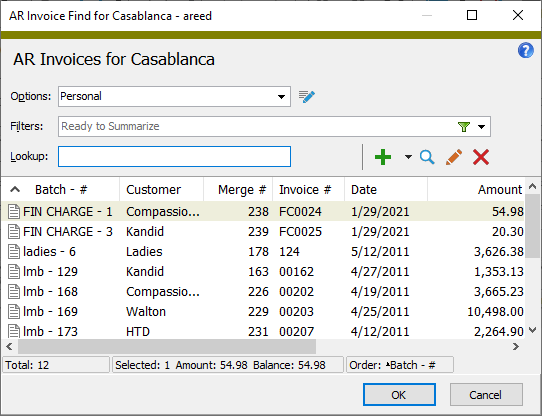
- In the Lookup field, enter the invoice number and press Enter.
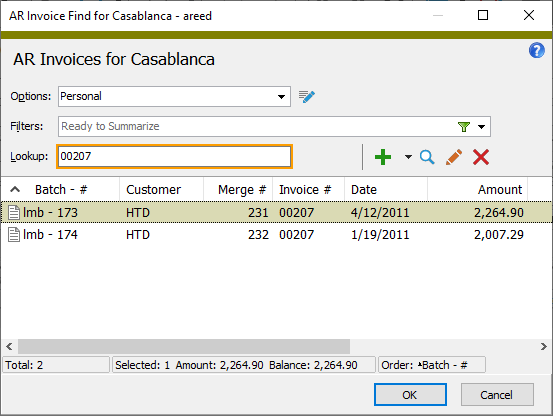
- Click OK to load details for the invoice, including the customer name, in the New Receipt window.
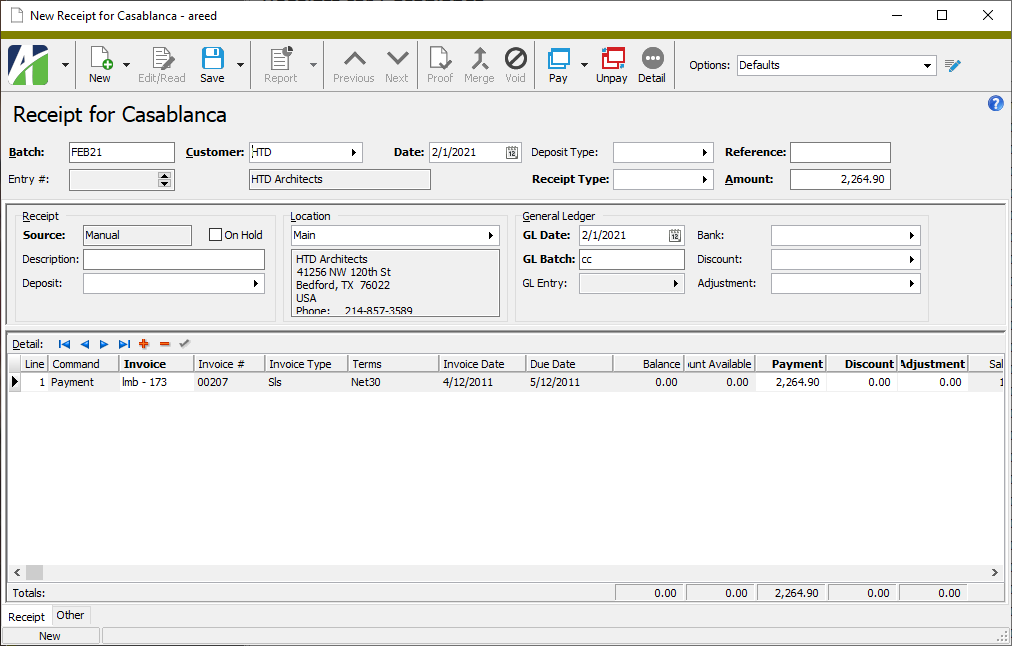
- Complete the receipt as usual. See "Create a receipt".
- When you finish, save the new receipt.
![]() Create a receipt that pays invoices for multiple customers
Create a receipt that pays invoices for multiple customers
Note
You must have "Pay Any" security access on receipts to use this feature.
The Pay Any feature comes in handy when you need to let one customer pay invoices for several other customers.
- In the Navigation pane, highlight the Accounts Receivable > Receipts folder.
- Click
 . The New Receipt window opens.
- In the Customer field, select the customer who is paying the invoice(s).
- In the toolbar, click the drop-down arrow next to the Pay button.
- From the drop-down menu, select Pay Any. The Find dialog box for invoices opens.

- In the Find dialog box, select the invoice(s) to pay. You can use Ctrl and/or Shift selection to select multiple invoices.
- Click OK. The invoices you selected load in the Detail table.
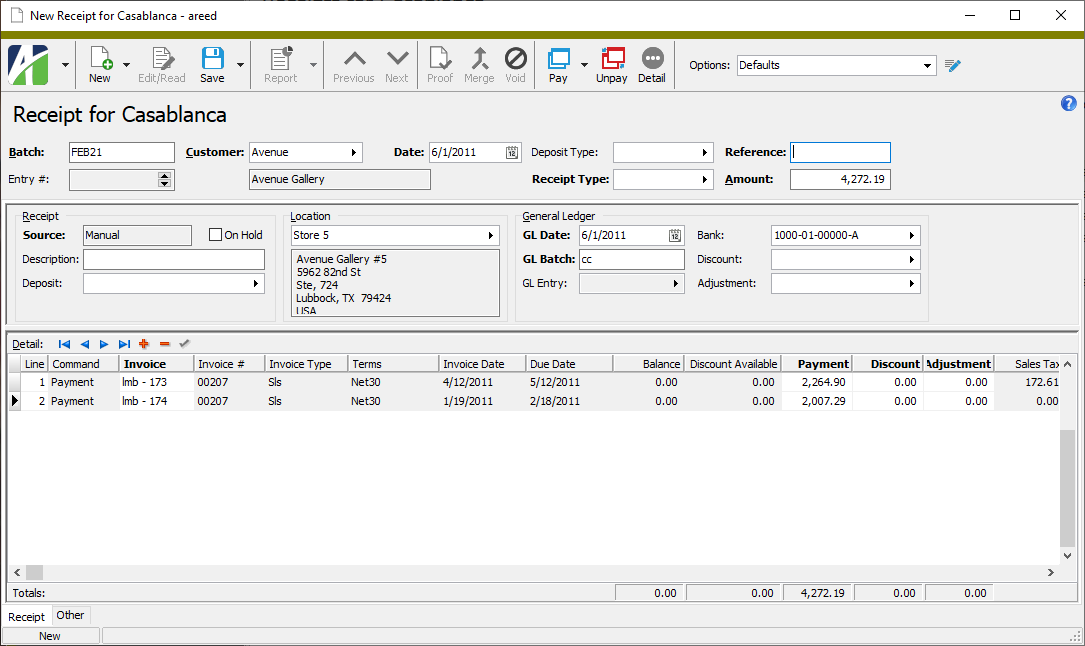
- Complete the receipt as usual. See "Create a receipt".
- When you finish, save the new receipt.
The procedure which follows creates a $0.00 receipt with a detail line for each applied credit and for each invoice to be credited.
To apply existing credits to existing charges:
Apply credits
- In the Navigation pane, highlight the Accounts Receivable > Receipts folder.
- Click
 . The New Receipt window opens.
 - Enter the name of the Batch to include the receipt in.
- In the Customer field, select the customer to apply credits for.
- In the Date field, enter the date to post the credit to the customer's account.
- In the Receipt Type field, select a receipt type which does not require a deposit but does have a bank account designated on it.
- In the Reference field, enter a note to help identify the receipt.
- In the Amount field, explicitly enter 0.00. This tells ActivityHD not to auto-calculate or change the amount.
- Click
 . The Find dialog box for invoices opens.
 - In the Find dialog box, select the credits to apply and the outstanding charges to apply them to and click OK. You can use Ctrl and/or Shift selection to select multiple invoices. (Alternatively, you can enter the credit invoices and charge invoices in the Detail table individually using the "Payment" command on each detail line.)
As ActivityHD applies credits, it calculates the total credit amount available, then it pays the selected invoice balances until the credit amount is exhausted, creating a partial payment if necessary on the last invoice that can be paid.
- Save the receipt and process as usual.
![]() Use a receipt to refund money to a customer
Use a receipt to refund money to a customer
![]() Step 1: Set up a receipt profile for refunds
Step 1: Set up a receipt profile for refunds
- In the Navigation pane, highlight the Accounts Receivable > Receipts folder.
- In the HD view, double-click a record (any record) to open it. The Receipt window opens.
-
Select
 > Tools > Options > Maintain Options. The Options dialog box opens.
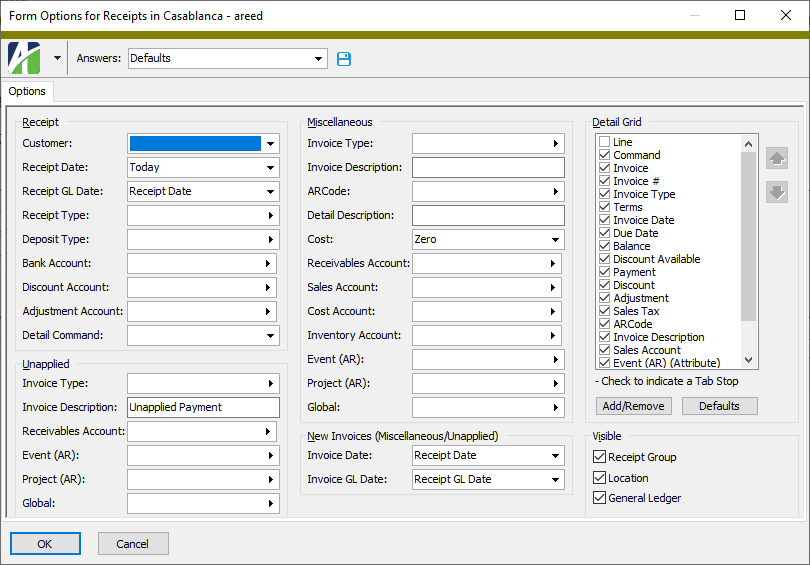
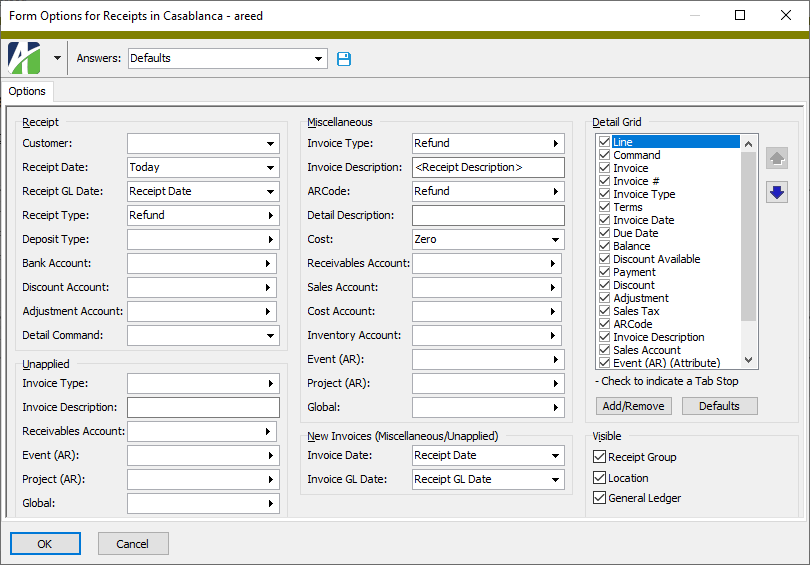
- In the Receipt section in the Receipt Type field, select the receipt type to use for refunds.
- In the Miscellaneous section in the Invoice Type field, select the invoice type to create for refunds.
- In the Invoice Description field, enter the default description to use when an invoice is created from a refund receipt. You can leave this field blank if you want to enter a description each time you enter a refund receipt. You can use literal text and/or keywords to derive the default description.
- In the ARCode field, select the default ARCode to use on new detail lines for each new invoice created from a refund receipt. If you leave this field blank, you will need to enter the ARCode on each detail line.
- In the Detail Grid list box, remove the fields you do not need to see when processing a refund. AccountingWare suggests you show the following fields:
- Line
- Command
- Invoice
- Invoice #
- Invoice Type
- Invoice Date
- Payment
- ARCode
- Sales Account
- Invoice Description
-
Click OK. The Save Answers dialog opens.
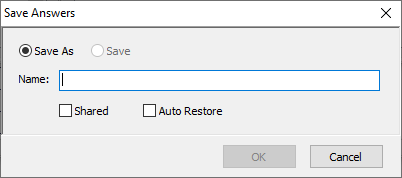
- Enter a Name for the profile. (May we be so bold to suggest "Refunds"?)
- If you want to allow other users to access the profile, mark the Shared checkbox.
- If you want the profile to load automatically the next time you open the Receipt window, mark the Auto Restore checkbox.
- Click OK.
Accept the default settings with the following changes:
![]() Step 2: Create a refund receipt
Step 2: Create a refund receipt
- In the Navigation pane, highlight the Accounts Receivable > Receipts folder.
- Click
 . The New Receipt window opens.
 -
From the Options drop-down list, select the refund profile you set up in Step 1.
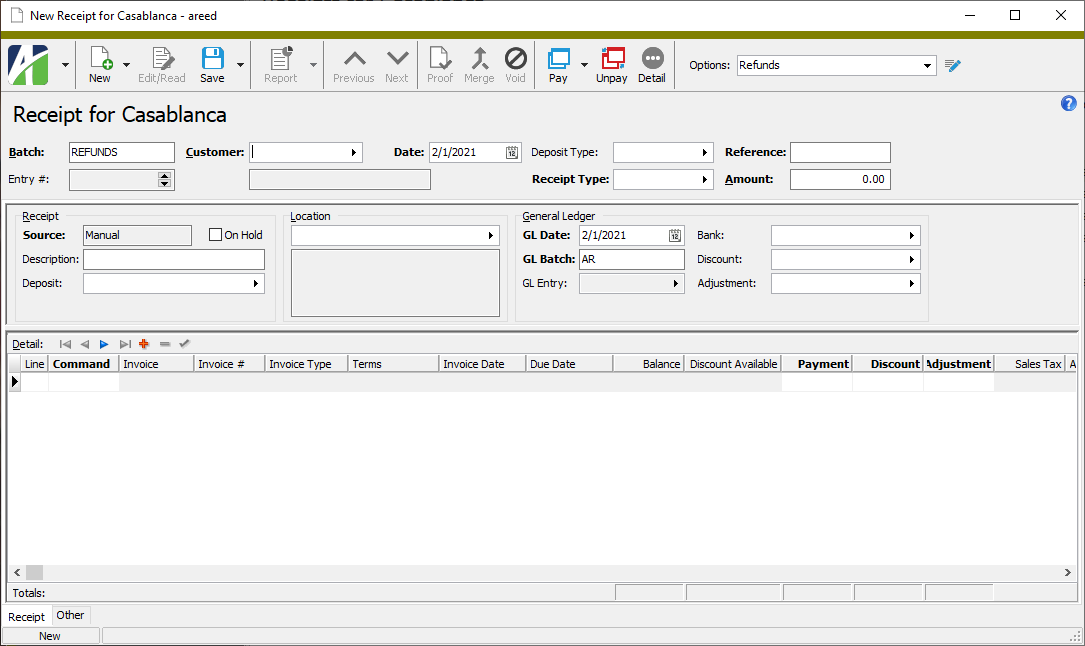
- Enter the name of the Batch to process the refund with.
- Select the Customer to whom you are making the refund.
- Verify the transaction Date. Change it if necessary.
- Ensure a refund receipt type is selected in the Receipt Type field.
- Ensure the Amount is 0.00.
- In the Receipt section, enter a Description of the receipt.
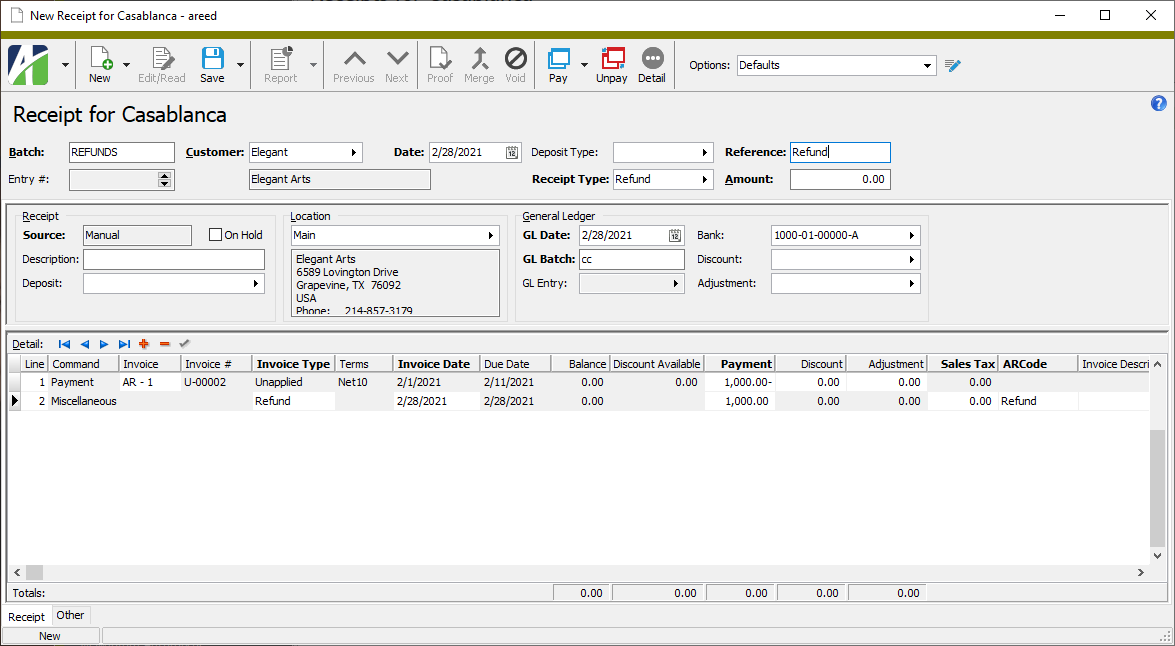
- In the Detail table, from the Command column drop-down list, select "Payment".
- In the Invoice column, select the invoice or balance to refund.
- Repeat steps 10-11 for each invoice or balance you need to refund for the customer.
- When you finish, go to the next available line (Ctrl+Down) and select "Miscellaneous" from the Command drop-down list. ActivityHD autofills the row from your default settings.
-
In the Payment column, enter the amount to refund.
- Save the receipt.
![]() Step 3: Proof the receipt (optional)
Step 3: Proof the receipt (optional)
-
With the refund receipt open in the Receipt window, click
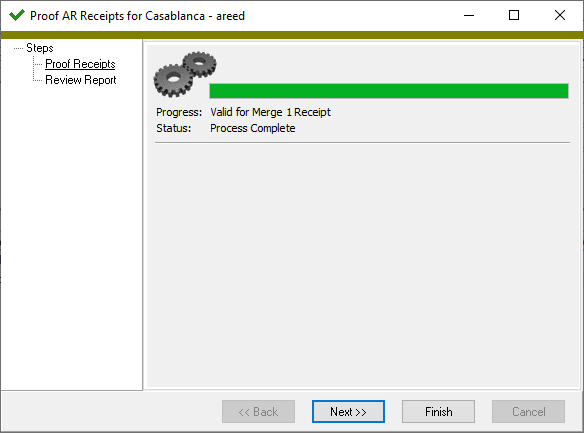
 . The Proof AR Receipts wizard starts.
-
Click Next >>.
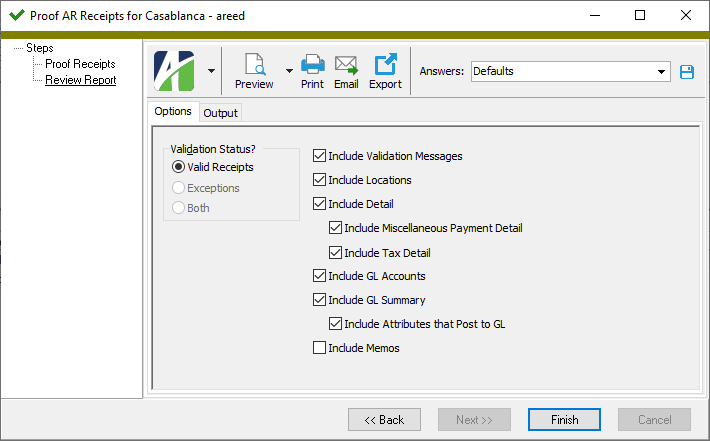
- Output and peruse the proof report using your preferred method.
- Click Finish.
-
With the refund receipt open in the Receipt window, click
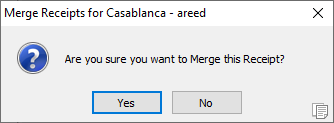
 . The Merge AR Receipts wizard starts. You are prompted to confirm that you want to merge the receipt.
-
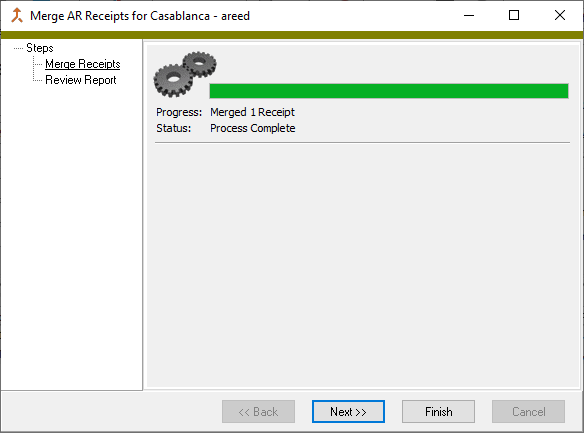
Click Yes. ActivityHD merges the receipt.
-
Click Next >>.
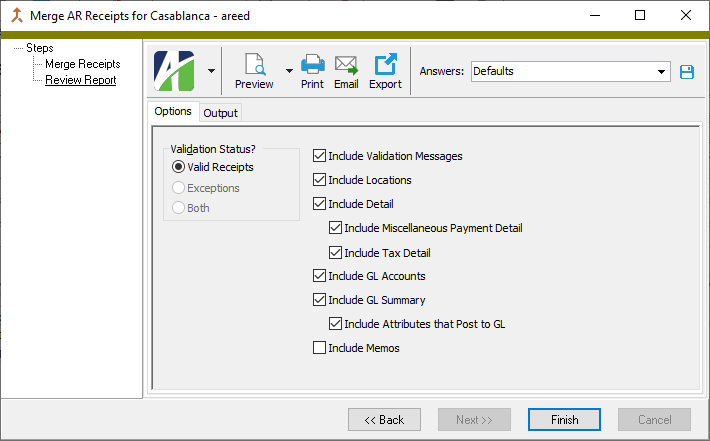
- Output and peruse the merge report using your preferred method.
- Click Finish.
![]() Remove all the detail lines from a receipt
Remove all the detail lines from a receipt
Sometimes you just need a do-over. Suppose you are entering a receipt and realize you've made several mistakes in the Detail table or you selected the wrong invoices to pay. ActivityHD makes it easy to get a fresh start.
- Ensure the receipt you need to remove the detail lines from is open in the Receipt window.
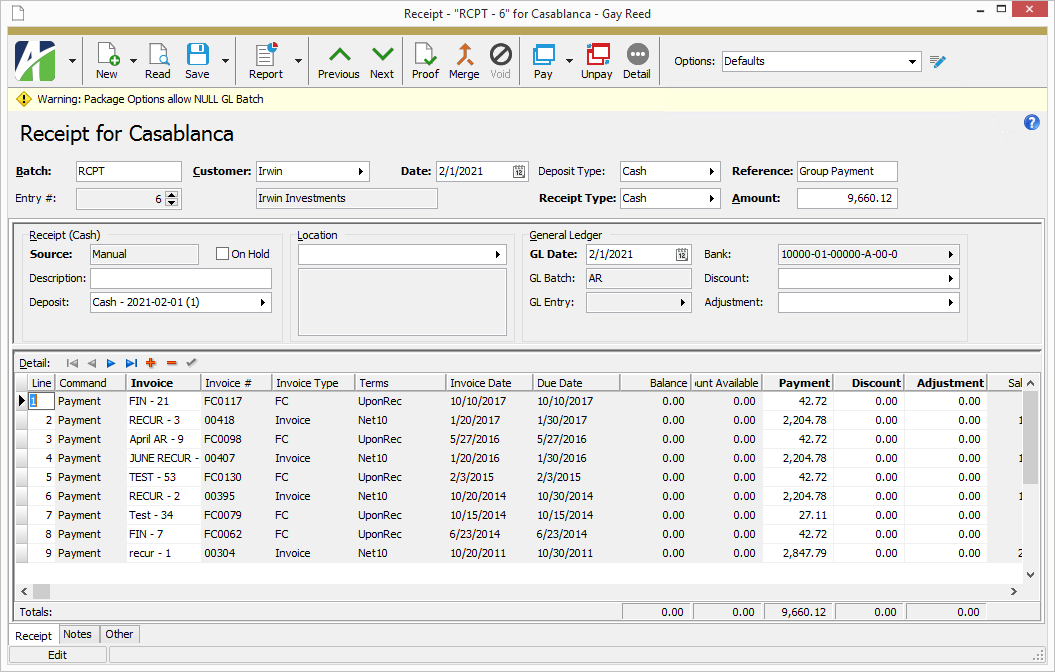
- In the toolbar, click
 . You are prompted to confirm that you want to delete all the detail lines.
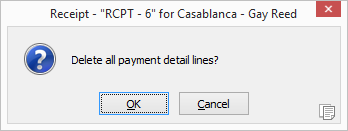
- Click OK. The Detail table is cleared.
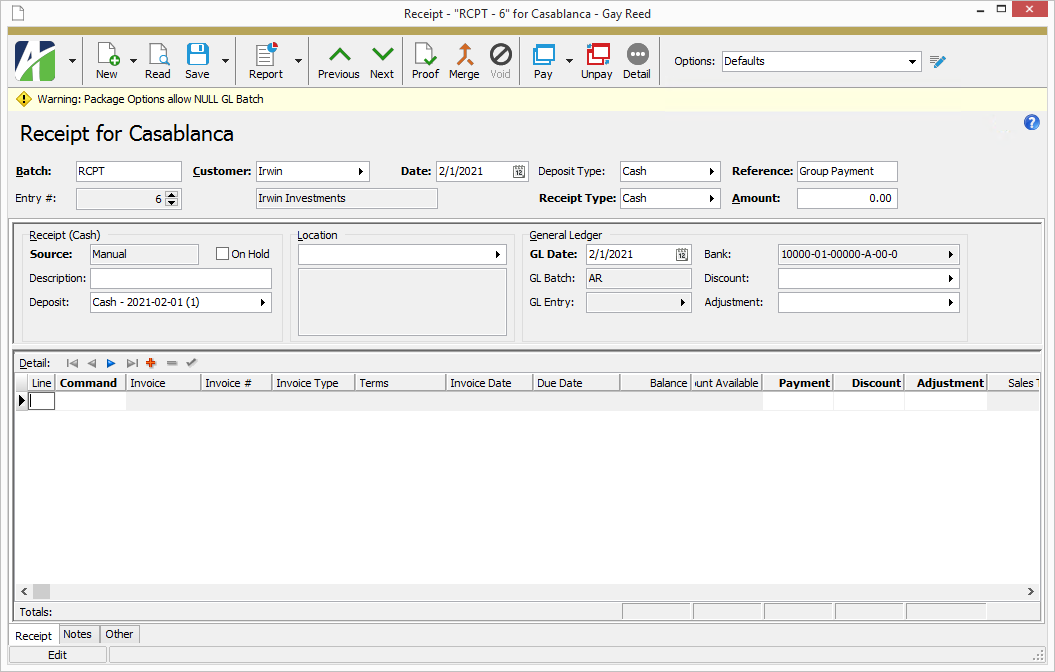
A receipt cannot be deleted if it has been merged.
To delete an unmerged receipt, highlight the receipt record in the HD view and click ![]() , or open the receipt and select
, or open the receipt and select ![]() > Edit > Delete. In either case, ActivityHD prompts you to confirm your action. Click Delete to delete the invoice.
> Edit > Delete. In either case, ActivityHD prompts you to confirm your action. Click Delete to delete the invoice.
You can use the Proof for Merge AR Receipts wizard to verify that receipts are ready to be merged. ActivityHD performs a series of validations on the receipts and returns errors for any receipts with validation failures. Errors must be corrected prior to merging. ActivityHD returns warnings for conditions that should be reviewed and possibly corrected. Warnings do not prevent receipts from being merged, but may, for instance, point out missing information that must be supplied before receipts can be finalized.
The Proof for Merge AR Receipts process is optional and the Proof step is now incorporated in the Merge AR Receipts process.
Proof receipts
- In the Navigation pane, highlight the Accounts Receivable > Receipts folder.
- Start the Proof for Merge AR Receipts wizard.
- To proof all or a filtered subset of receipts:
- Right-click the Receipts folder and select Select and Proof for Merge from the shortcut menu.
- On the Selection tab, define any filters to apply to the receipts.
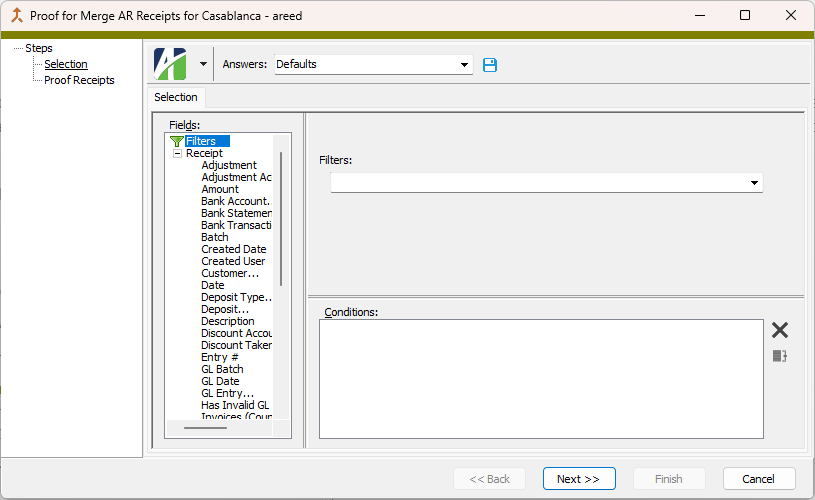
- Click Next >>.
Tip
Apply the "New Receipts" filter to select unmerged receipts.
- To proof specifically selected receipts:
- In the HD view, select the receipts to include in proofing. You can use Ctrl and/or Shift selection to select multiple receipts.
- From the menu, select Merge > Proof for Merge
Tip
Apply the "New Receipts" filter to see all unmerged invoices.
- To proof a particular receipt from the Receipt window:
- In the HD view, locate and double-click the receipt you want to proof. The Receipt window opens with the receipt loaded.
- From the menu, select Merge > Proof for Merge
- To proof all or a filtered subset of receipts:
-
The wizard reports how many receipts are valid for merging.
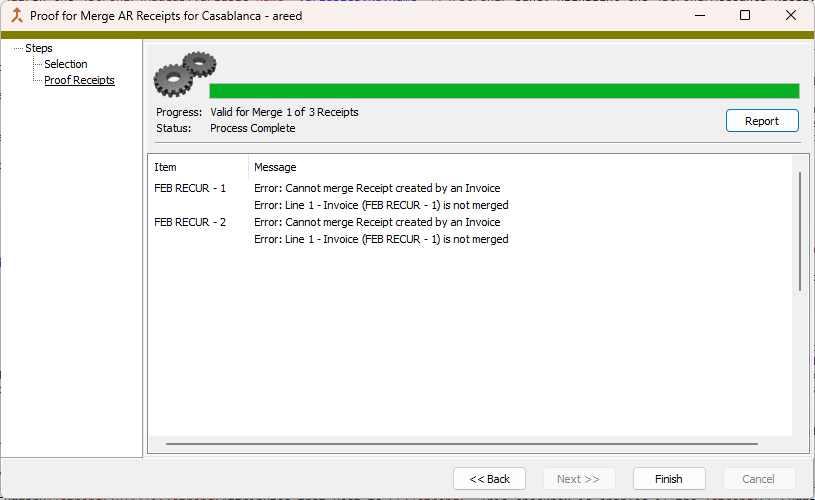
If the validation returns errors or warnings, ActivityHD lists the reasons why.
If you want to view or print the Merge AR Receipts Proof Report, click Report. Otherwise, skip to step 10.
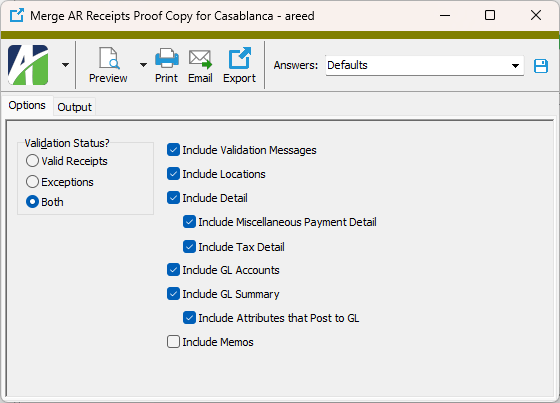
- In the Validation Status? field, select which receipts to include on the proof report. Your options are:
- Valid Receipts. Only shows receipts that are valid for merging. This option is disabled if there are no valid receipts in your selection. This option is preselected and the other options are disabled if all the receipts are valid.
- Exceptions. Only shows the receipts that are not valid for merging. This option is disabled if there are no invalid receipts in your selection. This option is preselected and the other options are disabled if all the receipts are invalid.
- Both. Shows both valid and invalid receipts. This option is disabled if all the receipts are valid or if all the receipts are invalid.
- Ensure the checkboxes for the additional information you want to include on the report are marked. All checkboxes except Include Memos are marked by default. Your options include:
- Validation Messages
- Locations
- Detail. If this checkbox is marked, the two checkboxes below it are enabled.
- Miscellaneous Payment Detail
- Tax Detail
- GL Accounts
- GL Summary
- Attributes that Post to GL. This checkbox is enabled if the GL Summary checkbox is marked. Mark this checkbox to include attributes which post to GL in the "GL Summary" section of the report.
- Report Options. To include a section at the end of the report with the report settings used to produce the report, leave the checkbox marked. To produce the report without this information, clear the checkbox.
- Memos
- Select the Output tab.
- In the Design field, look up and select the report design to use.
- In the toolbar, click the icon for the type of output you want:
 - Provides access to two preview options.
- Preview - Click the icon or click the drop-down arrow and select Preview from the drop-down menu to view the report in the Crystal Reports viewer.
- Preview to PDF - Click the drop-down arrow next to the icon and select Preview to PDF to view the report in the PDF reader.
 - Opens the Print dialog so that you can select and configure a printer and then print a paper copy of the report.
 - Opens the Report Email dialog so that you can address and compose an email that the report will be attached to. For best results, ensure your email client is running before you attempt to send a report via email.
 - Opens the Export Report dialog so that you can save the report to a file. File types include Crystal Reports (.rpt), PDF (.pdf), Microsoft Excel (.xls), Microsoft Word (.doc), rich text (.rtf), and XML (.xml).
- When you finish proofing the receipts, close the Merge AR Receipts Proof Copy dialog.
- Click Finish.
AR receipts must be merged to record payments against customers' open receivables. When you merge a receipt, a GL entry is created for posting to the general ledger. Simultaneously, the transaction is recorded as a deposit in Bank Reconciliation using the deposit information from the receipt. AccountingWare recommends that you proof receipts before merging them so that you can address any errors and warnings which may arise. The proof process and the merge process perform the same validations. Only receipts that pass validation can be merged.
Merge receipts
- In the Navigation pane, highlight the Accounts Receivable > Receipts folder.
- Start the Merge AR Receipts wizard.
- To merge all or a filtered subset of receipts:
- Right-click the Receipts folder and select Select and Merge from the shortcut menu.
On the Selection tab, define any filters to apply to the receipts.
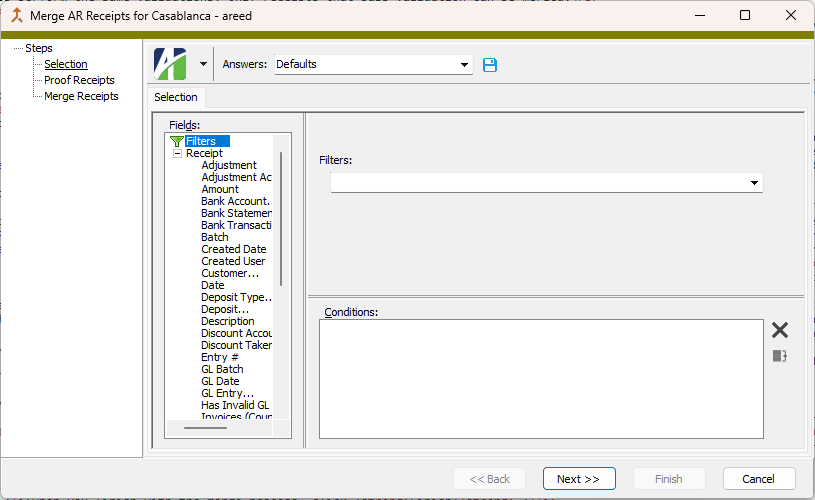
Tip
Apply the "New Receipts" filter to select unmerged receipts.
- Click Next >>.
- To merge specifically selected receipts:
- In the HD view, select the receipts to include in the merge. You can use Ctrl and/or Shift selection to select multiple receipts.
- Click
 .
.
Tip
Apply the "New Receipts" filter to see all unmerged invoices.
- To merge a particular receipt from the Receipt window:
- In the HD view, locate and double-click the receipt you want to merge. The Receipt window opens with the receipt loaded.
- Click
 .
.
- To merge all or a filtered subset of receipts:
- The wizard reports the number of receipts that are valid for merging.
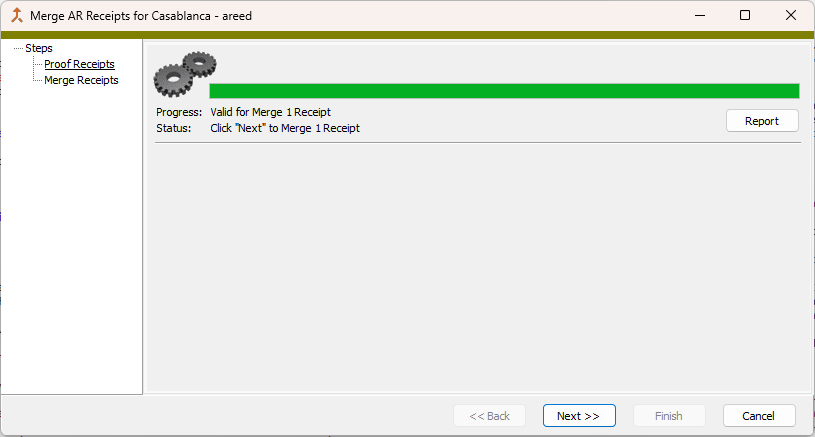
If the validation returns errors or warnings, ActivityHD lists the reasons why.
If you want to view or print the Merge AR Receipts Proof Report, click Report. Otherwise, skip to step 10.
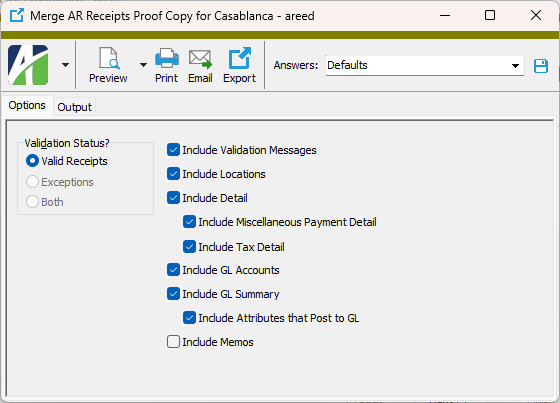
- In the Validation Status? field, select which receipts to include on the merge report. Your options are:
- Valid Receipts. Only shows receipts that are valid for merging. This option is disabled if there are no valid receipts in your selection. This option is preselected and the other options are disabled if all the receipts are valid.
- Exceptions. Only shows the receipts that are not valid for merging. This option is disabled if there are no invalid receipts in your selection. This option is preselected and the other options are disabled if all the receipts are invalid.
- Both. Shows both valid and invalid receipts. This option is disabled if all the receipts are valid or if all the receipts are invalid.
- Ensure the checkboxes for the additional information you want to include on the report are marked. All checkboxes except Include Memos are marked by default. Your options include:
- Validation Messages
- Locations
- Detail. If this checkbox is marked, the two checkboxes below it are enabled.
- Miscellaneous Payment Detail
- Tax Detail
- GL Accounts
- GL Summary
- Attributes that Post to GL. This checkbox is enabled if the GL Summary checkbox is marked. Mark this checkbox to include attributes which post to GL in the "GL Summary" section of the report.
- Report Options. To include a section at the end of the report with the report settings used to produce the report, leave the checkbox marked. To produce the report without this information, clear the checkbox.
- Memos
- Select the Output tab.
- In the Design field, look up and select the report design to use.
- In the toolbar, click the icon for the type of output you want:
 - Provides access to two preview options.
- Preview - Click the icon or click the drop-down arrow and select Preview from the drop-down menu to view the report in the Crystal Reports viewer.
- Preview to PDF - Click the drop-down arrow next to the icon and select Preview to PDF to view the report in the PDF reader.
 - Opens the Print dialog so that you can select and configure a printer and then print a paper copy of the report.
 - Opens the Report Email dialog so that you can address and compose an email that the report will be attached to. For best results, ensure your email client is running before you attempt to send a report via email.
 - Opens the Export Report dialog so that you can save the report to a file. File types include Crystal Reports (.rpt), PDF (.pdf), Microsoft Excel (.xls), Microsoft Word (.doc), rich text (.rtf), and XML (.xml).
- When you finish with the Merge AR Receipts Proof Report, close the Merge AR Receipts Proof Copy dialog.
- Back in the Merge AR Receipts wizard, click Next >>. ActivityHD merges the receipts and reports its results.
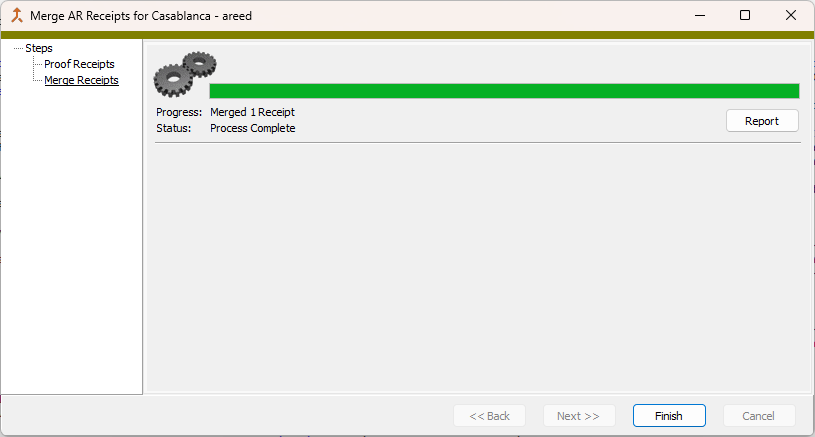
If desired, you can print or preview the proof report again, this time showing only the receipts which were successfully merged. To do so, click Report and repeat steps 4-9.
- Click Finish.
| Field | Description |
|---|---|
| Batch - # | The name of the receipt entry batch and the batch entry number. |
| Merge # | The system-generated sequence number assigned when the receipt was merged. |
| Customer |
The customer credited with the receipt. You cannot change the customer after the receipt is merged. |
| Customer name | The customer's name displays here to help you verify that the customer code is correct. |
| Date | The date the receipt posted to the customer's account. |
| Deposit Type | The deposit type assigned to the receipt. |
| Receipt Type | The receipt type assigned to the receipt. The receipt type can be changed on unmerged and merged receipts as long as it does not violate any of the restrictions on the deposit. |
| Reference | A brief note to help you identify the receipt. The reference cannot be changed after the receipt's GL entry is merged. |
| Amount |
The receipt amount. You cannot change the amount after the receipt is merged. |
| Source | The system-assigned receipt source. Valid values are:
|
| Description | The receipt description. The description can be modified even after the receipt is merged. |
| Deposit |
The deposit associated with the receipt. You cannot change the deposit after the receipt's GL entry is merged or if the deposit status is "On Hold" or "Locked". |
| Bank Rec |
The bank transaction that contains the receipt. Bank transactions are created when GL entries are merged. If the receipt is assigned to a deposit, the bank transaction represents all receipts in the deposit. Press F4 to open the bank transaction record. |
| Reverses | This field is visible only for reversal receipts. This field displays the batch name and entry number of the voided receipt that the current receipt reverses. |
| Voided By | This field is visible only for voided receipts. This field displays the batch name and entry number of the reversal receipt that voids the current receipt. |
| Location | The receipt location code. |
| Location details | The address for the receipt location. |
| GL Date |
The date the receipt is posted to the general ledger. This date cannot be changed after the associated GL entry is merged. |
| GL Batch |
The name of the GL batch that contains the GL entry that was created when the receipt was merged. If the receipt is assigned to a deposit, the GL batch cannot be changed. If the receipt is not assigned to a deposit, the GL batch cannot be changed after the GL entry is merged. |
| GL Entry |
The batch and entry number of the GL entry that contains the receipt's posting detail. Press F4 to open the journal entry record for the receipt. |
| Bank |
The bank account that is debited with the receipt amount in the GL entry that is created when the receipt is merged. The bank account cannot be changed after the GL entry is merged. |
| Discount |
The account that is debited with the total discount given. The discount account cannot be changed after the GL entry is merged. |
| Adjustment |
The account that is debited with the total adjustment amount. The adjustment account cannot be changed after the GL entry is merged. |
| Detail table |
This table shows the receipt detail lines. The columns that show in the table and the columns which have tab stops are controlled by options settings. In the following descriptions of the columns that may be included in the table, columns in the default configuration are noted by an asterisk (*).
|
![]() Validate GL information on receipts
Validate GL information on receipts
The Validate GL Information on AR Receipts wizard reapplies the logic that is used in the Receipt window when each receipt is entered and saved. In particular, the logic is applied in three areas:
- Derived GL accounts. Changes to any account masks can be applied to receipt accounts which were not manually overridden when the receipt was entered.
- Deposit information. Changes to the deposit can be applied to the deposit information on the receipt.
- Calculated sales tax amounts. Changes to tax rates can be applied to miscellaneous payment invoices that were not manually overridden when the receipt was entered.
ActivityHD tracks receipts which have invalid GL settings. Some of these settings must be corrected before a receipt can be merged; others must be corrected before the resulting GL journal entry can be merged. ActivityHD internally maintains an "Invalid GL" flag. This flag can be viewed by showing the Invalid GL? column in the HD view. The flag is automatically set on a receipt when any of the following conditions exist:
- The bank account on the receipt is invalid.
- The discount account is invalid and at least one receipt detail line has a non-zero discount amount.
- The adjustment account is invalid and at least one receipt detail line has a non-zero adjustment amount.
- The receivables account on a miscellaneous payment or unapplied payment line is invalid.
- The sales tax account is invalid on a miscellaneous payment line with non-zero sales tax.
- The sales account is invalid on a miscellaneous payment line.
- The cost account is invalid on a miscellaneous payment line with a non-zero cost amount.
- The inventory account is invalid on a miscellaneous payment line with a non-zero cost amount.
- The receipt is tied to a valid deposit and the GL receipt date is NULL.
- The receipt is tied to a valid deposit and the GL receipt date is not equal to the deposit GL date.
- The receipt is tied to a valid deposit and the GL receipt batch is NULL.
- The receipt is tied to a valid deposit and the GL receipt batch is not equal to the deposit GL batch.
- The receipt is tied to a valid deposit and the receipt bank account is NULL.
- The receipt is tied to a valid deposit and the receipt bank account is not equal to the deposit bank account.
To validate GL information on receipts:
- In the Navigation pane, highlight the Accounts Receivable > Receipts folder.
- Start the Validate GL Information on AR Receipts wizard.
- To validate all or a filtered subset of receipts:
- Right-click the Receipts folder and select Select and Validate GL from the shortcut menu.
- On the Selection tab, define any filters to apply to the receipts.
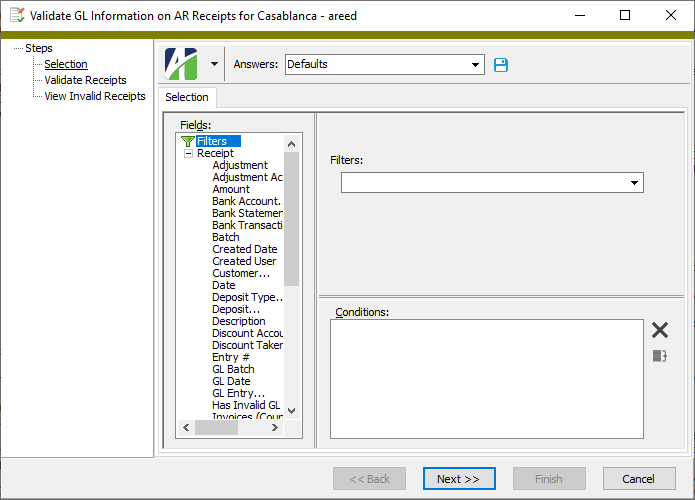
- Click Next >>.
- To validate GL for specifically selected receipts:
- In the HD view, select the receipts to validate. You can use Ctrl and/or Shift selection to select multiple receipts.
- Click
 .
.
- To validate all or a filtered subset of receipts:
-
The wizard prompts you to confirm that you want to validate the GL information on the selected receipts.

Click Yes. ActivityHD validates the GL information and reports its results.
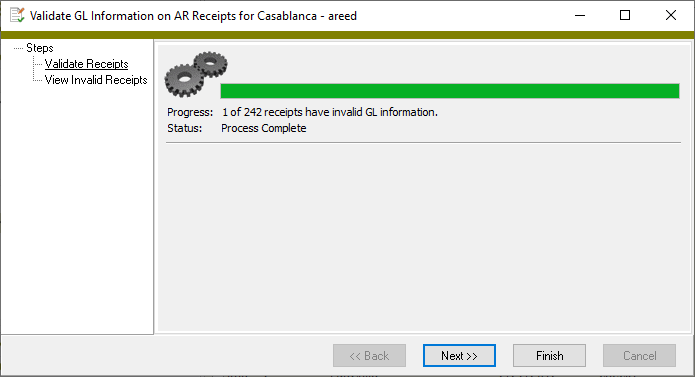
-
If there are no invalid receipts, click Finish to close the wizard.
If ActivityHD reports invalid receipts, continue at the next step.
-
Click Next >>.
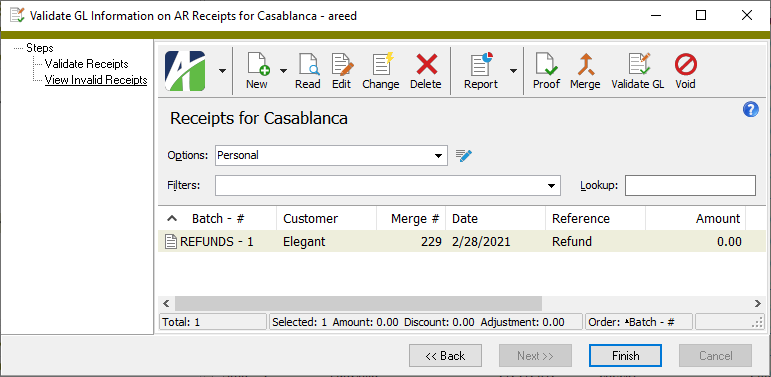
At this point, you can double-click the receipt(s) in the right pane to drill down to the Receipt window where you may be able to resolve validation errors or you can print the AR Receipts Listing.
- When you finish viewing or working with the receipt(s), click Finish.
Occasionally, you may need to void a receipt after it has been merged. For example, if a receipt was entered with the wrong amount, the wrong customer, or if the check was insufficient, it must be voided in order to reverse it. Unmerged receipts don't need to be voided since they can be corrected in the Receipt window or simply deleted.
When a receipt is voided, ActivityHD creates a reversal receipt to reverse the original receipt. On the reversal receipt, the signs are flipped on the receipt amount, on any discount or adjustment amounts, and on receipt detail amounts. The reversal receipt is flagged as a reversal with a reference to the original receipt it reverses. Also, the voided receipt is flagged as voided with a reference to the reversal receipt. Reversal receipts are automatically merged.
When you void a receipt that created a miscellaneous or unapplied payment invoice, the invoice is automatically voided as well.
To void receipts:
Void receipts
- In the Navigation pane, highlight the Accounts Receivable > Receipts folder.
- In the HD view, highlight the receipt(s) you need to void. You can use Ctrl and/or Shift selection to select multiple receipts.
- Click
 . The Void AR Receipts wizard starts.
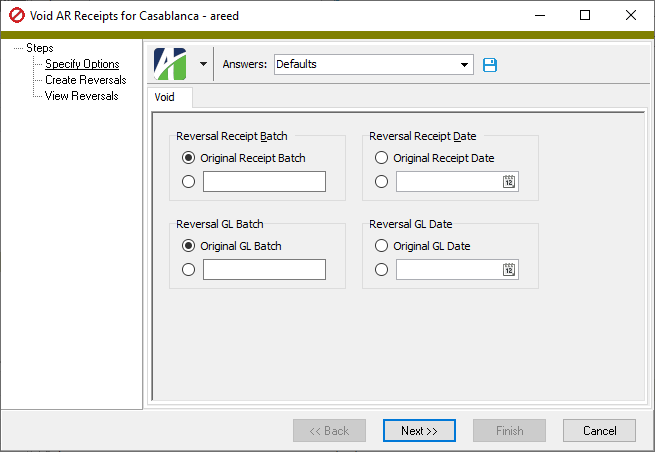
- In the Reversal Receipt Batch field, select which batch to process the reversal receipt(s) in. Your options are:
- Original Receipt Batch
- Specify the batch to process the reversal receipts in.
- In the Reversal GL Batch field, select the GL batch to use for the journal entries for the reversal receipt(s). Your options are:
- Original GL Batch
- Specify the GL batch to process the reversal journal entries in.
- In the Reversal Receipt Date field, select the receipt date to use on the reversal receipt(s). Your options are:
- Original Receipt Date
- Enter the receipt date to use on the reversal receipt(s).
- In the Reversal GL Date field, select the GL date to use on the reversal journal entries. Your options are:
- Original GL Date
- Enter the GL date to use on reversal journal entries.
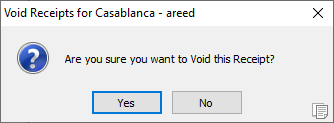
- Click Next >>. ActivityHD prompts you to confirm that you want to void the receipt(s).
-
Click Yes. ActivityHD reports the results.
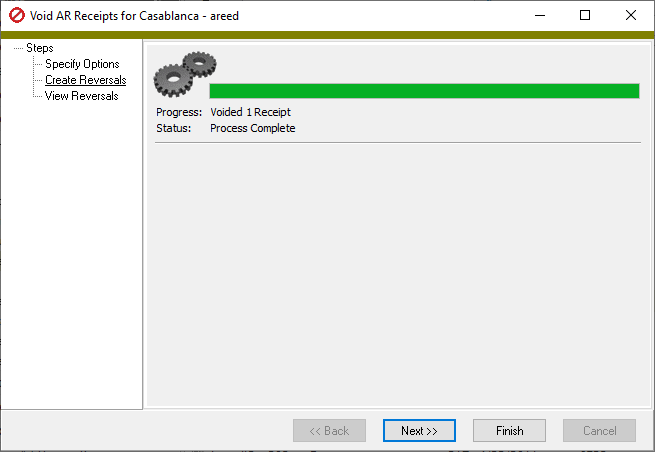
If the validation returns errors or warnings, ActivityHD lists the reasons why.
-
Click Next >>.
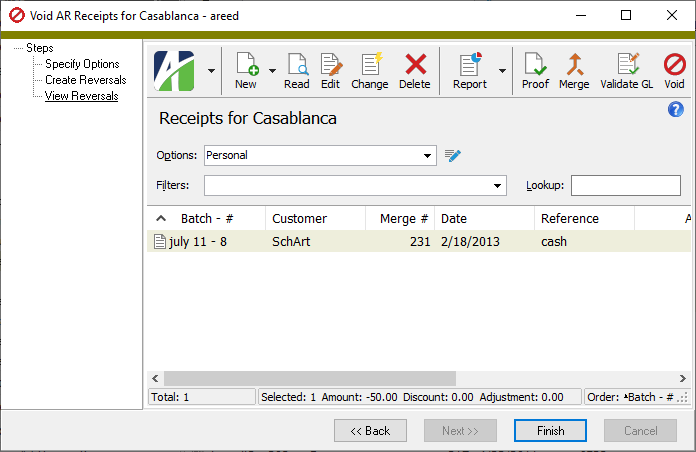
At this point, you can double-click the reversal receipt(s) in the right pane to drill down to the Receipt window or you can print the AR Receipts Listing.
Note
If all receipts in an "On Hold" or "Locked" deposit are voided, the deposit is automatically voided. Furthermore, its corresponding bank transaction is also voided.
- When you finish viewing or working with the reversal receipt(s), click Finish.
| Field | Source of the field value |
|---|---|
| Batch - # | Receipt batch is specified in the Void Receipts wizard. It is concatenated with the next available entry number for the receipt batch. |
| Date | Specified in the Void Receipts wizard. |
| Amount | Set to the amount of the voided receipt with the opposite sign. |
| Source | Set by ActivityHD to "Void". |
| Reverses | Set to the batch and entry number of the voided receipt. |
| GL Date | Specified in the Void Receipts wizard. |
| GL Batch | Specified in the Void Receipts wizard. |
| Deposit | A new deposit instance is created using the deposit type and the GL date on the reversal receipt. The deposit instance is voided and automatically set to "Locked". |
| Receipt Detail | All receipt detail on the reversal receipt have a command of "Payment". The balance of the associated invoice reflects the result of the voided receipt. The payment, discount, and adjustment amounts on the reversal receipt have the opposite sign of the voided receipt. |
Receipts Listing
Purpose
The AR Receipts Listing provides a list of receipts recorded in Accounts Receivable.
Content
For each receipt included on the report, the listing shows:
- batch - entry number
- customer code
- customer name
- receipt type
- GL date
- reference
- receipt date
- receipt amount
- merge number
- source
- receipt description
- classification
- GL batch
- deposit.
The report also includes a recap of total receipts and of new invoices.
Note
Invoices created from unapplied payments have an invoice amount of zero. As a result, these invoices only affect the count totals.
In addition, you can include one or more of the following:
- locations
- detail (for each detail line: line number, command [Payment, Unapplied, Miscellaneous], summary invoice number, invoice batch - entry number, invoice number, invoice type, payment terms, invoice date, due date, invoice balance, payment amount, discount amount, adjustment amount)
- miscellaneous payment detail (ARCode and description, whether taxable, customer tax category, item tax category, sales tax amount, tax entity, invoice description, salesperson, attributes, assigned attribute items, attribute item descriptions)
- tax detail (for each tax entity: tax entity code, tax amount)
- GL accounts (bank account, discount account, adjustment account, receivables account [if miscellaneous detail is included], sales account [if miscellaneous detail is included], tax account [if miscellaneous detail is included and there is a tax amount on the receipt detail line], cost account [if miscellaneous detail is included and there is a cost amount on the receipt detail line], inventory account [if miscellaneous detail is included and there is a cost amount on the receipt detail line])
- GL summary (for each GL account: account number and name, unit, source, count, total debits, total credits); optionally include attributes which post to GL
- memos.
The following totals appear on the report:
- receipt totals by receipt type
- new invoice totals by invoice type
- GL summary totals (optional) - (total debits, total credits).
Print the report
- In the Navigation pane, highlight the Accounts Receivable > Receipts folder.
- Start the report set-up wizard.
- To report on all or a filtered subset of receipts:
- Right-click the Receipts folder and select Select and Report > Receipts Listing from the shortcut menu.
- On the Selection tab, define any filters to apply to the data.
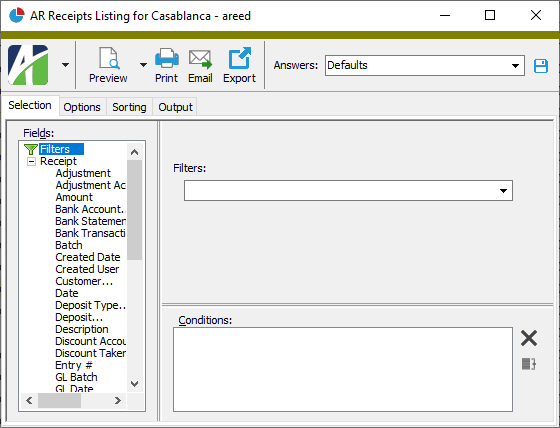
- To report on specifically selected receipts:
- In the HD view, select the receipts to include on the report. You can use Ctrl and/or Shift selection to select multiple records.
- Click
 .
.
- To report on a particular receipt from the Receipt window:
- In the HD view, locate and double-click the receipt to report on. The Receipt window opens with the receipt loaded.
- Click
 .
.
- To report on all or a filtered subset of receipts:
- Select the Options tab.
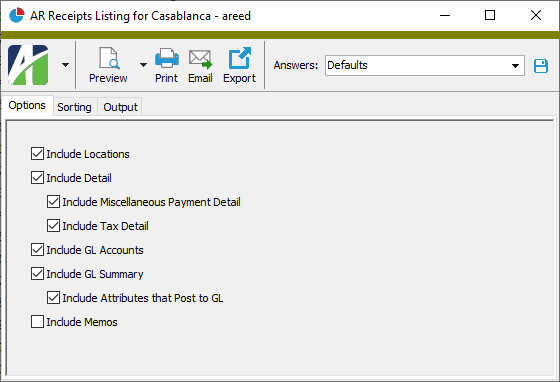
- Mark the checkbox(es) for the additional information to include:
- Locations
- Detail - If you mark this checkbox, the following checkboxes become enabled:
- Miscellaneous Payment Detail
- Tax Detail
- GL Accounts
- GL Summary
- Attributes that Post to GL. This checkbox is enabled if the GL Summary checkbox is marked. Mark this checkbox to include attributes which post to GL in the "GL Summary" section of the report.
- Report Options. To include a section at the end of the report with the report settings used to produce the report, leave the checkbox marked. To produce the report without this information, clear the checkbox.
- Memos
- Custom Fields (only visible if custom fields are set up)
- Select the Sorting tab.
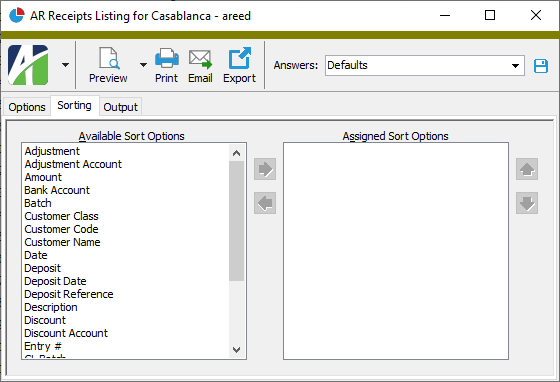
- In the Available Sort Options list box, highlight the field(s) to sort the report by, then click
 to move your selection(s) to the Assigned Sort Options list box.
 - If you selected multiple sort fields, use
 and
and  to arrange the sort fields in the order you want them applied.
 - Select the Output tab.
- In the Design field, look up and select the report design to use.
- In the toolbar, click the icon for the type of output you want:
 - Provides access to two preview options.
- Preview - Click the icon or click the drop-down arrow and select Preview from the drop-down menu to view the report in the Crystal Reports viewer.
- Preview to PDF - Click the drop-down arrow next to the icon and select Preview to PDF to view the report in the PDF reader.
 - Opens the Print dialog so that you can select and configure a printer and then print a paper copy of the report.
 - Opens the Report Email dialog so that you can address and compose an email that the report will be attached to. For best results, ensure your email client is running before you attempt to send a report via email.
 - Opens the Export Report dialog so that you can save the report to a file. File types include Crystal Reports (.rpt), PDF (.pdf), Microsoft Excel (.xls), Microsoft Word (.doc), rich text (.rtf), and XML (.xml).
Data extensions
The following data extensions are available for the report:
- Receipts
- Receipt detail
- Miscellaneous details
- Tax details
- Attributes
Controls denoted by green labels may or may not be visible depending on your options settings for receipts.
Receipt Record ID
The name for the batch of receipts to process the receipt with. The default batch name is the name from the last receipt entered. The batch name allows you to group receipts for proofing, merging, and reporting.
This field is visible for unmerged receipts only.
This field defaults to the next sequential number available for the specified batch, or "1" if this is the first entry in the batch.
If you need to override the entry number and you have "Entry Number" access on receipts, you can press Ctrl+Alt+U or select ![]() > Tools > Unlock Entry # to enable the field for editing. The combination of batch name and entry number must be unique across all receipts, merged and unmerged.
> Tools > Unlock Entry # to enable the field for editing. The combination of batch name and entry number must be unique across all receipts, merged and unmerged.
This field is visible for unmerged receipts only.
The batch name and entry number combined.
This field is visible after the receipt is merged.
The sequential number assigned to the receipt by ActivityHD during the receipt merge process. The merge number serves as part of the receipt audit trail.
This field is visible after the receipt is merged.
The customer to credit with the receipt. The customer must be a valid "payment customer".
Press F3 to look up the value.
If a value is already selected, you can press F4 to open the record in its native editor.
The deposit type to associate with the receipt.
If the receipt is associated with a deposit, the deposit type helps ActivityHD determine the applicable deposit based on the deposit type and GL receipt date. If a deposit with "New" status already exists for the combination of deposit type and GL receipt date, that deposit is used on the receipt. If a deposit does not yet exist, ActivityHD creates it.
If, however, a deposit was created and assigned to the receipt, the deposit type defaults from the deposit record.
Note
If the deposit type is associated with only one receipt type, the Receipt Type field automatically loads that receipt type.
If you leave this field blank and specify a receipt type that has only one deposit type associated with it, this field automatically loads that deposit type.
If you enter a receipt type and subsequently enter a deposit type that is not associated with it, the Receipt Type field is blanked out and you will need to enter a compatible receipt type.
Press F3 to look up the value.
If a value is already selected, you can press F4 to open the record in its native editor.
The receipt type to associate with the receipt.
Note
If "Zero Receipt" is selected, the receipt must have a zero receipt amount before it can be saved.
The receipt type provides the following functions:
- Categorizes receipts for reporting.
- Classifies receipts as cash, check, credit card, zero receipt, collapsed, or other.
- Determines valid deposit types.
- Determines if a deposit is required.
- Allows an optional receipt reference to be specified.
You can change the receipt type even on merged invoices as long as the change does not violate any of the restrictions on the deposit.
Note
If the deposit type entered is associated with only one receipt type, the Receipt Type field automatically loads that receipt type.
If you leave the Deposit Type field blank and specify a receipt type that has only one deposit type associated with it, that deposit type automatically loads in the Deposit Type field.
If you enter a receipt type and subsequently enter a deposit type that is not associated with it, the Receipt Type field is blanked out and you will need to enter a compatible receipt type.
Press F3 to look up the value.
If a value is already selected, you can press F4 to open the record in its native editor.
A note to help you identify the receipt. You can use up to 20 characters. If a default reference was specified on the receipt type you selected, this field defaults to that reference value.
Examples
For a check, you can use the check number as the reference.
For a cash payment, you might simply enter "CASH".
This field can be automatically calculated by letting ActivityHD total the payment amounts from the Detail table. If this is what you want to do, accept the 0.00 entry.
Note
If both credit and debit invoices are selected for payment, the Pay and Pay Any commands pay all selected credit invoices first, then pay debit invoices up to the receipt amount entered.
If you enter a manual amount here and click the Pay button to select and pay multiple outstanding invoices, ActivityHD pays the invoices until the amount is exhausted, making a partial payment on the "last" invoice processed if need be, and leaving any remaining invoices unpaid.
If you leave the amount at 0.00 and click the Pay button to select and pay multiple outstanding invoices, ActivityHD pays all the selected invoices in full and updates this amount accordingly.
Note
You can save a receipt where the Amount field does not equal the total payments in the Detail table. ActivityHD issues a warning but allows you to save the receipt. However, you are not allowed to merge the receipt until the conflict is resolved.
Receipt tab
- Import. The receipt was imported by an import macro.
- Manual. The receipt was entered manually in the Receipt window.
- Invoice. The receipt was created when an initial payment was entered on an invoice.
- Void. The receipt is a reversal receipt created in the Void Receipt process to void another receipt.
The receipt type determines if a deposit is required and which deposit types are valid.
If the deposit for the receipt already exists, this is the deposit assigned to the receipt.
Otherwise, let ActivityHD assign the deposit based on the deposit type and GL receipt date. If a deposit with a status of "New" exists that satisfies the deposit type-GL receipt date combination, ActivityHD assigns the receipt to that deposit. If such a deposit does not exist, ActivityHD creates one when you save the receipt.
You cannot change the deposit on a receipt after the receipt's GL entry is merged or if the status of the deposit is "Locked" or "On Hold".
Note
If a deposit is changed after it is assigned to receipts, those receipts are flagged as having "Invalid GL" and cannot be merged. Moreover, the GL entry for any merged receipt that references the changed deposit cannot be merged until the receipt GL information is corrected. There are two ways to correct this information:
- Open the receipt in edit mode and then save it. (You don't need to make any changes.)
- In the Receipts folder, select the receipts which need to be corrected and then run the Validate GL function.
Press F3 to look up the value.
If a value is already selected, you can press F4 to open the record in its native editor.
If this checkbox is marked, prevents the receipt from being merged.
The hold status of a miscellaneous invoice or an unapplied payment invoice is controlled by the receipt. Changes to a receipt's hold status are automatically applied to its miscellaneous invoices and unapplied payment invoices. As a result, when you run reports and exclude items on hold, both invoices and their receipts are excluded.
This checkbox is disabled for merged receipts and for initial payment receipts. The hold status of an initial payment receipt is controlled by the invoice that creates it.
Example
Suppose you enter a receipt but are uncertain about which ARCode to use on a "Miscellaneous" detail line. You can place the receipt on hold to indicate it needs further attention and to prevent it from being merged. When you resolve the problem, clear the On Hold checkbox to make the receipt eligible for merging.
The batch and entry number of the receipt that reverses the current receipt.
This field is only visible on voided receipts.
Press F3 to look up the value.
If a value is already selected, you can press F4 to open the record in its native editor.
The batch and entry number of the voided receipt that the current receipt reverses.
This field is only visible on reversal receipts.
Press F3 to look up the value.
If a value is already selected, you can press F4 to open the record in its native editor.
Displays the entry number of the bank transaction that contains the receipt. If the receipt references a deposit, the bank transaction represents all receipts on the deposit.
Since bank transactions are not created until the GL entry is merged, this field is not visible until then.
The receipt location. The default location is the customer's default statement location.
Press F3 to look up the value.
If a value is already selected, you can press F4 to open the record in its native editor.
The date to post the receipt to the general ledger. If you selected a deposit to associate with the receipt, this field defaults to the GL date on the deposit. If you change the GL date here, the Deposit field is blanked out and ActivityHD assigns or creates a different deposit when the receipt is saved.
If the receipt does not have a deposit, this field defaults to the receipt date. You can change the date until the receipt's GL entry is merged.
Note
"GL Date" access to the Receipts resource is required to access this field.
The name of the GL batch to use for the GL entry when the receipt is merged. Receipts are summarized into different GL entries based on the batch name. If the receipt has a deposit, this field displays the GL batch from the deposit type.
This field is enabled if you specified neither a deposit type nor a deposit on the receipt. Enter the name of the batch to use for the GL entry. If you change the GL batch name, the receipt's GL detail is "moved" to the new GL entry.
You cannot change the GL batch after the receipt's GL entry is merged.
This field is not visible until the receipt's GL entry is merged. This field displays the batch and entry number of the GL entry that contains the receipt's posting detail.
Press F3 to look up the value.
If a value is already selected, you can press F4 to open the record in its native editor.
The bank account to debit for the amount of the receipt. If the receipt has a deposit, this field displays the bank account from the deposit type.
This field is enabled if you specified neither a deposit type nor a deposit on the receipt. Select the bank account to debit for the amount of the receipt. A bank account must be specified before the receipt can be merged. The bank account cannot be changed after the receipt is merged.
Note
You can create a receipt without a valid bank account; however, the receipt is flagged as having "Invalid GL" and cannot be merged. To avoid this type of problem, AccountingWare recommends you define a default bank account in receipt options.
Press F2 to open the Account Expand dialog box where you can look up an account number, find an account number by its alias, build the account number by segment, or view setup and setup sources.
Press F3 to look up the account.
If an account is already selected, you can press F4 to open the record in the Account window.
The account to debit with the total discount given. If none of the lines in the Detail table has a discount, this account is not needed. If one or more detail lines has a discount amount, a valid discount account must be specified before the receipt can be merged. This field defaults to the discount account (if any) specified in the receipt options.
The discount account cannot be changed after the receipt is merged.
Press F2 to open the Account Expand dialog box where you can look up an account number, find an account number by its alias, build the account number by segment, or view setup and setup sources.
Press F3 to look up the account.
If an account is already selected, you can press F4 to open the record in the Account window.
The account to debit with the total adjustment amount. If none of the lines in the Detail table has an adjustment, this account is not needed. If one or more detail lines has an adjustment amount, a valid adjustment account must be specified before the receipt can be merged. This field defaults to the adjustment account (if any) specified in the receipt options.
The adjustment account cannot be changed after the receipt is merged.
Press F2 to open the Account Expand dialog box where you can look up an account number, find an account number by its alias, build the account number by segment, or view setup and setup sources.
Press F3 to look up the account.
If an account is already selected, you can press F4 to open the record in the Account window.
The columns in the Detail table depend on your receipt options settings. The columns available when you use the system default settings are shown above the green line. The remaining columns that can be added to the table are shown below the line in alphabetical order.
Tip
Line numbers in the Detail table are editable. You can change the line numbers in order to reorder the rows in the table.
- Payment. The line represents a regular payment on an existing invoice. When an invoice is selected for payment, ActivityHD calculates a full payment (less any discount and up to the receipt amount). The calculated payment and the discount can be overridden, if needed, and a partial payment or an adjustment amount can be entered.
- Unapplied. The line represents an unapplied payment. An unapplied payment creates an invoice that is automatically merged when the receipt is merged. The original amount of an unapplied payment is zero. Its initial outstanding balance is the negative of the payment amount. Because the invoice amount is zero, it does not create any GL postings. Since it has a credit balance, it can be applied as a payment to other invoices on a future receipt.
- Miscellaneous. The line represents a miscellaneous payment. A miscellaneous payment automatically creates an invoice for an amount equal to the payment amount on the receipt. The invoice is merged and fully paid when the receipt is merged. As a result, the invoice never actually contributes to outstanding accounts receivable. Creating an invoice to record sales information allows revenue (and inventory) to be tracked consistently, regardless of whether a "miscellaneous" receipt was used to record a cash sale or whether the sale was accrued and paid out over time.
The command cannot be changed after the receipt is merged.
The batch and entry number of the invoice paid by the receipt.
If this line represents a payment, you can change the invoice until the receipt is merged. You cannot change the invoice on miscellaneous or unapplied payments. Once the receipt for an unapplied payment or miscellaneous receipt is merged, ActivityHD loads the batch and entry number of the invoice that is created (and merged) during the receipt merge.
Press F3 to look up the value.
If a value is already selected, you can press F4 to open the record in its native editor.
The invoice number. If this is a miscellaneous detail line, the invoice number defaults to an invoice number of the form M-yyyyddmm; if unapplied, to U-yyyyddmm. If, however, the invoice type has a numbering scheme associated with it, the default invoice number is overridden.
The invoice number cannot be changed for payment detail lines. The invoice number on other detail lines can be changed until the receipt is merged.
The invoice type assigned to the invoice. For miscellaneous and unapplied detail lines, the default invoice type can be controlled with options settings.
The invoice type cannot be changed for payment detail lines. The invoice type on other detail lines can be changed until the receipt is merged.
Press F3 to look up the value.
If a value is already selected, you can press F4 to open the record in its native editor.
The payment terms from the invoice. Miscellaneous and unapplied receipts do not have payment terms. For payment detail lines, you can change the payment terms in the AR Invoice window.
Press F3 to look up the value.
If a value is already selected, you can press F4 to open the record in its native editor.
For payments, this column displays the invoice date from the invoice. For miscellaneous and unapplied detail lines, this date defaults to the receipt date.
The invoice date cannot be changed on payment detail lines. The invoice date on other detail lines can be changed until the receipt is merged.
The discount amount available on the invoice. ActivityHD calculates this amount based on the invoice terms and receipt date. If partial payments were previously applied on the invoice, previous discount given amounts are first subtracted from the maximum discount amount for the invoice as of the receipt date.
Discount Available = Maximum Discount - Previous Discount
The receipt amount that is applied as a payment on the invoice. When you select an invoice for payment, ActivityHD automatically sets the payment amount to the balance of the invoice less available discount, up to the remaining receipt amount. If you are entering a partial payment, enter that amount here.
The total payment amount for all detail lines must match the receipt amount before the receipt can be merged. The payment amount can be changed until the receipt is merged.
This column applies to payment detail lines only. Enter the discount amount to credit to the customer's account against the invoice. The discount account is debited with the total discount amount for all detail lines.
You can enter and merge a receipt with a discount amount and no discount account; however, you cannot merge the GL entry until a discount account is specified.
You can change the discount amount until the receipt is merged.
This column applies to payment detail lines only. Enter the amount of the invoice balance to credit to the customer's account as an adjustment. To adjust the invoice balance down, enter a positive adjustment amount. To adjust the invoice balance up, in cases such as overpayments where the payment amount exceeds the invoice balance by a nominal amount, enter a negative adjustment amount. The adjustment account is debited with the total adjustment amount for all detail lines.
You can enter and merge a receipt with an adjustment amount and no adjustment account; however, you cannot merge the GL entry until an adjustment account is specified.
You can change the adjustment amount until the receipt is merged.
The sales tax amount for the invoice. For miscellaneous payment lines, ActivityHD calculates the sales tax amount using the aggregate tax rate in effect for the invoice tax entity as of the invoice date. If the actual tax amount collected differs from the calculated amount, you can enter the actual sales tax collected here.
You can change the sales tax amount until the receipt is merged.
This column applies to miscellaneous detail lines only. Enter the ARCode that applies to the detail line. The ARCode categorizes the detail line for reporting, provides information for deriving GL accounts, and provides information for sales tax calculations. A default ARCode can be specified in options settings.
You can change the ARCode until the receipt is merged.
Press F3 to look up the value.
If a value is already selected, you can press F4 to open the record in its native editor.
The invoice description. For miscellaneous and unapplied detail lines, default invoice descriptions can be specified in options settings.
The invoice description can be modified even after the receipt is merged.
This column applies to miscellaneous detail lines only. The sales account is credited with the detail line's invoice amount. The default sales account is derived from account masks from the ARCode, attribute item(s), the invoice customer, the customer class, and options settings. When any of these changes, the sales account is updated unless the sales account was manually overridden.
If the sales account is not fully qualified or if the account does not exist, its background is shaded yellow. You should replace any wildcarded characters with valid entries. Manual overrides are indicated in purple. If you enter an override account and come to regret it, blank out the account and press Tab. The default account is restored.
You can change the sales account until the GL entry is merged.
Press F2 to open the Account Expand dialog box where you can look up an account number, find an account number by its alias, build the account number by segment, or view setup and setup sources.
Press F3 to look up the account.
If an account is already selected, you can press F4 to open the record in the Account window.
The amount of the invoice.
For unapplied payment detail lines, the amount is always zero.
For miscellaneous receipt detail lines, the amount is the payment amount for the detail line minus any sales tax amount. The amount automatically updates when the payment amount or sales tax amount changes.
One column displays for each active attribute with AR usage. Attributes are used to categorize invoices for reporting and to provide a GL account mask to use in determining GL accounts. For miscellaneous and unapplied detail lines, you may need to enter an appropriate attribute item.
You can change attribute items for miscellaneous and unapplied detail lines even after the receipt is merged. Changes to GL accounts only occur provided the account has not been manually overridden and the GL entry has not been merged.
Press F3 to look up the value.
If a value is already selected, you can press F4 to open the record in its native editor.
The invoice batch name. For miscellaneous and unapplied detail lines, the invoice batch defaults to the receipt batch. If you change the batch name, a new invoice entry number is automatically calculated.
You can change the batch name until the receipt is merged as long as the detail line does not represent a regular payment.
This column applies to miscellaneous detail lines only. The cost account is debited with the detail line's invoice cost. The default cost account is derived from the ARCode, attribute item(s), the invoice customer, customer class, and options settings. When any of these changes, the cost account is updated unless the cost account was manually overridden.
If the cost account is not fully qualified or if the account does not exist, its background is shaded yellow. You should replace any wildcarded characters with valid entries. Manual overrides are indicated in purple. If you enter an override account and come to regret it, blank out the account and press Tab. The default account is restored.
You can change the cost account until the GL entry is merged.
Press F2 to open the Account Expand dialog box where you can look up an account number, find an account number by its alias, build the account number by segment, or view setup and setup sources.
Press F3 to look up the account.
If an account is already selected, you can press F4 to open the record in the Account window.
The invoice customer. Because a single customer can pay invoices for multiple customers, the invoice customer does not necessarily have to match the receipt customer. For miscellaneous and unapplied detail lines, this field defaults to the receipt customer. If you need to change the invoice customer, select another customer that uses the receipt customer as its payment customer.
You can change the invoice customer until the receipt is merged as long as the detail line does not represent a regular payment.
Press F3 to look up the value.
If a value is already selected, you can press F4 to open the record in its native editor.
The customer tax category assigned to the invoice. For miscellaneous and unapplied detail lines, the column defaults to the default customer tax category from the invoice customer if one was assigned.
By default, all customers are assumed to be taxable. You can define customer tax categories to assign a nontaxable status to certain groups of customers. You can also define taxable customer tax categories in order to group customers for tax reporting.
The customer tax category can be changed at any time to produce accurate reporting; however, the sales tax amount on a merged invoice does not change since it represents the amount actually billed to the customer. For payment detail lines, you can change the customer tax category in the AR Invoice window.
Press F3 to look up the value.
If a value is already selected, you can press F4 to open the record in its native editor.
The tax entity that represents the location of the purchaser or the location where the items purchased are actually used. For miscellaneous and unapplied detail lines, the default location is the tax entity associated with the location specified on the receipt detail line. If no location is specified or if the specified location does not have a tax entity assigned, the origin tax entity is the default.
The destination tax entity can be changed at any time to produce accurate reporting; however, the sales tax amount on a merged invoice does not change since it represents the amount actually billed to the customer. For payment detail lines, you can change the destination tax entity in the AR Invoice window.
Press F3 to look up the value.
If a value is already selected, you can press F4 to open the record in its native editor.
This column applies to miscellaneous detail lines only. Enter a detail description for the miscellaneous detail line. The default description is the description from the ARCode or from the options settings if you specified a default there.
You can change the detail description even after the receipt is merged. Manual overrides are indicated in purple. If you change the ARCode after entering a manual description, the manual description is not lost.
If you enter an override description and come to regret it, blank out the description and press Tab. The default description is restored.
Press F2 to open the Miscellaneous Description dialog box where you can enter a lengthy description.
This column applies to miscellaneous detail lines only. Enter the quantity of the item sold. The value defaults to "1" for positive payment amounts and "-1" for negative payment amounts.
If you change the quantity, ActivityHD recalculates the unit price using the following formula:
Unit Price = (Amount + Discount) / Quantity
You can change the quantity until the receipt is merged.
This column applies to miscellaneous detail lines only. Enter the unit price of the item sold or have ActivityHD calculate the unit price for you when you enter the invoice amount and quantity. Unit prices may contain up to four decimal places. ActivityHD calculates the unit price according to this formula:
Unit Price = (Amount + Discount) / Quantity
When a different unit price is entered, ActivityHD recalculates the quantity:
Quantity = (Amount + Discount) / Unit Price
You can change the unit price until the receipt is merged.
The invoice entry number. For miscellaneous and unapplied detail lines, the entry number defaults to the next available entry number for the invoice batch.
You can change the entry number until the receipt is merged as long as the detail line is a miscellaneous or unapplied detail line and you have "Entry Number" access to receipts.
The finance method assigned to the invoice. The default finance method is the invoice customer's default finance method. You can select a different finance method if needed or you can clear the entry to exclude the invoice from finance charges.
Note
To include unapplied credits in the basis for finance charge assessment, the unapplied credits must reference a finance method and the finance method must be flagged to "Include Credits".
Press F3 to look up the value.
If a value is already selected, you can press F4 to open the record in its native editor.
The invoice GL batch. The GL batch is used for miscellaneous and unapplied payment invoices. The default GL batch is the receipt's GL batch.
You can change the GL batch until the receipt's GL entry is merged unless the detail line represents a regular payment.
This column applies to miscellaneous detail lines only. The inventory account is credited with the detail line's invoice cost. The default inventory account is derived from the ARCode, attribute item(s), the invoice customer, customer class, and options settings. When any of these changes, the inventory account is updated unless the inventory account was manually overridden.
If the inventory account is not fully qualified or if the account does not exist, its background is shaded yellow. You should replace any wildcarded characters with valid entries. Manual overrides are indicated in purple. If you enter an override account and come to regret it, blank out the account and press Tab. The default account is restored.
You can change the inventory account until the GL entry is merged.
Press F2 to open the Account Expand dialog box where you can look up an account number, find an account number by its alias, build the account number by segment, or view setup and setup sources.
Press F3 to look up the account.
If an account is already selected, you can press F4 to open the record in the Account window.
This column applies to miscellaneous detail lines only. The item tax category defaults from the item tax category assigned to the ARCode.
By default, all ARCodes are assumed to be taxable. You can define item tax categories to assign a nontaxable status to certain groups of ARCodes. You can also define taxable item tax categories in order to group ARCodes for tax reporting.
The item tax category can be changed at any time to produce accurate reporting; however, the sales tax amount on a merged invoice does not change since it represents the amount actually billed to the customer.
Press F3 to look up the value.
If a value is already selected, you can press F4 to open the record in its native editor.
The invoice location. For miscellaneous and unapplied detail lines, the location is set to the invoice customer's default invoice location. For regular payment detail lines, you can change the location in the AR Invoice window.
You can change the location even after the receipt is merged.
Press F3 to look up the value.
If a value is already selected, you can press F4 to open the record in its native editor.
If needed, enter special information about the payment detail line. For example, you can record the reason for an adjustment to the invoice balance and why you allowed a smaller payment to pay off the entire invoice balance.
You can change the memo at any time.
Press F2 to open the Memo dialog box where you can enter a lengthy note.
The origin tax entity from the invoice. The origin tax entity represents the location where the sale originated. For miscellaneous and unapplied detail lines, the origin tax entity defaults to the default tax entity. For regular payment detail lines, you can change the location in the AR Invoice window.
The origin tax entity can be changed at any time to produce accurate reporting; however, the sales tax amount on a merged invoice does not change since it represents the amount actually billed to the customer.
Press F3 to look up the value.
If a value is already selected, you can press F4 to open the record in its native editor.
The receivables account for the invoice. The receivables account is credited with the total Payment + Discount + Adjustment that is applied to the invoice. For miscellaneous receipt lines, the receivables account is also debited with the same amount by the invoice that is created when the receipt is merged. The default receivables account is derived from the invoice type, attribute item(s), the customer, customer class, and options settings. When any of these changes, the receivables account is updated unless the receivables account was manually overridden.
If the receivables account is not fully qualified or if the account does not exist, its background is shaded yellow. You should replace any wildcarded characters with valid entries. Manual overrides are indicated in purple. If you enter an override account and come to regret it, blank out the account and press Tab. The default account is restored.
You can change the receivables account until the receipt is merged as long as the detail line does not represent a regular payment.
Press F2 to open the Account Expand dialog box where you can look up an account number, find an account number by its alias, build the account number by segment, or view setup and setup sources.
Press F3 to look up the account.
If an account is already selected, you can press F4 to open the record in the Account window.
The salesperson primarily responsible for the invoice. For payment detail lines, the salesperson is read-only. For miscellaneous and unapplied detail lines, the salesperson defaults from the customer record.
On miscellaneous and unapplied detail lines, you can change the salesperson even after the receipt is merged.
Press F3 to look up the value.
If a value is already selected, you can press F4 to open the record in its native editor.
This column is visible only if the Summary Invoice interface is enabled. If the invoice on this detail line is linked to a summary invoice, the summary invoice batch and entry number display here.
Press F3 to look up the value.
If a value is already selected, you can press F4 to open the record in its native editor.
The jurisdiction that determines sales tax rates and tax reporting requirements. Depending on the tax entity source, the tax entity is set to either the origin tax entity or the destination tax entity.
Press F3 to look up the value.
If a value is already selected, you can press F4 to open the record in its native editor.
This setting determines which tax entity (origin or destination) is used for calculating sales tax and for tax reporting. For miscellaneous and unapplied detail lines, the source defaults from the destination tax entity's sourcing options and whether or not the origin and destination tax entities are in the same state/province.
The tax entity source can be changed at any time to produce accurate reporting; however, the sales tax amount on a merged invoice does not change since it represents the amount actually billed to the customer. For payment detail lines, you can change the tax entity source in the AR Invoice window.
This column applies to miscellaneous detail lines only. If the checkbox is marked, the detail line is considered taxable and sales tax is calculated based on the effective tax rate for the invoice tax entity. If the checkbox is unmarked, the detail line is nontaxable and no tax is calculated for the invoice. The state of the checkbox is determined by the customer tax category and/or the item tax category.
By default, invoices are considered taxable unless overridden by a nontaxable customer tax category or item tax category or if an exception is defined on the effective tax rate. So, if no customer tax category or item tax category is assigned to a miscellaneous invoice, the invoice is treated as taxable.
Custom tab
This tab is visible if custom fields exist for the entity. At a minimum, if there are custom fields, a Fields subtab will be present. One or more additional categories of subtabs may also be visible.
Fields subtab
This tab prompts for values for any custom fields set up for entity records of this entity type. Respond to the prompts as appropriate.
References subtab
This tab is visible if other records reference the current record.
Example
Suppose a custom field exists on PRCodes that references an ARCode. On the ARCode record, on the Custom > References subtab, you can view all the PRCodes which reference that ARCode.
Exchange Folder subtab
This tab is visible only if you set up a custom field with a data type of "Exchange Folder". The label on this tab is the name assigned to the custom field.
This tab shows the contents of the specified Exchange folder.
File subtab
This tab is visible only if you set up a custom field with a data type of "File". The label on the tab is the name assigned to the custom field.
This tab renders the contents of the specified file according to its file type.
Internet Address subtab
This tab is visible only if you set up a custom field with a data type of "Internet Address". The label on this tab is the name assigned to the custom field.
This tab shows the contents of the specified web page.
Network Folder subtab
This tab is visible only if you set up a custom field with a data type of "Network Folder". The label on this tab is the name assigned to the custom field.
This tab shows the contents of the specified network folder.
Notes tab
The Notes pane shows the Notes HD view filtered to show all notes for the selected receipt.
Double-click a row in the pane to drill down to its record in the Note window.
Attachments tab
The Attachments tab is visible if any record for a given entity has an attachment. If the Attachments tab is not visible, this implies that no record of the entity type has an attachment on it; however, once an attachment is added to any record of the entity type, the Attachments tab will become available.
Change Logs tab
This tab is visible if the user has "Change Logs" access to the associated data folder resource.
The Change Logs pane shows the Change Logs HD view filtered to show all change logs for the selected entity record.
Double-click a row in the pane to drill down to its record in the Change Log window.
Other tab
Developer tab
This tab is visible only when developer features are enabled.
Automation subtab
This subtab shows field names and values for the current data record. Use the information in the subtab to assist when creating automation objects such as bots and import files. The field names and field values can be copied from the text box and pasted directly into your code or application. To copy content from the text box, highlight the content to copy and press Ctrl+C or right-click your selection and select Copy from the context menu.
Export (XML) subtab
This subtab shows the XML syntax for exporting the selected data record. The syntax can be copied from the text box as an exemplar for creating your own automation objects for bots, import files, ActivWebAPI, etc. To copy content from the text box, highlight the content to copy and press Ctrl+C or right-click your selection and select Copy from the context menu.
Import (XML) subtab
This subtab allows you to select a file for import and shows the XML syntax for importing data records. Use the subtab to explore the XML syntax for importing data records. In particular, you can investigate the syntax which results when using Data.Import and ActivWebAPI data POST and DELETE routes.
Change Log (XML) subtab
This subtab is visible only when the Enable Change Logs option is marked in System Options or Company Options (depending on whether the feature applies at the system or the company level). This is the default setting when developer features are enabled.
This subtab allows you to investigate changes to the current data record. The syntax can be copied for use in bots, dashboards, ActivWebAPI, and other automation. To copy content from the text box, highlight the content to copy and press Ctrl+C or right-click your selection and select Copy from the context menu.
Select Statement (SQL) subtab
This subtab allows you to investigate the SQL select statement used to retrieve the current data record. The syntax can be copied as an exemplar for data sources and other automation. To copy content from the text box, highlight the content to copy and press Ctrl+C or right-click your selection and select Copy from the context menu.

|
|
Receipts security
Common accesses available on receipts
Special accesses available on receipts
| Access | A user with this access can... |
|---|---|
| Accounts | Access GL accounts in the Receipt window. |
| Entry Number | Override the entry number on a receipt. |
| GL Date | Access the GL Date field in the Receipt window. |
| Merge | Merge receipts. |
| Pay Any | Access the group pay process (does not limit by customer) |
| Proof | Run proof process to determine if receipts are valid for merging. |
| Void | Void a receipt. |
Receipt filters
| Filter Name | Effect |
|---|---|
| ? Batch | Prompts for a batch name and lists the receipts with a batch name that contains the specified search string. |
| ? Customer Code | Prompts for a customer code and lists receipts for customers with a customer code that contains the specified search string. |
| ? Customer Name | Prompts for a customer name and lists receipts for customers with a name that contains the specified search string. |
| ? Deposit | Prompts for a deposit name and lists the receipts in the deposit. |
| ? Receipt Amount | Prompts for a range of amounts and lists receipts with an amount in that range. |
| ? Receipt Created Date | Prompts for a range of dates and lists receipts created in that date range. |
| ? Receipt Date | Prompts for a range of dates and lists receipts with a receipt date in that date range. |
| ? Receipt GL Date | Prompts for a range of dates and lists receipts with a GL date in that date range. |
| ? Receipt Reference | Prompts for a reference and lists receipts with a reference that contains the specified search string. |
| ? Receipt Type | Prompts for a receipt type and lists receipts with a receipt type that contains the specified search string. |
| Has Invalid GL | Lists receipts with general ledger problems. |
| New Receipts | Lists unmerged receipts only. |
| Receipts for This Week | Lists receipts with a receipt date in the current week. |
| Receipts for Today | Lists receipts created today. |
| Voided Receipts | Lists receipts with a status of "Voided" or "Reversal". |
Report Email dialog
- Windows user default account. Sends email using the user's Windows default email account. For most users, this is the account configured in Outlook or another email client application.
- Server personal. Sends email using the email configuration for the system or company server and the email address on the current user's authorized user record. The authorized user record must have a confirmed email address.
- Server generic. Sends email using the email configuration and "from" address for the system or company server. This option requires "Send generic" access to the Server Email resource.
AR invoice expression keywords for receipts
The following keywords are available in expressions for AR invoice descriptions derived for invoices created during receipt entry.
| Keyword | Value |
|---|---|
| <Receipt Description> | Description field from the receipt |
| <Invoice Date> | Formatted invoice date |
| <Invoice Date Month> | Numeric value (1-12) of the month of the invoice date |
| <Invoice Date Month Name> | Month name of the invoice date |
| <Invoice Date Day> | Numeric value (1-31) for the day of the invoice date |
| <Invoice Date Year> | Four-digit numeric value (2014, 2015, ...) for the year of the invoice date |
Example
Suppose that you want the default invoice descriptions for unapplied payments to be similar to "Prepayment - August 2015". The following expression will generate descriptions of this sort:
Prepayment - <Invoice Date Month Name> <Invoice Date Year>
Validation messages for the Proof/Merge AR Receipts wizard
The following errors and warnings may be returned in the proofing process or merge process for receipts which do not pass validation:
Receipt Validations
- Error: Customer is obsolete. The receipt customer has been flagged as obsolete. You must either specify a different customer on the receipt or remove the current customer's obsolete flag.
- Error: Receipt is already merged.
- Error: Receipt is on hold. The receipt has been flagged as "On Hold". To merge the receipt, clear the flag.
- Error: GL Date is undefined.
- Error: GL Batch is undefined.
- Error: Bank Account is undefined.
- Error: Receipt is duplicate (xxxxx). Based on the duplicate conditions defined for the receipt type, the receipt is considered a duplicate.
- Error: GL Date doesn't match Deposit Date. The GL date on the receipt doesn't match the deposit date on the deposit assigned to the receipt. You can correct this on the receipt or using the Validate GL Information on AR Receipts wizard. Either way, the GL date on the receipt is automatically updated to match the deposit date.
- Error: GL Batch doesn't match Deposit GL Batch. The GL batch on the receipt doesn't match the GL batch on the deposit assigned to the receipt. You can correct this on the receipt or using the Validate GL Information on AR Receipts wizard. Either way, the GL batch on the receipt is automatically updated to match the deposit GL batch.
- Error: Bank Account doesn't match Deposit Bank Account. The bank account on the receipt doesn't match the bank account on the deposit assigned to the receipt. You can correct this on the receipt or using the Validate GL Information on AR Receipts wizard. Either way, the bank account on the receipt is automatically updated to match the bank account on the deposit.
- Error: Payment Total (x,xxx.xx) doesn't equal Receipt Amount (x,xxx.xx).
- Error: Receipt Type (xxxxx) requires a Deposit. The receipt is not assigned to a deposit but the receipt type requires a deposit.
- Error: Receipt Type (xxxxx) doesn't allow Deposit Type (xxxxx). The receipt type on the receipt is not valid for the deposit type specified on the receipt.
- Error: Cannot merge Receipt created by an Invoice. The receipt is the result of an initial payment on an invoice; therefore, it cannot be merged separately from the invoice. The receipt will be merged when the invoice is merged.
- Warning: No invoices are selected for payment. There is no receipt detail on the receipt.
- Warning: Discount Account is needed and undefined. The receipt has a discount amount but no discount account is specified on the receipt. While you can still merge the receipt, you will not be able to merge its GL entry until the situation is corrected.
- Warning: Adjustment Account is needed and undefined. The receipt has an adjustment amount but no adjustment account is specified on the receipt. While you can still merge the receipt, you will not be able to merge its GL entry until the situation is corrected.
Receipt Detail Validations
- Error: Line xx - Invoice (xxxxx) has different payment customer (xxxxx). The invoice selected for payment on this receipt detail line has a different payment customer than the receipt customer specified on the receipt. Although this situation is allowed when the "Pay Any" feature is used, the current user does not have "Pay Any" security authorization.
- Error: Line xx - Invoice (xxxxx) receivables account is invalid (xxxx-xx-x).
- Error: Line xx - Invoice (xxxxx) source is invalid (xxxxx).
- Error: Line xx - Invoice (xxxxx) is already merged.
- Error: Line xx - Invoice (xxxxx) is not merged.
- Error: Line xx - Invoice (xxxxx) is duplicate (xxxxx). Based on the duplicate conditions defined for the invoice type assigned on this receipt detail line, the resulting miscellaneous or unapplied payment is considered a duplicate.
- Error: Line xx - Invoice (xxxxx) GL Batch is undefined.
- Error: Line xx - Invoice (xxxxx) Salesperson is obsolete (xxxxx). The invoice salesperson specified on this receipt detail line has been flagged as obsolete. Either assign another salesperson to this receipt detail line or remove the obsolete flag from the current salesperson.
- Error: Line xx - Invoice (xxxxx) ARCode is obsolete. The ARCode specified on this receipt detail line has been flagged as obsolete. Either assign a different ARCode to this receipt detail line or remove the obsolete flag from the current ARCode.
- Error: Invoice (xxxxx) Sales Tax (x,xxx.xx) doesn't equal Total Detail Tax (x,xxx.xx)
- Error: Line xx - Unapplied payment invoice amount not zero (x,xxx.xx).
- Warning: Line xx - Miscellaneous sales tax account is invalid (xxxx-xx-x). This receipt detail line is for a miscellaneous receipt that contains a sales tax amount; however, a valid sales tax account has not been specified on this detail line. While you can still merge the miscellaneous invoice and the receipt, you will not be able to merge the GL entry until this situation is corrected.
- Warning: Line xx - Miscellaneous sales account is invalid (xxxx-xx-x). This receipt detail line is for a miscellaneous receipt; however, a valid sales account has not been specified on this detail line. While you can still merge the miscellaneous invoice and the receipt, you will not be able to merge the GL entry until this situation is corrected.
- Warning: Line xx - Miscellaneous cost account is invalid (xxxx-xx-x). This receipt detail line is for a miscellaneous receipt with a non-zero cost amount; however, a valid cost account has not been specified on this detail line. While you can still merge the miscellaneous invoice and the receipt, you will not be able to merge the GL entry until this situation is corrected.
- Warning: Line xx - Miscellaneous inventory account is invalid (xxxx-xx-x). This receipt detail line is for a miscellaneous receipt with a non-zero cost amount; however, a valid inventory account has not been specified on this detail line. While you can still merge the miscellaneous invoice and the receipt, you will not be able to merge the GL entry until this situation is corrected.
- Warning: Line xx - Invoice (xxxxx) has (xx) invalid Sales Tax detail xxxxx.
- Warning: Line xx - Total payment (x,xxx.xx) exceeds invoice balance (x,xxx.xx).
GL Validations
- Error: Line xxx debit x,xxx.xx has digits in unused part. The journal entry has significant digits outside the scale specified for the GL unit.
- Error: Line xxx credit x,xxx.xx has digits in unused part. The journal entry has significant digits outside the scale specified for the GL unit.
- Error: Line xxx has no control calendar for account xxxx-xx-x. There is no control calendar defined for the account on the journal entry. A GL account's control calendar is determined by the calendar specified on a GL segment item or by the company's default calendar.
- Error: Line xxx has no period for date xx/xx/xxxx in calendar xxxxx. The date on the journal entry does not fall within a defined period for the account's control calendar. This error is also returned if there is no control calendar defined for the account.
- Error: There is no period for today (xx/xx/xxxx) in calendar xxxxx. Today's date does not fall within a defined period for the account's control calendar. This error is also returned if there is no control calendar defined for the account.
- Error: Entry is unbalanced - Accounts: xxxx-xx-x, Unit: xxxxx, Date: xx/xx/xxxx - xx/xx/xxxx, Amount: x,xxx.xx. Based on the balancing segments defined for the account, the journal entry is out of balance.
- Error/Warning: Line xxx date xx/xx/xxxx is outside account xxxx-xx-x effective date range. The date on the journal entry is outside the defined posting date range for the account. Whether this message is an error or warning depends on the posting date message defined on the account.
- Error/Warning: Line xxx date xx/xx/xxxx is posting to a closed period in calendar xxxxx.The journal entry is trying to post to a closed period of the account's control calendar. The Open Before and Open After fields on the GL calendar determine how many periods to consider an account open before and after the current date. Whether this message is an error or warning depends on the post control setting on the GL calendar. AR-specific post controls can be set on the GL calendar by period. Package-specific controls trump general posting controls.
Validation messages for the Void AR Invoices wizard
The following messages may be returned in the void receipts process for receipts which do not pass validation:
- Error: Receipt is not merged. Only merged receipts can be voided. Unmerged receipts can be corrected or deleted in the Receipt window instead.
- Error: Receipt is a reversal receipt. The receipt is a reversal receipt that voided another receipt. Reversal receipts cannot be voided.
- Error: Receipt is already voided. Since the receipt has already been voided, it cannot be voided again.
- Error: Receipt has invalid GL information. The GL information on the receipt must be corrected before the receipt can be voided. You may be able to correct the invalid information by running the Validate GL wizard for the receipt.
|
5225 S Loop 289, #207 Lubbock, TX 79424 806.687.8500 | 800.354.7152 |
© 2025 AccountingWare, LLC All rights reserved. |