Maintain receipt options
You can dictate the behavior of many of the controls on the Receipt tab of the Receipt window using options settings. By defining profiles in the Options dialog box which suit the way you approach receipt entry, you can make the process more efficient and less time-consuming.
Maintain receipt options
- In the Navigation pane, highlight the Accounts Receivable > Receipts folder.
- In the HD view, double-click a record to open it. The Receipt window opens.
- Click
 (next to the Options dropdown) or select
  > Tools > Options > Maintain Options. The Options dialog box opens.
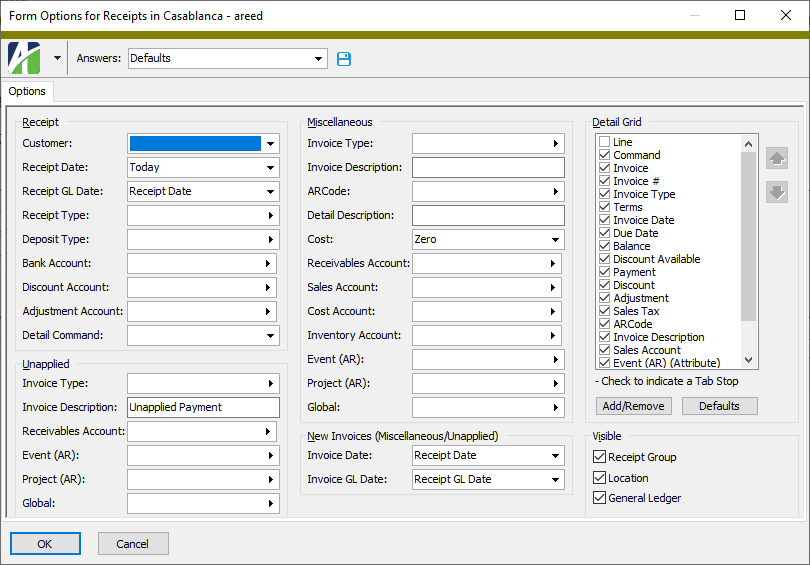
-
- <blank>. Do not use a default customer. You will need to enter a customer code on each receipt.
- Previous. Default to the last customer code entered on a receipt. This is useful when you are entering several receipts for the same customer in a single session.
- From the Receipt Date drop-down list, select the default date to load on new receipts. Your options are:
- <blank>. Do not default the receipt date. You will need to enter the receipt date on each new receipt.
- Previous. Default to the receipt date on the last receipt entered.
- Today. Default to the current system date.
- From the Receipt GL Date drop-down list, select the date to load as the default GL date on new receipts. Your options are:
- <blank>. Do not default the GL date. You will need to enter a GL date on each new receipt.
- Previous. Default to the GL date on the last receipt entered.
- Today. Default to the current system date.
- Receipt Date. Default the GL date to the date entered for the receipt date. If the receipt date changes, the GL date changes as well.
-
In the Receipt Type field, select the default receipt type to load on each new receipt. Leave the field blank if you want to select the receipt type on each new receipt.
Note
If you leave this field blank but specify a default deposit type below that is associated with only one receipt type, then that receipt type serves as the default receipt type.
-
In the Deposit Type field, select the default deposit type to load on each new receipt. Leave the field blank if you want to select the deposit type on each new receipt.
Notes
If a default receipt type was entered in the previous field and only one deposit type is associated with that receipt type, then the deposit type from the receipt type is used as the default regardless of what you enter here.
Also, if a default receipt type was entered in the previous field but the deposit type you entered here is not associated with that receipt type, the default deposit type is not used.
- In the Bank Account field, select the default bank account to use on receipts when a deposit type is not specified. If a deposit type is specified, the bank account is the account assigned to the deposit type.
- In the Discount Account field, select the default discount account to use on each new receipt. This account is debited with the total discount given. You can see the total discount given in the Receipt Detail table.
- In the Adjustment Account field, select the default adjustment account to use on each new receipt entered. This account is debited with the total adjustment amount. You can see the total adjustment amount in the Receipt Detail table.
- From the Detail Command drop-down list, select the default command to load on each new detail line in the Receipt Detail table. Your options are:
- <blank>. You will need to specify the command on each detail line.
- Previous. Default to the command used on the last detail line entered.
- Payment. Default to "Payment". This option represents a regular payment on an existing invoice.
- Unapplied. Default to "Unapplied". This option creates an invoice that is automatically merged when the receipt is merged. The original amount of an unapplied invoice is zero. Its initial outstanding balance is the negative of the payment amount. Because the invoice amount is zero, it does not create any GL postings. Since it has a credit balance, it can be applied as a payment to other invoices on a future receipt.
- Miscellaneous. Default to "Miscellaneous". This option automatically creates an invoice for the receipt that matches the payment amount. This invoice is merged and fully paid when the receipt is merged, so it never contributes to the outstanding accounts receivable. Creating an invoice to record sales information allows revenue (and inventory) to be tracked consistently, regardless of whether a "miscellaneous" receipt was used to record a cash sale or whether the sale was accrued and paid out over time.
- In the Unapplied section in the Invoice Type field, select the default invoice type to use when a new invoice is created from an unapplied payment. If you leave this field blank, you must enter the invoice type on each unapplied payment.
- In the Invoice Description field, enter the default description to use when a new invoice is created from an unapplied payment. You can leave the field blank if you want to enter invoice descriptions individually when you enter unapplied payments. You can use literal text and/or keywords to derive the default invoice descriptions.
-
In the Receivables Account field, enter the account mask to use for determining the receivables account to use on unapplied payments.
The receivables account can be constructed automatically from the account masks defined on invoice type, attribute items (in reverse display order), customer, customer class, and the account mask specified here, in that order.
Note
It is common to post unapplied payments to a deferred revenue account rather than to a receivables account. If this is your practice, AccountingWare recommends that you create a special invoice type to use on unapplied payments that has a deferred revenue account specified in the Receivables field.
- Below the Receivables Account field, there is one field visible for each active attribute with AR usage in the system. For each attribute, enter the default attribute item to use on new unapplied payments. To use the default attribute item from the customer record (if specified) or to enter the attribute item each time you enter an unapplied payment, leave this field blank.
- In the Miscellaneous section in the Invoice Type field, select the default invoice type to use when a new invoice is created from a miscellaneous receipt. If you leave this field blank, you must enter the invoice type on each miscellaneous receipt.
- In the Invoice Description field, enter the default description to use when a new invoice is created from a miscellaneous receipt. You can leave this field blank if you want to enter invoice descriptions individually when you enter miscellaneous receipts. You can use literal text and/or keywords to derive the default invoice descriptions.
- In the ARCode field, select the default ARCode to use on new detail lines for each new invoice created from a miscellaneous receipt. If you leave this field blank, you will need to enter the ARCode on each detail line of an invoice created for a miscellaneous receipt.
- In the Detail Description field, enter the default description to load on new detail lines for each new invoice created from a miscellaneous receipt. If you leave this field blank, the description defaults from the ARCode description.
- From the Cost drop-down list, select the value to load as a default for the cost on new detail lines for each new invoice created from a miscellaneous receipt. Your options are:
- <blank>. Do not default the cost on detail lines. You will need to enter the cost on each invoice detail line.
- Zero. Default the cost on each invoice detail line to zero. Since the cost is required on each detail line, defaulting to zero is useful when you make entries which have no cost of sales/inventory effect.
-
In the Receivables Account field, enter the account mask to use for determining the receivables account to use on miscellaneous receipts.
The receivables account can be constructed automatically from the account masks defined on invoice type, attribute items (in reverse display order), customer, customer class, and the account mask specified here, in that order.
-
In the Sales Account field, enter the account mask to use for determining the sales account to use on miscellaneous receipts.
The sales account can be constructed automatically from the account masks defined on ARCode, attribute items (in reverse display order), customer, customer class, and the account mask specified here, in that order.
-
In the Cost Account field, enter the account mask to use for determining the cost account to use on miscellaneous receipts.
The cost account can be constructed automatically from the account masks defined on ARCode, attribute items (in reverse display order), customer, customer class, and the account mask specified here, in that order.
Note
A cost account is only needed when the cost amount on the miscellaneous receipt is non-zero.
-
In the Inventory Account field, enter the account mask to use for determining the inventory account to use on miscellaneous receipts.
The inventory account can be constructed automatically from the account masks defined on ARCode, attribute items (in reverse display order), customer, customer class, and the account mask specified here, in that order.
Note
An inventory account is only needed when the cost amount on the miscellaneous receipt is non-zero.
- Below the Inventory Account field, there is one field visible for each active attribute with AR usage in the system. For each attribute, enter the default attribute item to use on each new miscellaneous receipt. To use the default attribute item from the customer record (if specified) or to enter the attribute item each time you enter a miscellaneous receipt, leave this field blank.
- In the New Invoices (Miscellaneous/Unapplied) section from the Invoice Date drop-down list, select the default date to load on new invoices created when a miscellaneous receipt or unapplied payment is entered. Your options are:
- <blank>. Do not default the invoice date. You will need to enter the invoice date on each new invoice.
- Previous. Default to the invoice date on the last invoice created for a miscellaneous receipt or unapplied payment.
- Today. Default to the current system date.
- Receipt Date. Default the invoice date to the receipt date.
- Receipt GL Date. Default the invoice date to the GL receipt date.
- In the Invoice GL Date field, select the default GL date to load on new invoices created when a miscellaneous receipt or unapplied payment is entered. Your options are:
- <blank>. Do not default the invoice GL date. You will need to enter the GL date on each new invoice.
- Previous. Default to the invoice GL date on the last invoice created for a miscellaneous receipt or unapplied payment.
- Today. Default to the current system date.
- Invoice Date. Default to the same date that was entered for the invoice date.
- Receipt GL Date. Default the invoice GL date to the GL receipt date.
Period End (Invoice Date). Default the invoice GL date to the last day of the period that contains the invoice date.
Note
The GL calendar used to determine the period end date is derived from one of the following sources:
- If one of the segments in your account numbers is set to require a calendar, that segment's segment item from the receivables account on the invoice is used to determine the GL calendar and thus the period end date for the period that contains the invoice date.
- If none of the account segments requires a calendar, the company's default calendar is used.
- If none of the account segments requires a calendar and no default calendar is defined for the company, ActivityHD cannot derive the period end date. You must provide a GL date when you enter an invoice.
- In the Detail Grid section, configure the Detail table to streamline invoice entry. You can do one or more of the following:
- Add columns. To do so:
- Click Add/Remove. The Column Selection dialog box opens.
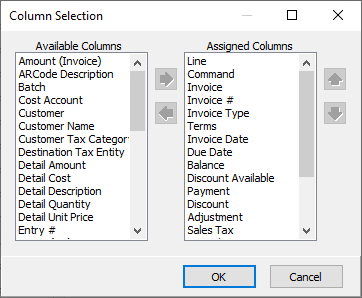
- In the Available Columns list box, highlight the columns to add to the table, then click
 to move your selection(s) to the Assigned Columns list box.
 - Click OK.
- Click Add/Remove. The Column Selection dialog box opens.
- Remove columns. To do so:
- Click Add/Remove. The Column Selection dialog box opens.
- In the Assigned Columns list box, highlight the columns to remove from the table, then click
 to move your selection(s) to the Available Columns list box.
 - Click OK.
- Click Add/Remove. The Column Selection dialog box opens.
- Reorder columns. To do so:
- Highlight a column name in the Detail Grid list box.
- Use
 and
and  to move the column to the desired position.
 - Repeat the last step for other columns you need to move.
- Set tab stops. To do so:
- In the Detail Grid list box, ensure the checkbox for the columns that need a tab stop are marked.
- Clear the checkbox for the columns that do not need a tab stop.
- Add columns. To do so:
- In the Visible section, ensure the checkbox is marked next to each section you want to make visible and available for data input in the receipt entry window. ActivityHD lets you remove controls to simplify receipt entry. For any required fields among these controls, if you choose not to show the control you need to ensure that the entry is handled by default values. The following controls can be hidden or shown:
- Receipt Group. Shows the Receipt section which contains the Source, On Hold (before merge), Description, Deposit, and Bank Rec (after merge) fields.
- Location. Shows the Location field and its related address block. The receipt location defaults to the customer's default statement location.
- General Ledger. Shows the General Ledger section which contains the GL Date, GL Batch, GL Entry, Bank, Discount, and Adjustment fields.
-
When you finish, click OK. If you started from the "Defaults" profile, you are prompted to save the settings profile.
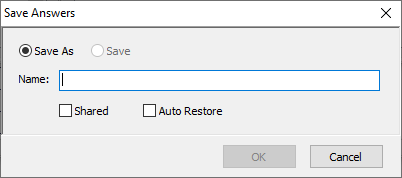
Provide a Name for the profile, mark the Shared and Auto Restore options as appropriate, and click OK.
If you started from an existing profile, you are prompted whether to save the changes. Click Yes.