Maintain recurring invoice options
You can manage the behavior of many of the controls on the Recurring tab of the Recurring Invoice window using options settings. By defining profiles in the Options dialog box which suit the way you approach recurring invoice entry, you can make the process more efficient and less time-consuming.
Maintain recurring AR invoice options
- In the Navigation pane, highlight the Accounts Receivable > Invoices > Recurring folder.
- In the HD view, double-click a record to open it. The Recurring Invoice window opens.
- Click
 (next to the Options dropdown) or select
  > Tools > Options > Maintain Options. The Options dialog box opens.
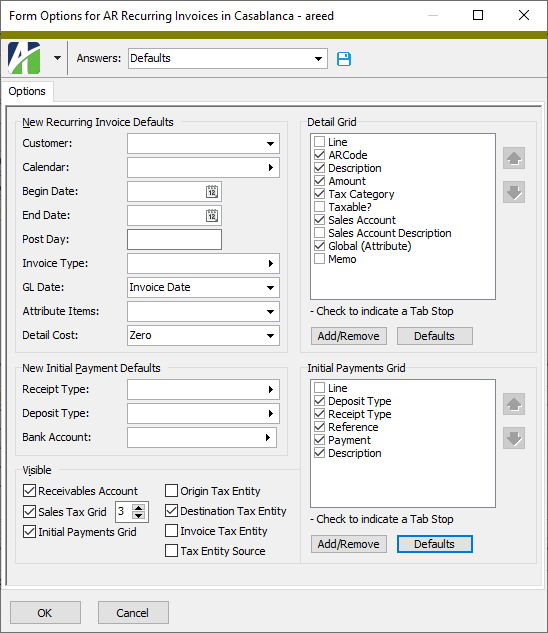
- In the New Recurring Invoice Defaults section from the Customer drop-down list, select the default customer code to load on new recurring invoices. Your options are:
- <blank>. Do not use a default customer code. You will need to enter a customer code on each recurring invoice.
- Previous. Default to the last customer code entered on a recurring invoice.
- In the Calendar field, select the default calendar to use when new recurring invoices are entered. If you leave this field blank, you will need to enter a calendar on every new recurring invoice. The calendar determines the frequency of invoice creation. Unless the Allow Duplicates checkbox is marked on a recurring invoice, ActivityHD does not allow duplicate invoices in the same period of the calendar.
- In the Begin Date and End Date fields, enter the range of dates to use as the default dates for when the new recurring invoice can be processed. If you leave the Begin Date blank on a recurring invoice, there is no limit to the earliest date that the recurring invoice can be processed. If you leave the End Date blank on a recurring invoice, there is no limit to the latest date that the recurring invoice can be processed.
-
In the Post Day field, enter the day of the month to use as the default invoice posting day for each new recurring invoice. If you leave this field blank, you will need to enter the posting day on each recurring invoice. To use the actual processing date as the invoice date, enter "0". To set the post day to the last day of the month, enter a value that exceeds the last day of the period.
Example
If you are using a monthly calendar to process recurring invoices once a month and you want the invoice date on each invoice produced to be the 10th of the month, enter "10".
- In the Invoice Type field, select the default invoice type to assign on each new recurring invoice you enter. If you leave the field blank, you will need to enter an invoice type on each recurring invoice.
- From the GL Date drop-down list, select the type of date to use as the default GL date on the new recurring invoices you enter. Your options are:
- <blank>. Do not default the GL date type. You will need to select the GL date type on each new recurring invoice.
- Invoice Date. The GL date type defaults to "Invoice Date" when you enter new recurring invoices. When a recurring invoice with this GL date type is processed, the GL date on the resulting invoice defaults to the invoice date.
- Period End Date. The GL date type defaults to "Period End Date" when you enter new recurring invoices. When a recurring invoice with this GL date type is processed, the GL date on the resulting invoice defaults to the last day of the period that contains the invoice date.
- If one of the segments in your account numbers is set to require a calendar, that segment's segment item from the receivables account on the invoice is used to determine the GL calendar and thus the period end date for the period that contains the invoice date.
- If none of the account segments require a calendar, the company's default calendar is used.
- If none of the account segments require a calendar and no default calendar is defined for the company, ActivityHD cannot derive the period end date. You must provide a GL date when you enter an invoice.
Note
The GL calendar used to determine the period end date is derived from one of the following sources:
- From the Attribute Items drop-down list, select which attribute items to include by default on new recurring invoices. Your options are:
- <blank>. If default attribute item(s) are assigned on the customer, those attribute items load. Otherwise, you will need to enter any applicable attribute items on new recurring invoices.
- Previous. Default to the attribute item(s) from the last recurring invoice entered.
- From the Detail Cost drop-down list, select the value to load as a default for the cost on each recurring invoice detail line. Your options are:
- <blank>. Do not default the cost on detail lines. You will need to enter the cost on each recurring invoice detail line.
- Zero. Default the cost on each recurring invoice detail line to zero. Since the cost is required on each detail line, defaulting to zero is useful when you make entries which have no cost of sales/inventory effect.
-
In the New Initial Payment Defaults section in the Receipt Type field, select the default receipt type to assign to new initial payments. Leave this field blank to require a receipt type to be entered on each initial payment.
Note
If you leave this field blank but a default deposit type is specified below that is associated with only one receipt type, then that receipt type serves as the default receipt type on initial payments.
-
In the Deposit Type field, select the default deposit type to assign to new initial payments. Leave this field blank to require a deposit type to be entered on each initial payment.
Note
If a default receipt type was entered in the previous field and only one deposit is associated with that receipt type, then the deposit type from the receipt type is used as the default on initial payments regardless of what you enter here.
Also, if a default receipt type was entered in the previous field but the deposit type you entered here is not associated with that receipt type, the default deposit type is not used.
- In the Bank Account field, select the default bank account to use on each new initial payment whenever a deposit type is not specified. When a deposit type is specified on an initial payment, the bank account defaults from the deposit type.
- In the Visible section, ensure the checkbox is marked next to each field or table you want to make visible and available for data input in the Recurring Invoice entry window. ActivityHD lets you remove controls in order to simplify recurring invoice entry. For any required fields among these controls, if you choose not to show the control you need to ensure that the entry is handled by default values. The following controls can be hidden or shown:
Receivables Account. Shows the AR Account field.
The receivables account can be constructed automatically from the account masks defined on invoice type, attribute items (in reverse display order), customer, and customer class, in that order. If account masks are defined so that the correct receivables accounts can be constructed on recurring invoices, it is safe to remove this field from the Recurring Invoice window. In fact, even if an invalid account is constructed, you can still save the recurring invoice; however, the account must be changed to a valid receivables account before the resulting invoice can be merged.
- Sales Tax Grid. Shows the Sales Tax Detail table. If you select this option, enter the number of rows to show in the table. The table shows one line per tax jurisdiction for the tax entity on the recurring invoice. Each detail line shows the tax amount and tax liability account for the corresponding tax jurisdiction.
- Initial Payments Grid. Shows the Initial Payment(s) table. If you hide this table, you are unable to enter initial payments against recurring invoices. If the invoice type requires a zero balance and this table is not visible, you are unable to enter an initial payment to arrive at a zero balance.
- Origin Tax Entity. Shows the origin tax entity in the Origin field in the Sales Tax section of the Recurring Invoice window. The origin tax entity defaults from the tax entity that is designated as the default tax entity. As long as you do not need to change the tax entity, it is safe to remove the field from the Recurring Invoice window.
- Destination Tax Entity. Shows the destination tax entity in the Destination field in the Sales Tax section of the Recurring Invoice window. The destination tax entity defaults from the tax entity assigned to the customer location specified on the recurring invoice. If a tax entity is assigned on the customer location and you do not need to change it, it is safe to remove the field from the Recurring Invoice window.
- Invoice Tax Entity. Shows the tax entity that is applied to the recurring invoice in the Tax Entity field in the Sales Tax section of the Recurring Invoice window. This field is display-only. The tax entity source determines whether the origin or destination entity is used to calculate taxes on the recurring invoice.
- Tax Entity Source. Shows whether the origin tax entity or destination tax entity is the source for calculating tax on the recurring invoice. The tax entity source is based on the In-State Source and Out-of-State Source settings on the tax entity. If the state (province) portion of the origin and destination are the same, the In-State Source setting is used. If the state (province) portion of the origin and destination are different, the Out-of-State Source setting is used. If these settings are not specified, you will need to select the tax entity source at recurring invoice entry time. If the settings are defined appropriately for all tax entities, it is safe to remove the field from the Recurring Invoice window.
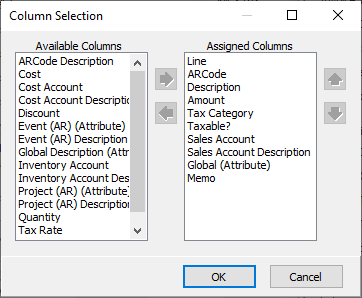
- In the Detail Grid section, configure the Detail table to streamline recurring invoice entry. You can do one or more of the following:
- Add columns. To do so:
- Click Add/Remove. The Column Selection dialog box opens.

- In the Available Columns list box, highlight the columns to add to the table, then click
 to move your selection(s) to the Assigned Columns list box.
 - Click OK.
- Click Add/Remove. The Column Selection dialog box opens.
- Remove columns. To do so:
- Click Add/Remove. The Column Selection dialog box opens.
- In the Assigned Columns list box, highlight the columns to remove from the table, then click
 to move your selection(s) to the Available Columns list box.
 - Click OK.
- Click Add/Remove. The Column Selection dialog box opens.
- Reorder columns. To do so:
- Highlight a column name in the Detail Grid list box.
- Use
 and
and  to move the column to the desired position.
 - Repeat the last step for other columns you need to move.
- Set tab stops. To do so:
- In the Detail Grid list box, ensure the checkbox for the columns that need a tab stop are marked.
- Clear the checkbox for the columns that do not need a tab stop.
- Add columns. To do so:
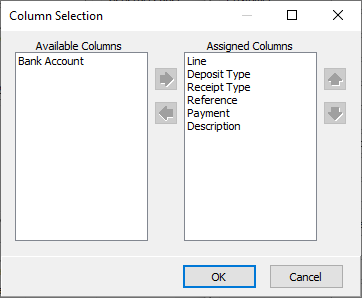
- In the Initial Payments Grid section, configure the Initial Payment(s) table to streamline entry of initial payments on recurring invoices. Use the same techniques as described above for the Detail table.
-
When you finish, click OK. If you started from the "Defaults" profile, you are prompted to save the settings profile.
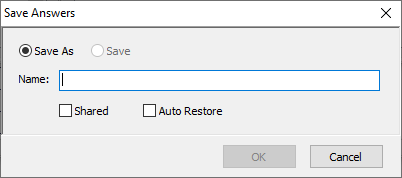
Provide a Name for the profile, mark the Shared and Auto Restore options as appropriate, and click OK.
If you started from an existing profile, you are prompted whether to save the changes. Click Yes.