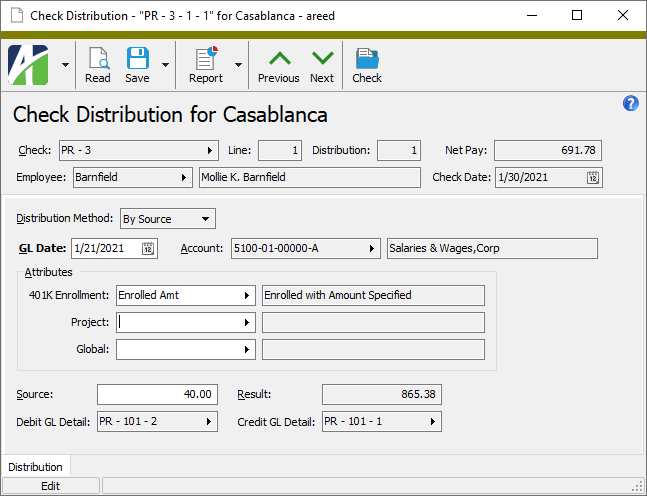
The Distributions table on the Lines tab of the Check window shows how a check line's expense will be accrued in General Ledger. The Distribution window shows the detail for a single distribution line.
Accrual distributions cannot be changed or deleted if the associated GL entry is merged. However, additional distributions can be entered to adjust a merged distribution. When you enter adjusting distributions, a new GL entry is automatically created.
The Check Distributions HD view can optionally include columns for all payroll attributes. Attributes with employee-only usage show the attribute item for the employee as of the GL date. Attributes with distribution usage show the value from the distribution line; this value may differ from the employee default value.
Maintain a check line distribution
Until the GL entry associated with an accrual distribution is merged, certain fields on a distribution detail line are available for editing. Once the GL entry is merged, the accrual distribution cannot be changed (except for distribution attributes). You can, however, enter additional distributions to adjust already merged distributions. When you do, the new GL entry is created automatically.
To maintain a distribution when the GL entry is not merged:
Maintain a check line distribution
- In the Navigation pane, highlight the Payroll/Human Resources > Checks > Distributions folder.
- In the HD view, locate and double-click the distribution you want to maintain to load it in the Distribution window.
- The GL Date defaults to the date specified on the payroll run. For some distribution methods ("Follows Pay" and "Split Period"), the date may be calculated from other values. Enter a different GL date if needed.
-
If the distribution account is not fully qualified or if the account does not exist, the Account field (or a portion of it) is enabled and its background is shaded yellow. If a fully-qualified derived account number has been changed to a different valid account number, the field is enabled and the account number displays in purple. Enter any part of the account number you need to complete or change.
-
If you are prompted for distribution attributes, select an appropriate attribute item to assign to each attribute.
Note
Check line distributions which "follow pay" derive the GL date, account, attributes, and allocated amounts from the distributions on the pay lines they follow. You cannot modify distribution attributes on distributions which follow pay.
Note
If an attribute is flagged for "Use on GL Detail" and to "Follow Calendar Post Control" and to "Post to GL" for Payroll and the payroll check is merged and the corresponding accrual journal entry is merged and the post control is "Error", the attribute item on a check line distribution cannot be changed. If those conditions exist but the post control is "Warning", a message is displayed before the attribute item can be changed.
The post control in effect is determined as follows:
- If there is a segment-specific control calendar on the distribution GL account, use the control calendar. Otherwise, use the default calendar.
- Open the calendar period that contains the distribution GL date. If there is a Payroll-specific post control for the period, use it.
- If the period of the posting date is outside the periods before or the periods after the current period, use the post control on the calendar.
- In the Source field, enter the source amount to use to calculate the distribution result. If there is only one distribution line for the check line, the source is typically the check line's source amount. If you change the source value, ActivityHD recalculates the result.
- If the distribution method is "Manual", the Result field is enabled. If needed, enter the result amount directly in this field. If you do, the source amount is not updated.
- Save your changes.
Perform only the steps needed to update the distribution record.
Check Distributions Listing
Purpose
The Check Distributions Listing provides a list of check distribution records in Payroll.
Content
For each check distribution included on the report, the listing shows:
- batch - entry - line - distribution number
- PRCode
- GL date
- source
- result.
The following totals appear on the report:
- account totals per employee
- distribution line count per account per employee
- source amount per account per employee
- result amount per account per employee
- employee totals or account totals
- grand totals.
Print the report
- In the Navigation pane, highlight the Payroll/Human Resources > Checks > Distributions folder.
- Start the report set-up wizard.
- To report on all or a filtered subset of check distributions:
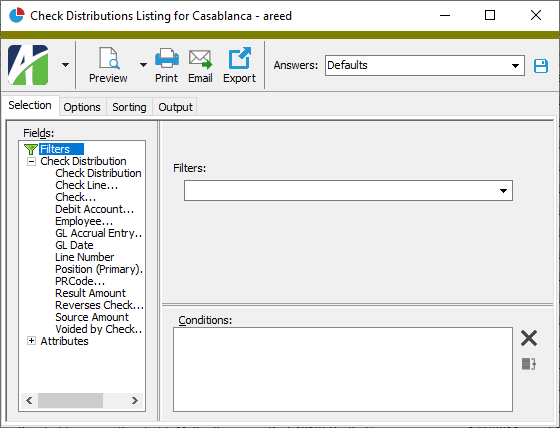
- Right-click the Distributions folder and select Select and Report > Check Distributions Listing from the shortcut menu.
- On the Selection tab, define any filters to apply to the data.
- To report on specifically selected check distributions:
- In the HD view, select the check distributions to include on the report. You can use Ctrl and/or Shift selection to select multiple records.
- Click
 and select Check Distributions Listing from the drop-down menu.
- To report on a particular check distribution from the Distribution window:
- In the HD view, locate and double-click the check distribution to report on. The Distribution window opens with the check distribution loaded.
- Click and select Check Distributions Listing from the drop-down menu.
- To report on all or a filtered subset of check distributions:
- Select the Options tab.
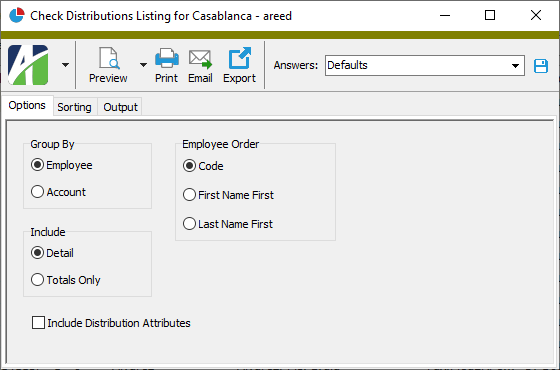
- In the Group By field, select how to group distribution records on the report. Your options are:
- Employee
- Account
- In the Employee Order field, select the sort order for employee records on the report. Your options are:
- Code - Base the sort order on the employee code.
- First Name First
- Last Name First
- In the Include field, select the information to include on the report. Your options are:
- Detail
- Totals Only
- If you selected "Detail" in the Include field, the Include Distribution Attributes checkbox is enabled. Mark the checkbox to include a second line for each distribution line which shows the associated distribution attributes and their values.
- To include a section at the end of the report with the report settings used to produce the report, leave the Include Report Options checkbox marked. To produce the report without this information, clear the checkbox.
- Select the Sorting tab.
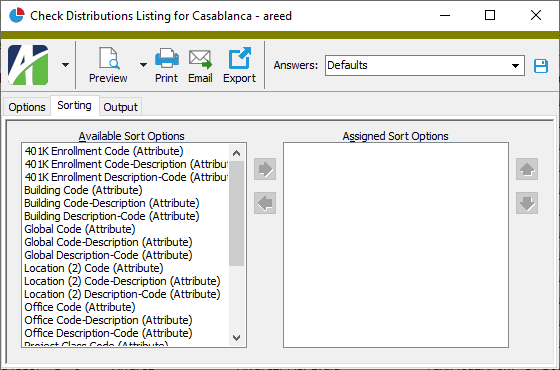
- In the Available Sort Options list box, highlight the field(s) to sort the report by, then click
 to move your selection(s) to the Assigned Sort Options list box.
 - If you selected multiple sort fields, use
 and
and  to arrange the sort fields in the order you want them applied.
 - Select the Output tab.
- In the Design field, look up and select the report design to use.
- In the toolbar, click the icon for the type of output you want:
 - Provides access to two preview options.
- Preview - Click the icon or click the drop-down arrow and select Preview from the drop-down menu to view the report in the Crystal Reports viewer.
- Preview to PDF - Click the drop-down arrow next to the icon and select Preview to PDF to view the report in the PDF reader.
 - Opens the Print dialog so that you can select and configure a printer and then print a paper copy of the report.
 - Opens the Report Email dialog so that you can address and compose an email that the report will be attached to. For best results, ensure your email client is running before you attempt to send a report via email.
 - Opens the Export Report dialog so that you can save the report to a file. File types include Crystal Reports (.rpt), PDF (.pdf), Microsoft Excel (.xls), Microsoft Word (.doc), rich text (.rtf), and XML (.xml).
Note
Detail sorts first by the options you specify and then by check batch, check entry number, check line order, and distribution order.
Data extensions
The following data extensions are available for the report:
- Employees
- Checks
- Check lines
- Check line distributions
Distribution Analysis
Purpose
The Distribution Analysis shows individual distribution postings for a specified period.
Content
When printed to include details, for each batch name - entry number - line number - distribution number included on the report, the report shows:
- GL date
- GL account and account name
- source amount
- result amount.
The following totals appear on the report:
- sorting option subtotals (optional)
- grand totals.
Print the report
- In the Navigation pane, highlight the Payroll/Human Resources > Checks > Distributions folder.
- Start the report set-up wizard.
- To report on all or a filtered subset of check distributions:
- Right-click the Distributions folder and select Select and Report > Distribution Analysis from the shortcut menu.
- On the Selection tab, define any filters to apply to the data.
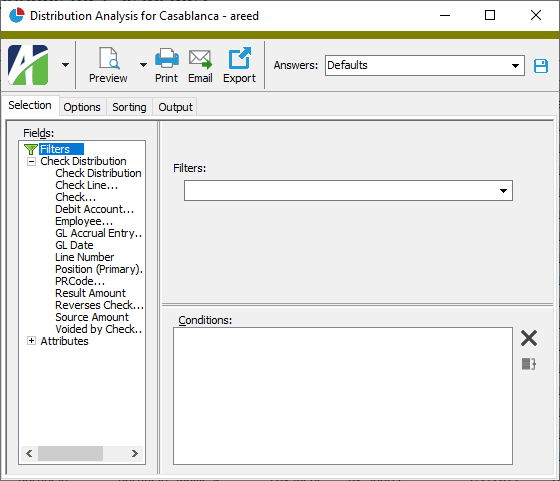
- To report on specifically selected check distributions:
- In the HD view, select the distributions to include on the report. You can use Ctrl and/or Shift selection to select multiple records.
- Click and select Distribution Analysis from the drop-down menu.
- To report on a particular distribution from the Distribution window:
- In the HD view, locate and double-click the check distribution to report on. The Distribution window opens with the check distribution loaded.
- Click and select Distribution Analysis from the drop-down menu.
- To report on all or a filtered subset of check distributions:
- Select the Options tab.
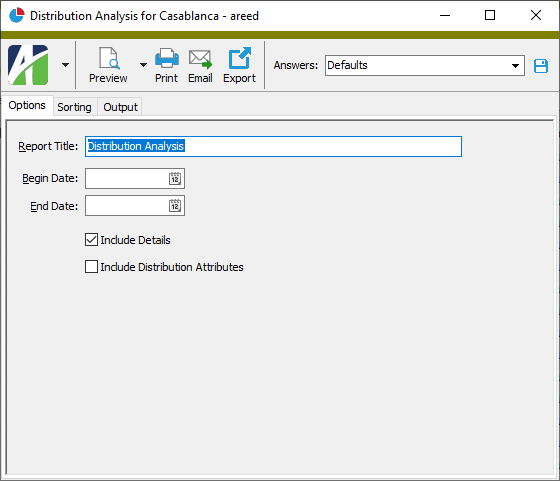
- In the Report Title field, type a title for the report. You can use up to 100 characters.
- In the Begin Date and End Date fields, enter the range of dates for which to include distribution data on the report.
- To include distribution detail on the report, mark the Include Details checkbox. If you do not include detail, the report shows grand totals only for the date range you specified.
- If you marked the Include Details checkbox, the Include Distribution Attributes checkbox is enabled. Mark the checkbox to include a second line for each distribution line which shows the associated distribution attributes and their values.
- To include a section at the end of the report with the report settings used to produce the report, leave the Include Report Options checkbox marked. To produce the report without this information, clear the checkbox.
- Select the Sorting tab.
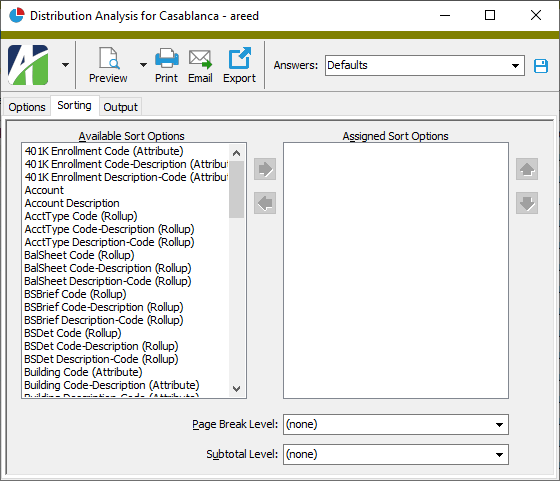
- In the Available Sort Options list box, highlight the field(s) to sort by, then click to move your selection(s) to the Assigned Sort Options list box.
- If you selected multiple sort fields, use and to arrange the sort fields in the order you want them applied.
- To start a new page for each change in one of the sorting options you specified, select the sorting option to break on from the Page Break Level drop-down list. If you do not want to insert page breaks, accept "(none)".
- To subtotal based on one of the sorting options you specified, select the sorting option to subtotal on from the Subtotal Through Level drop-down list. If you do not want to show subtotals, accept "(none)".
- Select the Output tab.
- In the Design field, look up and select the report design to use.
- In the toolbar, click the icon for the type of output you want:
- - Provides access to two preview options.
- Preview - Click the icon or click the drop-down arrow and select Preview from the drop-down menu to view the report in the Crystal Reports viewer.
- Preview to PDF - Click the drop-down arrow next to the icon and select Preview to PDF to view the report in the PDF reader.
- - Opens the Print dialog so that you can select and configure a printer and then print a paper copy of the report.
- - Opens the Report Email dialog so that you can address and compose an email that the report will be attached to. For best results, ensure your email client is running before you attempt to send a report via email.
- - Opens the Export Report dialog so that you can save the report to a file. File types include Crystal Reports (.rpt), PDF (.pdf), Microsoft Excel (.xls), Microsoft Word (.doc), rich text (.rtf), and XML (.xml).
Data extensions
The following data extensions are available for the report:
- Employees
- Checks
- Check distributions
Distribution Record ID
Press F3 to look up the value.
If a value is already selected, you can press F4 to open the record in its native editor.
Press F3 to look up the value.
If a value is already selected, you can press F4 to open the record in its native editor.
Distribution tab
Accrual distributions cannot be changed or deleted if their GL entries have been merged. You can, however, enter additional distributions to adjust merged distributions. New GL entries are automatically created for these new entries.
- By Source. The account number was determined from the PRCode, the employee attributes, or both.
Follows Pay. Distributions were automatically generated for selected PRCodes. The distributions are proportional to the distributions for a selected group of other check lines. "Follows Pay" is defined on the PRCode segment item.
- Manual. Account numbers were entered manually.
- Split Period. The distribution split the check between two GL periods.
The distribution account. This account is derived using the debit account masks from the check line's PRCode and the distribution attributes. The values supplied by the PRCode and the distribution attributes cannot be changed unless you unlock the account number. If wild cards remain in the account number, you can enter values for them.
If the account is not fully qualified or if the account does not exist, the background is shaded yellow. If a fully qualified derived account number is changed to a different valid account number, the account number displays in purple. You can merge checks with invalid distribution accounts, but you must either create the missing account or enter a valid distribution account before you can merge the associated GL entry.
If you must unlock the account, select the field and then select ![]() > Tools > Unlock Debit Account or press Ctrl+Alt+U.
> Tools > Unlock Debit Account or press Ctrl+Alt+U.
Press F2 to open the Account Expand dialog box where you can look up an account number, find an account number by its alias, build the account number by segment, or view setup and setup sources.
Press F3 to look up the account.
If an account is already selected, you can press F4 to open the record in the Account window.
This section lists the distribution attributes defined for usage in Payroll and shows the attribute item currently assigned to each attribute for this distribution.
Note
Check line distributions which "follow pay" derive the GL date, account, attributes, and allocated amounts from the distributions on the pay lines they follow. You cannot modify distribution attributes on distributions which follow pay.
Note
If an attribute is flagged for "Use on GL Detail" and to "Follow Calendar Post Control" and to "Post to GL" for Payroll and the payroll check is merged and the corresponding accrual journal entry is merged and the post control is "Error", the attribute item on a check line distribution cannot be changed. If those conditions exist but the post control is "Warning", a message is displayed before the attribute item can be changed.
The post control in effect is determined as follows:
- If there is a segment-specific control calendar on the distribution GL account, use the control calendar. Otherwise, use the default calendar.
- Open the calendar period that contains the distribution GL date. If there is a Payroll-specific post control for the period, use it.
- If the period of the posting date is outside the periods before or the periods after the current period, use the post control on the calendar.
Press F3 to look up the value.
If a value is already selected, you can press F4 to open the record in its native editor.
The source amount for the distribution. The default source value is the check line's source amount. The source amount is used to calculate the distribution result. If there is only one distribution line for the check line, the source is typically the check line's source amount. You can change the source amount if you need to distribute the check line across multiple accounts.
To enter the remaining source amount on a distribution line, press Ctrl+B or select ![]() > Tools > Distribute Balance.
> Tools > Distribute Balance.
When you enter a source amount, ActivityHD automatically calculates the distribution result using the check line's effective rate:
Distribution Source * (Check Line Result/Check Line Source)
The result of the distribution calculation. For results which are automatically calculated, the following formula is used:
Result = Distribution Source * (Check Line Result/Check Line Source)
If the manual distribution method is used, you can enter the result amount directly. When you manually enter the result, the source amount is not updated.
The journal entry and line number of the detail row with the debit entry for the check distribution.
Press F3 to look up the value.
If a value is already selected, you can press F4 to open the record in its native editor.
The journal entry and line number of the detail row with the credit entry for the check distribution.
Press F3 to look up the value.
If a value is already selected, you can press F4 to open the record in its native editor.
Check distributions security
Common accesses available on check distributions
Check distributions filters
The following built-in filters are available for check distributions:
Report Email dialog
- Windows user default account. Sends email using the user's Windows default email account. For most users, this is the account configured in Outlook or another email client application.
- Server personal. Sends email using the email configuration for the system or company server and the email address on the current user's authorized user record. The authorized user record must have a confirmed email address.
- Server generic. Sends email using the email configuration and "from" address for the system or company server. This option requires "Send generic" access to the Server Email resource.
|
5225 S Loop 289, #207 Lubbock, TX 79424 806.687.8500 | 800.354.7152 |
© 2025 AccountingWare, LLC All rights reserved. |