Perform the following step the first time direct deposit is processed and thereafter only if your bank information changes:
Perform the next steps the first time direct deposit is processed and thereafter when employees enroll in direct deposit.
- Set up disbursement account information and disbursement rules for employees who enroll in direct deposit.
- Generate prenotes (optional).
- If you generated prenotes, submit the prenote file to your bank.
- If the bank identifies errors in the prenote file, correct them.
Perform the following steps every time you process direct deposits.
- Create a payroll run.
- Process the payroll run.
- Proof checks (optional, but highly recommended).
- Merge checks.
- Process direct deposits.
- Validate GL accounts.
- Submit the direct deposit file to your bank.
- Generate pay statements.
Pay Statements
Purpose
The Pay Statements report produces employee notices about pay, whether printed check or direct deposit. The report is formatted like a direct deposit stub.
If your organization uses employee Self-Serve, you can post employees' pay statements online. ActivityHD makes the primary attachment on check records viewable on the Self-Serve site. By default, the pay statement is set as the primary attachment on check records.
Note
Only pay statements for merged checks with a pay statement attachment can be viewed in Employees Self-Serve.
Tip
Pay statements can be scheduled for background printing. So, if you generate payroll on a Monday but do not want pay statements to go out until Wednesday when the funds are available, you can schedule the pay statements to be emailed automatically on Wednesday morning.
Content
For each check for which you are creating a pay statement, the pay statement shows:
- employee name
- pay period end date
- FINAL/CORRECTION indicator, if applicable
- check date
- employee code
- current and year-to-date taxable gross
- current and year-to-date net pay
- wage information (segment item code, hours, rate, current amount, year-to-date amount, totals)
- deduction information (segment item code, current amount, year-to-date amount, totals)
- paid benefit information (segment item code, current amount, year-to-date amount, totals)
- tax information (segment item code, current amount, year-to-date amount, totals)
- reimbursement information (segment item code, current amount, year-to-date amount, totals)
- disbursements (pay method, account number, account type, current amount, year-to-date amount, source).
In addition, you can include:
- unmerged checks
- unmarked disbursements.
Print the report
- In the Navigation pane, highlight the Payroll/Human Resources > Checks folder.
- Start the report set-up wizard.
- To create pay statements for all or a filtered subset of checks:
- Right-click the Checks folder and select Select and Report > Pay Statements from the shortcut menu.
- On the Selection tab, define any filters to apply to the checks.

- To create pay statements for specifically selected checks:
- In the HD view, select the checks to print pay statements for. You can use Ctrl and/or Shift selection to select multiple checks.
- Click
 and select Pay Statements from the drop-down menu.
- To create a pay statement for a particular check from the Check window:
- In the HD view, locate and double-click the check you want to print a pay statement for. The Check window opens with the check loaded.
- Click and select Pay Statements from the drop-down menu.
- To create pay statements for all or a filtered subset of checks:
- Select the Options tab.
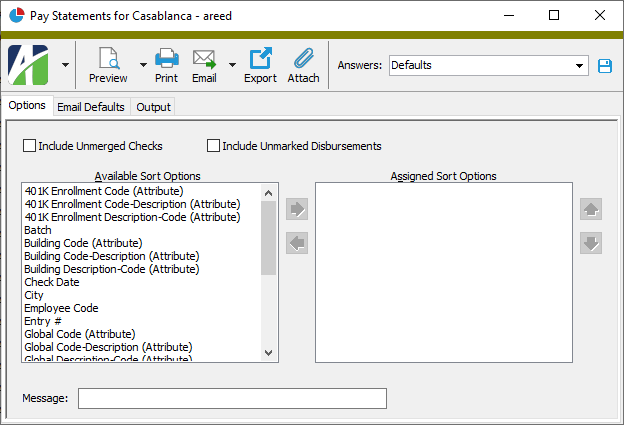
- Mark the checkbox(es) for the additional information to include:
- Unmerged Checks
- Unmarked Disbursements
- To include a section at the end of the report with the report settings used to produce the report, leave the Include Report Options checkbox marked. To produce the report without this information, clear the checkbox.
- In the Available Sort Options list box, highlight the field(s) to sort the pay statements by, then click
 to move your selection(s) to the Assigned Sort Options list box.
 - If you selected multiple sort fields, use
 and
and  to arrange the sort fields in the order you want them applied.
 -
To include a message on the pay statements (provided the selected pay statement design incorporates it), enter the text in the Message field.
Note
The built-in sample pay statement design, "Pay Statement Sample", incorporates the message field.
-
To send pay statements to employees using the Email > Email to Employees feature, select the Email Defaults tab to set up the default email content. Otherwise, skip to step 13.

- From the From drop-down list, select the email account from which to send the email. Your options are:
- Windows user default account. Sends email using the user's Windows default email account. For most users, this is the account configured in Outlook or another email client application.
- Server personal. Sends email using the email configuration for the system or company server and the email address on the current user's authorized user record. The authorized user record must have a confirmed email address.
- Server generic. Sends email using the email configuration and "from" address for the system or company server. This option requires "Send generic" access to the Server Email resource.
- Use the CC and BCC fields to enter any email addresses to copy and/or blind copy on the pay statement emails. Separate email addresses with semi-colons.
- Enter a Subject and body for the email. You can use keywords to customize the content of the subject line and body text of the email. Keywords are replaced in the resulting email with the corresponding check and employee information. Click to see the keywords available for use when you customize an email for pay statements.
- Select the Output tab.
-
In the Design field, look up and select the report design to use.
Note
Federal W-4 and state W-4 information is available in the data stream for easy inclusion on pay statements. Contact AccountingWare Support for assistance.
- In the toolbar, click the icon for the type of output you want:
 - Provides access to two preview options.
- Preview - Click the icon or click the drop-down arrow and select Preview from the drop-down menu to view the report in the Crystal Reports viewer.
- Preview to PDF - Click the drop-down arrow next to the icon and select Preview to PDF to view the report in the PDF reader.
 - Opens the Print dialog so that you can select and configure a printer and then print a paper copy of the pay statements.
 - Opens a drop-down menu so that you can select whom to send the email to. Select Email to send the pay statements to a list of recipients you specify. Select Email to Employees to send each employee a copy of their pay statement.
 - Opens the Export Report dialog so that you can save the pay statements to a file. File types include Crystal Reports (.rpt), PDF (.pdf), Microsoft Excel (.xls), Microsoft Word (.doc), rich text (.rtf), and XML (.xml).
 - Attaches a copy of the pay statements to the corresponding check records. The PDF attachment can be viewed from an employee Self-Serve system. This command sets the Primary Attachment flag which controls what is seen on the Self-Serve site.
Note
The Attach command in the Print Checks wizard does NOT control the Primary Attachment flag.
Data extensions
The following data extensions are available for the report:
- Checks
- Employees
- Check disbursements
- Check stub items