Important!
Attachments must be enabled to use ACA transmissions.
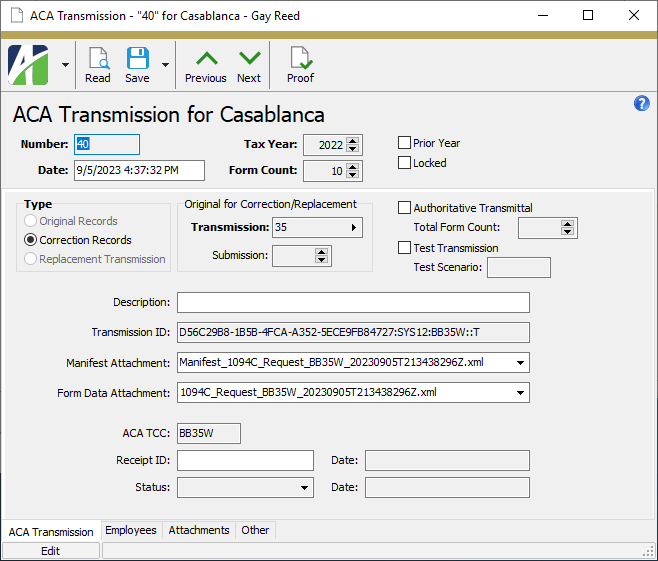
ACA transmissions store information about the files you create to upload ACA 1094-C and 1095-C data to the IRS.
![]()
From the ACA Transmissions folder you can generate the XML files for 1094-C/1095-C electronic submission and store the files as attachments to transmission records. The Create IRS 1095-C Transmission process creates original transmissions as well as correction and replacement transmissions. A correction or replacement transmission process creates a new transmission record which references the original transmission and uses the XML files attached to the original transmission to obtain required data for the correction or replacement.
![]() Create and submit a test transmission
Create and submit a test transmission
Before you submit your first live ACA transmission to the IRS, you must establish with the IRS that you can communicate with their Affordable Care Act Information Return (AIR) system. To accomplish this, you prepare a test transmission and submit it to the IRS's Affordable Care Act Assurance Testing System (AATS).
Note
The communications test is only performed the first year you submit ACA data.
AccountingWare provides a test scenario for you to use for communications testing. You can perform other testing if desired, but be sure you do not submit actual employee data to the test system. Only test data with approved TIN and SSN numbers is allowed.
Create and submit a test transmission
- In the Navigation pane, highlight the Payroll/Human Resources > Government > ACA Transmissions folder.
-
Right-click the folder and select Create Test from the shortcut menu. The Create Test ACA Transmission wizard starts.
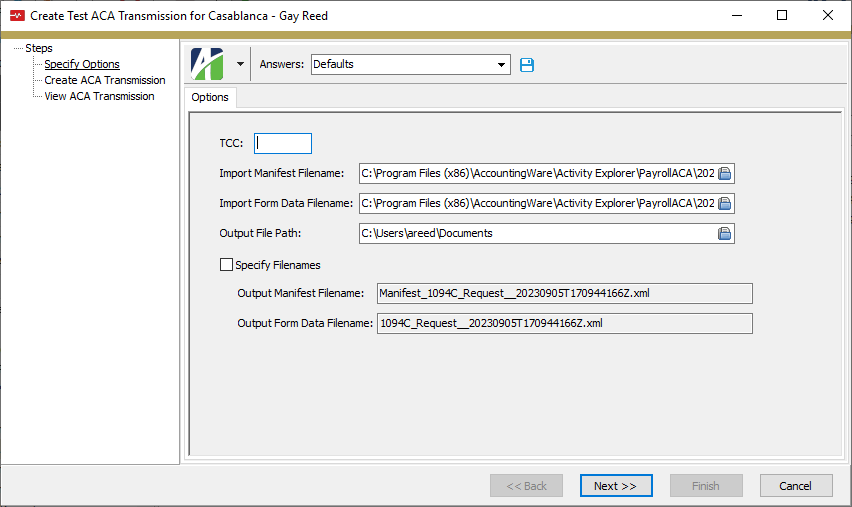
- In the TCC field, enter the Transmitter Control Code assigned to the employer by the IRS.
- In the Import Manifest Filename field, browse to the location of the import manifest test file and select the file. You can find an import manifest test file in your ..\AccountingWare\Activity Explorer\PayrollACA\ folder.
- In the Import Form Data Filename field, browse to the location of the import form data test file and select the file. You can find an import form data test file in your ..\AccountingWare\Activity Explorer\PayrollACA\ folder.
- In the Output File Path field, enter the path or browse to the location of the folder where you want to save the manifest and form data files which are generated by the process.
- To specify the names for the output manifest file and the output form data file, mark the Specify Filenames checkbox and enter the file names in the corresponding fields. AccountingWare highly recommends you accept the file names suggested by ActivityHD.
-
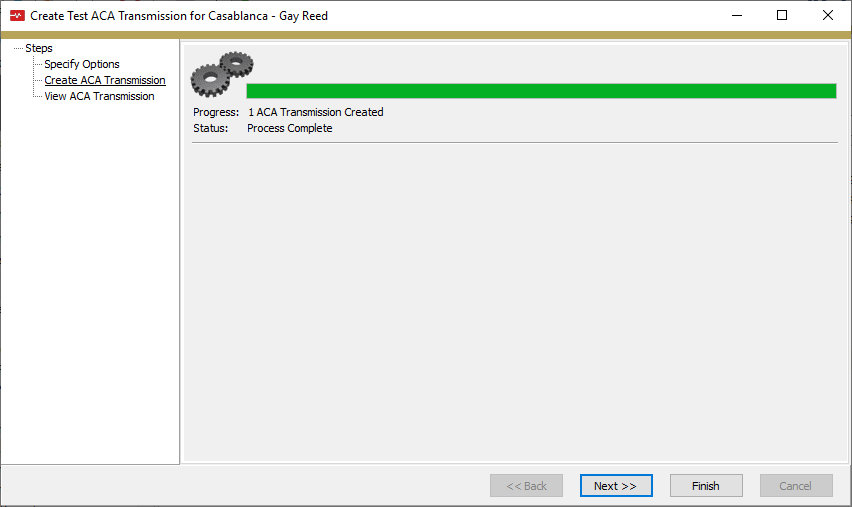
Click Next >>. ActivityHD creates the transmission file.
-
Click Next >>.
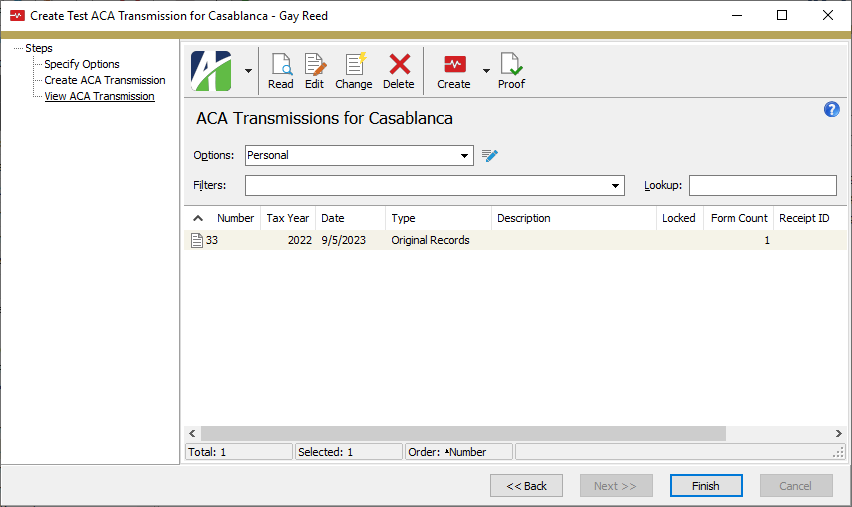
If desired, you can double-click the transmission to open its record in the ACA Transmission window.
- Click Finish.
-
Open a browser and navigate to the Affordable Care Act Information Returns (AIR) page.
-
Click the User Interface (UI) ACA Assurance Testing System (AATS) link.
-
Click Sign in with ID.me. The log-in page loads.
-
Enter your ID.me Username and Password, then click Sign in. Follow the on-screen instructions to complete the test upload.
-
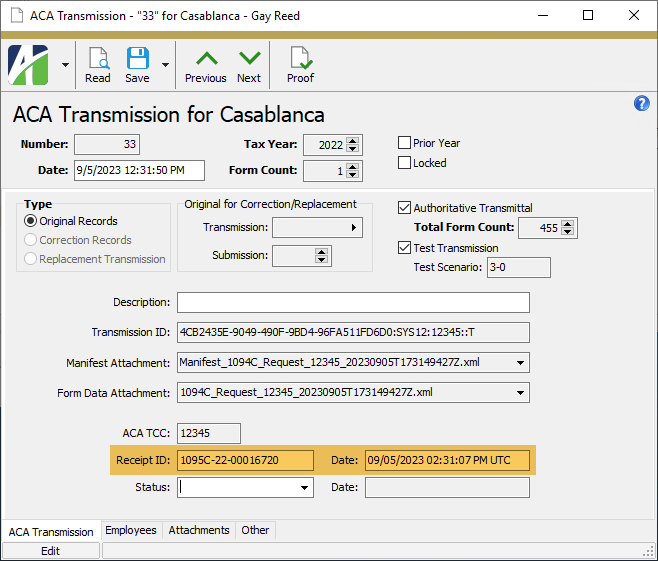
Note the Receipt ID from the confirmation in order to check the status of the transmission subsequently.
Tip
AccountingWare recommends that you take a screen capture of the confirmation page and attach it to the ACA transmission record.
- In ActivityHD, open the ACA transmission record that was created in the Create Test ACA Transmission process.
-
In the Receipt ID field, enter or copy and paste the receipt ID from the Transmission Confirmation page.
Tip
Copying and pasting from the confirmation page is the most reliable way to ensure the receipt ID and date are correct.
-
In the Date field adjacent to the Receipt ID field, enter or copy and paste the date from the Transmission Confirmation page.
- Save your changes.
- Some time later, log back into the ACA website to check the status of the test transmission. You will need the Receipt ID to retrieve the transmission status.
Tip
AccountingWare recommends that you take a screen capture of the transmission status page and attach it to the ACA transmission record.
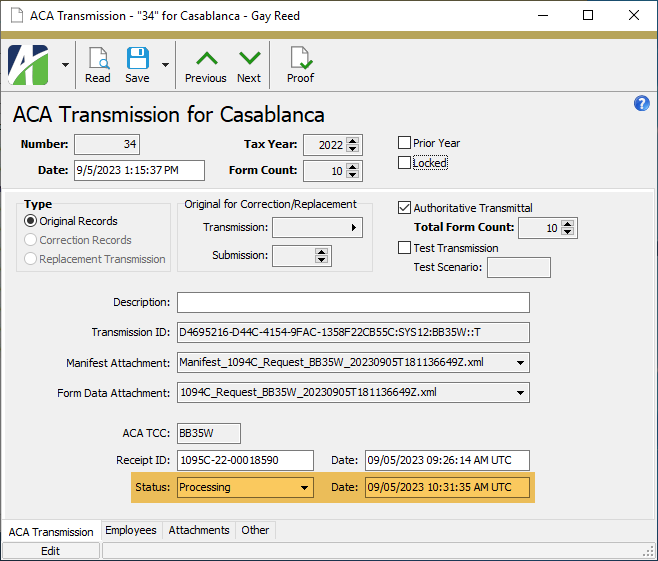
- In ActivityHD in the ACA transmission record, go to the Status field and select the status returned to you by the IRS from the drop-down list.
-
In the Date field adjacent to the Status field, enter or copy and paste the date of the status.
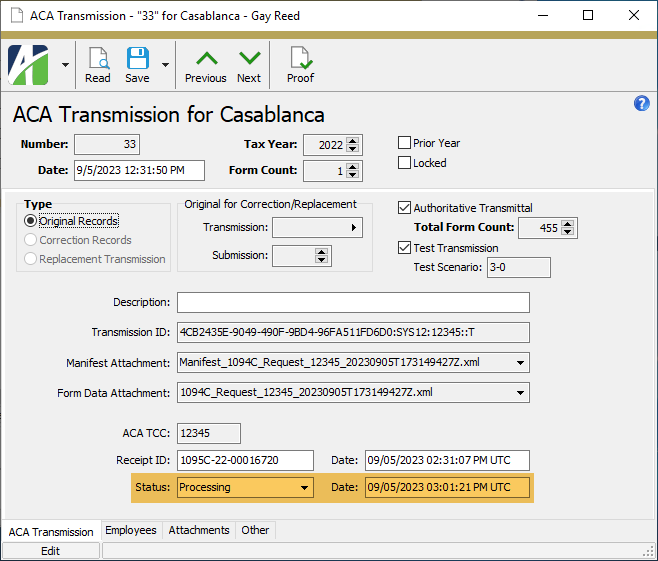
- Save your changes.
- If the status returned to you was "Processing" instead of "Accepted", check back occasionally until the status changes to "Accepted".
Tip
AccountingWare recommends that you take a screen capture of the "Accepted" transmission status page and attach it to the ACA transmission record.
-
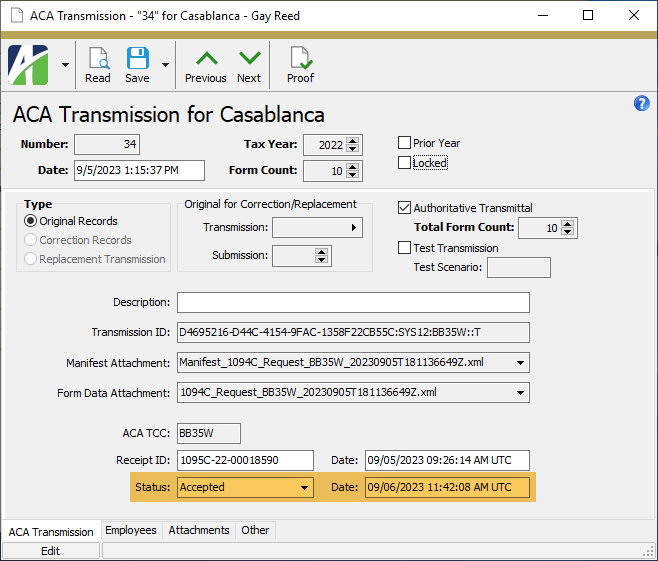
Once the status is "Accepted", return to the ACA transmission record and change the Status field and adjacent Date field to the new status and status date.
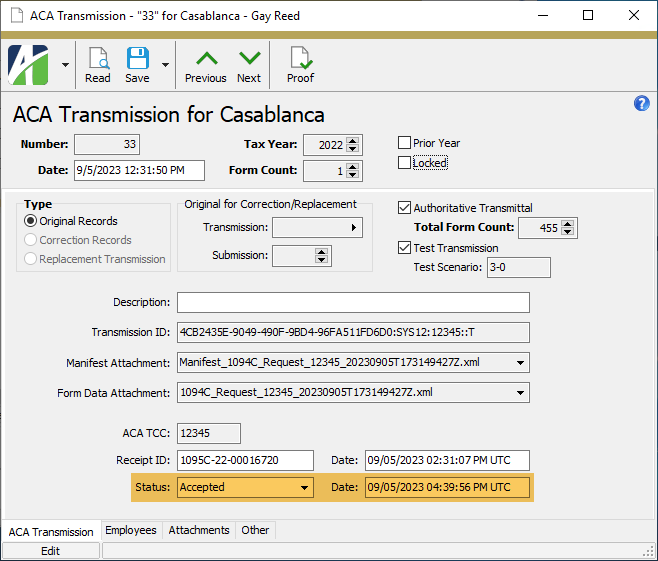
- Save your changes.
- After your test transmission is "Accepted", call the IRS Help Desk (1-866-937-4130; at the main menu, press 3). When you call, be prepared with your TCC, receipt ID, and company information. After a successful interview, the IRS will start the process of moving the status of your TCC from "Test" to "Production". Once you are moved to production, you can file your actual 1095-Cs with the IRS.
Note
Before you attempt to submit your actual 1095-Cs to the IRS, contact AccountingWare support to ensure that you are on a version of ActivityHD which can transmit them.
![]() Create an original ACA transmission
Create an original ACA transmission
Create an original ACA transmission
- In the Navigation pane, highlight the Payroll/Human Resources > Government > ACA Transmissions folder.
- Start the Create IRS 1095-C Transmission wizard.
- To create the ACA transmission for all or a filtered subset of employees:
- Right-click the ACA Transmissions folder and select Create from the shortcut menu.
On the Selection tab, define any filters to apply to the data.
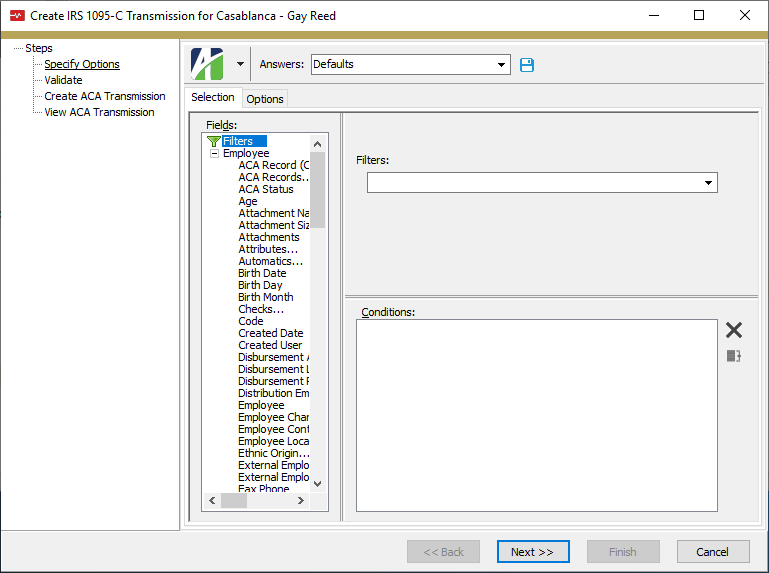
- To create the ACA transmission for specifically selected employees:
- In the HD view, select the employees to include in the transmission. You can use Ctrl and/or Shift selection to select multiple records.
- Right-click and select Create from the shortcut menu.
- To create the ACA transmission for all or a filtered subset of employees:
-
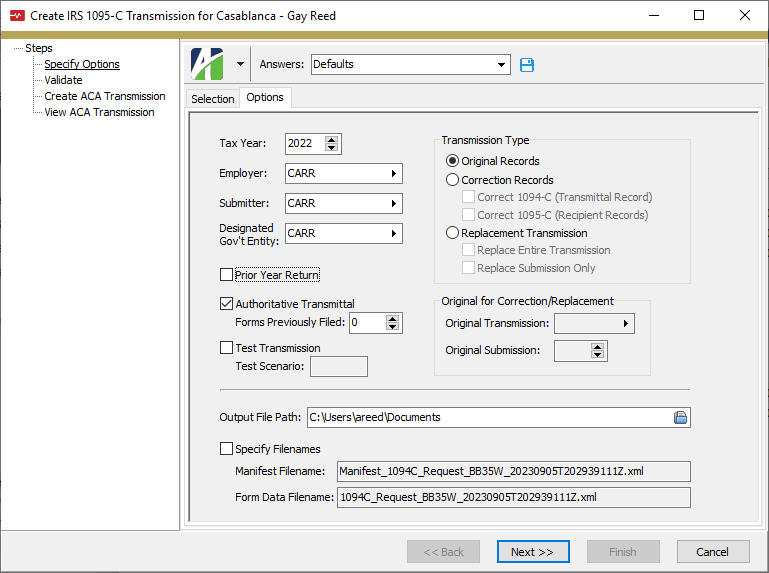
Select the Options tab.

- The Tax Year field defaults to the most recent tax year. If you are creating a transmission for a different tax year, enter the year.
- In the Employer field, select the export employer record for the ACA employer.
- In the Submitter field, select the export submitter record for the ACA submitter.
- If this transmission represents a designated government entity filing on behalf of an employer, select the entity's export submitter record in the Designated Gov't Entity field.
- If you are creating the transmission for a prior tax filing year, mark the Prior Year Return checkbox.
- If this is the employer's authoritative transmittal
 The aggregate employer-level data for the employer. There must be only one authoritative transmittal per employer., leave the Authoritative Transmittal checkbox marked and enter the number of 1095-Cs previously filed in the Forms Previously Filed field. If this transmission does not represent the authoritative transmittal, clear the checkbox.
 - In the Transmission Type field, select "Original Records".
- In the Output File Path field, browse to the folder where you want to save the transmission file.
- If you want to specify the file names for the transmission manifest and for the form data, mark the Specify Filenames checkbox. Otherwise, ActivityHD will use the default names it generates.
- If you mark the Specify Filenames checkbox, the Manifest Filename and Form Data Filename fields are enabled. Enter the names to assign to the manifest file and the form data file.
-
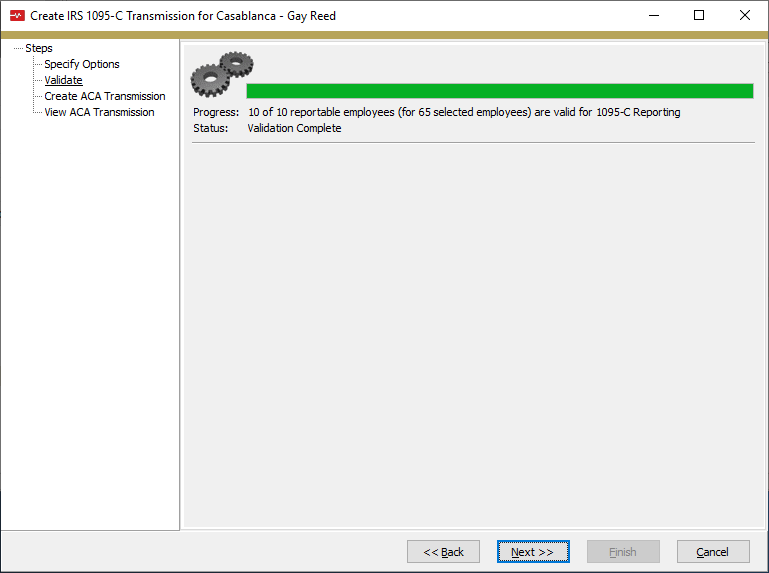
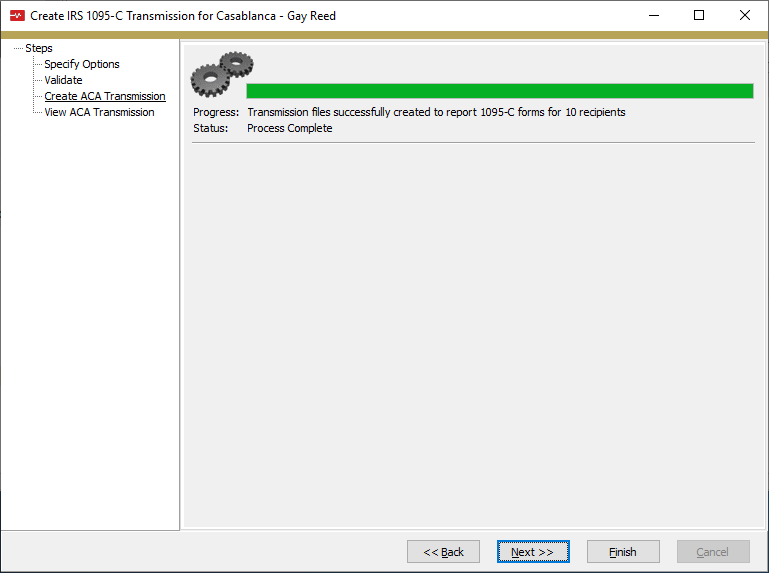
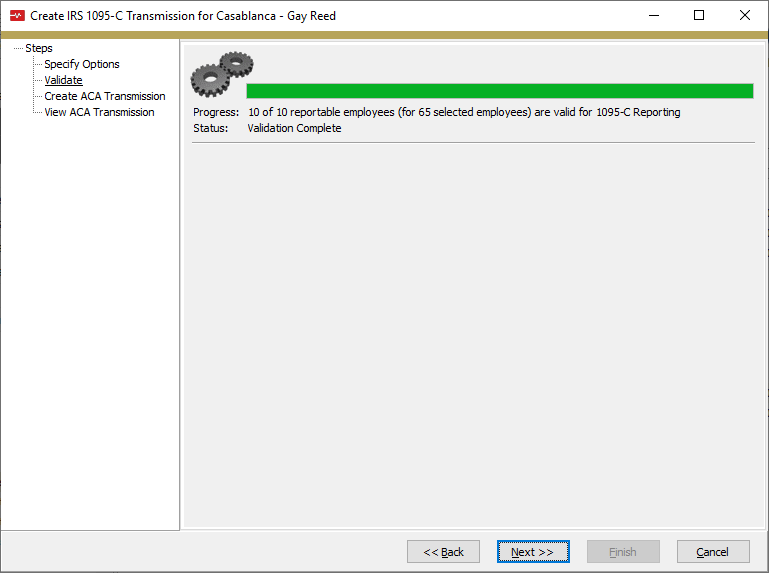
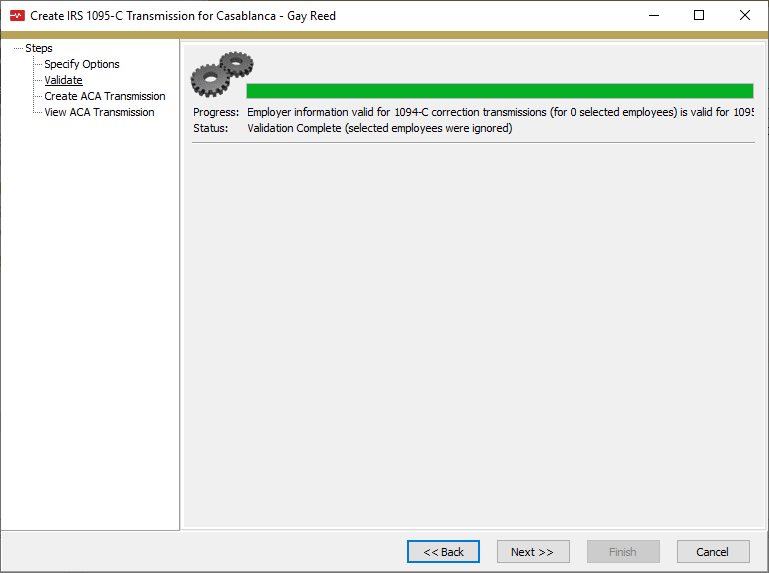
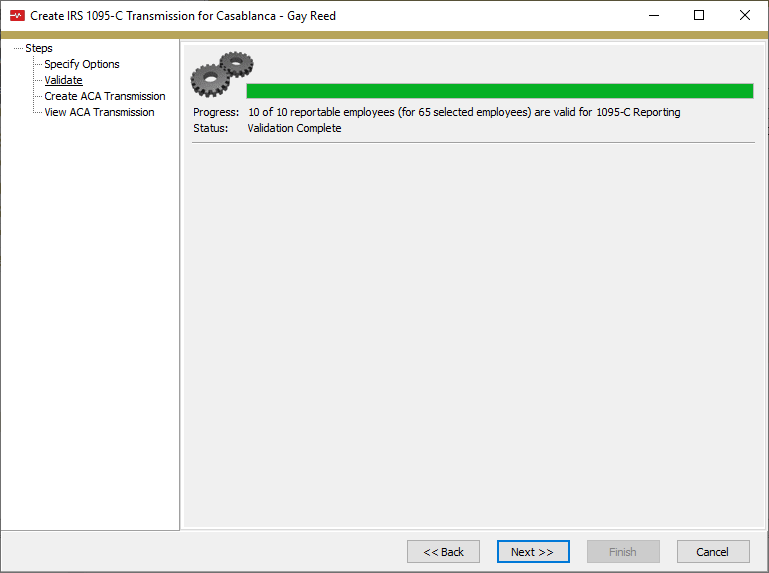
Click Next >>. ActivityHD validates which employee records are valid for 1095-C reporting and reports its results.
-
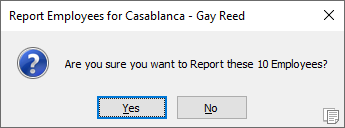
Click Next >>. ActivityHD prompts you to confirm that you want to create the transmission files for the selected employee(s).

-
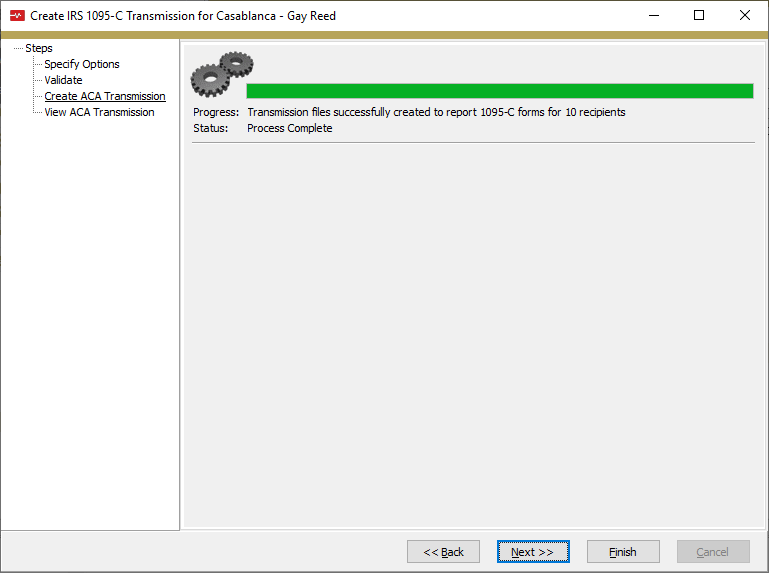
Click Yes. ActivityHD creates the transmission files and reports its results.
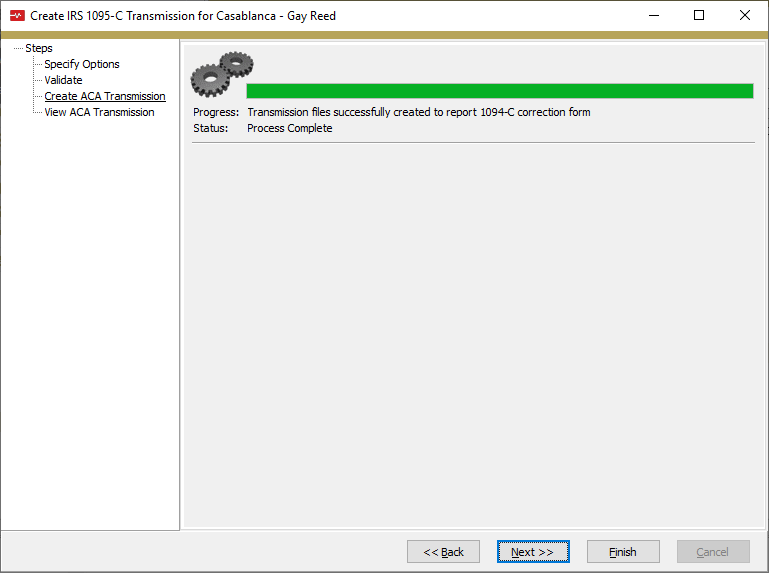
-
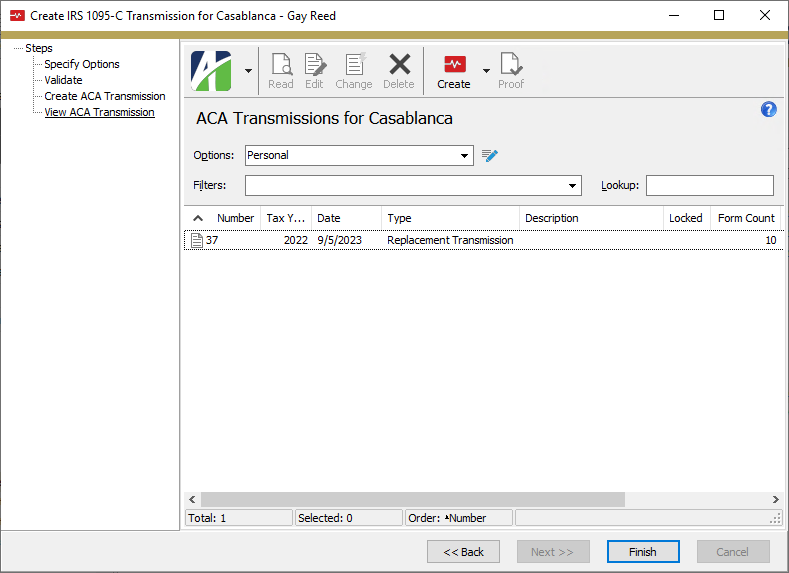
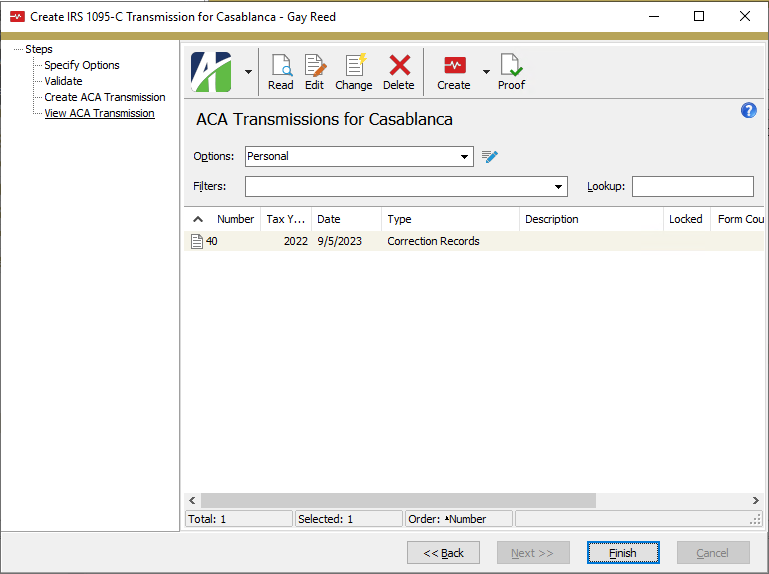
Click Next >>. At this point you can drill down on the ACA transmission entry to see its underlying ACA transmission record.
-
Recommended: Run the Proof ACA Transmission report.
To learn how, expand this link.-
Click
 .
.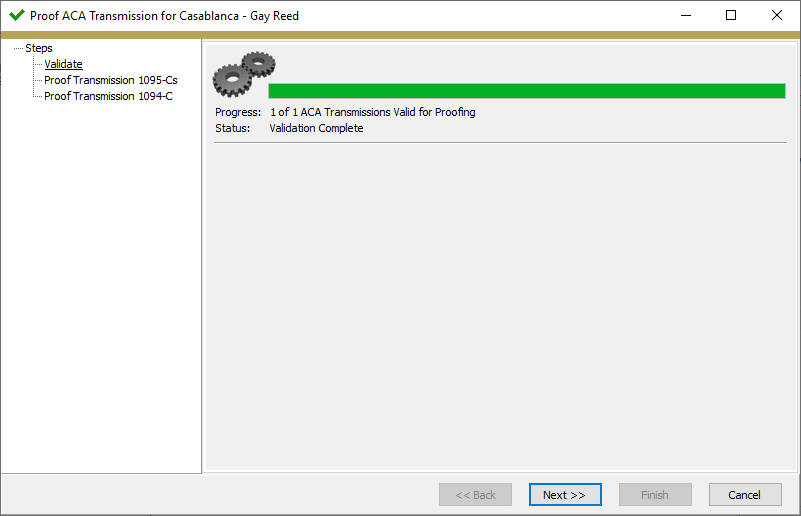
The Validate step automatically checks the transmission's manifest and form data files against the XML schema files provided by the IRS. The XML schema files describe the structure and valid content for the XML files. Errors may indicate invalid data which needs to be corrected before the transmission can be submitted to the IRS. If there are schema validation errors, only the first error is shown.
-
Click Next >>.
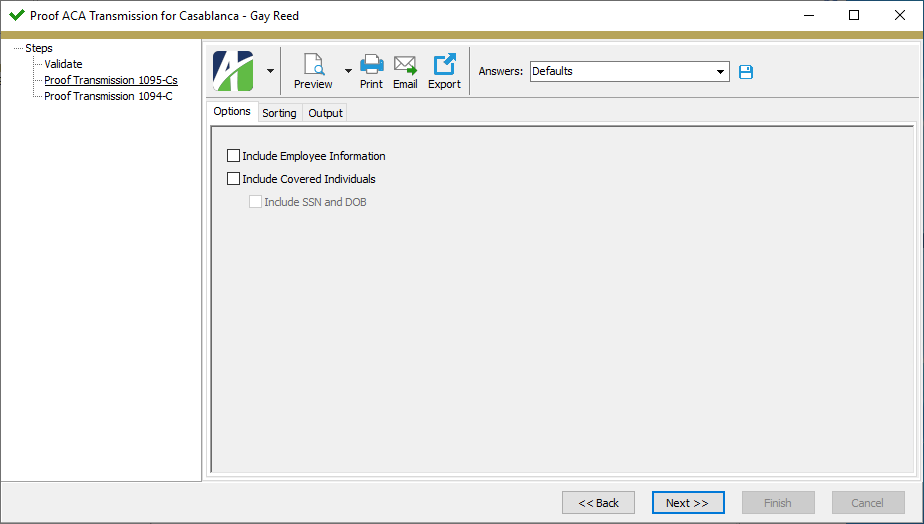
- To include employee social security numbers and addresses on the report, mark the Include Employee Information checkbox.
- To include the names of other individuals who are covered by an employee's insurance for ACA purposes on the report, mark the Include Covered Individuals
- If you mark the Include Covered Individuals checkbox, the Include SSN and DOB checkbox is enabled. Mark the checkbox if you also want to include the social security numbers and dates of birth for covered individuals.
-
Select the Sorting tab.
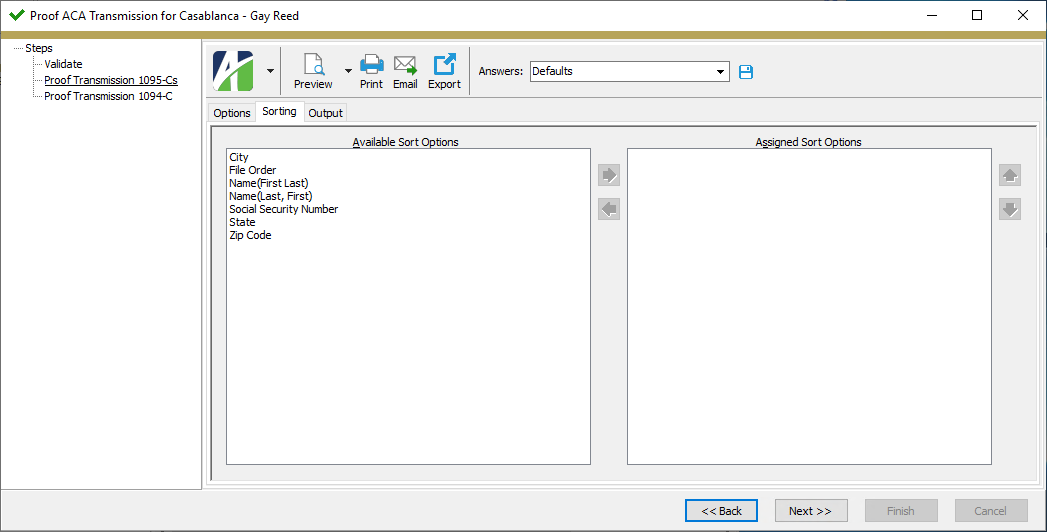
- In the Available Sort Options list box, highlight the field(s) to sort the report by, then click
 to move your selection(s) to the Assigned Sort Options list box.
 - If you selected multiple sort fields, use
 and
and  to arrange the sort fields in the order you want them applied.
 -
Select the Output tab.
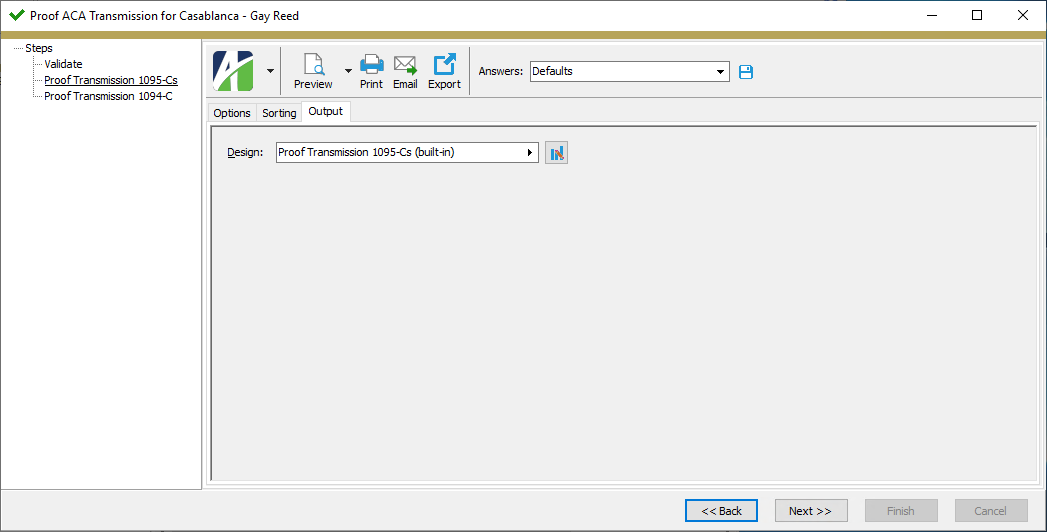
- In the Design field, look up and select the report design to use for the Proof Transmission 1095-Cs report.
- In the toolbar, click the icon for the type of output you want:
 - Provides access to two preview options.
- Preview - Click the icon or click the drop-down arrow and select Preview from the drop-down menu to view the report in the Crystal Reports viewer.
- Preview to PDF - Click the drop-down arrow next to the icon and select Preview to PDF to view the report in the PDF reader.
 - Opens the Print dialog so that you can select and configure a printer and then print a paper copy of the report.
 - Opens the Report Email dialog so that you can address and compose an email that the report will be attached to. For best results, ensure your email client is running before you attempt to send a report via email.
 - Opens the Export Report dialog so that you can save the report to a file. File types include Crystal Reports (.rpt), PDF (.pdf), Microsoft Excel (.xls), Microsoft Word (.doc), rich text (.rtf), and XML (.xml).
-
When you finish reviewing the Proof Transmission 1095-Cs report, click Next >> to move to the Proof Transmission 1094-C step.
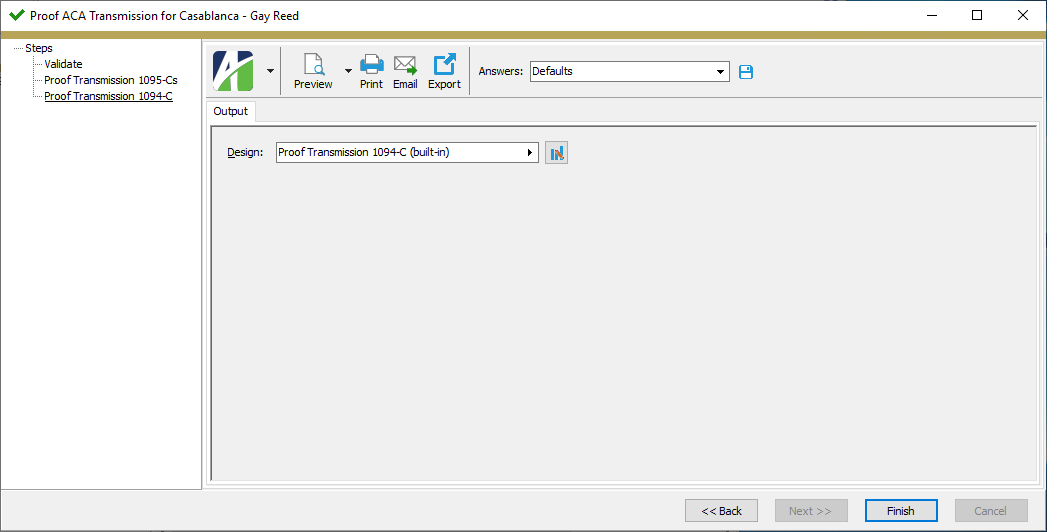
- In the Design field, look up and select the report design to use for the Proof Transmission 1094-C report.
- In the toolbar, click the icon for the type of output you want:
- - Provides access to two preview options.
- Preview - Click the icon or click the drop-down arrow and select Preview from the drop-down menu to view the report in the Crystal Reports viewer.
- Preview to PDF - Click the drop-down arrow next to the icon and select Preview to PDF to view the report in the PDF reader.
- - Opens the Print dialog so that you can select and configure a printer and then print a paper copy of the report.
- - Opens the Report Email dialog so that you can address and compose an email that the report will be attached to. For best results, ensure your email client is running before you attempt to send a report via email.
- - Opens the Export Report dialog so that you can save the report to a file. File types include Crystal Reports (.rpt), PDF (.pdf), Microsoft Excel (.xls), Microsoft Word (.doc), rich text (.rtf), and XML (.xml).
- When you finish reviewing the Proof Transmission 1095-Cs report, click Finish. You are returned to the Create IRS 1095-C Transmission wizard.
The basic Proof Transmission 1095-Cs report shows each recipient's name and their Line 14-16 values.
-
- Click Finish.
If you did not proof the ACA transmission during the creation process, you can proof it after the fact.
Proof an ACA transmission
- In the Navigation pane, highlight the Payroll/Human Resources > Government > ACA Transmissions folder.
- In the HD view, select the transmission to proof.
-
In the toolbar, click
.
The Validate step automatically checks the transmission's manifest and form data files against the XML schema files provided by the IRS. The XML schema files describe the structure and valid content for the XML files. Errors may indicate invalid data which needs to be corrected before the transmission can be submitted to the IRS. If there are schema validation errors, only the first error is shown.
-
Click Next >>.
- To include employee social security numbers and addresses on the report, mark the Include Employee Information checkbox.
- To include the names of other individuals who are covered by an employee's insurance for ACA purposes on the report, mark the Include Covered Individuals
- If you mark the Include Covered Individuals checkbox, the Include SSN and DOB checkbox is enabled. Mark the checkbox if you also want to include the social security numbers and dates of birth for covered individuals.
-
Select the Sorting tab.
- In the Available Sort Options list box, highlight the field(s) to sort the report by, then click to move your selection(s) to the Assigned Sort Options list box.
- If you selected multiple sort fields, use and to arrange the sort fields in the order you want them applied.
-
Select the Output tab.
- In the Design field, look up and select the report design to use for the Proof Transmission 1095-Cs report.
- In the toolbar, click the icon for the type of output you want:
- - Provides access to two preview options.
- Preview - Click the icon or click the drop-down arrow and select Preview from the drop-down menu to view the report in the Crystal Reports viewer.
- Preview to PDF - Click the drop-down arrow next to the icon and select Preview to PDF to view the report in the PDF reader.
- - Opens the Print dialog so that you can select and configure a printer and then print a paper copy of the report.
- - Opens the Report Email dialog so that you can address and compose an email that the report will be attached to. For best results, ensure your email client is running before you attempt to send a report via email.
- - Opens the Export Report dialog so that you can save the report to a file. File types include Crystal Reports (.rpt), PDF (.pdf), Microsoft Excel (.xls), Microsoft Word (.doc), rich text (.rtf), and XML (.xml).
-
When you finish reviewing the Proof Transmission 1095-Cs report, click Next >> to move to the Proof Transmission 1094-C step.
- In the Design field, look up and select the report design to use for the Proof Transmission 1094-C report.
- In the toolbar, click the icon for the type of output you want:
- - Provides access to two preview options.
- Preview - Click the icon or click the drop-down arrow and select Preview from the drop-down menu to view the report in the Crystal Reports viewer.
- Preview to PDF - Click the drop-down arrow next to the icon and select Preview to PDF to view the report in the PDF reader.
- - Opens the Print dialog so that you can select and configure a printer and then print a paper copy of the report.
- - Opens the Report Email dialog so that you can address and compose an email that the report will be attached to. For best results, ensure your email client is running before you attempt to send a report via email.
- - Opens the Export Report dialog so that you can save the report to a file. File types include Crystal Reports (.rpt), PDF (.pdf), Microsoft Excel (.xls), Microsoft Word (.doc), rich text (.rtf), and XML (.xml).
- When you finish reviewing the Proof Transmission 1095-Cs report, click Finish.
The basic Proof Transmission 1095-Cs report shows each recipient's name and their Line 14-16 values.
The following data extension is available for the proof report:
- ACA transmissions
Note
Before you attempt to submit your actual 1095-Cs to the IRS, contact AccountingWare support to ensure that you are on a version of ActivityHD which can transmit them.
Submit an ACA transmission
-
Open a browser and navigate to the Affordable Care Act Information Returns (AIR) page.
-
Click the User Interface (UI) Production System link.
-
Click Sign in with ID.me. The log-in page loads.
-
Enter your ID.me Username and Password, then click Sign in. Follow the on-screen instructions to complete the upload.
-
Note the Receipt ID from the confirmation in order to check the status of the transmission subsequently.
Tip
AccountingWare recommends that you take a screen capture of the confirmation page and attach it to the ACA transmission record.
- In ActivityHD, open the ACA transmission record that was created in the Create ACA Transmission process.
-
In the Receipt ID field, enter or copy and paste the receipt ID from the Transmission Confirmation page.
Tip
Copying and pasting from the confirmation page is the most reliable way to ensure the receipt ID and date are correct.
-
In the Date field adjacent to the Receipt ID field, enter or copy and paste the date from the Transmission Confirmation page.
 05/
05/ - Save your changes.
-
Some time later, log back into the ACA website to check the status of the transmission. You will need the Receipt ID to retrieve the transmission status.
Tip
AccountingWare recommends that you take a screen capture of the transmission status page and attach it to the ACA transmission record.
- In ActivityHD in the ACA transmission record, go to the Status field and select the status returned to you by the IRS from the drop-down list.
-
In the Date field adjacent to the Status field, enter or copy and paste the date of the status.
- Save your changes.
-
If the status returned to you was "Processing" instead of "Accepted", check back occasionally until the status changes to "Accepted".
Tip
AccountingWare recommends that you take a screen capture of the "Accepted" transmission status page and attach it to the ACA transmission record.
-
Once the status is "Accepted", return to the ACA transmission record and change the Status field and adjacent Date field to the new status and status date.
- Save your changes.
![]() Fix problems with 1094-Cs and 1095-Cs
Fix problems with 1094-Cs and 1095-Cs
After you transmit your files to the IRS, a few things can occur that may make it necessary for you to take corrective action. Typically, this involves making any necessary changes to the data, regenerating the affected 1095-Cs or 1094-Cs, preparing corrections and/or replacements using the Create ACA Transmission process, and submitting the updated records through the AIR system.
![]() Expand this link to see a table of transmission statuses the IRS can return:
Expand this link to see a table of transmission statuses the IRS can return:
![]()
Expand the appropriate link to learn how to resolve the problem described:
- The IRS cannot find your transmission.
In this case, either your TCC or your receipt ID (or both) were probably entered incorrectly. Double-check your TCC and your receipt ID, then return to the AIR page and attempt to check your transmission status again. If the problem persists, contact the IRS Help Desk (1-866-937-4130).
- The IRS returns a status of "Rejected".
When your transmission is rejected by the IRS, you will need to make corrections and then submit a replacement file. There are two points at which a submission can be rejected: at the IRS Portal and by AIR. Errors that come from rejection at the IRS portal are prefixed with "TPE"; errors from AIR are prefixed with "AIR".
To replace a rejected transmission, do the following:
-
Transfer the status and status time of the rejection to the ACA transmission record in ActivityHD.
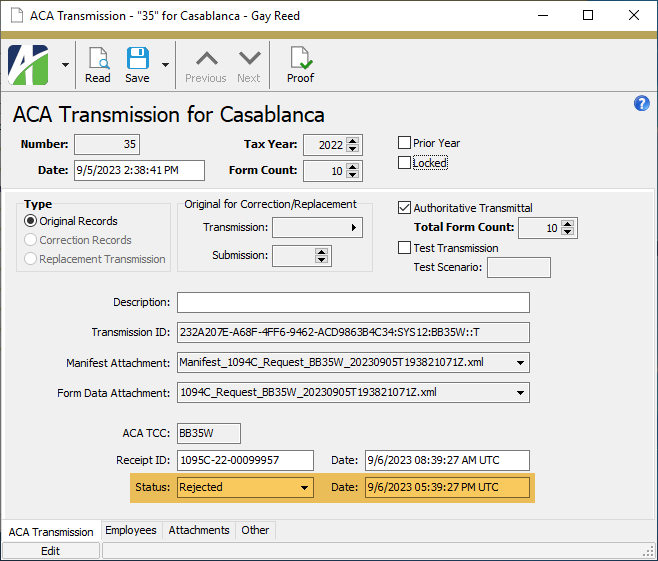
- Save your changes.
-
Download the acknowledgment file from the ACA website.
- With the ACA transmission record open in ActivityHD, select the Attachments tab.
-
Locate the acknowledgment file in File Explorer, then click and drag the file onto the Attachments list box.
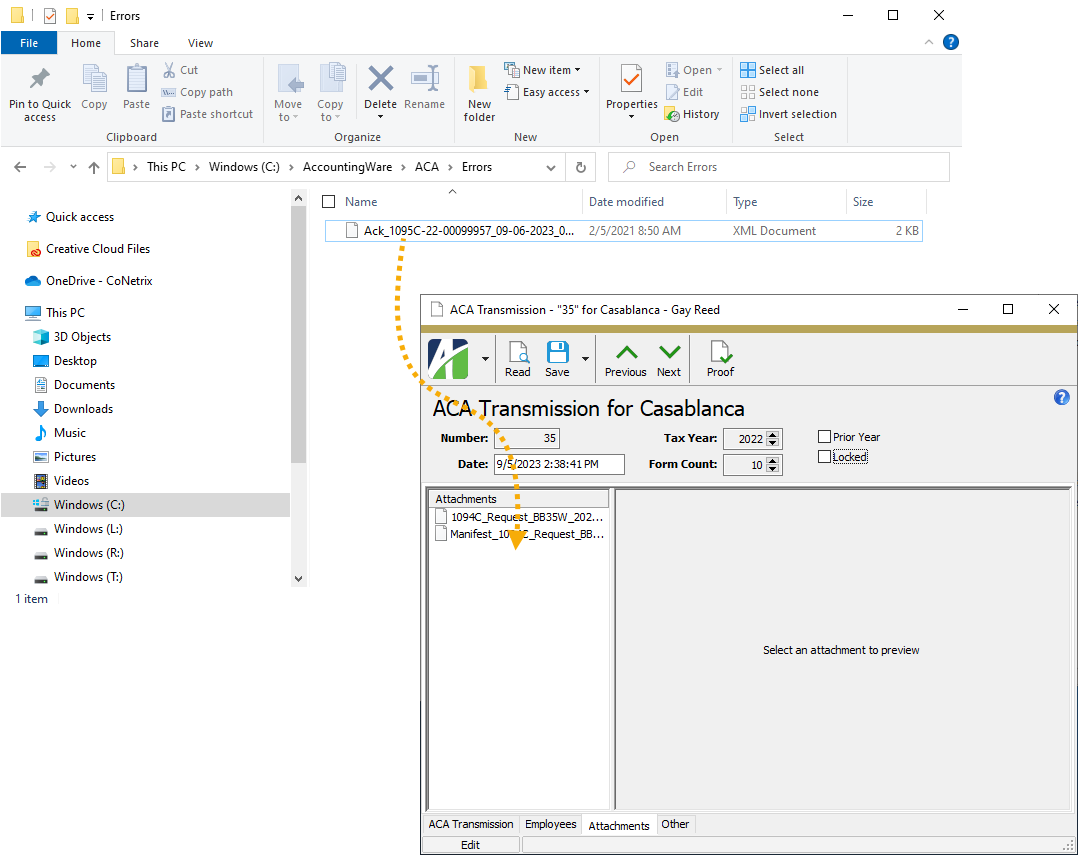
- Save your changes.
- Resolve all issues reported in the acknowledgment file. If you have questions about how to resolve a particular issue, call AccountingWare Customer Service at 800.354.7152.
- After all issues are resolved, in ActivityHD go to Payroll/Human Resources > Government > ACA Transmissions.
-
Right-click on the ACA Transmissions folder and select Create from the shortcut menu. The Create IRS 1095-C Transmission wizard starts.
- On the Selection tab, define any filters you need to apply to the data.
-
Select the Options tab.
- Enter the Tax Year of the transmission file you are replacing.
- In the Employer field, select the export employer record for the ACA employer.
- In the Submitter field, select the export submitter record for the ACA submitter.
- If you are creating the transmission for a prior tax filing year, mark the Prior Year Return checkbox.
- If this transmission represents the employer's authoritative transmittal The aggregate employer-level data for the employer. There must be only one authoritative transmittal per employer., mark the Authoritative Transmittal checkbox and enter the number of 1095-Cs previously filed in the Forms Previously Filed field.
- In the Transmission Type field, select "Replacement Transmission". The two checkboxes below this option become enabled.
- If you are replacing the entire transmission file, mark the Replace Entire Transmission checkbox. If you are only replacing a submission file from the transmission, mark the Replace Submission Only checkbox.
- In the Original Transmission field, select the original transmission that you are replacing.
-
If you marked the Replace Submission Only checkbox, the Original Submission field is enabled. Enter the number of the submission you are replacing.
Note
ActivityHD only creates one submission per transmission, so this value will always be "1".
- In the Output File Path field, browse to the folder where you want to save the replacement transmission file.
- If you want to specify the file names for the transmission manifest and for the form data, mark the Specify Filenames checkbox. Otherwise, ActivityHD will use the default names it generates.
- If you marked the Specify Filenames checkbox, the Manifest Filename and Form Data Filename fields are enabled. Enter the names to assign to the manifest file and the form data file.
-
Click Next >>. ActivityHD validates which employee records are valid for 1095-C reporting and reports its results.
-
Click Next >>. ActivityHD prompts you to confirm that you want to create the transmission files for the selected employee(s).
-
Click Yes. ActivityHD creates the transmission files and reports its results.
-
Click Next >>.
At this point, you can drill down on the ACA transmission to see the underlying ACA transmission record.
- Click Finish.
- Submit the file to the IRS.
-
- The IRS returns a status of "Accepted with Errors", or the IRS returns a status of "Accepted" but errors are subsequently identified in-house.
Transmissions with a status of "Accepted with Errors" must be corrected. Transmissions with a status of "Accepted" must be corrected if errors are detected after a successful transmission. A transmission with correction records can only contain corrections and cannot contain any original records. A correction transmission can contain corrections to the transmittal record (Form 1094-C) or to information return records (1095-C), but not both. If you need to correct both types of records, you will need to create two transmission records.
Correct a transmittal record (1094-C)
- In the Navigation pane, highlight the Payroll/Human Resources > Government > ACA Transmissions folder.
-
Right-click the ACA Transmissions folder and select Create from the shortcut menu.
-
Select the Options tab.
- The Tax Year field defaults to the most recent tax year. If you are creating a correction transmission for a different tax year, enter the year.
- In the Employer field, select the export employer record for the ACA employer.
- In the Submitter field, select the export submitter record for the ACA submitter.
- If you are creating the correction transmission for a prior tax filing year, mark the Prior Year Return checkbox.
- If you are correcting the employer's authoritative transmittal, mark the Authoritative Transmittal checkbox and enter the number of 1095-Cs previously filed in the Forms Previously Filed field.
- In the Transmission Type field, select "Correction Records".
- Mark the Correct 1094-C (Transmittal Record) checkbox.
- In the Output Path field, browse to the folder where you want to save the correction transmission file.
- If you want to specify the file names for the transmission manifest and for the form data, mark the Specify Filenames checkbox. Otherwise, ActivityHD will use the default names it generates.
- If you mark the Specify Filenames checkbox, the Manifest Filename and Form Data Filename fields are enabled. Enter the names to assign to the manifest file and the form data file.
-
Click Next >>. ActivityHD validates the employer information for the 1094-C is valid.
-
Click Next >>. ActivityHD creates the transmission files and reports its results.
-
Click Next >>.
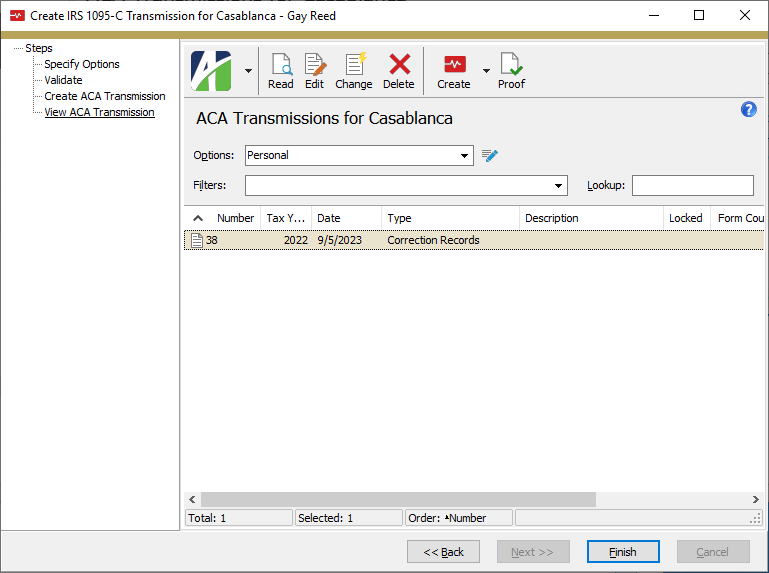
At this point you can drill down on the ACA transmission entry to see its underlying ACA transmission record.
- Click Finish.
- Submit the file to the IRS.
Correct information return records (1095-Cs)
- In the Navigation pane, highlight the Payroll/Human Resources > Government > ACA Transmissions folder.
-
Right-click the ACA Transmissions folder and select Create from the shortcut menu.
-
Select the Options tab.
- The Tax Year field defaults to the most recent tax year. If you are creating a correction transmission for a different tax year, enter the year.
- In the Employer field, select the export employer record for the ACA employer.
- In the Submitter field, select the export submitter record for the ACA submitter.
- If you are creating the correction transmission for a prior tax filing year, mark the Prior Year Return checkbox.
- In the Transmission Type field, select "Correction Records".
- Mark the Correct 1095-C (Recipient Records) checkbox.
- In the Output Path field, browse to the folder where you want to save the correction transmission files.
- If you want to specify the file names for the transmission manifest and for the form data, mark the Specify Filenames checkbox. Otherwise, ActivityHD will use the default names it generates.
- If you marked the Specify Filenames checkbox, the Manifest Filename and Form Data Filename fields are enabled. Enter the names to assign to the manifest file and the form data file.
-
Click Next >>. ActivityHD validates which employee records are valid for 1095-C reporting and reports its results.
-
Click Next >>. ActivityHD prompts you to confirm that you want to create the transmission files for the selected employee(s).
-
Click Yes. ActivityHD creates the transmission files and reports its results.
-
Click Next >>.
At this point, you can drill down on the ACA transmission to see the underlying ACA transmission record.
- Click Finish.
- Submit the file to the IRS.
- The IRS returns a status of "Partially Accepted".
A partially accepted transmission implies that at least one submission in the transmission has been accepted (including "Accepted with Errors") and at least one submission failed validation. Since ActivityHD's transmissions contain only one submission, this error is not possible.
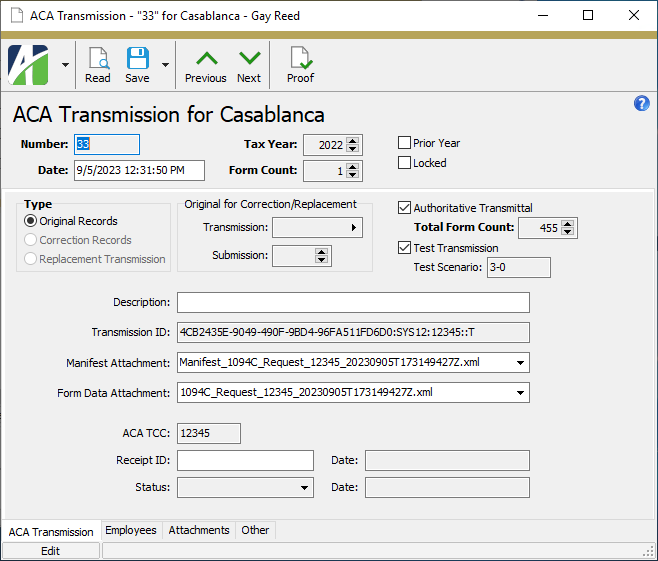
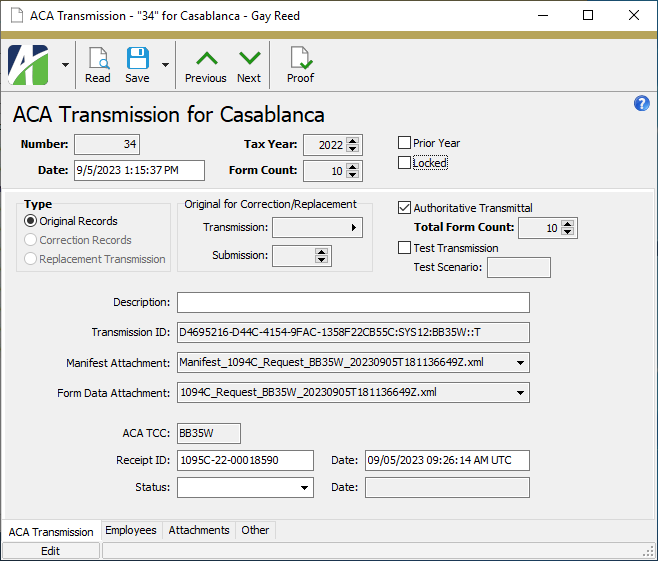
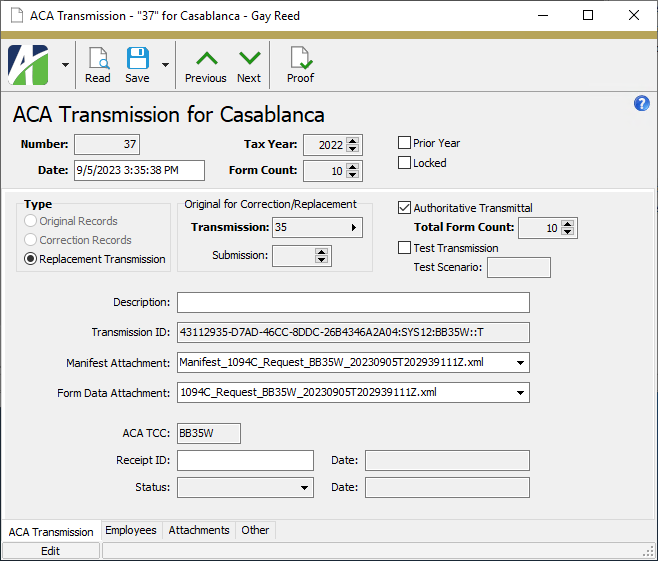
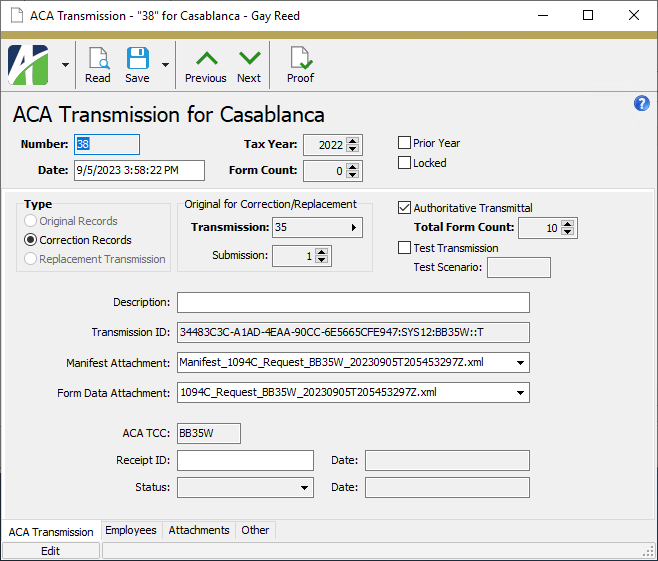
ACA Transmission Record ID
ACA Transmission tab
- Original Records
- Correction Records
- Replacement Transmission
Press F3 to look up the value.
If a value is already selected, you can press F4 to open the record in its native editor.
- Processing. Processing is still in progress.
- Accepted. Processing is complete and no errors were found.
- Accepted with Errors. Processing is complete and the errors found are documented in the Error Data File that is attached to the acknowledgment.
- Rejected. The transmission was rejected. Depending on the reason for the rejection, there may or may not be an Error Data File attached to the acknowledgment.
- Not Found. A transmission for the Receipt ID entered was not found.
Employees tab
Custom tab
This tab is visible if custom fields exist for the entity. At a minimum, if there are custom fields a Fields subtab will be present. One or more additional categories of subtabs may also be visible.
Fields subtab
This tab prompts for values for any custom fields set up for entity records of this entity type. Respond to the prompts as appropriate.
References subtab
This tab is visible if other records reference the current record.
From the drop-down list, select the custom field to view references for. Reference custom fields have the following format: PackageName.EntityName.CustomFieldName.
Example
Suppose a custom field exists on PRCodes that references an ARCode. On the ARCode record, on the Custom > References subtab, you can view all the PRCodes which reference that ARCode.
Exchange Folder subtab
This tab is visible only if you set up a custom field with a data type of "Exchange Folder". The label on this tab is the name assigned to the custom field.
This tab shows the contents of the specified exchange folder.
File subtab
This tab is visible only if you set up a custom field with a data type of "File". The label on the tab is the name assigned to the custom field.
This tab renders the contents of the specified file according to its file type.
Internet Address subtab
This tab is visible only if you set up a custom field with a data type of "Internet Address". The label on this tab is the name assigned to the custom field.
This tab shows the contents of the specified web page.
Network Folder subtab
This tab is visible only if you set up a custom field with a data type of "Network Folder". The label on this tab is the name assigned to the custom field.
This tab shows the contents of the specified network folder.
Attachments tab
The Attachments tab is visible if any record for a given entity has an attachment. If the Attachments tab is not visible, this implies that no record of the entity type has an attachment on it; however, once an attachment is added to any record of the entity type, the Attachments tab will become available.
Change Logs tab
This tab is visible if the user has "Change Logs" access to the associated data folder resource.
The Change Logs pane shows the Change Logs HD view filtered to show all change logs for the selected entity record.
Double-click a row in the pane to drill down to its record in the Change Log window.
Other tab
Developer tab
This tab is visible only when developer features are enabled.
Automation subtab
This subtab shows field names and values for the current data record. Use the information in the subtab to assist when creating automation objects such as bots and import files. The field names and field values can be copied from the text box and pasted directly into your code or application. To copy content from the text box, highlight the content to copy and press Ctrl+C or right-click your selection and select Copy from the context menu.
Export (XML) subtab
This subtab shows the XML syntax for exporting the selected data record. The syntax can be copied from the text box as an exemplar for creating your own automation objects for bots, import files, ActivWebAPI, etc. To copy content from the text box, highlight the content to copy and press Ctrl+C or right-click your selection and select Copy from the context menu.
Import (XML) subtab
This subtab allows you to select a file for import and shows the XML syntax for importing data records. Use the subtab to explore the XML syntax for importing data records. In particular, you can investigate the syntax which results when using Data.Import and ActivWebAPI data POST and DELETE routes.
Change Log (XML) subtab
This subtab is visible only when the Enable Change Logs option is marked in System Options or Company Options (depending on whether the feature applies at the system or the company level). This is the default setting when developer features are enabled.
This subtab allows you to investigate changes to the current data record. The syntax can be copied for use in bots, dashboards, ActivWebAPI, and other automation. To copy content from the text box, highlight the content to copy and press Ctrl+C or right-click your selection and select Copy from the context menu.
Select Statement (SQL) subtab
This subtab allows you to investigate the SQL select statement used to retrieve the current data record. The syntax can be copied as an exemplar for data sources and other automation. To copy content from the text box, highlight the content to copy and press Ctrl+C or right-click your selection and select Copy from the context menu.
ACA transmissions security
Common accesses available on ACA transmissions
Special accesses available on ACA transmissions
| Access | A user with this access can... |
|---|---|
| Proof | Proof ACA transmission records. |
Report Email dialog
- Windows user default account. Sends email using the user's Windows default email account. For most users, this is the account configured in Outlook or another email client application.
- Server personal. Sends email using the email configuration for the system or company server and the email address on the current user's authorized user record. The authorized user record must have a confirmed email address.
- Server generic. Sends email using the email configuration and "from" address for the system or company server. This option requires "Send generic" access to the Server Email resource.
|
5225 S Loop 289, #207 Lubbock, TX 79424 806.687.8500 | 800.354.7152 |
© 2025 AccountingWare, LLC All rights reserved. |