The third step in setting up your general ledger, after creating calendars and units, is creating segments. An account segment is a portion of your account numbers that represents an aspect of your business that you need to report on. The number of segments you create depends on your reporting needs.
Some commonly used segments include:
| Company | Department | Tenant |
| Division | Project | Airline |
| Main | Cost Center | Salesperson |
| Region | Profit Center | Responsibility Unit |
| Ledger | Account Number | Property |
The structure of an account number consists of up to three types of segments:
- Primary. This type of segment is required for every account. The primary segment is the main identifier for the account number. Members of the primary segment represent your main breakdown of assets, liabilities, capital, revenue, and expenses. Only one segment can be designated as the primary segment.
- Auxiliary. Auxiliary segments are optional and you can have up to ten of them. They allow you to expand your accounts to reflect the diversification of your organization. When appropriate, you can specify address information for an auxiliary segment item. This information can be printed in the headings of user-designed financial reports.
- Ledger. Only one segment can be designated as a ledger segment; however, you can have any number of ledger items. A ledger segment associates a particular type of data to each account in your general ledger. You can require that all accounts in a ledger be in balance. This is particularly useful for your actual ledger. If you have statistics and/or budget ledgers, you should not require them to be in balance.
Create a segment
- In the Navigation pane, highlight the General Ledger > Setup > Segments folder.
- Click
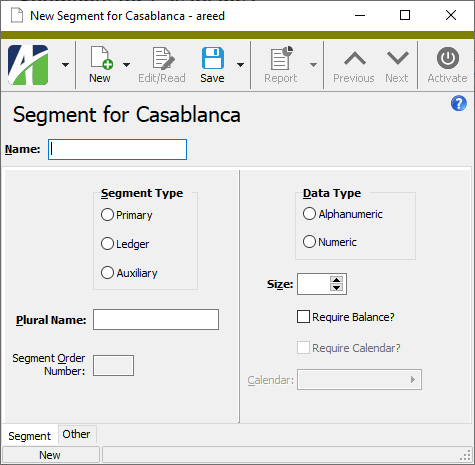
 . The New Segment window opens.
-
Enter a unique Name for the segment.
Note
You can use spaces in segment names but AccountingWare does not recommend it. Using spaces introduces unnecessary complexities when designing financials.
- In the Plural Name field, enter the plural form of the name to display on the folder for this segment and in other places in ActivityHD where the segment name is used.
- In the Segment Type field, select the type of segment to create. The segment type affects how segment items are defined, how segments behave, and chart of accounts generation. Your options are:
- Primary. The main account segment. Members of this segment represent your main breakdown of assets, liabilities, capital, revenue, and expenses. You must have exactly one primary segment.
- Ledger. The ledger segment associates a data type with each account in the general ledger. You can require all accounts in a particular ledger to be in balance, or forgo that requirement for statistics and budget ledgers. Units can be specified on ledger segment items. You must have exactly one ledger segment.
- Auxiliary. Auxiliary segments let you expand accounts to reflect the diversification of your organization. When appropriate, you can specify address information for auxiliary segments that can be printed in the headings of user-designed reports.
Note
The segment type cannot be changed once the segment is saved.
- In the Data Type field, select the type of data that is valid for the segment item codes for this segment. Your options are:
Alphanumeric. Segment item codes can contain numbers, letters, or miscellaneous characters.
Note
You cannot use wildcard characters such as asterisk (*), underscore (_), percent (%), or question mark (?) in a segment item code.
- Numeric. Segment item codes can only contain numbers.
Note
You can change the data type from numeric to alphanumeric at any time with no restrictions. You can only change the data type from alphanumeric to numeric if all segment item codes are already numeric.
- In the Size field, enter the length of the segment. Segments can be up to 12 characters long.
-
If you want to require that debits and credits for the segment always be in balance on either a period or daily basis, mark the Require Balance? checkbox. Typically, only self-balancing entities (like companies, funds, and independent divisions) should require balancing. The checkbox is marked by default for ledger segments.
Note
This flag can be overridden. This makes it possible to create statistical ledgers that do not require balancing even for self-balancing entities.
- If the Require Balance? checkbox is marked, the Require Calendar? checkbox is enabled. Mark this checkbox to require a calendar for the segment. If no segment for the chart of accounts requires a calendar, the default calendar is used.
- If you marked the Require Calendar? checkbox, the Calendar field is enabled. Select the calendar to use for the segment.
- The Create Indexes checkbox is marked by default. When marked, indexes are automatically created on database columns for segments either at the account level or the journal detail level. Using this option has the potential to dramatically improve performance for queries which limit by those values. If you do not want indexes created automatically or have not experienced performance issues, clear the checkbox.
- Save the new segment.
Activated segments appear as segments in your account numbers.
A few things to keep in mind:
- Both the primary and ledger segments must be activated before accounts can be created.
- Active segments cannot be deleted. If you need to delete a segment, first deactivate it, then delete it.
- You should create segment items in a segment before activating the segment.
To activate a segment:
Activate a segment
- In the Navigation pane, highlight the General Ledger > Setup > Segments folder.
- In the HD view, highlight the inactive segment to activate.
- Click
 . ActivityHD prompts you for the default segment item to add on all existing accounts.
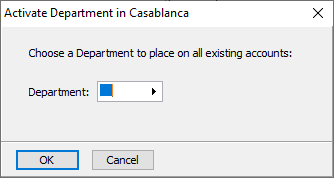
- Select the segment item to use, then click OK. ActivityHD activates the segment.
Deactivating a segment is an alternative to deleting it. Deactivation removes the segment from account numbers but does not remove the segment from the system. You must deactivate a segment to delete it, but deletion is not necessary.
A few things to keep in mind:
- Primary and ledger segments cannot be deactivated while there are accounts. To deactivate them you must first delete the accounts.
- A segment cannot be deactivated if it causes accounts not to be unique.
- A segment cannot be deactivated if it is currently rolled up. First, delete the rollup.
- A segment cannot be deactivated if it is referenced in an account rule.
To deactivate a segment:
Deactivate a segment
- In the Navigation pane, highlight the General Ledger > Setup > Segments folder.
- In the HD view, highlight the active segment to deactivate.
- Click
 . ActivityHD reminds you that the segment will be removed from all accounts and prompts you to confirm the action.
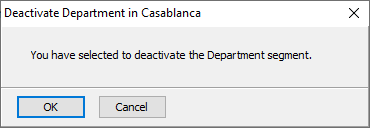
- Click OK. ActivityHD deactivates the segment.
Resizing segments is part of the tremendous flexibility in chart of accounts maintenance. Instead of deleting the segment that needs to be resized and creating a new one, you can simply increase or decrease the size of the segment.
A few rules apply to resizing segments:
- A segment cannot be resized if the segment is rolled up by an active rollup.
- The maximum size of a segment is 12 characters. If you increase the segment size, padding must be added to the mask and to the starts or ends of any rollups that directly roll up the segment. Use the same pad character that is used to pad the segment item codes and pad the same side.
- Decreasing segment size is not allowed if it results in any duplicates.
- When segment size is decreased, the masks and starts or ends of any rollups that directly roll up the segment must be trimmed. Trim from the same side as the trimming is done from the segment item codes.
To resize segments:
Resize a segment
- In the Navigation pane, highlight the General Ledger > Setup > Segments folder.
- In the HD view, highlight the segment to resize.
- Click
 . The Resize Segments pop-up window opens.
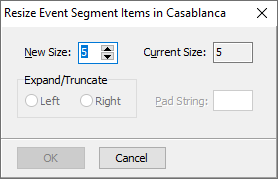
- In the New Size field, enter the new length for the segment.
- If you are increasing the size of the segment, the next field is labeled "Expand On". If you are decreasing the size, the field is labeled "Truncate On". Select the side of the field to expand or truncate. Your options are:
- Right
- Left
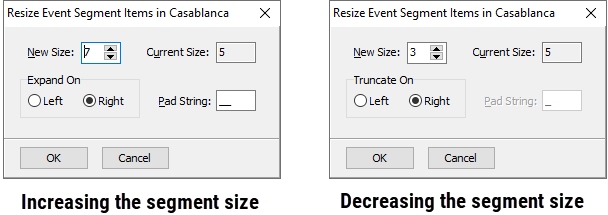
- If you are increasing the segment size, the Pad String field is enabled. Enter the number(s), alphabetic character(s), or space(s) to use in the pad string. Enter one character per new position in the segment. If you leave this field blank, 0 will be used.
- Click OK to resize the segment.
Reorder a segment
Reordering segments changes the appearance of the chart of accounts by changing the positions of the segments in account numbers.
- In the Navigation pane, highlight the General Ledger > Setup > Segments folder.
- Click
 . The Reorder Segments pop-up window opens.
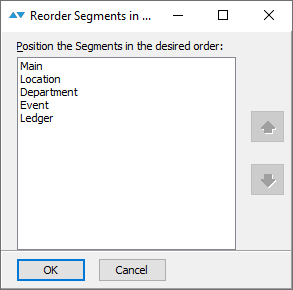
Segments appear in account numbers in the same order as they appear here.
- In the list box, highlight a segment you want to move.
- Use
 and
and  to move the segment to the desired position.
 - Repeat steps 3-4 for other segments as needed until you achieve the desired order.
- When you finish, click OK.
![]() Remove a segment from an account number
Remove a segment from an account number
Remove a segment from an account number
To remove a segment from an account, you must first deactivate the segment. However, you cannot deactivate a segment if doing so results in duplicate account numbers.
To ensure no duplicate account numbers will result:
- Identify the segment item to combine existing accounts into.
- Create a filter on the Chart of Accounts folder to select all accounts where the segment item is not equal to the segment item you will be combining into.
- Apply the filter.
- Press Ctrl+A to select all accounts returned by the filter.
- Right-click and select Change from the shortcut menu. The Change Accounts wizard starts.
- On the Changes tab, ensure the Account branch is expanded and select the account segment which contains the segment item to change.
- In the segment item field, select the item you will combine the other segment items into.
- Click Next >>. You are prompted to confirm your action.
- Click Yes. You can ignore the errors for accounts that already had the selected segment item.
- When the process completes, click Finish.
- Select the segment folder for the segment you want to remove.
- Highlight every segment item in the folder, except the one you want to combine the others into.
- Right-click and select Combine. The Combine Segment Items wizard starts.
- In the Combine Into field, select the segment item to combine the others into.
- Click Next >>. ActivityHD prompts you to confirm that you want to combine the segment items.
- Click Yes.
- When the process completes, click Finish.
- At this point, you can deactivate the segment since all accounts have the same segment item in the segment.
- Once the segment is deactivated, you can delete it.
Note
There may be other conflicts which also need to be resolved before you remove a segment. For example, you cannot deactivate a segment which is currently rolled up or a segment which is referenced by an account rule.
Note
You cannot delete a segment if it has any segment items, any references, or if it is currently activated.
Tip
Rather than deleting a segment, consider deactivating it.
Delete a segment
- In the Navigation pane, highlight the General Ledger > Setup > Segments folder.
- Select the inactive segment you want to delete.
-
In the toolbar, click
 . ActivityHD prompts you to confirm that you want to delete the segment.
-
Click Delete.
If the segment has no segment items and no references, ActivityHD deletes the segment.
If, on the other hand, the segment has segment items, ActivityHD warns you that deleting the segment will result in the segment items being deleted as well. Choose wisely, grasshopper.
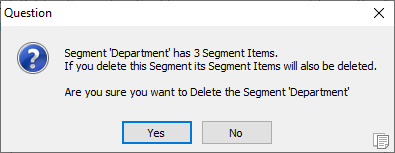
If you want to delete the segment despite the consequences, click Yes.
If you have a segment that you no longer use, but which should not be permanently deleted, you can flag it as obsolete. When you flag a segment as obsolete, its folder is no longer visible in the Navigation pane.
- In the Navigation pane, highlight the General Ledger > Setup > Segments folder.
-
In the HD view, right-click the segment to flag as obsolete and select Obsolete from the shortcut menu. You are prompted to confirm the action.

- Click Yes. The segment is flagged as obsolete and is removed from the HD view (unless the Include Obsolete checkbox is marked).
To restore a segment that has been flagged as obsolete, repeat the steps above.
Segments Listing
Purpose
The Segments Listing provides a list of segments defined in the General Ledger.
Content
For each segment included on the report, the listing shows:
- plural name
- whether the segment is active or not
- segment type
- data type
- size
- whether to require balancing on the segment
- whether to require a calendar on the segment
- segment order number.
In addition, you can include one or more of the following:
- timestamps
- memos
- custom fields.
The following total appears on the report:
- record count.
Print the report
- In the Navigation pane, highlight the General Ledger > Setup > Segments folder.
- Start the report set-up wizard.
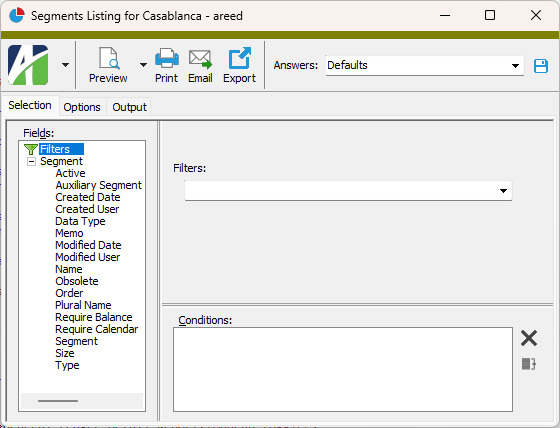
- To report on all or a filtered subset of segments:
- Right-click the Segments folder and select Select and Report > Segments Listing from the shortcut menu.
- On the Selection tab, define any filters to apply to the data.
- To report on specifically selected segments:
- In the HD view, select the segments to include on the report. You can use Ctrl and/or Shift selection to select multiple records.
- Click
 .
.
- To report on a particular segment from the Segment window:
- In the HD view, locate and double-click the segment to report on. The Segment window opens with the segment loaded.
- Click
 .
.
- To report on all or a filtered subset of segments:
- Select the Options tab.
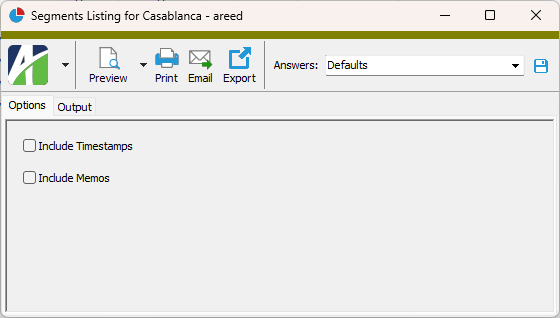
- To include a section at the end of the report with the report settings used to produce the report, leave the Include Report Options checkbox marked. To produce the report without this information, clear the checkbox.
- Mark the checkbox(es) for the additional information to include:
- Timestamps
- Memos
- Custom Fields (only visible if custom fields are set up)
- Select the Output tab.
- In the Design field, look up and select the report design to use.
- In the toolbar, click the icon for the type of output you want:
 - Provides access to two preview options.
- Preview - Click the icon or click the drop-down arrow and select Preview from the drop-down menu to view the report in the Crystal Reports viewer.
- Preview to PDF - Click the drop-down arrow next to the icon and select Preview to PDF to view the report in the PDF reader.
 - Opens the Print dialog so that you can select and configure a printer and then print a paper copy of the report.
 - Opens the Report Email dialog so that you can address and compose an email that the report will be attached to. For best results, ensure your email client is running before you attempt to send a report via email.
 - Opens the Export Report dialog so that you can save the report to a file. File types include Crystal Reports (.rpt), PDF (.pdf), Microsoft Excel (.xls), Microsoft Word (.doc), rich text (.rtf), and XML (.xml).
Data extensions
The following data extension is available for the report:
- Segments
Segment Record ID
A unique name for the segment.
Note
While spaces are allowed in segment names, AccountingWare discourages this practice because it introduces avoidable complexity when designing financials.
Segment tab
- Primary. Use this type for your main account segment. Members of this segment represent your main breakdown of assets, liabilities, capital, revenue, and expenses. You must have exactly one primary segment.
- Ledger. The ledger segment associates a data type with each account in the general ledger. You can require all accounts in a particular ledger to be in balance, or forgo that requirement for statistics and budget ledgers. Units can be specified on ledger segment items. You must have exactly one ledger segment.
- Auxiliary. Auxiliary segments let you expand accounts to reflect the diversification of your organization. When appropriate, you can specify address information for auxiliary segments that can be printed in the headings of user-designed reports. You can define up to ten auxiliary segments.
Note
Once a segment is saved, the segment type cannot be changed.
Alphanumeric. Segment item codes can contain numbers, letters, or miscellaneous characters.
Note
Reserved characters cannot be used in rollup codes. Reserved characters include asterisk (*), underscore (_), percent (%), and question mark (?).
- Numeric. Segment item codes can only contain numbers.
Note
The data type of a segment can be changed from numeric to alphanumeric with impunity. However, you can only change the data type from alphanumeric to numeric if all existing segment item codes are fully numeric.
This checkbox is enabled if the Require Balance? checkbox is marked. Mark this checkbox if you want the segment to require a calendar. Only one segment at a time can require a calendar. This checkbox cannot be edited if another segment already has the Require Calendar? flag marked.
This field is enabled if the Require Calendar? checkbox is marked. Select the calendar to use for this segment.
Press F3 to look up the value.
If a value is already selected, you can press F4 to open the record in its native editor.
Custom tab
This tab is visible if custom fields exist for the entity. At a minimum, if there are custom fields, a Fields subtab will be present. One or more additional categories of subtabs may also be visible.
Fields subtab
This tab prompts for values for any custom fields set up for entity records of this entity type. Respond to the prompts as appropriate.
References subtab
This tab is visible if other records reference the current record.
Example
Suppose a custom field exists on PRCodes that references an ARCode. On the ARCode record, on the Custom > References subtab, you can view all the PRCodes which reference that ARCode.
Exchange Folder subtab
This tab is visible only if you set up a custom field with a data type of "Exchange Folder". The label on this tab is the name assigned to the custom field.
This tab shows the contents of the specified Exchange folder.
File subtab
This tab is visible only if you set up a custom field with a data type of "File". The label on the tab is the name assigned to the custom field.
This tab renders the contents of the specified file according to its file type.
Internet Address subtab
This tab is visible only if you set up a custom field with a data type of "Internet Address". The label on this tab is the name assigned to the custom field.
This tab shows the contents of the specified web page.
Network Folder subtab
This tab is visible only if you set up a custom field with a data type of "Network Folder". The label on this tab is the name assigned to the custom field.
This tab shows the contents of the specified network folder.
[Segment Names] tab
The [Segment Names] pane shows the [Segment Name] Segment Items HD view showing all segment items for the selected segment.
Double-click a row in the pane to drill down to its record in the [Segment Name] Segment Item window.
[Segment Name] Classes tab
The [Segment Name] Classes pane shows the segment's Classes HD view showing all classes for the selected segment.
Double-click a row in the pane to drill down to its record in the [Segment Name] Class window.
Attachments tab
The Attachments tab is visible if any record for a given entity has an attachment. If the Attachments tab is not visible, this implies that no record of the entity type has an attachment on it; however, once an attachment is added to any record of the entity type, the Attachments tab will become available.
Other tab
Segments security
Common accesses available on segments
| Access | A user with this access can... |
|---|---|
| Change | Use the mass change action on segments. |
| Change Logs | |
| Custom Fields | Create and edit custom fields for segments. |
| Data | Have read-only access to segments from anywhere in the software (e.g., field validations, filters, date expressions). |
| Delete | Delete segments. |
| Edit | Edit segment records. |
| Export | Export segment records from ActivityHD. |
| Import | Import segment records into ActivityHD. |
| New | Create new segment records. |
| Read | Have read-only access to segment records. |
| Report | Run reports with segment information. |
| Report Designs | Create and edit report designs with segment information. This access enables the Report Designs button on the Output tab of report dialogs. |
| Shared Answers | Create and edit saved answers related to segments. |
| Shared Filters | Create and edit shared filters on segments. |
| Visible | View the Segments folder in the Navigation pane. |
Special accesses available on segments
| Access | A user with this access can... |
|---|---|
| Activate | Activate the segments needed for accounts. |
| Reorder | Reorder the positions of segments in account numbers. |
| Resize | Resize segments. |
Segments filters
The following built-in filters are available for segments:
| Filter Name | Effect |
|---|---|
| Active Segments | Lists active segments only. |
| Inactive Segments | Lists inactive segments only. |
Report Email dialog
- Windows user default account. Sends email using the user's Windows default email account. For most users, this is the account configured in Outlook or another email client application.
- Server personal. Sends email using the email configuration for the system or company server and the email address on the current user's authorized user record. The authorized user record must have a confirmed email address.
- Server generic. Sends email using the email configuration and "from" address for the system or company server. This option requires "Send generic" access to the Server Email resource.
|
5225 S Loop 289, #207 Lubbock, TX 79424 806.687.8500 | 800.354.7152 |
© 2025 AccountingWare, LLC All rights reserved. |