Account rules specify the valid combinations of segment items that can be used to form the accounts that are automatically added to the chart of accounts in the Create Accounts process. This is the fifth, albeit optional, step in creating the chart of accounts.
If your general ledger is simple, you may not need to define any account rules, you can simply add accounts manually. If, on the other hand, you want all possible combinations of segment items to be valid entries in the chart of accounts, you don't need account rules either. Without account rules, the Create Accounts process will generate all possible combinations of segment items.
Example
Suppose you have five segments with the following number of segment items: 5 Stores, 5 Divisions, 20 Departments, 200 Accounts, 3 Ledgers.
With no account rules, ActivityHD would add 5 x 5 x 20 x 200 x 3 = 300,000 accounts to the chart of accounts.
Too many accounts makes the chart of accounts unwieldy and increases the potential for data entry errors.
If your organization is like most, your account generation needs lie somewhere between these two extremes. In that case, using account rules to narrowly define the accounts you want to generate makes perfect sense.
You can create account rules using references and segment item classes or with masks and ranges. The advantage of using references and segment item classes is that you do not need to update the account rules every time you add new segment items.
Create an account rule with references and segment item classes
Create an account rule with references and segment items
- In the Navigation pane, highlight the General Ledger > Setup > Account Rules folder.
- Click
 . The New Account Rule window opens.
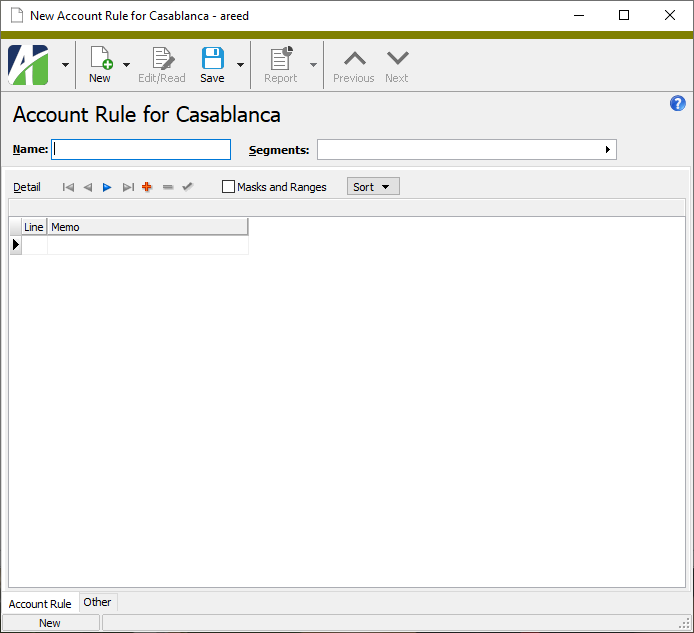
- Enter a unique, descriptive Name for the account rule.
- In the Segments field, click
 and select Expand. The Assigned Segments dialog box opens so you can select the segment(s) affected by the account rule.
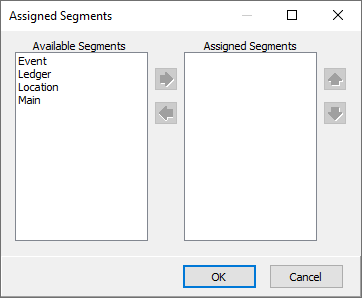
- In the Available Segments list box, highlight the segment(s) to assign to the account rule and then click
 to move your selection(s) to the Assigned Segments list box. You can use Ctrl and/or Shift selection to select multiple segments.
 -
In the Assigned Segments list box, ensure the segments are listed in the order they need to appear in account numbers. To change the position of a segment, highlight it in the list box and use
 and
and  to move it to the desired position. Repeat for other segments until you achieve the desired order.
Tip
If your work on an account rule deals primarily with segment items for a segment that is not the first segment, you can temporarily reorder the segments so that the one you want to sort on appears first in the list. Just remember to revert to the desired segment order before you save your changes.
- When you finish selecting and arranging segments, click OK.
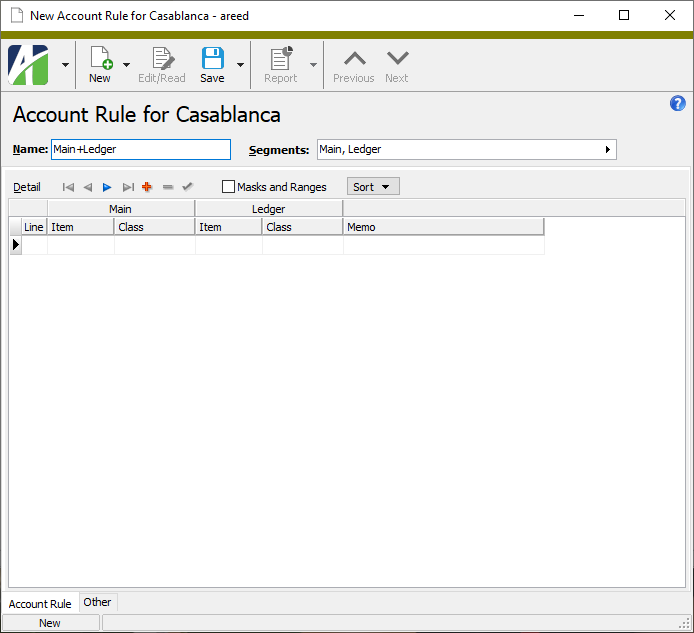
- In the Detail table, use the rows in the table to define the relationships between/among the selected segments. To do so, for each detail line, define the segment item and class from the first segment which legally combine with the item and class from the second segment (and others, if applicable) to form valid account numbers.
- In the Item field for the first segment, select the segment item to include.
- In the Class field, select the segment item class to include for the corresponding segment item.
- In the Item and Class fields for the second segment, select the segment item and class which relate to the first segment to form valid account numbers.
- Continue in this fashion for other segments, if applicable.
- In the Memo field, enter a note about the detail line if desired.
- Add more rows to the account rule definition as needed, specifying valid item and class combinations for each segment in each row.
- When you finish, save the new account rule.
Create an account rule with masks and ranges
Note
If an account rule specifies both a mask and a range, the result of the account rule is the intersection (the set of accounts which satisfy both) of the mask and the range.
Create an account rule with masks and ranges
- In the Navigation pane, highlight the General Ledger > Setup > Account Rules folder.
- Click
 . The New Account Rule window opens.
- Enter a unique, descriptive Name for the account rule.
- In the Segments field, click
 and select Expand. The Assigned Segments dialog box opens so you can select the segment(s) affected by the account rule.
- In the Available Segments list box, highlight the segment(s) to assign to the account rule and then click
 to move your selection(s) to the Assigned Segments list box. You can use Ctrl and/or Shift selection to select multiple segments.
 -
In the Assigned Segments list box, ensure the segments are listed in the order they need to appear in account numbers. To change the position of a segment, highlight it in the list box and use
 and
and  to move it to the desired position. Repeat for other segments until you achieve the desired order.
Tip
If your work on an account rule deals primarily with segment items for a segment that is not the first segment, you can temporarily reorder the segments so that the one you want to sort on appears first in the list. Just remember to revert to the desired segment order before you save your changes.
- When you finish selecting and arranging segments, click OK.
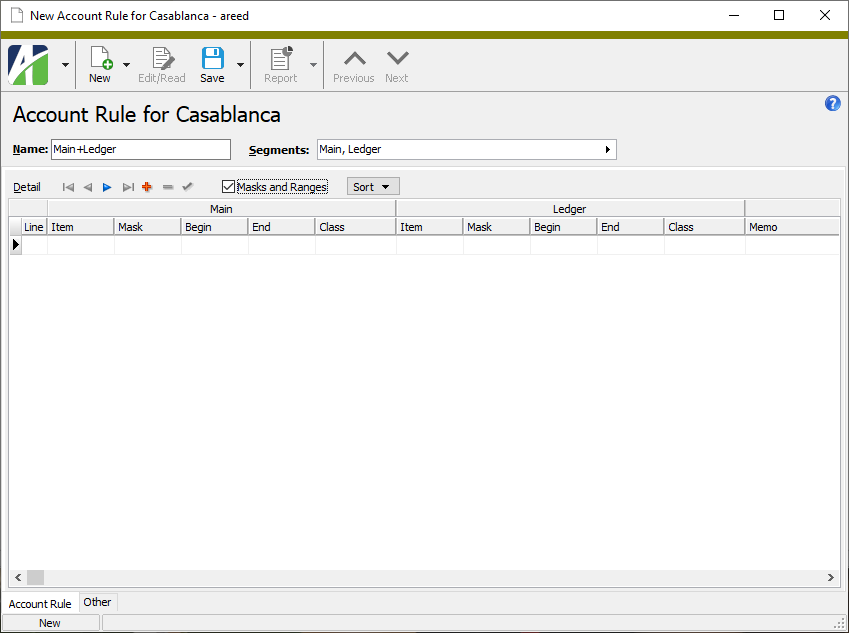
- Mark the Masks and Ranges checkbox.
-
In the Detail table, use the rows in the table to define the relationships between/among the selected segments. To do so, for each detail line, define the mask, segment item range, or segment item and class combination which legally combines with the mask, segment item range, or segment item and class combination from the second segment (and others, if applicable) to form valid account numbers.
Note
For best performance, use the same type of criteria to define each detail line for a segment. In other words, use all masks, all ranges, or all items/classes for the segment. Criteria can vary from segment to segment.
- To specify a mask, type the segment mask in the appropriate Mask column. Use a mask when you want to include segment items which have common characters but are not in a particular order.
- To specify a range of segment item codes, enter codes in the appropriate Begin and End columns. Use a range of segment item codes when you want to include codes that are in a particular order.
- To specify a segment item and class, select the segment item in the Item column and select a segment item class in the Class column.
- In the Memo field, enter a note about the detail line if desired.
- Add more rows to the account rule definition as needed, specifying masks, ranges, or segment items and classes for each segment in each row.
- When you finish, save the new account rule.
The following examples are offered as a starting point to help you understand how account rules can be set up.
Example 1: Relating the ledger segment to the primary segment
Ledger segments generally identify the following types of postings:
- Actual financial information
- Budget information
- Commitments
- Statistics
The A ledger is typically assigned to all main segment items. The B ledger is generally only used for revenue and expense "mains". Commitments may not be tracked at a detail level, and the S ledger is often used on only a few "mains".
The following image shows a ledger account rule with multiple ledgers being used.
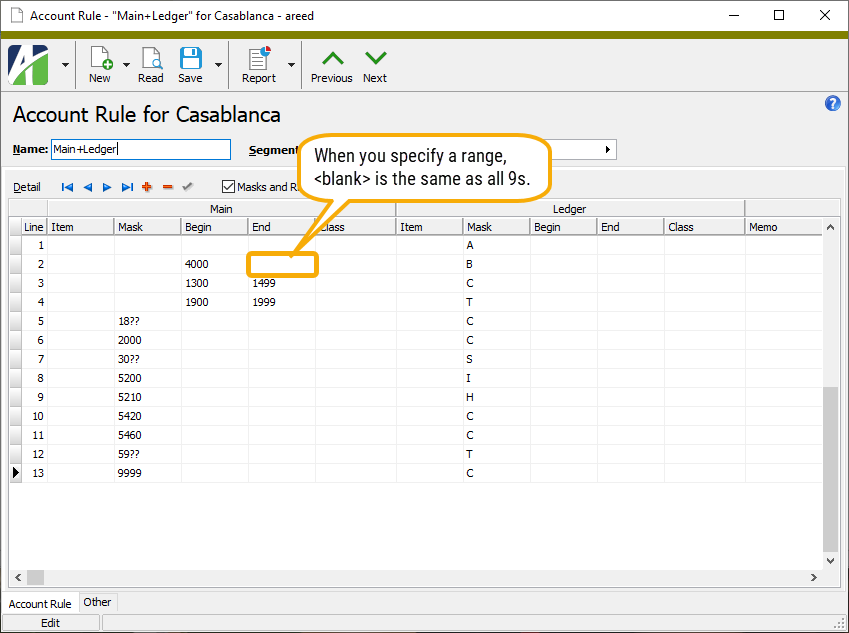
Here's how to interpret this account rule definition:
- Line 1 This line relates all valid mains to the A (Actual) ledger.
- Line 2 The B (Budget) ledger applies to all revenue and expense mains; therefore, the range is 4000 to 9999.
- Line 3 The C (Commitments) ledger relates to mains 1300 through 1499.
- Line 4 The T (Tax) ledger relates to mains 1900 through 1999.
- Line 5 All mains with "18" in the first two digits relate to the C ledger.
- Lines 6, 10, 11, 13 Individual mains 2000, 5420, 5460, and 9999 relate to the C ledger.
- Line 7 This line relates certain capital stock accounts with "30" in the first two digits to the S (Statistical) ledger. Since no beginning or ending mains are specified, this relates the S ledger to mains 3000 to 3099.
- Line 8 Individual main 5200 relates to the I (Item) ledger.
- Line 9 Individual main 5210 relates to the H (Hours) ledger.
- Line 12 All mains with "59" in the first two digits relate to the T ledger.
Example 2: Relating an auxiliary segment to another auxiliary segment
Sometimes you may need an account rule that relates two auxiliary segments. For example, suppose you have several stores and departments. Both are represented as auxiliary segments. Consider the following scenario:
| Stores | Departments |
|---|---|
| 0 Corporate Office | 00 Administrative Department |
| 1 Lubbock Store | 10 Furniture Department |
| 2 Albuquerque Store | 20 Supplies Department |
| 3 Brooklyn Store | 30 Equipment Department |
| 4 Boston Store |
The following conditions exist:
- The Corporate Office only relates to the Administrative Department.
- The Lubbock and Albuquerque stores don't sell furniture.
- The Brooklyn store sells everything.
- The Boston store doesn't sell equipment.
The following image depicts an account rule that will handle these relationships between Store and Dept segments. Note that this account rule is only necessary because there are additional conditions between the two subsidiary segments. If this control doesn't exist, all departments relate to all stores.
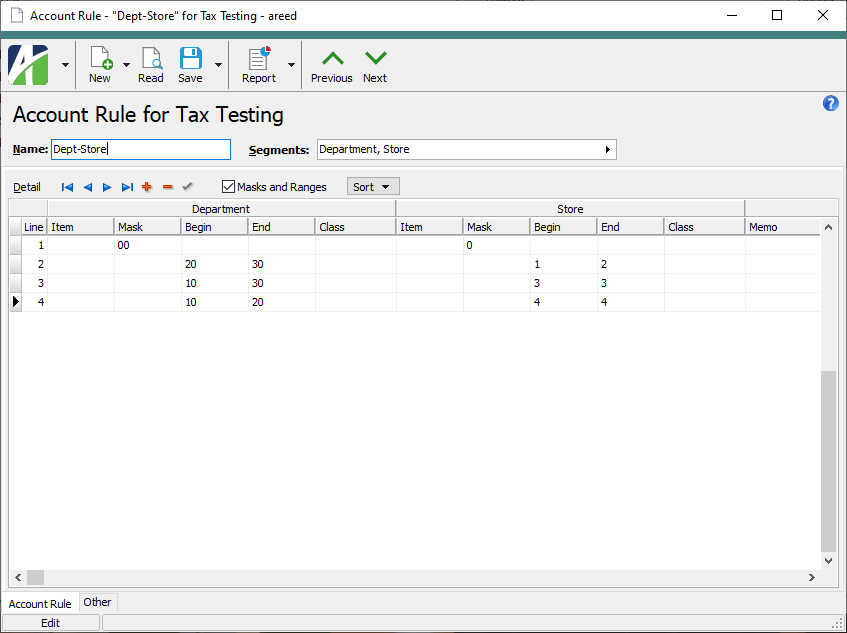
Here's how to interpret this account rule definition:
- Line 1 Corporate does not sell merchandise and only relates to the Administrative Department. We specify this in the Mask field.
- Line 2 Lubbock and Albuquerque don't sell furniture; therefore, they relate to departments 20 and 30 only.
- Line 3 Brooklyn sells everything but doesn't relate to the Administrative Department, it relates to departments 10 through 30. If you wanted to keep this detail line flexible so that when other departments are added they get added for this store automatically, you could leave the End column for this store blank.
- Line 4 Boston doesn't sell furniture, so we exclude department 30. If you create a new department 50, you will need to change the account rule if you want to relate that department to the Boston store.
![]() Flag an account rule as obsolete
Flag an account rule as obsolete
If you want to exclude an account rule from being used in the Create Accounts process, you can flag the rule as obsolete. Flagging an account rule as obsolete retains it in the system but excludes it from being processed. Obsolete rules are hidden from the regular HD view of the Account Rules folder but can be shown by marking the Include Obsolete checkbox.
- In the Navigation pane, highlight the General Ledger > Setup > Account Rules folder.
- In the HD view, right-click the account rule you want to flag as obsolete.
- From the shortcut menu, select Obsolete. ActivityHD prompts you to confirm that you want to change the account rule's status.

- Click Yes.
Note
To clear the obsolete flag, mark the Include Obsolete checkbox in the HD view and repeat the process above.
You can delete account rules with impunity.
To delete an account rule, highlight the account rule record in the HD view and click ![]() , or open the account rule and select
, or open the account rule and select ![]() > Edit > Delete. In either case, ActivityHD prompts you to confirm your action. Click Delete to delete the account rule.
> Edit > Delete. In either case, ActivityHD prompts you to confirm your action. Click Delete to delete the account rule.
Account Rules Listing
Purpose
The Account Rules Listing provides a list of account rules defined in General Ledger.
Content
If the report is run to show detail, for each account rule detail line included on the report, the listing shows:
- segment masks
- beginning of segment code ranges
- ending of segment code ranges.
In addition, you can include one or more of the following:
- assigned segments
- detail memos
- timestamps
- memos
- custom fields.
The following total appears on the report:
- record count.
Print the report
- In the Navigation pane, highlight the General Ledger > Setup > Account Rules folder.
- Start the report set-up wizard.
- To report on all or a filtered subset of account rules:
- Right-click the Account Rules folder and select Select and Report > Account Rules Listing from the shortcut menu.
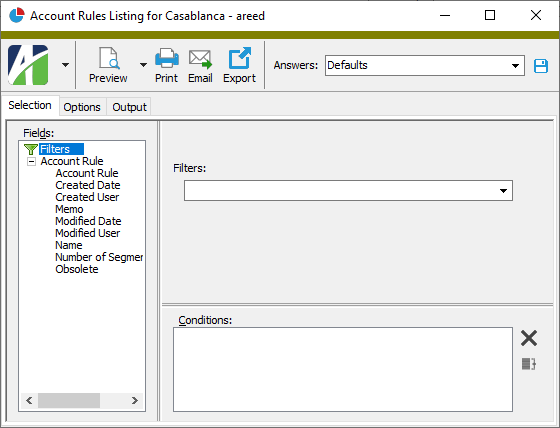
- On the Selection tab, define any filters to apply to the data.
- To report on specifically selected account rules:
- In the HD view, select the account rules to include on the report. You can use Ctrl and/or Shift selection to select multiple records.
- Click
 .
.
- To report on a particular account rule from the Account Rule window:
- In the HD view, locate and double-click the account rule to report on. The Account Rule window opens with the account rule loaded.
- Click
 .
.
- To report on all or a filtered subset of account rules:
- Select the Options tab.
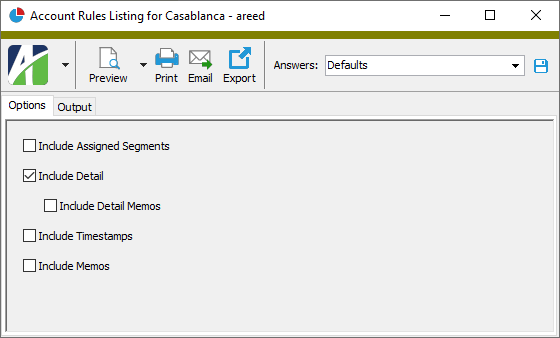
- Mark the checkbox(es) for the additional information to include:
- Assigned Segments
- Detail. If you mark this checkbox, the following checkbox becomes enabled:
- Detail Memos
- Report Options. To include a section at the end of the report with the report settings used to produce the report, leave the checkbox marked. To produce the report without this information, clear the checkbox.
- Timestamps
- Memos
- Custom Fields (only visible if custom fields are set up)
- Select the Output tab.
- In the Design field, look up and select the report design to use.
- In the toolbar, click the icon for the type of output you want:
 - Provides access to two preview options.
- Preview - Click the icon or click the drop-down arrow and select Preview from the drop-down menu to view the report in the Crystal Reports viewer.
- Preview to PDF - Click the drop-down arrow next to the icon and select Preview to PDF to view the report in the PDF reader.
 - Opens the Print dialog so that you can select and configure a printer and then print a paper copy of the report.
 - Opens the Report Email dialog so that you can address and compose an email that the report will be attached to. For best results, ensure your email client is running before you attempt to send a report via email.
 - Opens the Export Report dialog so that you can save the report to a file. File types include Crystal Reports (.rpt), PDF (.pdf), Microsoft Excel (.xls), Microsoft Word (.doc), rich text (.rtf), and XML (.xml).
Data extensions
The following data extensions are available for the report:
- Account rules
- Account rule segments
Account Rule Record ID
Select the segment(s) to include in the account rule.
If you enter segments by typing, enter them in the order you want them applied and separate segments with commas.
To select segments, click ![]() and select Expand to open the Assigned Segments dialog box.
and select Expand to open the Assigned Segments dialog box.

To assign segments to the account rule, highlight them in the Available Segments list box, then click ![]() to move your selection(s) to the Assigned Segments list box.
to move your selection(s) to the Assigned Segments list box.
To set the order in which a segment is applied, highlight it in the Assigned Segments list box and use ![]() and
and ![]() to move it to the desired position. Repeat this action for other segments until you achieve the desired order.
to move it to the desired position. Repeat this action for other segments until you achieve the desired order.
Tip
If your work on an account rule deals primarily with segment items for a segment that is not the first segment, you can temporarily reorder the segments so that the one you want to sort on appears first in the list. Just remember to revert to the desired segment order before you save your changes.
Press F2 to open a dialog box where you can add and remove selections for this field.
Press F3 to look up the item.
Account Rule tab
- Ascending
- Descending
Detail table with references and segment item classes
Provide the following information for each segment on each row of the table.
Select the segment item to include.
Press F3 to look up the value.
If a value is already selected, you can press F4 to open the record in its native editor.
Select the segment item class to include for the selected segment item.
Press F3 to look up the value.
If a value is already selected, you can press F4 to open the record in its native editor.
Provide the following information for each row of the table.
Detail table with masks and ranges
Use the rows in the table to define the relationships between/among the selected segments. For each detail line, define the mask, segment item range, or segment item and class combination which legally combine with the mask, segment item range, or segment item and class combination from the second segment (and other segments, if applicable) to form valid account numbers.
Note
For best performance, use the same type of criteria to define each detail line for a segment. In other words, use all masks, all ranges, or all items/classes for the segment. Criteria can vary from segment to segment.
Provide the following information for each segment on each row of the table.
If you are specifying a segment item and class for the segment, select the segment item to include.
Press F3 to look up the value.
If a value is already selected, you can press F4 to open the record in its native editor.
If you are specifying a mask for the segment, enter the segment mask. Use a mask when you want to include segment items which have common characters but are not in a particular order.
Press F3 to look up the value.
If a value is already selected, you can press F4 to open the record in its native editor.
If you are specifying a range of segment items, enter the first segment item in the range. Use a segment item range when you want to include segment items that are in a particular order.
Press F3 to look up the value.
If a value is already selected, you can press F4 to open the record in its native editor.
If you are specifying a range of segment items, enter the last segment item in the range.
Press F3 to look up the value.
If a value is already selected, you can press F4 to open the record in its native editor.
If you are specifying a segment item and class for the segment, select the segment item class to include for the selected segment.
Press F3 to look up the value.
If a value is already selected, you can press F4 to open the record in its native editor.
Provide the following information for each row of the table.
Custom tab
This tab is visible if custom fields exist for the entity. At a minimum, if there are custom fields, a Fields subtab will be present. One or more additional categories of subtabs may also be visible.
Fields subtab
This tab prompts for values for any custom fields set up for entity records of this entity type. Respond to the prompts as appropriate.
References subtab
This tab is visible if other records reference the current record.
Example
Suppose a custom field exists on PRCodes that references an ARCode. On the ARCode record, on the Custom > References subtab, you can view all the PRCodes which reference that ARCode.
Exchange Folder subtab
This tab is visible only if you set up a custom field with a data type of "Exchange Folder". The label on this tab is the name assigned to the custom field.
This tab shows the contents of the specified Exchange folder.
File subtab
This tab is visible only if you set up a custom field with a data type of "File". The label on the tab is the name assigned to the custom field.
This tab renders the contents of the specified file according to its file type.
Internet Address subtab
This tab is visible only if you set up a custom field with a data type of "Internet Address". The label on this tab is the name assigned to the custom field.
This tab shows the contents of the specified web page.
Network Folder subtab
This tab is visible only if you set up a custom field with a data type of "Network Folder". The label on this tab is the name assigned to the custom field.
This tab shows the contents of the specified network folder.
Attachments tab
The Attachments tab is visible if any record for a given entity has an attachment. If the Attachments tab is not visible, this implies that no record of the entity type has an attachment on it; however, once an attachment is added to any record of the entity type, the Attachments tab will become available.
Other tab

|
Extras\General Ledger\Import Account Rules.xls |
Account rules security
Common accesses available on account rules
| Access | A user with this access can... |
|---|---|
| Change | Use the mass change action on account rules. |
| Change Logs | |
| Custom Fields | Create and edit custom fields for account rules. |
| Data | Have read-only access to account rules from anywhere in the software (e.g., field validations, filters, date expressions). |
| Delete | Delete account rules. |
| Edit | Edit account rule records. |
| Export | Export account rule records from ActivityHD. |
| Import | Import account rule records into ActivityHD. |
| New | Create new account rule records. |
| Read | Have read-only access to account rule records. |
| Report | Run reports with account rule information. |
| Report Designs | Create and edit report designs with account rule information. This access enables the Report Designs button on the Output tab of report dialogs. |
| Shared Answers | Create and edit saved answers related to account rules. |
| Shared Filters | Create and edit shared filters on account rules. |
| Visible | View the Account Rules folder in the Navigation pane. |
Report Email dialog
- Windows user default account. Sends email using the user's Windows default email account. For most users, this is the account configured in Outlook or another email client application.
- Server personal. Sends email using the email configuration for the system or company server and the email address on the current user's authorized user record. The authorized user record must have a confirmed email address.
- Server generic. Sends email using the email configuration and "from" address for the system or company server. This option requires "Send generic" access to the Server Email resource.
|
5225 S Loop 289, #207 Lubbock, TX 79424 806.687.8500 | 800.354.7152 |
© 2025 AccountingWare, LLC All rights reserved. |