Attribute items are the values which are available for a particular attribute. They are useful for categorizing transactions and may make it possible to reduce the number of accounts and the number of segments needed in your account structure.
An attribute is sourced if it borrows its attribute items from another system resource. For attributes which are tied to a source, the attribute items are the attribute items for another attribute, customers, rollup items, segment items, employees, or vendors. You cannot directly add attribute items to a sourced attribute. Instead, if you need to add items, you must add them to the source. The attribute items for a non-sourced attribute are user-defined.
Note
Your Attribute Item window may differ from the window depicted in the images below. Only packages for which you are licensed and which the attribute uses (or that an attribute rolled up by an attribute uses) are represented in your window while the images depict all possible packages.
Create an attribute item
- In the Navigation pane, highlight the General Ledger > Setup > Attributes > [Attribute Name[s]] folder.
-
Click
 . The New Attribute Item window opens.
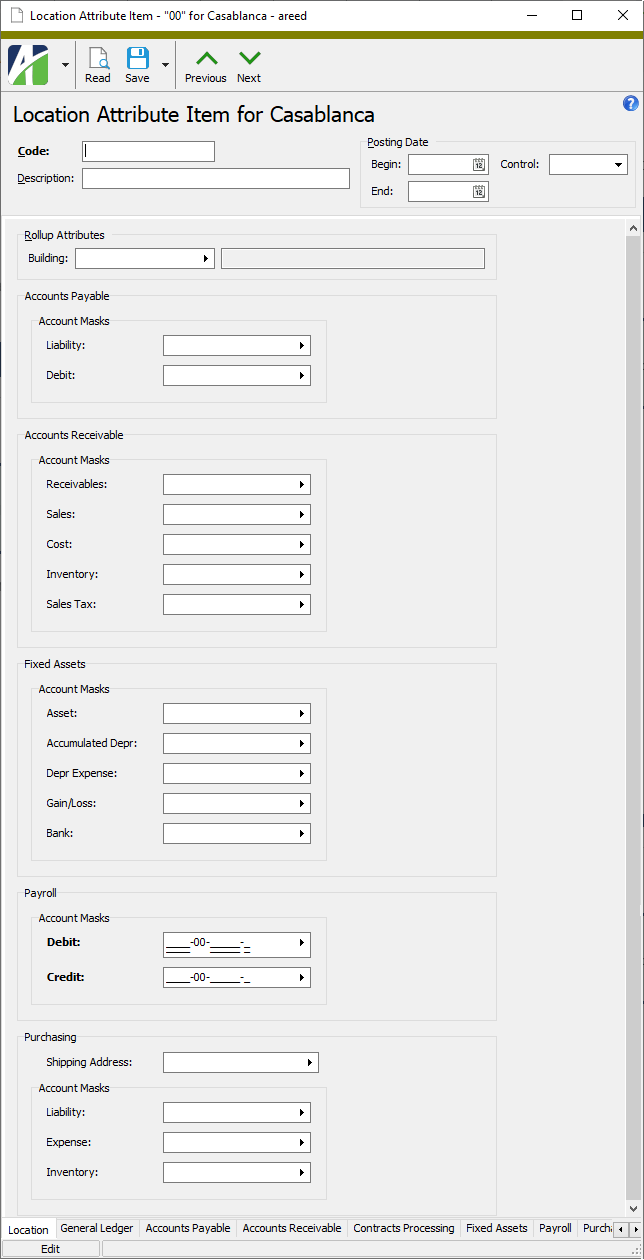
- Enter a unique Code for the attribute item.
- Enter a Description of the attribute item.
- Use the fields in the Posting Date section to specify the posting control for this attribute item. If you do not set posting control parameters here, the posting control is inherited from the item's rollup. If you do not need to specify posting control settings, skip to step 6. Otherwise, to set up the posting control for the attribute item:
- In the Begin field, enter the earliest posting date for the attribute item. Leave this field blank if you do not need to restrict usage by beginning date. If a posting control is specified, either a beginning date, end date, or both must be set.
- In the End field, enter the latest posting date for the attribute item. Leave this field blank if you do not need to restrict usage by end date. If a posting control is specified, either a beginning date, end date, or both must be set.
- From the Control drop-down list, select the severity of the validation. This field is required if you enter a date in either the Begin or End field. Valid options are:
- Error. Displays a message and prevents merging.
- Warning. Displays a message but permits merging.
- If the direct attribute or rollup attribute associated with the current attribute item has a rollup attribute, the Rollup Attributes section is visible. In the field (named for the rollup attribute), select the attribute item from the rollup attribute to assign to the current attribute item.
- Continue by defining the attribute for each package it will be used with. To see instructions for each package, expand the corresponding link:
- In the Account Masks section of the Accounts Payable area, for each account type enter the part of the invoice detail account to default from the attribute item. If the field label is bold, an account mask is required. The types of account masks include:
- Liability
- Debit
- In the Account Masks section of the Accounts Receivable area, for each account type enter the part of the account to default from the attribute item. If the field label is bold, an account mask is required. The types of account masks include:
- Receivables
- Sales
- Cost
- Inventory
- Sales Tax
- In the Account Masks section of the Fixed Assets area, for each account type enter the part of the account to default from the attribute item. If the field label is bold, an account mask is required. The types of account masks include:
- Asset
- Accumulated Depr
- Depr Expense
- Gain/Loss
- Bank
- In the Account Masks section of the Payroll area, for each account type enter the part of the account to default from the attribute item. If the field label is bold, an account mask is required. The types of account masks include:
- Debit
- Credit
- In the Shipping Address field in the Purchasing area, enter the default shipping address for orders with the attribute item.
- In the Account Masks section, for each account type enter the part of the account to default from the attribute item. If the field label is bold, an account mask is required. The types of account masks include:
- Liability
- Expense
- Inventory
- When you finish, save the new attribute item.
![]() Combine unsourced attribute items
Combine unsourced attribute items
Only unsourced attribute items can be combined.
To combine unsourced attribute items:
Combine unsourced attribute items
- In the Navigation pane, expand the General Ledger > Setup > Attributes folder, then highlight the appropriate attribute.
- Start the Combine wizard using one of the following methods:
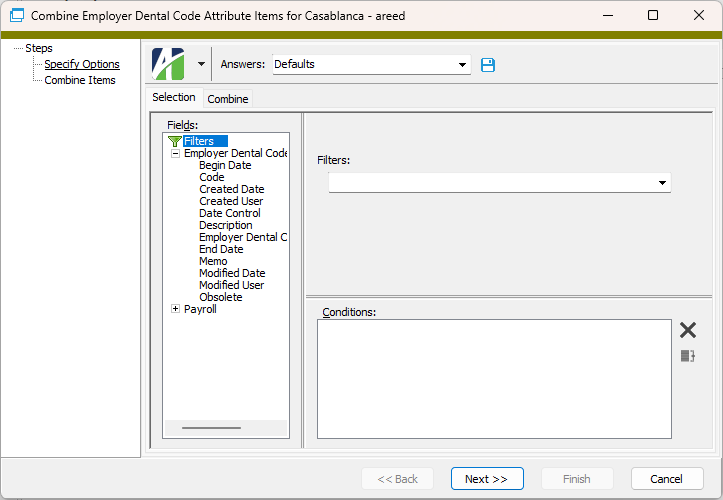
- To use filters to select the attribute item(s) to combine:
- Right-click the attribute folder for the attribute items to combine and select Select and Combine from the shortcut menu.
- On the Selection tab, define any filters to apply to the data.
- To hand-select the attribute item(s) to combine:
- In the HD view, select the attribute item(s) to combine. You can use Ctrl and/or Shift to select multiple attribute items.
- Click
 .
.
- To use filters to select the attribute item(s) to combine:
- On the Combine tab, select the combine action to apply.
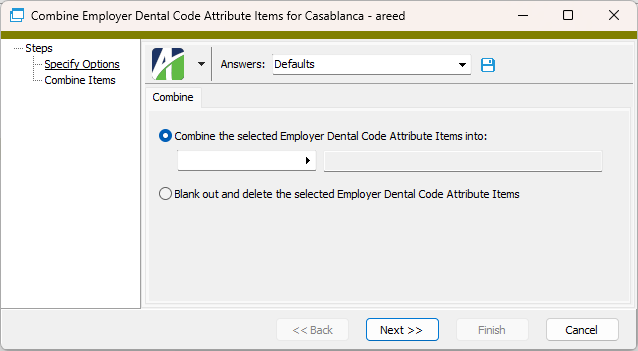
Your options are:
- Combine the selected [Attribute Name] Attribute Items into. If you select this option, use the accompanying field to select the target attribute item. The selected attribute item(s) will be combined into this attribute item. All references to the selected attribute item(s) will be changed to reference the target attribute item and the attribute item(s) that are selected to be combined will be deleted.
- Blank out and delete the selected [Attribute Name] Attribute Items. If you select this option, you are essentially combining the selected item(s) into a blank item. All references to the selected item(s) will be blanked out and the attribute item(s) that are selected to be "combined" will be deleted.
- Click Next >>. ActivityHD prompts you to click OK to start the combine process.
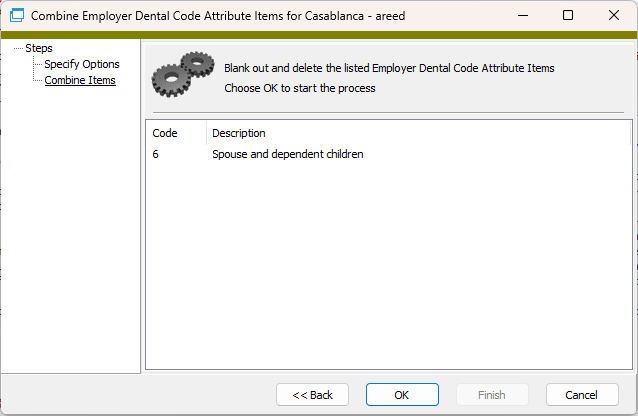
- To combine attribute items, click OK. ActivityHD reports the results.
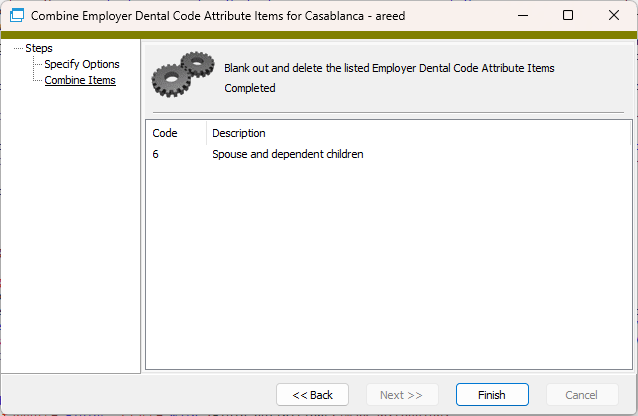
- Click Finish.
An attribute item cannot be deleted if it has any references.
To delete an attribute item that is not in use, highlight the attribute item in the HD view and click ![]() , or open the attribute item record and select
, or open the attribute item record and select ![]() > Edit > Delete. In either case, ActivityHD prompts you to confirm your action. Click Delete to delete the attribute item.
> Edit > Delete. In either case, ActivityHD prompts you to confirm your action. Click Delete to delete the attribute item.
[Attribute Name] Attribute Item Record ID
- <blank>. No posting control is applied at this level. This option is valid only when posting control settings are not specified.
- Error. Displays a message and prevents merging.
- Warning. Displays a message but permits merging.
[Attribute Name] tab
Press F3 to look up the value.
If a value is already selected, you can press F4 to open the record in its native editor.
The package-specific sections listed below are only visible if the associated attribute (or an attribute that rolls up the attribute) is set up for use on items in the package.
Press F3 to look up the value.
If a value is already selected, you can press F4 to open the record in its native editor.
Press F3 to look up the value.
If a value is already selected, you can press F4 to open the record in its native editor.
Press F3 to look up the value.
If a value is already selected, you can press F4 to open the record in its native editor.
Press F3 to look up the value.
If a value is already selected, you can press F4 to open the record in its native editor.
Press F3 to look up the value.
If a value is already selected, you can press F4 to open the record in its native editor.
Press F3 to look up the value.
If a value is already selected, you can press F4 to open the record in its native editor.
Press F3 to look up the value.
If a value is already selected, you can press F4 to open the record in its native editor.
Press F3 to look up the value.
If a value is already selected, you can press F4 to open the record in its native editor.
Press F3 to look up the value.
If a value is already selected, you can press F4 to open the record in its native editor.
Press F3 to look up the value.
If a value is already selected, you can press F4 to open the record in its native editor.
Press F3 to look up the value.
If a value is already selected, you can press F4 to open the record in its native editor.
Press F3 to look up the value.
If a value is already selected, you can press F4 to open the record in its native editor.
Press F3 to look up the value.
If a value is already selected, you can press F4 to open the record in its native editor.
Press F3 to look up the value.
If a value is already selected, you can press F4 to open the record in its native editor.
Press F3 to look up the value.
If a value is already selected, you can press F4 to open the record in its native editor.
Press F3 to look up the value.
If a value is already selected, you can press F4 to open the record in its native editor.
Press F3 to look up the value.
If a value is already selected, you can press F4 to open the record in its native editor.
Press F3 to look up the value.
If a value is already selected, you can press F4 to open the record in its native editor.
Custom tab
This tab is visible if custom fields exist for the entity. At a minimum, if there are custom fields, a Fields subtab will be present. One or more additional categories of subtabs may also be visible.
Fields subtab
This tab prompts for values for any custom fields set up for entity records of this entity type. Respond to the prompts as appropriate.
References subtab
This tab is visible if other records reference the current record.
Example
Suppose a custom field exists on PRCodes that references an ARCode. On the ARCode record, on the Custom > References subtab, you can view all the PRCodes which reference that ARCode.
Exchange Folder subtab
This tab is visible only if you set up a custom field with a data type of "Exchange Folder". The label on this tab is the name assigned to the custom field.
This tab shows the contents of the specified Exchange folder.
File subtab
This tab is visible only if you set up a custom field with a data type of "File". The label on the tab is the name assigned to the custom field.
This tab renders the contents of the specified file according to its file type.
Internet Address subtab
This tab is visible only if you set up a custom field with a data type of "Internet Address". The label on this tab is the name assigned to the custom field.
This tab shows the contents of the specified web page.
Network Folder subtab
This tab is visible only if you set up a custom field with a data type of "Network Folder". The label on this tab is the name assigned to the custom field.
This tab shows the contents of the specified network folder.
The package-specific tabs listed below are only visible if the associated attribute is set up for use on items in the package.
General Ledger tab
Journal Detail subtab
The Journal Detail pane shows the journal detail records the attribute item is applied on.
Double-click a row in the pane to drill down to its record in the Journal Detail window.
Subsidiary Detail subtab
The Subsidiary Detail pane shows the subsidiary detail records the attribute item is applied on.
Double-click a row in the pane to drill down to its record in the Journal Detail window.
Allocation Entries subtab
The Allocation Entries pane shows the allocation entry records the attribute item is applied on.
Double-click a row in the pane to drill down to its record in the Allocation Entry window.
Recurring Entries subtab
The Recurring Entries pane shows the recurring entry records the attribute item is applied on.
Double-click a row in the pane to drill down to its record in the Recurring Entry window.
Financial Views subtab
The Financial View Items pane shows the financial view items the attribute is applied on. (This subtab will have one sub-subtab for each affected financial view.)
Double-click a row in the pane to drill down to the financial view item.
Bank Reconciliation tab
Adjustments subtab
The Bank Statement Adjustments pane shows the bank statement adjustment records the attribute item is applied on.
Double-click a row in the pane to drill down to its record on the Adjustments tab of the Bank Statement window.
Accounts Payable tab
Vendors subtab
The Vendors pane shows the vendor records the attribute item is applied on.
Double-click a row in the pane to drill down to its record in the Vendor window.
Invoices subtab
The AP Invoices pane shows the invoice records the attribute item is applied on.
Double-click a row in the pane to drill down to its record in the AP Invoice window.
Invoice GL Detail subtab
The AP Invoice GL Detail pane shows the invoice GL detail records the attribute item is applied on.
Double-click a row in the pane to drill down to its record in the AP Invoice GL Detail window.
Invoice Extra GL subtab
The AP Invoice Extra GL pane shows the invoice extra GL records the attribute item is applied on.
Double-click a row in the pane to drill down to its record in the AP Invoice Extra GL window.
Recurring subtab
The Recurring pane shows the recurring invoice records the attribute item is applied on.
Double-click a row in the pane to drill down to its record in the AP Recurring Invoice window.
Notes subtab
The Notes pane shows the note records the attribute item is referenced on.
Double-click a row in the pane to drill down to its record in the Note window.
Accounts Receivable tab
Customers subtab
The AR Customers pane shows the customer records the attribute item is applied on.
Double-click a row in the pane to drill down to its record in the AR Customer window.
Invoices subtab
The AR Invoices pane shows the invoice records the attribute item is applied on.
Double-click a row in the pane to drill down to its record in the AR Invoice window.
Invoice Detail subtab
The AR Invoice Detail pane shows the invoice detail records the attribute item is applied on.
Double-click a row in the pane to drill down to its record in the AR Invoice Detail window.
Invoice Extra GL subtab
The AR Invoice Extra GL pane shows the invoice extra GL records the attribute item is applied on.
Double-click a row in the pane to drill down to its record on the Extra GL tab of the AR Invoice window.
Recurring subtab
The AR Recurring Invoices pane shows the recurring invoice records the attribute item is applied on.
Double-click a row in the pane to drill down to its record in the AR Recurring Invoice window.
Recurring Detail subtab
The AR Recurring Detail pane shows the recurring invoice detail records the attribute item is applied on.
Double-click a row in the pane to drill down to its record in the AR Recurring Detail window.
Summary Invoices subtab
The Summary Invoices pane shows the summary invoice records the attribute item is applied on.
Double-click a row in the pane to drill down to its record in the Summary Invoice window.
Finance Methods subtab
The Finance Methods pane shows the finance method records the attribute item is applied on.
Double-click a row in the pane to drill down to its record in the Finance Method window.
Notes subtab
The Notes pane shows the note records the attribute item is referenced on.
Double-click a row in the pane to drill down to its record in the Note window.
Contracts Processing tab
Contracts subtab
The Contracts pane shows the contract records the attribute item is applied on.
Double-click a row in the pane to drill down to its record in the Contract window.
Settlements subtab
The Settlements pane shows the settlement records the attribute item is applied on.
Double-click a row in the pane to drill down to its record in the Settlement window.
Work Orders subtab
The Work Orders pane shows the work order records the attribute item is applied on.
Double-click a row in the pane to drill down to its record in the Work Order window.
Fixed Assets tab
Assets subtab
The Assets pane shows the asset records the attribute item is applied on.
Double-click a row in the pane to drill down to its record in the Asset window.
GL Detail subtab
The Asset GL Detail pane shows the asset GL detail records the attribute item is applied on.
Double-click a row in the pane to drill down to its record in the Asset GL Detail window.
Notes subtab
The Notes pane shows the note records the attribute item is referenced on.
Double-click a row in the pane to drill down to its record in the Note window.
Payroll tab
Distributions subtab
The Check Distributions pane shows the distribution records the attribute item is applied on.
Double-click a row in the pane to drill down to its record in the Check Distribution window.
Time Sheet Lines subtab
The Time Sheet Lines pane shows the time sheet line records the attribute item is applied on.
Double-click a row in the pane to drill down to its record in the Time Sheet Line window.
Employees subtab
The Employees pane shows the employee records the attribute item is applied on.
Double-click a row in the pane to drill down to its record in the Employee window.
Notes subtab
The Notes pane shows the note records the attribute item is referenced on.
Double-click a row in the pane to drill down to its record in the Note window.
Purchasing tab
Purchases subtab
The Purchases pane shows the purchase records the attribute item is applied on.
Double-click a row in the pane to drill down to its record in the Purchase window.
Orders subtab
The Purchase Orders pane shows the purchase order records the attribute item is applied on.
Double-click a row in the pane to drill down to its record in the Purchase Order window.
Attachments tab
The Attachments tab is visible if any record for a given entity has an attachment. If the Attachments tab is not visible, this implies that no record of the entity type has an attachment on it; however, once an attachment is added to any record of the entity type, the Attachments tab will become available.
Change Logs tab
This tab is visible if the user has "Change Logs" access to the associated data folder resource.
The Change Logs pane shows the Change Logs HD view filtered to show all change logs for the selected entity record.
Double-click a row in the pane to drill down to its record in the Change Log window.
Other tab
Developer tab
This tab is visible only when developer features are enabled.
Automation subtab
This subtab shows field names and values for the current data record. Use the information in the subtab to assist when creating automation objects such as bots and import files. The field names and field values can be copied from the text box and pasted directly into your code or application. To copy content from the text box, highlight the content to copy and press Ctrl+C or right-click your selection and select Copy from the context menu.
Export (XML) subtab
This subtab shows the XML syntax for exporting the selected data record. The syntax can be copied from the text box as an exemplar for creating your own automation objects for bots, import files, ActivWebAPI, etc. To copy content from the text box, highlight the content to copy and press Ctrl+C or right-click your selection and select Copy from the context menu.
Import (XML) subtab
This subtab allows you to select a file for import and shows the XML syntax for importing data records. Use the subtab to explore the XML syntax for importing data records. In particular, you can investigate the syntax which results when using Data.Import and ActivWebAPI data POST and DELETE routes.
Change Log (XML) subtab
This subtab is visible only when the Enable Change Logs option is marked in System Options or Company Options (depending on whether the feature applies at the system or the company level). This is the default setting when developer features are enabled.
This subtab allows you to investigate changes to the current data record. The syntax can be copied for use in bots, dashboards, ActivWebAPI, and other automation. To copy content from the text box, highlight the content to copy and press Ctrl+C or right-click your selection and select Copy from the context menu.
Select Statement (SQL) subtab
This subtab allows you to investigate the SQL select statement used to retrieve the current data record. The syntax can be copied as an exemplar for data sources and other automation. To copy content from the text box, highlight the content to copy and press Ctrl+C or right-click your selection and select Copy from the context menu.

|
Extras\General Ledger\Import Attribute Items.xls; Combine Attribute Items.xlsm |
Attribute items security
Common accesses available on attribute items
| Access | A user with this access can... |
|---|---|
| Change | Use the mass change action on attribute items. |
| Custom Fields | Create and edit custom fields for attribute items. |
| Data | Have read-only access to attribute items from anywhere in the software (e.g., field validations, filters, date expressions). |
| Delete | Delete attribute items. |
| Edit | Edit attribute item records. |
| Export | Export attribute item records from ActivityHD. |
| Import | Import attribute item records into ActivityHD. |
| New | Create new attribute item records. |
| Read | Have read-only access to attribute item records. |
| Report | Run reports with attribute item information. |
| Report Designs | Create and edit report designs with attribute item information. This access enables the Report Designs button on the Output tab of report dialogs. |
| Shared Answers | Create and edit saved answers related to attribute items. |
| Shared Filters | Create and edit shared filters on attribute items. |
| Visible | View the Attribute Items folder in the Navigation pane. |
Special accesses available on attribute items
| Access | A user with this access can... |
|---|---|
| Combine | Combine attributes. |
|
5225 S Loop 289, #207 Lubbock, TX 79424 806.687.8500 | 800.354.7152 |
© 2025 AccountingWare, LLC All rights reserved. |