Maintain invoice options
You can set defaults to improve efficiency when entering invoices.
Maintain AP invoice options
- In the Navigation pane, highlight the Accounts Payable > Invoices folder.
- In the HD view, double-click a record to open it. The AP Invoice window opens.
- Click
 (next to the Options dropdown) or select
  > Tools > Options > Maintain Options. The Form Options for AP Invoices window opens.
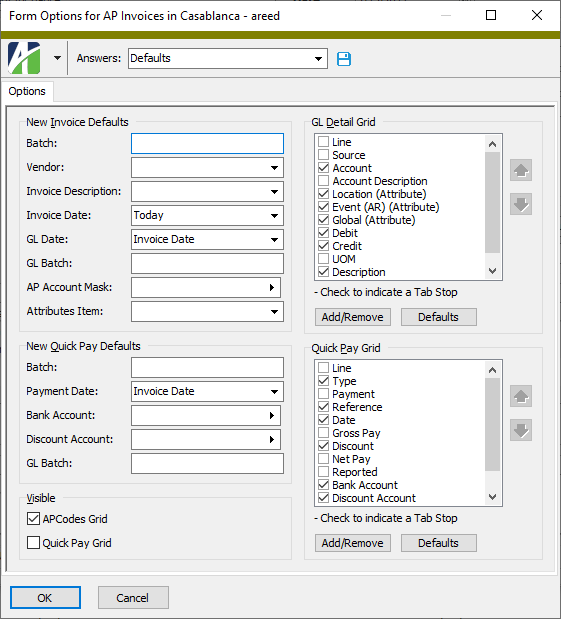
- In the New Invoice Defaults section, enter the name of the default AP Batch to assign to new invoices that use this options profile.
- In the Vendor field, select the vendor to load by default when entering a new invoice. Your options are:
- <blank>. Do not load a vendor by default.
- Previous. Load the vendor from the last invoice entered.
- In the Invoice Description field, select the invoice description to load by default. Your options are:
- <blank>. Do not load a default invoice description.
- Previous. Load the invoice description from the last invoice entered.
- In the Invoice Date field, select the invoice date to load by default. Your options are:
- <blank>. Do not load a default invoice date.
- Previous. Load the invoice date from the last invoice entered.
- Today. Load today's date.
- In the GL Date field, select the date to load by default for the GL date when entering a new invoice. Your options are:
- <blank>. Do not load a default GL date.
- Previous. Load the GL date from the last invoice entered.
- Today. Load today's date.
- Invoice Date. Load the invoice date.
- Period End. Load the period end date for the calendar associated with the AP liability account.
- Enter the name of the default GL Batch to assign to new invoices which use this options profile.
- In the AP Account Mask field, select the specific account number or provide an account mask for the default AP account on the invoice. This account mask is used in conjunction with the account mask on the vendor to determine the default AP account on new invoices.
- In the Attributes Item field, select the attribute item(s) to load by default on a new invoice. Your options are:
- <blank>. If default attribute item(s) are assigned on the vendor, those attribute items will load. Otherwise, you will need to enter any applicable attribute items on new invoices.
- Previous. Default to the attribute item(s) from the last invoice entered. This is useful when multiple invoices with the same attribute item entries are entered in a single data entry session.
- In the New Quick Pay Defaults section, enter the AP Batch to assign to new Quick Pay payments.
- In the Payment Date field, select the payment date to load by default for Quick Pay payments. Your options are:
- <blank>. Do not load a default payment date.
- Today. Load today's date as the default payment date.
- Invoice Date. Load the invoice date as the default payment date.
- Invoice GL Date. Load the invoice GL date as the default payment date.
- In the Bank Account field, select the default bank account from which to make the Quick Pay payment.
- In the Discount Account field, select the default discount account to post discount amounts to for Quick Pay payments.
- Enter the name of the default GL Batch to assign to new Quick Pay payments.
- In the Visible section, mark the checkbox for each table to show on the Invoice tab. To hide a table, ensure that its checkbox is cleared. Valid options are:
- APCodes Grid
- Quick Pay Grid
- In the GL Detail Grid section, configure the GL Detail table to your needs. You can do one or more of the following:
- Add columns. To do so:
Click Add/Remove. The Column Selection dialog box opens.
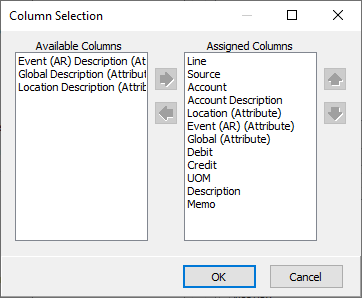
In the Available Columns list box, highlight the columns to add to the table, then click
 to move your selections to the Assigned Columns list box.
Note
All available columns are added to the table by default. This instruction applies if columns have been removed and you want to add them back to the table.
- Click OK.
- Remove columns. To do so:
Click Add/Remove. The Column Selection dialog box opens.
- In the Assigned Columns list box, highlight the columns to remove from the table, then click
 to move your selections to the Available Columns list box.
 - Click OK.
- Reorder columns. To do so:
- Highlight a column name in the GL Detail Grid list box.
- Use
 and
and  to move the column to the desired position.
 - Repeat the last step for other columns you need to move.
- Set tab stops. To do so:
- In the GL Detail Grid list box, ensure the checkboxes for the columns that need a tab stop are marked.
- Clear the checkbox for the columns that do not need a tab stop.
- Add columns. To do so:
- In the Quick Pay Grid section, configure the Quick Pay table to streamline Quick Pay payment entry. You can do one or more of the following:
- Add columns. To do so:
Click Add/Remove. The Column Selection dialog box opens.
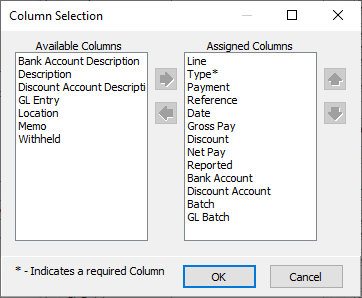
In the Available Columns list box, highlight the columns to add to the table, then click
to move your selections to the Assigned Columns list box.- Click OK.
- Remove columns. To do so:
Click Add/Remove. The Column Selection dialog box opens.
- In the Assigned Columns list box, highlight the columns to remove from the table, then click to move your selections to the Available Columns list box.
- Click OK.
- Reorder columns. To do so:
- Highlight a column name in the Quick Pay Grid list box.
- Use and to move the column to the desired position.
- Repeat the last step for other columns you need to move.
- Set tab stops. To do so:
- In the Quick Pay Grid list box, ensure the checkboxes for the columns that need a tab stop are marked.
- Clear the checkbox for the columns that do not need a tab stop.
- Add columns. To do so:
- Click OK. You are prompted to save the settings with a profile name.
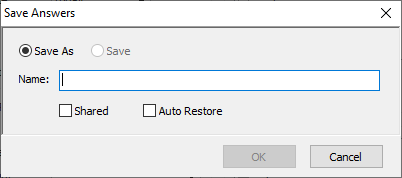
- Enter a Name for the profile.
- To give other users access to this profile, mark the Shared checkbox.
- To load this profile automatically the next time you enter invoices, mark the Auto Restore checkbox.
- Click OK.