![]() An entity used to track an accumulated balance for an employee. A leave ledger might track vacation leave, sick leave, PTO, comp time, a benefit qualification, or any other balance specific to an employee.s. Leave entries are created automatically when a leave plan is processed. You can also make manual entries to a leave ledger in the New Security & Leave Entry window.
An entity used to track an accumulated balance for an employee. A leave ledger might track vacation leave, sick leave, PTO, comp time, a benefit qualification, or any other balance specific to an employee.s. Leave entries are created automatically when a leave plan is processed. You can also make manual entries to a leave ledger in the New Security & Leave Entry window.
![]() Make a manual leave plan entry
Make a manual leave plan entry
Make a manual leave plan entry
- In the Navigation pane, highlight the Payroll/Human Resources > Leave Plans > Leave Entries folder.
- Click
 . The New Seniority & Leave Entry window opens.
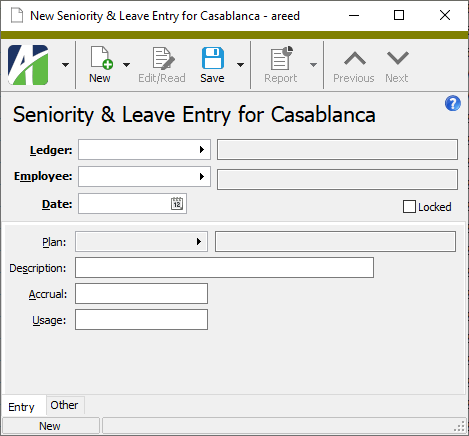
- In the Ledger field, select the leave ledger to associate with the leave entry.
- In the Employee field, select the employee code of the employee for whom you are making the leave entry.
- Enter the Date of the leave entry.
- If you need to protect the leave entry record (except for the Description and Memo fields) from future changes, mark the Locked checkbox.
- Enter a Description of the leave entry.
- If this leave entry adds to the ledger balance, enter the amount to add in the Accrual field.
- If this leave entry subtracts from the ledger balance, enter the amount to subtract in the Usage field.
- Save the new leave entry.
You cannot delete a locked leave entry. If you need to delete an entry that is locked, you must first unlock it. Unlocking a saved leave entry requires you to have "Lock" access to the Seniority & Leave Entries resource.
To delete a locked leave entry:
Delete leave entries
- In the Navigation pane, highlight the Payroll/Human Resources folder.
- In the HD view, locate and double-click the entry you need to delete to open it in the Seniority & Leave Entry window.
- Clear the Locked checkbox.
- Save your changes.
- Select
 > Edit > Delete. ActivityHD prompts you to confirm the action.
 - Click Delete.
Tip
If you need to delete multiple locked leave entries, select the entries in the HD view and use the mass changer to unlock the entries, then click ![]() in the ActivityHD toolbar to delete the leave entries.
in the ActivityHD toolbar to delete the leave entries.
Entries Listing
Purpose
The Entries Listing provides a list of leave entries recorded in Payroll.
Content
For each leave entry included on the report, the listing shows:
- employee code
- employee name
- date
- accrual
- usage
- leave plan
- description
- whether the entry is locked.
In addition, you can include one or more of the following:
- timestamps
- memos
- custom fields.
The following totals appear on the report:
- ledger totals
- grand totals.
Print the report
- In the Navigation pane, highlight the Payroll/Human Resources > Leave Plans > Leave Entries folder.
- Start the report set-up wizard.
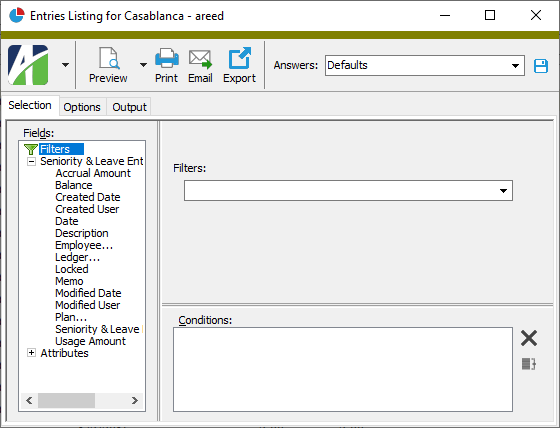
- To report on all or a filtered subset of leave entries:
- Right-click the Leave Entries folder and select Select and Report > Entries Listing from the shortcut menu.
- On the Selection tab, define any filters to apply to the data.
- To report on specifically selected leave entries:
- In the HD view, select the leave entries to include on the report. You can use Ctrl and/or Shift selection to select multiple records.
- Click
 .
.
- To report on a particular leave entry from the Seniority & Leave Entry window:
- In the HD view, locate and double-click the leave entry to report on. The Seniority & Leave Entry window opens with the leave entry loaded.
- Click .
- To report on all or a filtered subset of leave entries:
- Select the Options tab.
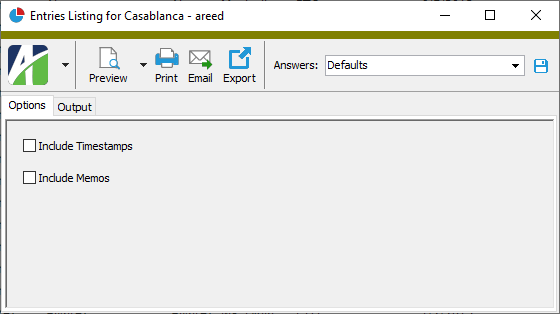
- Mark the checkbox(es) for the additional information to include:
- Timestamps
- Memos
- Custom Fields (only visible if custom fields are set up)
- Select the Output tab.
- In the Design field, look up and select the report design to use.
- In the toolbar, click the icon for the type of output you want:
 - Provides access to two preview options.
- Preview - Click the icon or click the drop-down arrow and select Preview from the drop-down menu to view the report in the Crystal Reports viewer.
- Preview to PDF - Click the drop-down arrow next to the icon and select Preview to PDF to view the report in the PDF reader.
 - Opens the Print dialog so that you can select and configure a printer and then print a paper copy of the report.
 - Opens the Report Email dialog so that you can address and compose an email that the report will be attached to. For best results, ensure your email client is running before you attempt to send a report via email.
 - Opens the Export Report dialog so that you can save the report to a file. File types include Crystal Reports (.rpt), PDF (.pdf), Microsoft Excel (.xls), Microsoft Word (.doc), rich text (.rtf), and XML (.xml).
Data extensions
The following data extension is available for the report:
- Leave entries
Leave Entry Record ID
The leave ledger associated with the leave entry. The ledger can represent service months, a PTO plan, a benefit qualification tracker, or any other employee-specific balance.
Press F3 to look up the value.
If a value is already selected, you can press F4 to open the record in its native editor.
The employee code of the employee associated with the leave entry. If you accessed this window from the Leave Entries subtab of the Seniority & Leave tab of the employee record, ActivityHD prefills the employee code for you.
Press F3 to look up the value.
If a value is already selected, you can press F4 to open the record in its native editor.
Entry tab
Press F3 to look up the value.
If a value is already selected, you can press F4 to open the record in its native editor.
Custom tab
This tab is visible if custom fields exist for the entity. At a minimum, if there are custom fields, a Fields subtab will be present. One or more additional categories of subtabs may also be visible.
Fields subtab
This tab prompts for values for any custom fields set up for entity records of this entity type. Respond to the prompts as appropriate.
References subtab
This tab is visible if other records reference the current record.
Example
Suppose a custom field exists on PRCodes that references an ARCode. On the ARCode record, on the Custom > References subtab, you can view all the PRCodes which reference that ARCode.
Exchange Folder subtab
This tab is visible only if you set up a custom field with a data type of "Exchange Folder". The label on this tab is the name assigned to the custom field.
This tab shows the contents of the specified Exchange folder.
File subtab
This tab is visible only if you set up a custom field with a data type of "File". The label on the tab is the name assigned to the custom field.
This tab renders the contents of the specified file according to its file type.
Internet Address subtab
This tab is visible only if you set up a custom field with a data type of "Internet Address". The label on this tab is the name assigned to the custom field.
This tab shows the contents of the specified web page.
Network Folder subtab
This tab is visible only if you set up a custom field with a data type of "Network Folder". The label on this tab is the name assigned to the custom field.
This tab shows the contents of the specified network folder.
Attachments tab
The Attachments tab is visible if any record for a given entity has an attachment. If the Attachments tab is not visible, this implies that no record of the entity type has an attachment on it; however, once an attachment is added to any record of the entity type, the Attachments tab will become available.
Change Logs tab
This tab is visible if the user has "Change Logs" access to the associated data folder resource.
The Change Logs pane shows the Change Logs HD view filtered to show all change logs for the selected entity record.
Double-click a row in the pane to drill down to its record in the Change Log window.
Other tab
Developer tab
This tab is visible only when developer features are enabled.
Automation subtab
This subtab shows field names and values for the current data record. Use the information in the subtab to assist when creating automation objects such as bots and import files. The field names and field values can be copied from the text box and pasted directly into your code or application. To copy content from the text box, highlight the content to copy and press Ctrl+C or right-click your selection and select Copy from the context menu.
Export (XML) subtab
This subtab shows the XML syntax for exporting the selected data record. The syntax can be copied from the text box as an exemplar for creating your own automation objects for bots, import files, ActivWebAPI, etc. To copy content from the text box, highlight the content to copy and press Ctrl+C or right-click your selection and select Copy from the context menu.
Import (XML) subtab
This subtab allows you to select a file for import and shows the XML syntax for importing data records. Use the subtab to explore the XML syntax for importing data records. In particular, you can investigate the syntax which results when using Data.Import and ActivWebAPI data POST and DELETE routes.
Change Log (XML) subtab
This subtab is visible only when the Enable Change Logs option is marked in System Options or Company Options (depending on whether the feature applies at the system or the company level). This is the default setting when developer features are enabled.
This subtab allows you to investigate changes to the current data record. The syntax can be copied for use in bots, dashboards, ActivWebAPI, and other automation. To copy content from the text box, highlight the content to copy and press Ctrl+C or right-click your selection and select Copy from the context menu.
Select Statement (SQL) subtab
This subtab allows you to investigate the SQL select statement used to retrieve the current data record. The syntax can be copied as an exemplar for data sources and other automation. To copy content from the text box, highlight the content to copy and press Ctrl+C or right-click your selection and select Copy from the context menu.

|
Extras\Payroll\Import Seniority & Leave Entries.xls |
Seniority and leave entries security
Common accesses available on seniority and leave entries
Special accesses available on seniority and leave entries
| Access | A user with this access can... |
|---|---|
| Lock | Edit the Locked field on a leave entry. |
| Process | Process leave plans. |
Seniority and leave entries filters
The following built-in filters are available for seniority and leave entries:
Report Email dialog
- Windows user default account. Sends email using the user's Windows default email account. For most users, this is the account configured in Outlook or another email client application.
- Server personal. Sends email using the email configuration for the system or company server and the email address on the current user's authorized user record. The authorized user record must have a confirmed email address.
- Server generic. Sends email using the email configuration and "from" address for the system or company server. This option requires "Send generic" access to the Server Email resource.
|
5225 S Loop 289, #207 Lubbock, TX 79424 806.687.8500 | 800.354.7152 |
© 2025 AccountingWare, LLC All rights reserved. |