Purchasing agents

Security
Built-in filters

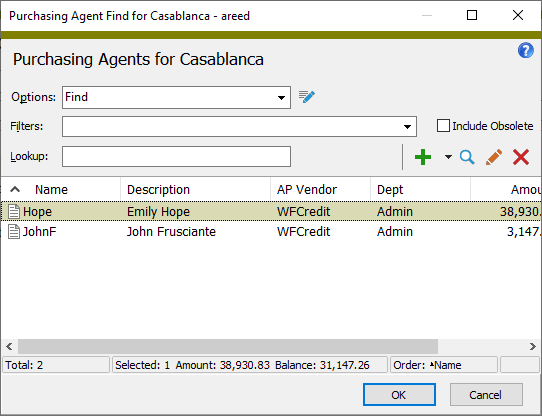
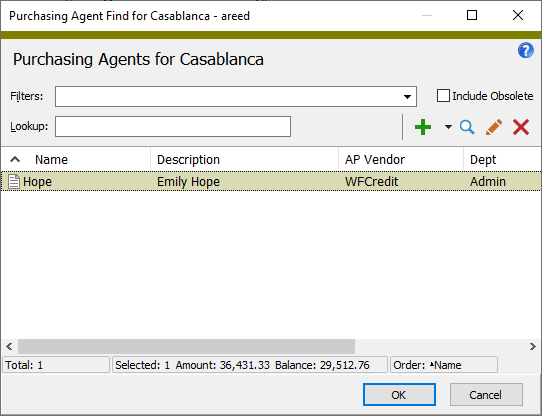
A purchasing agent is an individual who purchases goods and services on behalf of a company. An agent may be a company employee who makes purchases from his/her own funds (and is subsequently reimbursed) or who uses a company credit card or charge account to make purchases.

Sometimes an agent may represent a factor, a company that has purchased the receivables of one or more of your vendors. In this case, payment for any purchases from the vendor would need to be paid to the factor (agent).

×

Purchasing agents security

Common accesses available on purchasing agents

Access A user with this access can...
Change Use the mass change action on purchasing agents.
Custom Fields Create and edit custom fields for purchasing agents.
Data Have read-only access to purchasing agents from anywhere in the software (e.g., field validations, filters, date expressions).
Delete Delete purchasing agents.
Edit Edit purchasing agent records.
Export Export purchasing agent records from ActivityHD.
Import Import purchasing agent records into ActivityHD.
New Create new purchasing agent records.
Read Have read-only access to purchasing agent records.
Report Run reports with purchasing agent information.
Report Designs Create and edit report designs with purchasing agent information. This access enables the Report Designs button on the Output tab of report dialogs.
Shared Answers Create and edit action profiles and report profiles related to purchasing agents.
Shared Filters Create and edit shared filters on purchasing agents.
Visible View the Agents folder in the Navigation pane.

Special accesses available on purchasing agents

Access A user with this access can...
Invoice Process invoices for purchasing agents.


×

Purchasing agent filters

The following built-in filters are available for purchasing agents:

Filter Name Effect
Master Purchases Lists the purchasing agents with purchases with a status of "Master".
Open Purchases Lists the purchasing agents with open purchases (i.e., purchases with any status except "Closed" or "Canceled").


×

Report Email dialog

From
The email account from which to send the email. Valid options are:
  • Windows user default account. Sends email using the user's Windows default email account. For most users, this is the account configured in Outlook or another email client application.
  • Server personal. Sends email using the email configuration for the system or company server and the email address on the current user's authorized user record. The authorized user record must have a confirmed email address.
  • Server generic. Sends email using the email configuration and "from" address for the system or company server. This option requires "Send generic" access to the Server Email resource.
To
The email address(es) to which to send the email. Separate email addresses with semi-colons.
CC
The email addresses to copy on the email. Separate email addresses with semi-colons.
BCC
The email addresses to blind copy on the email. Separate email addresses with semi-colons.
Subject
The subject line.
Text box
The body of the email.


×

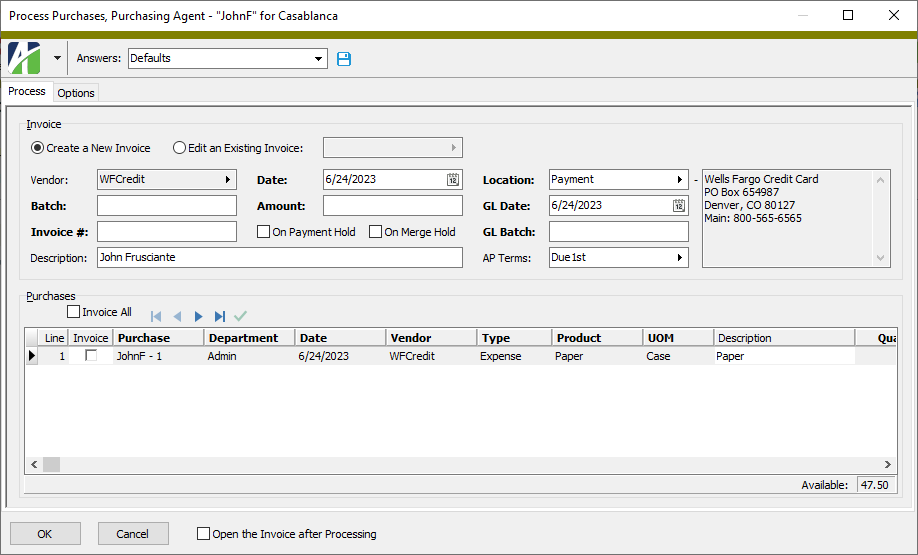
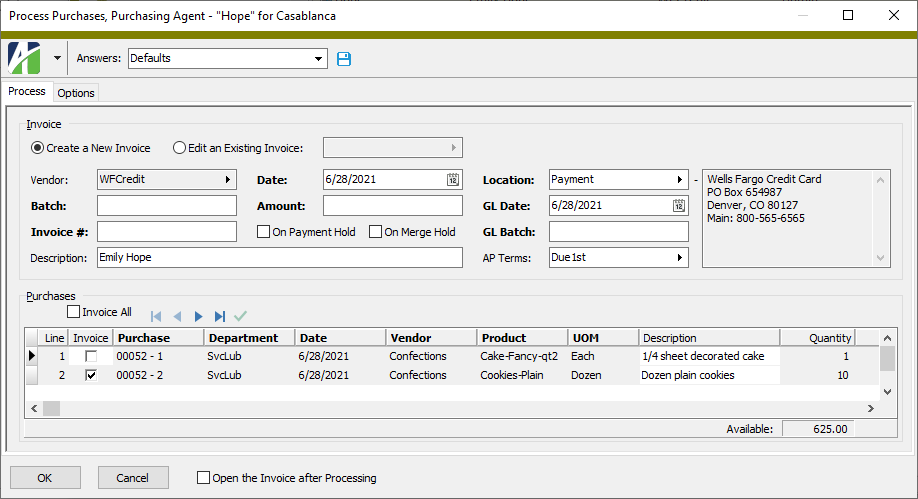
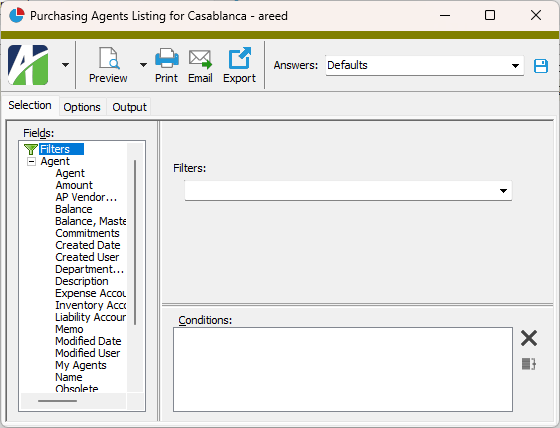
Process Purchases, Purchasing Agent wizard

Process tab

Invoice
Use this section to select invoice processing options for the selected purchasing agent.
Invoice action options
The type of invoice processing to perform. Your options are:
  • Create a New Invoice. Create a new invoice for the purchases you select in the Purchases table. The AP invoice is created using the options you specify in the rest of this section.
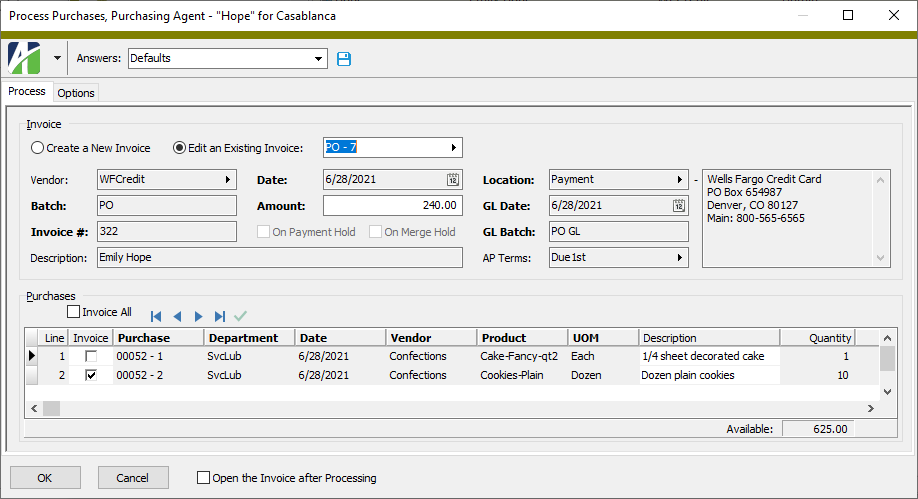
  • Edit an Existing Invoice. Assign purchases to an invoice that already exists. If you select this option, the adjacent field is enabled so that you can select one of the PO vendor's unmerged AP invoices to assign purchases to. After you select this option and specify an existing invoice, information for the selected invoice loads in this section and the fields are disabled.

    Example

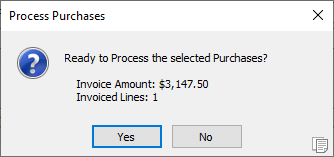
    Suppose you download credit card charges every week for review. As you confirm the charges weekly, you process them to AP invoices (enter purchases, assign agents, etc.). While you perform these activities on a weekly basis, you don't want four or five invoices per month for a credit card, just one monthly invoice. This option lets you recall the invoice you started the first week of the month and add charges to it each successive week.

    Press F3 to look up the value.

    If a value is already selected, you can press F4 to open the record in its native editor.

Vendor

Displays the vendor assigned to the agent as the AP vendor. This vendor is paid for the invoiced purchases.

Press F3 to look up the value.

If a value is already selected, you can press F4 to open the record in its native editor.

Batch
The name of the batch of AP invoices to include the invoice in.
Invoice #
An invoice number that uniquely identifies the invoice for the vendor.
Description
A description of the invoice. This field defaults to the purchasing agent's name.
Date
The invoice date.
Amount
The total amount of the invoice. This amount must equal the total of the purchases ultimately selected for invoicing in the Purchases table.
On Payment Hold
Indicates if the invoice has a status of "Payment Hold". Invoices on payment hold are not included in group payments and a warning occurs in the Accounts Payable Payments window if you attempt to pay an invoice on payment hold.
On Merge Hold
Indicates if the invoice has a status of "Merge Hold". Merge hold indicates that the invoice needs further attention before being merged.
Location

The payment location for the invoice. The default location is the vendor's default payment location. The address associated with the selected location displays to the right.

Press F3 to look up the value.

If a value is already selected, you can press F4 to open the record in its native editor.

GL Date
The posting date to use when the invoice is merged in Accounts Payable and posted to the general ledger.
GL Batch
The name of the GL batch to use when the invoice is merged in Accounts Payable and posted to the general ledger. Batches can be used to select groups of journal entries for proofing, merging, or deleting.
AP Terms

The payment terms for the invoice. The default payment terms are the vendor's default terms.

Press F3 to look up the value.

If a value is already selected, you can press F4 to open the record in its native editor.

Purchases
Invoice All
Mark this checkbox to select all the purchasing agent's available purchases for invoice processing.
Purchases table

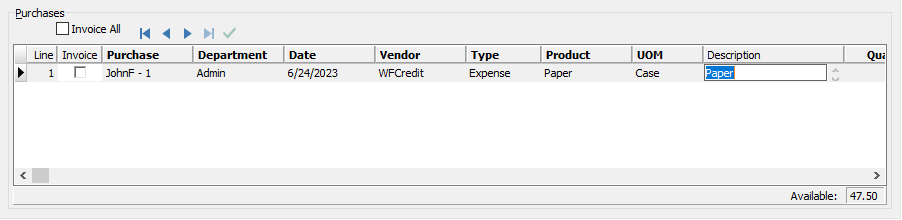
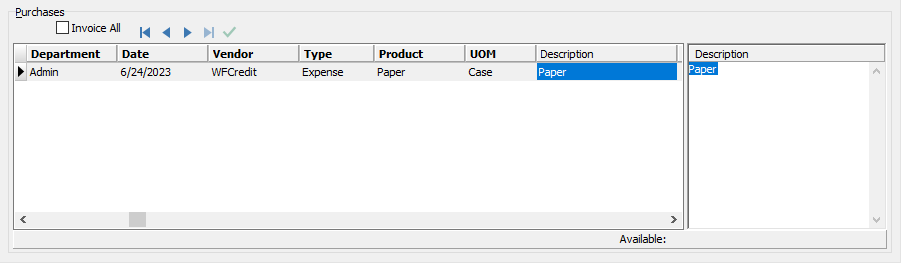
The table shows the purchases with a status of "Master" that are assigned to the selected purchasing agent.

Note

The visibility and order of the columns in the table are controlled by the settings on the Options tab.

Invoice

Mark the checkbox to select the purchase in this row for invoice processing.

Note

If the checkbox is marked and disabled, the purchase comes from a standard purchase order and has been invoiced but not received.

Purchase

A system-assigned identifier for the purchase. ActivityHD uses the agent code and a sequential number to identify a purchase.

Example

If the agent code is "JSMITH", the first purchase assigned to the agent would be given the number "1". The system-assigned identifier would be "JSMITH-1".

Department

The department associated with the purchase.

Press F3 to look up the value.

If a value is already selected, you can press F4 to open the record in its native editor.

Date
The purchase date. This date does not affect the invoice date or GL date for the purchase. Those dates are based on the dates entered in the Invoice section.
Vendor

The vendor from which the purchase was made.

Example

If an employee purchases office supplies from a particular vendor on a corporate credit card, you can use this vendor designation to track the purchases made from the office supply vendor.

If you do not need to track the purchases from a particular vendor, or if a vendor does not make sense in this context (such as when reimbursing an employee for mileage), you can use a generic miscellaneous vendor here.

Press F3 to look up the value.

If a value is already selected, you can press F4 to open the record in its native editor.

Product

The product purchased.

Press F3 to look up the value.

If a value is already selected, you can press F4 to open the record in its native editor.

UOM

The unit of measure in which the product was purchased.

Press F3 to look up the value.

If a value is already selected, you can press F4 to open the record in its native editor.

Description
A description for the purchase.
Quantity
The quantity of the product purchased expressed in terms of the unit of measure. This entry is blank and disabled if the quantity rule on the unit of measure is "Amount Only".
Unit Cost
The cost of a single unit of measure of the product purchased. The entry is blank and disabled if the quantity rule on the unit of measure is "Amount Only".
Amount
The extended purchase cost of the product purchased.
Attribute(s)

Depending on your options settings, there may be a column in the table for each active purchase-type attribute with a setting of "Allowed" or "Required". Attributes provide additional ways to categorize purchases and may help determine the GL accounts used during invoice posting.

For each attribute represented, select an attribute item that is appropriate for the corresponding purchase.

Press F3 to look up the value.

If a value is already selected, you can press F4 to open the record in its native editor.

Account

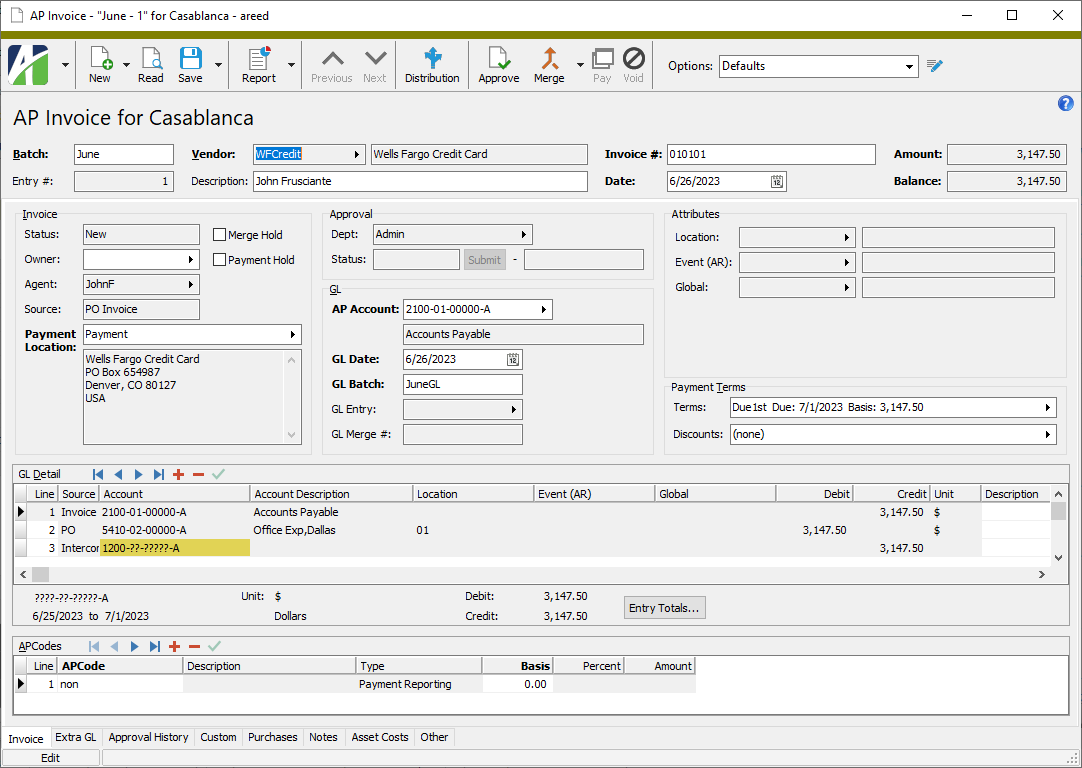
The account to which the purchase is posted when invoiced.

Press F2 to open the Account Expand dialog box where you can look up an account number, find an account number by its alias, build the account number by segment, or view setup and setup sources.

Press F3 to look up the account.

If an account is already selected, you can press F4 to open the record in the Account window.

Part Number
The vendor's part number for the product/unit of measure.
Serial Number
The product's serial number. Use this entry if you need to track specific purchases of the product by serial number.
Reference

Additional information to help identify the purchase.

Example

If you are entering airfare expenses and charging them to a corporate credit card, you can use this entry to record the ticket number. This is useful for reconciling the charges on the credit card statement.

Invoice

After the purchase is invoiced, this entry displays the invoice batch and entry number of the resulting invoice.

Press F3 to look up the value.

If a value is already selected, you can press F4 to open the record in its native editor.

Receipt

After the purchase is received, this entry displays the receipt batch and entry number of the resulting receipt. This entry is blank for miscellaneous purchases since a receipt is not required.

Press F3 to look up the value.

If a value is already selected, you can press F4 to open the record in its native editor.

Canceled
A checkmark indicates that the purchase is canceled and is not eligible for processing.
Memo

Additional descriptive information about the purchase. Press F2 to access the Memo popup which makes it easier to enter a long memo.
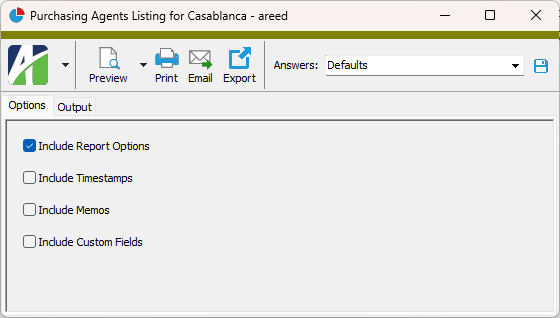
Available
The total amount of purchases in the table not yet selected for processing.
Selected
The total amount of invoices in the table selected to be invoiced. This total must match the invoice amount in the Invoice section in order to process the invoice.
Open the Invoice after Processing
Mark the checkbox to open the AP invoice created or updated in the invoicing process when the process concludes.

Options tab

Display Options
Use the options in this section to determine the appearance of the software interface under the specified conditions.
Account Override
Mark this checkbox to display account numbers in purple whenever the default account number has been overridden.
Attribute Override
Mark this checkbox to display attribute items in purple whenever the default attribute item has been overridden.
Confirmation Message
Mark this checkbox to have ActivityHD prompt you to confirm that you want to process the purchases when you click OK. The confirmation message shows the total invoice amount and the number of invoice lines.
Detail Description Position
Select where on the Process tab you want to edit the detail description. This setting is intended to aid efficient entry. Your options are:
  • In Place. Edit the description directly on the purchase line in the Purchases table (provided you do not hide the description by deselecting it in the Detail Columns list box).

  • Bottom. Edit the description in a text box below the Purchases table. If you need long descriptions, this option provides the most room for text.

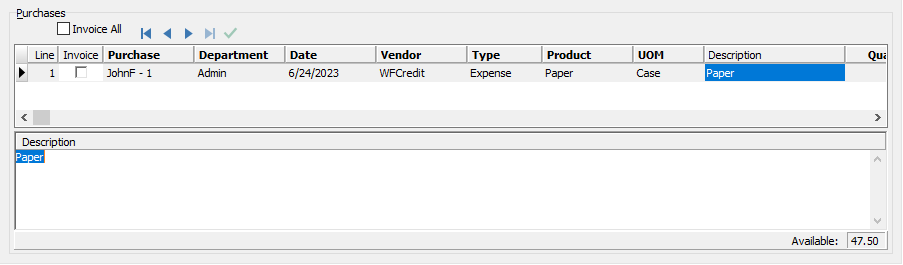
  • Right. Edit the description in a text box to the right of the Purchases table.

Invoice Tab Stops
By default, all fields in the Invoice section of the Process tab are included in the tab order. Clear the checkboxes for any fields you want to skip past in order to improve efficient data entry.
Detail Columns
The list box shows the columns you can include in the Purchases table on the Process tab. The checkboxes indicate which columns are included in the tab order. Clear the checkbox next to any column you want to skip in the tab order. Ensure the checkbox next to every column you want to include in the tab order is marked.
Order buttons
Use these buttons to change the order that columns appear in the table. To do so, highlight a column name and use and to move the column to the desired position. Repeat this action for other columns until you achieve the desired order.
Add/Remove button

Use this button to open the Column Selection dialog box where you can add and/or remove columns from the Purchases table.

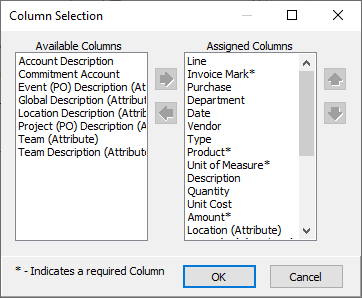
To remove columns from the Purchases table, highlight the column(s) in the Assigned Columns list box and click to move the selected column(s) to the Available Columns list box.

To add columns to the Purchases table, highlight the column(s) in the Available Columns list box and click to move the selected column(s) to the Assigned Columns list box.

Defaults button
Click this button to restore the system default settings for columns in the Purchases table.