The Journal Detail folder provides access to the journal detail lines which constitute your journal entries. From this folder, you can view, edit, and delete detail lines.
![]() Change a detail line for an unmerged journal entry that originated in General Ledger
Change a detail line for an unmerged journal entry that originated in General Ledger
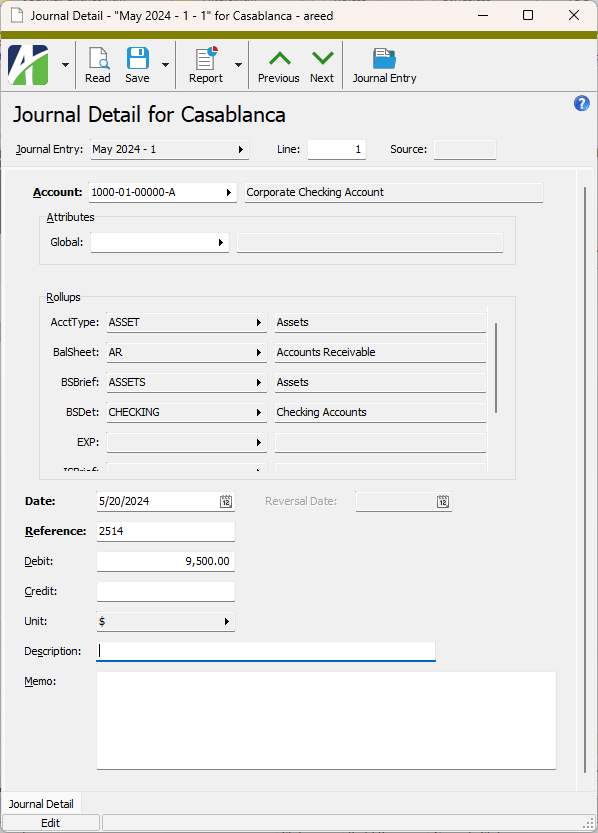
If a journal entry originates in General Ledger, you can edit its detail lines until the journal entry is merged. After that point, only the description and memo can be edited.
Change a detail line on an unmerged journal entry that originated in General Ledger
- In the Navigation pane, highlight the General Ledger > Journal Entries > Journal Detail folder.
- In the HD view, locate and double-click the journal detail record you want to open.
- Perform only the steps you need to correct the journal detail line:
- In the Account field, select the account number to post the detail line to.
- In the fields in the Attributes section, select any attribute values which apply to the detail line.
- In the Date field, enter the posting date for the detail line.
Enter a Reference for the detail line. You can use up to 20 characters.
Examples
deposit number, invoice number, "JE" for journal entry, "PMT" for payment
- In the Debit or Credit field, enter the amount to post to the specified account for this detail line.
- Unless it was overridden previously, the Description defaults from the description on the journal entry. Enter the description to use for the detail line.
- Enter a Memo if you need to provide additional information about the detail line. If the detail line was created as a result of processing recurring journal entries, the default memo was copied from the memo on the corresponding detail line of the recurring entry it was generated from.
- When you finish, save your changes.
![]() Change a detail line for a merged entry
Change a detail line for a merged entry
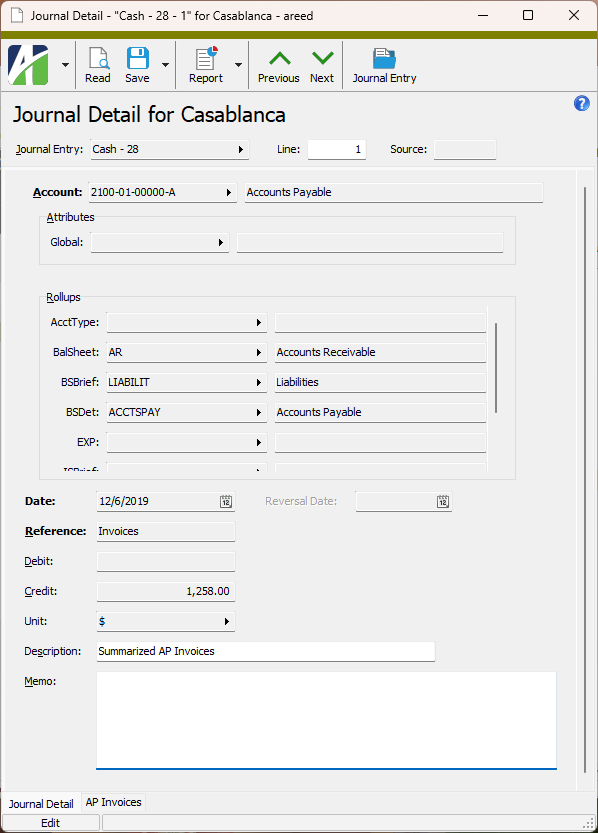
If a journal entry has already been merged, only the description and memo on its detail lines are available for editing. Likewise, if a journal entry originated in a subsidiary package, whether or not it has been merged, only the description and memo on its detail lines can be edited in General Ledger; go to the subsidiary package if you need to make other changes.
Change a detail line for a merged entry
- In the Navigation pane, highlight the General Ledger > Journal Entries > Journal Detail folder.
- In the HD view, locate and double-click the journal detail record you want to open.
- Perform only the steps you need to correct the journal detail line:
- Unless it was overridden previously, the Description defaults from the description on the journal entry. Enter the description to use for the detail line.
- Enter a Memo if you need to provide additional information about the detail line.
- When you finish, save your changes.
![]() Drill down on financial function detail
Drill down on financial function detail
Drill down on financial function detail
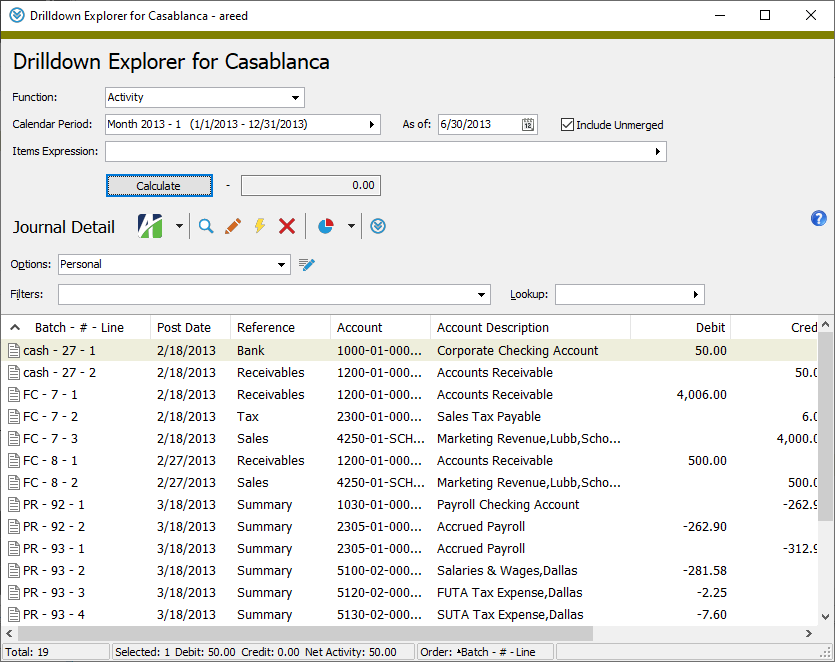
The Drilldown Explorer lets you execute a financial function and view the result as well as the detail behind the calculation.
- In the Navigation pane, highlight the General Ledger > Journal Entries > Journal Detail folder.
- Click
 or right-click the folder and select Drilldown Explorer from the shortcut menu.
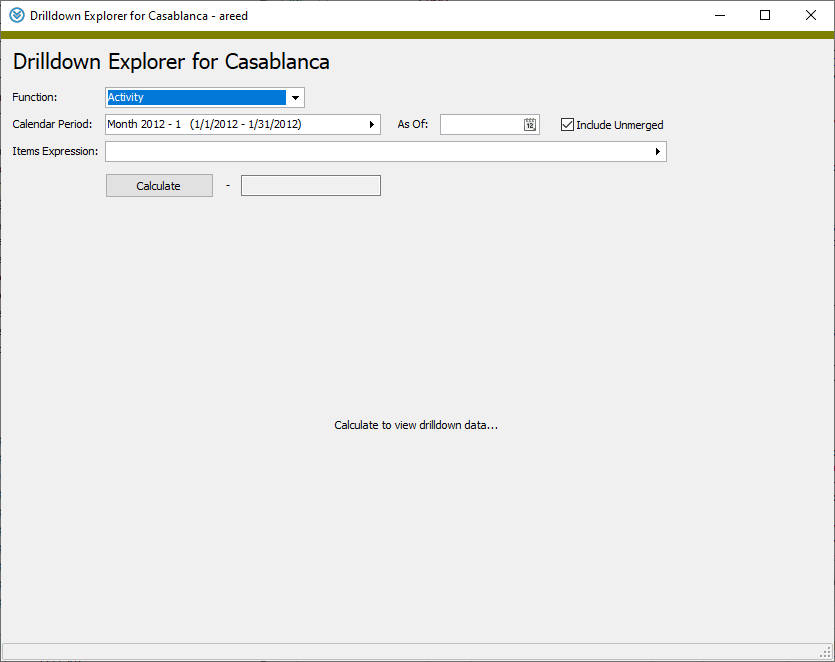
- From the Function drop-down list, select the financial function to view details for.
- In the Calendar Period field, select the accounting period for which to return data.
- In the As Of field, select the last date for which to view journal detail entries. The default is the last day of the period you selected.
- If you want to include unmerged transactions in the results, mark the Include Unmerged checkbox.
- If you want to limit the detail based on an Items Expression, click
 to open the Account Conditions dialog box where you can build an expression by selecting items and specifying constraints.
 -
Click Calculate. The journal detail records which match your criteria load in the view.
![]() Delete a journal entry detail line
Delete a journal entry detail line
Delete a journal entry detail line
Detail lines for merged journal entries cannot be deleted. Likewise, detail lines for journal entries which originated in subsidiary packages cannot be deleted from General Ledger; go to the originating package to make changes. You can, however, delete detail lines for unmerged journal entries that originated in General Ledger.
Important!
Exercise caution when deleting detail lines. Deleting detail lines can cause out-of-balance entries.
- In the Navigation pane, highlight the General Ledger > Journal Entries > Journal Entry Detail folder.
- In the HD view, locate and highlight the detail line you need to delete.
- Click
 . ActivityHD prompts you to confirm that you want to delete the detail line.
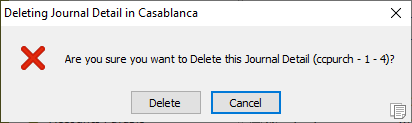
- Click Delete.
Journal Detail Listing
Purpose
The Journal Detail Listing provides a list of journal detail entries from your General Ledger.
Content
For each journal detail record included on the report, the listing shows:
- batch, entry number, and line number
- account number
- account description
- posting date
- reference
- unit
- debit amount
- credit amount.
In addition, you can include one or more of the following:
- attributes
- detail line description
- journal entry information (system - journal source, activity source, whether the entry is merged, whether the journal entry is a closing entry, whether the journal entry is a reversing entry, whether the entry is on hold, indication of voided and reversal entries with batch and entry number)
- subsidiary detail (date, transaction description, and amount for detail entries arising from subsidiary ledgers).
For items from a subsidiary ledger, you can drill down on the values in the Reference column to see subsidiary detail in a separate tab (whether or not you mark the Subsidiary Detail checkbox).
The following totals appear on the report:
- journal entry count
- detail line count
- grand totals.
Print the report
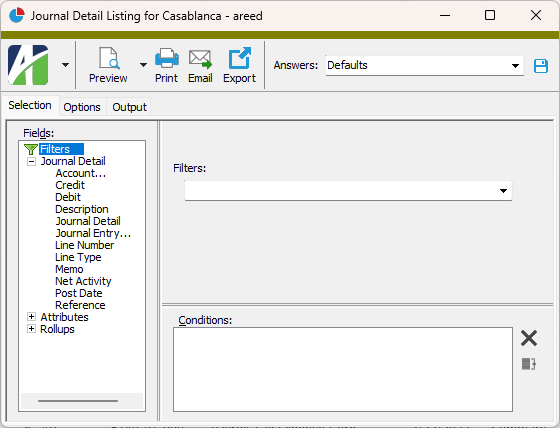
- In the Navigation pane, highlight the General Ledger > Journal Entries > Journal Detail folder.
- Start the report set-up wizard.
- To report on all or a filtered subset of detail entries:
- Right-click the Journal Detail folder and select Select and Report > Journal Detail Listing from the shortcut menu.
- On the Selection tab, define any filters to apply to the data.
- To report on specifically selected detail entries:
- In the HD view, select the detail entries to include on the report. You can use Ctrl and/or Shift selection to select multiple records.
- Click
 .
.
- To report on a particular journal detail record from the Journal Detail window:
- In the HD view, locate and double-click the journal detail record to report on. The Journal Detail window opens with the journal detail record loaded.
- Click .
- To report on all or a filtered subset of detail entries:
- Select the Options tab.
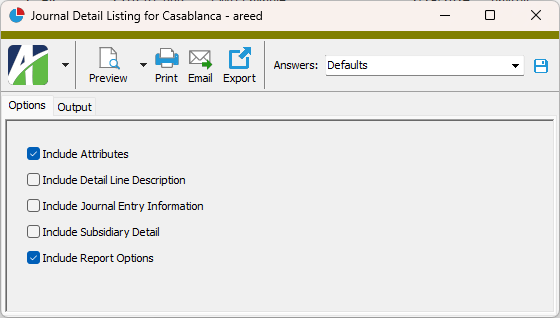
- Mark the checkbox(es) for the additional information to include:
- Attributes
- Detail Line Description
- Journal Entry Information
- Subsidiary Detail
- To include a section at the end of the report with the report settings used to produce the report, leave the Include Report Options checkbox marked. To produce the report without this information, clear the checkbox.
- Select the Output tab.
- In the Design field, look up and select the report design to use.
- In the toolbar, click the icon for the type of output you want:
 - Provides access to two preview options.
- Preview - Click the icon or click the drop-down arrow and select Preview from the drop-down menu to view the report in the Crystal Reports viewer.
- Preview to PDF - Click the drop-down arrow next to the icon and select Preview to PDF to view the report in the PDF reader.
 - Opens the Print dialog so that you can select and configure a printer and then print a paper copy of the report.
 - Opens the Report Email dialog so that you can address and compose an email that the report will be attached to. For best results, ensure your email client is running before you attempt to send a report via email.
 - Opens the Export Report dialog so that you can save the report to a file. File types include Crystal Reports (.rpt), PDF (.pdf), Microsoft Excel (.xls), Microsoft Word (.doc), rich text (.rtf), and XML (.xml).
Data extensions
The following data extension is available for the report:
- Journal detail
GL Summary Report
Purpose
The GL Summary Report provides summarized journal detail information based on sorting criteria or a listing of journal detail which can be grouped by sorting criteria. The report automatically sorts, groups, and page breaks by unit, but additional sorting, grouping, and page breaking can be specified as well. The report can be used as a source for providing the journal detail behind an amount on a financial statement with a view into multiple levels of subtotals.
When you run the report, you must either include detail or specify a sorting option to subtotal on or both.
Content
If the report is run to include detail without specifying a subtotal level, the report shows the following for each journal detail entry included:
- account number
- account description
- posting date
- reference
- debit amount
- credit amount
- net transaction amount.
If the report is run without detail but with a subtotal level specified, the report shows the following summary information:
- subtotal level
- debit total
- credit total
- net transaction amount.
If the report is run to include detail and with a subtotal level specified, the report shows journal detail entries grouped by the subtotal level.
If you run the report to include detail, you can optionally include one or more of the following:
- attributes
- journal entry information (system - journal source, activity source, whether the entry is merged, whether the journal entry is a closing entry, whether the journal entry is a reversing entry, whether the entry is on hold, indication of voided and reversal entries with batch and entry number)
- subsidiary detail (date, transaction description, and amount for detail entries arising from subsidiary ledgers).
In addition, if you specify a subtotal level, the following totals show on the report:
- total debits for each instance of the subtotal level
- total credits for each instance of the subtotal level
- total net amount for each instance of the subtotal level.
For items from a subsidiary ledger, you can drill down on the values in the Reference column to see subsidiary detail in a separate tab (whether or not you mark the Subsidiary Detail checkbox).
Print the report
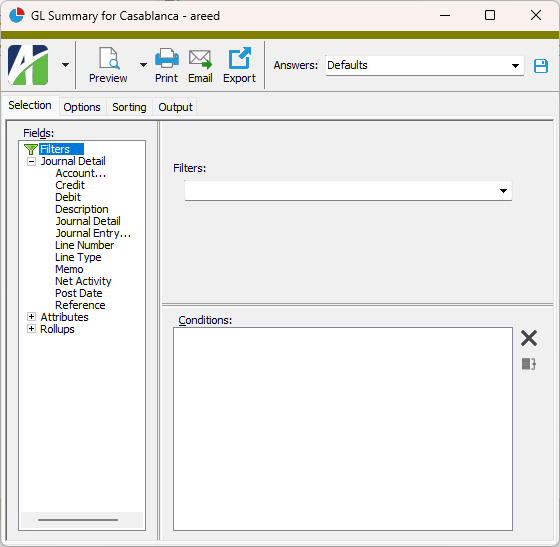
- In the Navigation pane, highlight the General Ledger > Journal Entries > Journal Detail folder.
- Start the report set-up wizard.
- To report on all or a filtered subset of detail entries:
- Right-click the Journal Detail folder and select Select and Report > GL Summary from the shortcut menu.
- On the Selection tab, define any filters to apply to the data.
- To report on specifically selected detail entries:
- In the HD view, select the detail entries to include on the report. You can use Ctrl and/or Shift selection to select multiple records.
- Click .
- To report on a particular journal detail record from the Journal Detail window:
- In the HD view, locate and double-click the journal detail record to report on. The Journal Detail window opens with the journal detail record loaded.
- Click .
- To report on all or a filtered subset of detail entries:
- Select the Options tab.
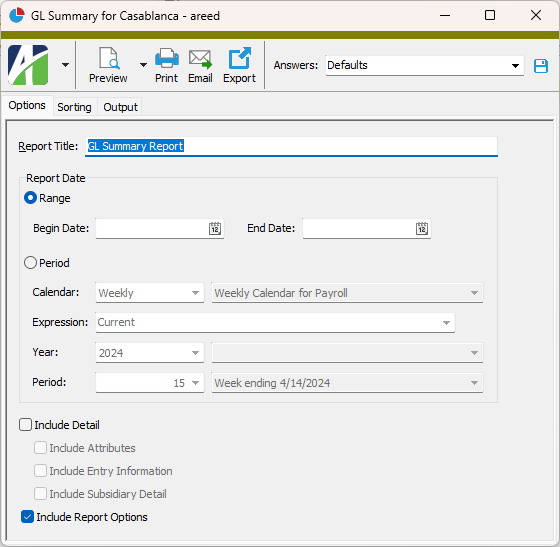
- Enter the Report Title you want to appear at the top of the printed report. The default title is "GL Summary Report".
- In the Report Date section, select how to determine the dates the report includes information for. Your options are:
Range. Select this option to report based on a range of dates.
If you select "Range", enter the Begin Date and End Date of the range of dates to report on.
Note
Leave both dates blank to report on all dates represented in the data.
Period. Select this option to report based on a particular calendar period or on a period expression.
If you select "Period", do the following:
- From the Calendar drop-down list, select the calendar to base the report on.
To define the reporting period using a relative expression, select or enter the period expression in the Expression field. If you prefer to explicitly enter the year and period, skip to step c.
You can select from the following common period expressions:
- Current
- Current - 1 period
- Current - 1 year
Alternatively, you can type a valid period expression in the field. For help on period expression syntax, click the help button to the right of the field.
If you select or enter a period expression, ActivityHD adjusts the values in the Year and Period fields accordingly.
If you enter a period expression, continue at step 6.
- From the Year drop-down list, select the year of the period to report on.
- From the Period drop-down list, select the period to report on.
- To include debit/credit posting detail on the report, mark the Include Detail checkbox. If you mark the checkbox, the remaining checkboxes are enabled.
- If you marked the Include Detail checkbox, mark the checkbox(es) for the additional information to include:
- Attributes
- Entry Information
- Subsidiary Detail
- To include a section at the end of the report with the report settings used to produce the report, leave the Include Report Options checkbox marked. To produce the report without this information, clear the checkbox.
-
Select the Sorting tab.
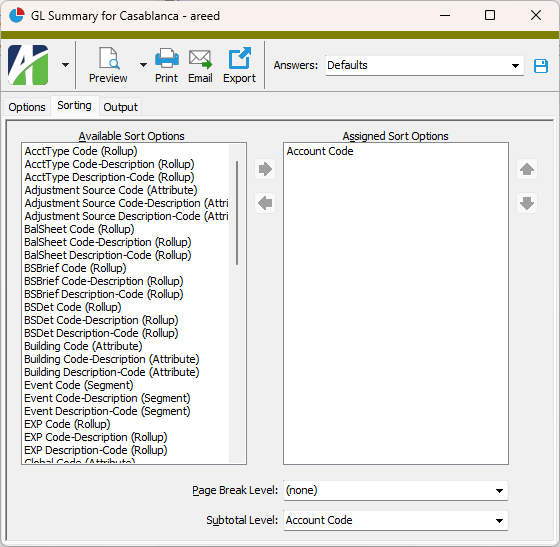
-
In the Available Sort Options list box, highlight the option(s) to sort the report by, then click
 to move your selection(s) to the Assigned Sort Options list box.
Note
Because it is common to run the report for account-level totals, the "Account Code" sort option is preselected and the "Account Code" option is also preselected in the Subtotal Level field. Nevertheless, you can remove or add to the list of sort options and also change or remove the subtotal level as needed.
- If you selected multiple sort options, use
 and
and  to arrange the sort options in the order you want them applied.
 - If you want the report to start a new page for each change in one of the sorting options you specified, select the sorting option to break on from the Page Break Level drop-down list. If you do not want to insert page breaks, accept "(none)".
- If you want the report to subtotal based on one of the sorting options you specified, select the sorting option to subtotal on from the Subtotal Level drop-down list. If you do not want to show subtotals, accept "(none)".
- Select the Output tab.
- In the Design field, look up and select the report design to use.
- In the toolbar, click the icon for the type of output you want:
- - Provides access to two preview options.
- Preview - Click the icon or click the drop-down arrow and select Preview from the drop-down menu to view the report in the Crystal Reports viewer.
- Preview to PDF - Click the drop-down arrow next to the icon and select Preview to PDF to view the report in the PDF reader.
- - Opens the Print dialog so that you can select and configure a printer and then print a paper copy of the report.
- - Opens the Report Email dialog so that you can address and compose an email that the report will be attached to. For best results, ensure your email client is running before you attempt to send a report via email.
- - Opens the Export Report dialog so that you can save the report to a file. File types include Crystal Reports (.rpt), PDF (.pdf), Microsoft Excel (.xls), Microsoft Word (.doc), rich text (.rtf), and XML (.xml).
Data extensions
The following data extensions are available for the report:
- Journal detail
- GL detail source
Journal Detail Record ID
Press F3 to look up the value.
If a value is already selected, you can press F4 to open the record in its native editor.
Journal Detail tab
The account number to which the detail line is posted.
Press F2 to open the Account Expand dialog box where you can look up an account number, find an account number by its alias, build the account number by segment, or view setup and setup sources.
Press F3 to look up the account.
If an account is already selected, you can press F4 to open the record in the Account window.
The unit associated with the account on the detail line.
Press F3 to look up the value.
If a value is already selected, you can press F4 to open the record in its native editor.
Subsidiary Detail tab
The Subsidiary Detail pane shows the Subsidiary Detail HD view filtered to show subsidiary detail lines for the selected journal detail line.
Double-click a row in the pane to drill down to its record in the Journal Detail window.
For postings from a subsidiary package, one of the following tabs will be visible to allow you to research the subsidiary detail that was summarized into the GL postings. The type of GL posting determines which tab is visible. To see a tab for subsidiary detail, the user must have permission for the appropriate folder. Security views are also applied.
AP Invoices tab
Invoices subtab
This tab is visible if the GL entry source is AP-Invoice and the GL detail reference is "Invoices".
The AP Invoices pane shows the AP Invoices HD view in Accounts Payable filtered to show all invoices associated with the selected journal detail record.
Double-click a row in the pane to drill down to its record in the AP Invoice window.
Invoice GL Detail subtab
This tab is visible if the GL entry source is AP-Invoice and the GL detail reference is "Invoices".
The AP Invoice GL Detail pane shows the AP Invoice GL Detail HD view in Accounts Payable filtered to show all invoice GL detail lines associated with the selected journal detail record.
Double-click a row in the pane to drill down to its record in the AP Invoice GL Detail window.
Invoice Extra GL subtab (AP)
This tab is visible if the GL entry source is AP-Invoice and the GL detail reference is "Extra".
The AP Invoice Extra GL pane shows the AP Invoice Extra GL HD view in Accounts Payable filtered to show all invoice extra GL lines associated with the selected journal detail record.
Double-click a row in the pane to drill down to the AP Invoice window with focus on the extra GL record in the Extra GL tab.
AP Payments tab
Payments subtab
This tab is visible if the GL entry source is AP-Payment and the GL detail reference is "Payments".
The Payments pane shows the Payments HD view in Accounts Payable filtered to show all payments associated with the selected journal detail record.
Double-click a row in the pane to drill down to its record in the Payment window.
Payment Detail subtab
This tab is visible if the GL entry source is AP-Payment and the GL detail reference is "Payments".
The Payment Detail pane shows the Payment Detail HD view in Accounts Payable filtered to show all payment detail lines associated with the selected journal detail record.
Double-click a row in the pane to drill down to its record in the Payment window.
AR Invoices tab
Invoices subtab
This tab is visible if the GL entry source is AR-Invoice and the GL detail reference is "Receivables".
The AR Invoices pane shows the AR Invoices HD view in Accounts Receivable filtered to show all invoices associated with the selected journal detail record.
Double-click a row in the pane to drill down to its record in the AR Invoice window.
Invoice Detail subtab
This tab is visible if the GL entry source is AR-Invoice and the GL detail reference is "Cost", "Inventory", or "Sales".
The AR Invoice Detail pane shows the AR Invoice Detail HD view in Accounts Receivable filtered to show all invoice detail lines associated with the selected journal detail record.
Double-click a row in the pane to drill down to its record in the AR Invoice Detail window.
Invoice Tax Detail tab
This tab is visible if the GL entry source is AR-Invoice and the GL detail reference is "Tax".
The AR Invoice Tax Detail pane shows the AR Invoice Tax Detail HD view in Accounts Receivable filtered to show all invoice tax detail lines associated with the selected journal detail record.
Double-click a row in the pane to drill down to its record in the AR Invoice Tax Detail window.
Invoice Extra GL subtab (AR)
This tab is visible if the GL entry source is AR-Invoice and the GL detail reference is "Extra".
The AR Invoice Extra GL pane shows the AR Invoice Extra GL HD view in Accounts Receivable filtered to show all invoice extra GL lines associated with the selected journal detail record.
Double-click a row in the pane to drill down to the AR Invoice window with focus on the extra GL record in the Extra GL tab.
AR Receipts tab
Receipts tab
This tab is visible if the GL entry source is AR-Receipt and the GL detail reference is "Adjustment", "Bank", or "Discount".
The Receipts pane shows the Receipts HD view in Accounts Receivable filtered to show the receipts associated with the journal detail line.
Double-click a row in the pane to drill down to its record in the Receipt window.
Receipt Detail subtab
This tab is visible if the GL entry source is AR-Receipt and the GL detail reference is "Receivables".
The Receipt Detail pane shows the Receipt Detail HD view in Accounts Receivable filtered to show all receipt detail lines associated with the selected journal detail record.
Double-click a row in the pane to drill down to its record in the Receipt Detail window.
Deposits subtab
This tab is visible if the GL entry source is AR-Receipt and the GL detail reference is "Receivables".
The Deposits pane shows the Deposits HD view in Accounts Receivable filtered to show all deposits associated with the selected journal detail record.
Double-click a row in the pane to drill down to its record in the Deposit window.
Bank Adjustments tab
Adjustments subtab
This tab is visible if the GL entry source is BR-Adjustment and the GL detail reference is "Fee", "Fee Correct", "Interest", "Int Correct", "Transfer In", "Transfer Out", "Other In", or "Other Out".
The Bank Statement Adjustments pane shows the Bank Statement Adjustments HD view in Bank Reconciliation filtered to show all bank statement adjustments associated with the selected journal detail record.
Double-click a row in the pane to drill down to the Bank Statement window with focus on the adjustment record in the Adjustments tab.
Statements subtab
This tab is visible if the GL entry source is BR-Adjustments and the GL detail reference is "Fee", "Fee Correct", "Interest", "Int Correct", "Transfer In", "Transfer Out", "Other In", or "Other Out".
The Bank Statements pane shows the Bank Statements HD view in Bank Reconciliation filtered to show all bank statements associated with the selected journal detail record.
Double-click a row in the pane to drill down to its record in the Bank Statement window.
Asset GL Detail tab
This tab is visible if the GL entry source is FA-Depreciation and the GL detail reference is "Expense".
The Asset GL Detail pane shows the Asset GL Detail HD view in Fixed Assets filtered to show asset GL detail lines for the selected journal detail line.
Double-click a row in the pane to drill down to its record in the Asset GL Detail window.
Payroll Checks tab
Checks subtab
This tab is visible if the GL entry source is PR-Liability and the GL detail reference is "Summary".
The Checks pane shows the Checks HD view in Payroll filtered to show all checks associated with the selected journal detail record.
Double-click a row in the pane to drill down to its record in the Check window.
Check Lines subtab
This tab is visible if the GL entry source is PR-Liability and the GL detail reference is "Summary".
The Check Lines pane shows the Check Lines HD view in Payroll filtered to show all check lines associated with the selected journal detail record.
Double-click a row in the pane to drill down to its record in the Check Line window.
Disbursements tab
This tab is visible if the GL entry source is PR-Cash and the GL detail reference is "Summary".
The Check Disbursements pane shows the Check Disbursements HD view in Payroll filtered to show all disbursements associated with the selected journal detail record.
Double-click a row in the pane to drill down to its record in the Check Disbursement window.
Distributions tab
This tab is visible if the GL entry source is PR-Accrual and the GL detail reference is "Summary".
The Check Distributions pane shows the Check Distributions HD view in Payroll filtered to show all distributions associated with the selected journal detail record.
Double-click a row in the pane to drill down to its record in the Check Distribution window.
Journal detail security
Common accesses available on journal detail
| Access | A user with this access can... |
|---|---|
| Change | Use the mass change action on journal detail. |
| Data | Have read-only access to journal detail from anywhere in the software (e.g., field validations, filters, date expressions). |
| Delete | Delete journal detail. |
| Edit | Edit journal detail records. |
| Read | Have read-only access to journal detail records. |
| Report | Run reports with journal detail information. |
| Report Designs | Create and edit report designs with journal detail information. This access enables the Report Designs button on the Output tab of report dialogs. |
| Shared Answers | Create and edit saved answers related to journal detail. |
| Shared Filters | Create and edit shared filters on journal detail. |
| Visible | View the Journal Detail folder in the Navigation pane. |
Journal detail filters
The following built-in filters are available for journal detail:
| Filter Name | Effect |
|---|---|
| ? Amount (Debit or Credit) | Prompts for a range of amounts and lists the journal detail entries with a debit or credit amount in that range. |
| ? Credit Amount | Prompts for a range of amounts and lists the journal detail entries with a credit amount in that range. |
| ? Date Range | Prompts for a range of dates and lists the journal detail entries with a posting date in that date range. |
| ? Debit Amount | Prompts for a range of amounts and lists the journal detail entries with a debit amount in that range. |
| ? [Segment Name] (active segments only) | Prompts for a segment item (wildcards allowed) and returns journal detail for accounts with the specified segment value. |
| ? [Segment Name] Range (active segments only) | Prompts for a range of segment items and returns journal detail for accounts with a segment item in the range. |
| ? Ledger | Prompts for a ledger segment and returns journal detail for accounts with the specified ledger segment. |
| Merged Entries | Lists merged journal detail entries only. |
| New Entries | Lists unmerged journal detail entries only. |
Account Conditions
If the account mask you specified in the field that accompanies the Condition field is too broad or too narrow to capture the accounts you need, enter a SQL condition statement here to exclude or include accounts. Accounts are included which satisfy both the condition and the account mask.
If you entered a condition in the underlying field, it is carried over into this text box.
Alternatively, you can use the table below to describe the conditions you need and ActivityHD will build and add the conditions to this text box.
Report Email dialog
- Windows user default account. Sends email using the user's Windows default email account. For most users, this is the account configured in Outlook or another email client application.
- Server personal. Sends email using the email configuration for the system or company server and the email address on the current user's authorized user record. The authorized user record must have a confirmed email address.
- Server generic. Sends email using the email configuration and "from" address for the system or company server. This option requires "Send generic" access to the Server Email resource.
|
5225 S Loop 289, #207 Lubbock, TX 79424 806.687.8500 | 800.354.7152 |
© 2025 AccountingWare, LLC All rights reserved. |