Filters
The Filters folder aggregates all the filters for a company that you have permissions to see. Within the HD view, you can perform actions on several filters at once. The familiar filtering, column filtering, and lookup features are available on the Filters folder just as they are on most other folders in ActivityHD.
Example
Suppose you want to clean up the personal filters for employees who are no longer employed at your company. You could:
- Create a column filter on the Shared column to show filters that are "Not Shared".
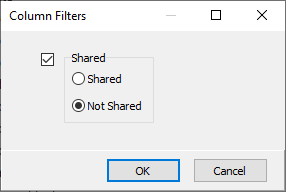
- Create a column filter on the User column to show filters for obsolete users.
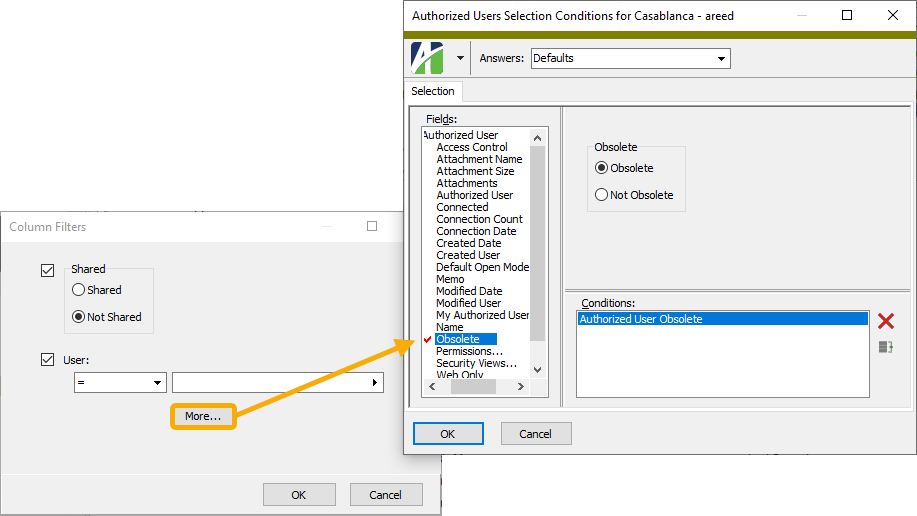
- Review the results, select the filters you want to remove, and delete them.
The Filters folder also provides access to creating and maintaining filters similar to the Maintain Filters feature. An advantage of Maintain Filters is that the guesswork is removed from selecting the package and resource associated with the filter since Maintain Filters is tightly associated with the entity you are creating the filter for and those values are automatically associated with the filter.
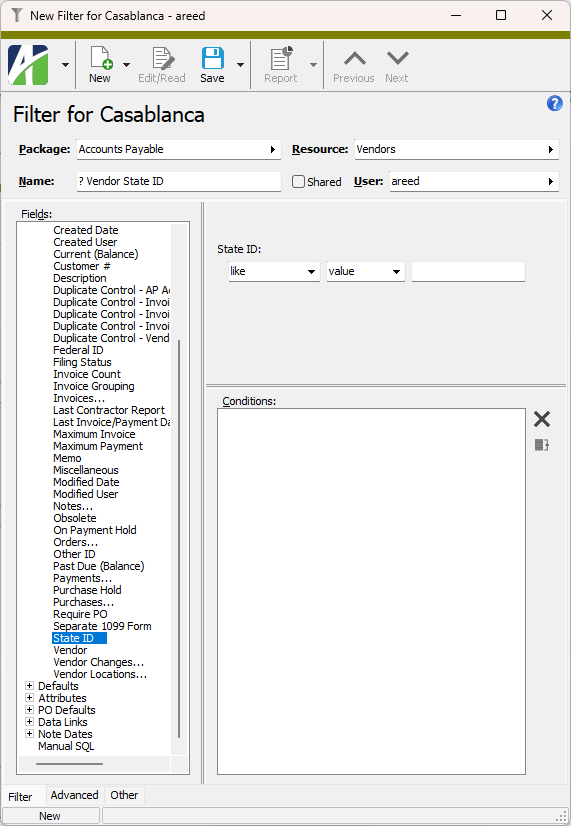
Create a basic filter
- In the Navigation pane, highlight the [Company Name] > Administration > Setup > Filters folder.
- Right-click the Filters folder and select New. The Filter window opens.
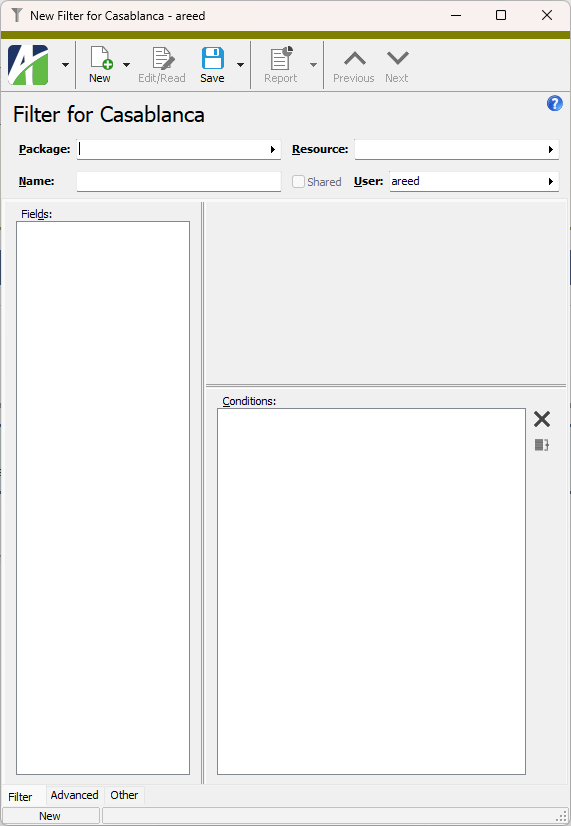
- In the Package field, select the ActivityHD package which contains the data folder to associate with the filter.
- In the Resource field, select the data folder to create the filter for.
- Enter a descriptive Name for the filter.
-
If you want other users to have access to the filter, mark the Shared? checkbox.
If you mark the Shared? checkbox, the User field is disabled; skip to step 8.
- If you did not mark the Shared? checkbox, the User field is enabled. By default, this field contains your authorized user name. If you need to make a different user the owner of the filter, select the user's authorized user name.
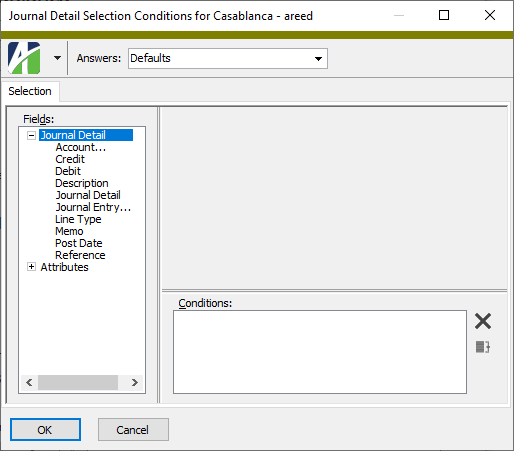
- In the Fields list box, expand the entity list that contains the field you want to specify filtering conditions on (if it's not already expanded), then highlight the field name. Condition prompts load in the panel to the right.
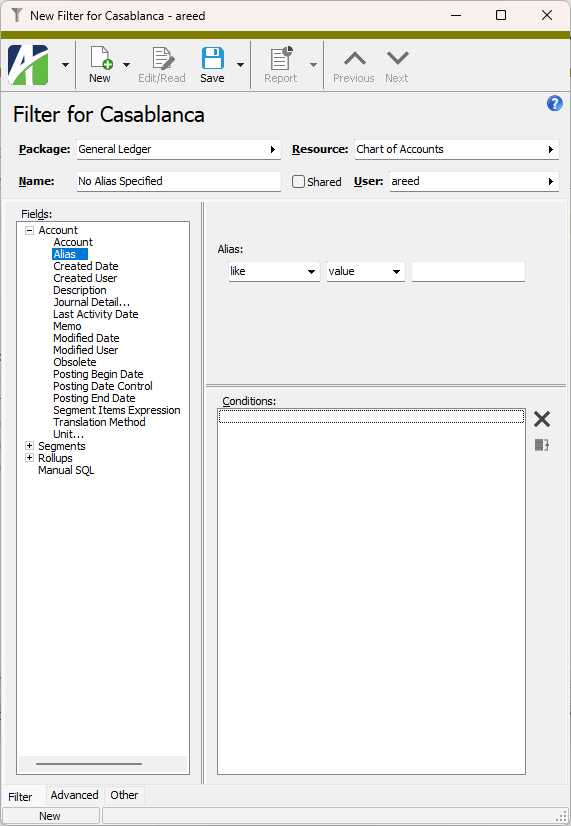
- Respond to the prompts as appropriate. ActivityHD builds the conditions you define and adds them to the Conditions text box.
- If needed, repeat steps 8 and 9 to define additional conditions.
- When you finish, save the filter.
Create a prompting filter
Sometimes you need a filter that returns the same type of results but with different input(s). Rather than create a filter for each change in criterion, ActivityHD lets you create one filter that prompts you for the variable information each time you apply the filter. This type of filter is a prompting filter.
- In the Navigation pane, highlight the [Company Name] > Administration > Setup > Filters folder.
- Right-click the Filters folder and select New. The Filter window opens.
- In the Package field, select the ActivityHD package which contains the data folder to associate with the filter.
- In the Resource field, select the data folder to create the filter for.
- In the Name field, type a question mark (?) followed by a descriptive name for the filter.
-
If you want other users to have access to the filter, mark the Shared? checkbox.
If you mark the Shared? checkbox, the User field is disabled; skip to step 8.
- If you did not mark the Shared? checkbox, the User field is enabled. By default, this field contains your authorized user name. If you need to make a different user the owner of the filter, select the user's authorized user name.
- In the Fields list box, expand the entity list that contains the field you want to specify filtering conditions on (if it's not already expanded), then highlight the field name. Condition prompts load in the panel to the right.
Note
You can only define a prompting filter on fields with condition prompts that permit you to select a comparison operator.
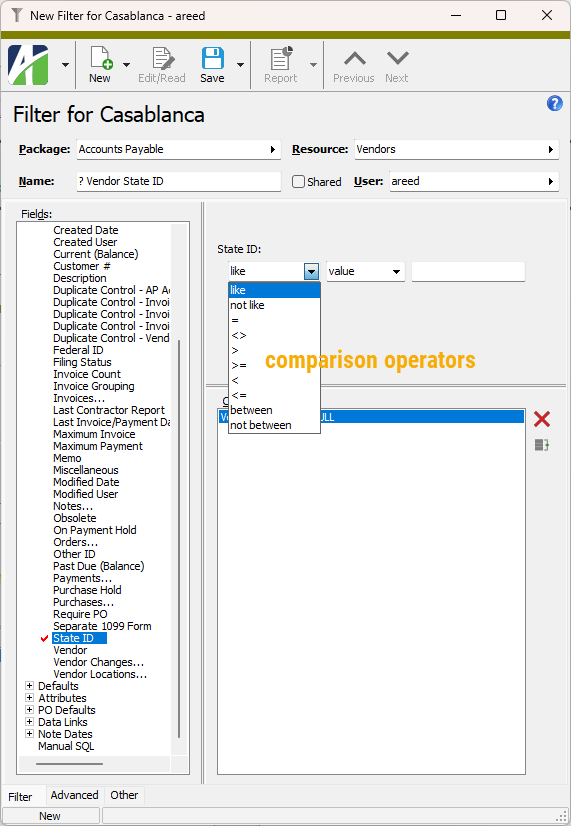
- From the first drop-down list, select the comparison operator to use.
- From the second drop-down list, select "parameter". ActivityHD fills in the parameter name for you.
- If you selected the "like" or "not like" operator in the first drop-down list, an Automatic Parameter Wildcarding section is added below the condition prompts for the field.
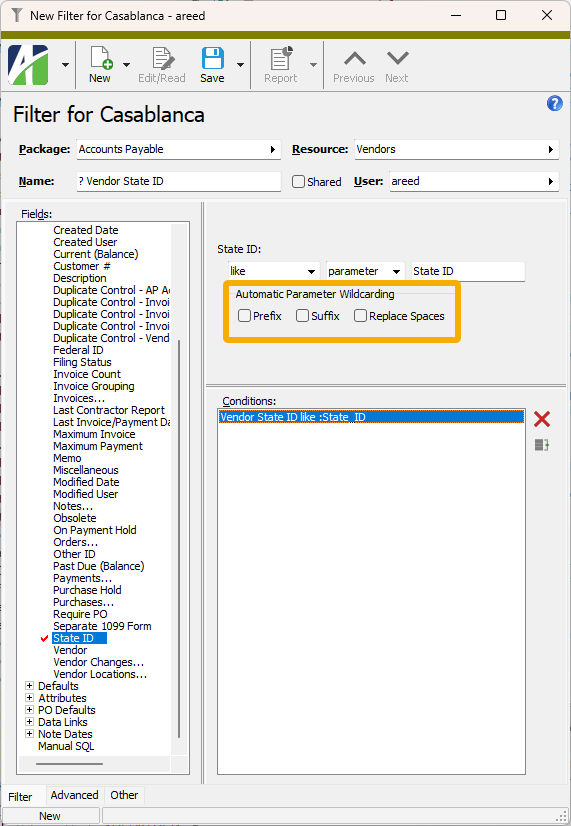
If you want ActivityHD to apply wildcards to the parameter value that is entered when the filter is applied to data, mark the checkbox(es) for the locations to add wildcards to. Your options are:
- Prefix. Adds a wildcard (*) before the parameter value.
- Suffix. Adds a wildcard (*) after the parameter value.
- Replace Spaces. Replaces any spaces in the parameter value with a wildcard (*).
- If there are additional condition prompts, respond to them appropriately.
- When you finish, save the filter.
Modify a filter
Tip
A built-in filter cannot be modified. If you need a filter that is similar to a built-in filter, open the similar built-in filter in the Filter window, then click ![]() and select New Copy. Modify the copy of the built-in filter and save it with a new name.
and select New Copy. Modify the copy of the built-in filter and save it with a new name.
- In the Navigation pane, highlight the [Company Name] > Administration > Setup > Filters folder.
- In the Filters HD view, double-click the filter to modify to open it in the Filter window.
- In the Fields list box, locate and highlight the field you need to modify or add to the filter.
- Make the needed changes to the filter. Follow the directions that apply to the action you need to take:
- Delete - To remove a field from the filter, delete all conditions on the field. To do so, highlight the condition(s) and click
 .
. - Change - To change the conditions on a field, change the settings which define the conditions on the field.
- Add - To add a field, respond to the prompts appropriately.
- Delete - To remove a field from the filter, delete all conditions on the field. To do so, highlight the condition(s) and click
- When you finish, save the filter.
Note
If you modify a filter that is currently applied, you must unapply and reapply the filter to see the effects of your changes.
Hide filters
If you regularly use a few filters and would prefer the filters you rarely or never use to be out of sight, you can hide the filters you don't want to see.
- In the Navigation pane, highlight the [Company Name] > Administration > Setup > Filters folder.
- In the Filters HD view, double-click the filter you want to hide to open it in the Filter window.
- Select the Advanced tab.
- Mark the Hidden checkbox.
- Save your changes.
To restore a hidden filter, follow the same steps, but clear the Hidden checkbox.
![]() Save column settings for a filter
Save column settings for a filter
Save column settings for a filter
ActivityHD can remember the arrangement of columns you used the last time you applied a particular personal or shared filter so that you do not need to arrange the columns the next time you apply the filter.
- In the Navigation pane, highlight the [Company Name] > Administration > Setup > Filters folder.
- In the Filters HD view, double-click the filter you want ActivityHD to recall the column arrangement for to open it in the Filter window.
- Select the Advanced tab.
- Mark the Save Column Settings? checkbox.
- Save your changes.
Use manual SQL
A filter condition is the predicate of a SQL WHERE clause. If you prefer, you can write the filter conditions using SQL directly rather than using the software interface to build the filter conditions. You can also combine the two methods.
- In the Navigation pane, highlight the [Company Name] > Administration > Setup > Filters folder.
- In the Filters HD view, double-click the filter you want to use manual SQL in to open it in the Filter window.
- On the Filter tab in the Fields list box, highlight "Manual SQL" (at the bottom of the list). A Manual SQL text box is added in the right panel.
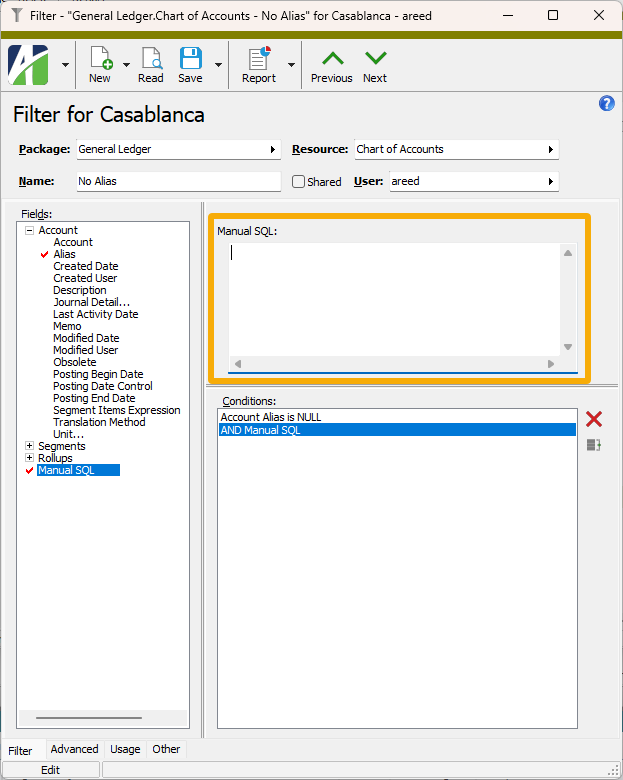
- In the Manual SQL field, enter the conditions to apply.
- Select the Advanced tab.
- Click Check Conditions. ActivityHD will notify you if the conditions are error-free. Otherwise, ActivityHD notifies you of syntax problems so that you can make corrections.
- After you resolve any syntax problems, save your changes.
Create a "sounds like" filter
ActivityHD provides a "sounds like" filter so that you can search names, descriptions, etc., when you don't know the exact spelling. To accomplish this, ActivityHD uses a function called SOUNDEX. Creating a SOUNDEX filter combines the parameter filter concept with manual SQL.
- In the Navigation pane, highlight the [Company Name] > Administration > Setup > Filters folder.
- Right-click the Filters folder and select New. The Filter window opens.
- In the Package field, select the ActivityHD package which contains the data folder to associate with the filter.
- In the Resource field, select the data folder to create the filter for.
- In the Name field, type a question mark (?) followed by a descriptive name for the filter.
Example
? Last name sounds like
-
If you want other users to have access to the filter, mark the Shared? checkbox.
If you mark the Shared? checkbox, the User field is disabled; skip to step 8.
- If you did not mark the Shared? checkbox, the User field is enabled. By default, this field contains your authorized user name. If you need to make a different user the owner of the filter, select the user's authorized user name.
- On the Filters tab in the Fields pane, highlight "Manual SQL". A Manual SQL text box is added in the section to the right of the Fields pane.
- In the Manual SQL text box, enter the following:
SOUNDEX(<field name>) = SOUNDEX(:<parameter name>)
Note
An easy way to determine the field name and the parameter name is to select the field name in the Fields list and select the "like" or "=" operator with the "parameter" option. Go to the Advanced tab and you will find the field name and the parameter name in the SQL Conditions box. If you do this, don't forget to delete the bogus conditions from the Conditions text box on the Filters tab before proceeding.
- Perform the conditions check if desired.
- Save the new filter.
Work with parameters
On prompting filters, ActivityHD lets you specify the field type, the prompt text, and the hint text for the prompt. By default, parameter prompts default to their native field type. Nonetheless, you can change the field type if need be. A type of "date" ensures that the field is formatted to accept date inputs and that the field includes a pop-up calendar for selecting a date. A type of "reference" allows you to specify the table that contains the valid values for the field and provides look-up capability.
To customize a prompting filter:
- Set up the prompting filter as described in "Create a prompting filter" above or load an existing prompting filter.
- Select the Advanced tab. Note that the Parameters table has a row for each parameter the filter prompts for.
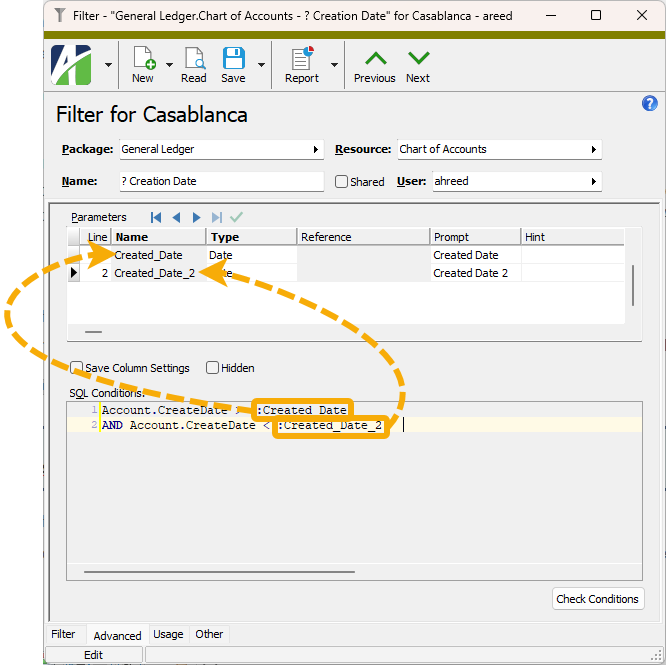
Note
In the SQL Conditions box, parameters are preceded by a colon (:).
- For each row in the Parameters table that you need to change, do the following:
- From the Type drop-down list, select the data type for the parameter. Your options are:
- String
- Date
- Time
- Reference
- Reference Mask
- In the Prompt field, enter the label to use when prompting for the parameter value.
- In the Hint field, enter hint text to help the user know what to enter.
- From the Type drop-down list, select the data type for the parameter. Your options are:
- When you finish, save your changes.
Filter Record ID
Filter tab
 Operator and value/parameter selectors.

To use the selector:
- From the first dropdown, select the operator to use to determine whether a value matches the selection criteria. Your options are:
- like
- not like
- =
- <> (not equal)
- <
- <=
- >
- >=
- between
- not between
- From the second dropdown, select how to determine the value used to return matches to the filter. Your options are:
- value. Select this option to specify an explicit value.
- parameter. Select this option to allow the user to select a value when the filter is invoked.
- Input in the third field depends on whether "value" or "parameter" is selected in the previous field.
- If you selected "value", enter or select the field value for the filter to match.
- If you selected "parameter", the field name is auto-filled in the third field. The user can select from a list of valid field values when the filter is invoked.
If you selected "between" or "not between" in the first field, two additional fields which mirror the second and third fields are added so that a range of values can be specified. Repeat steps 2 and 3 to complete these fields.

- From the first dropdown, select the operator to use to determine whether a value matches the selection criteria. Your options are:

To use the selector:
- From the first dropdown, select the operator to use to determine whether a date matches the selection criteria. Your options are:
- like
- not like
- =
- <> (not equal)
- <
- <=
- >
- >=
- between
- not between
- From the second dropdown, select how to determine the date used to return matches to the filter. Your options are:
- value. Select this option to specify an explicit date or a date expression.
- parameter. Select this option to allow the user to specify a date or date expression when the filter is invoked.
- Input in the third field depends on whether "value" or "parameter" is selected in the previous field.
- If you selected "value", enter or select the date or date expression for the filter to match.
- If you selected "parameter", the field name is auto-filled in the third field. The user can specify a date or date expression when the filter is invoked.
By default, "between" is selected in the first field, and if either "between" or "not between" are selected, two additional fields which mirror the second and third fields are displayed so that a date range can be specified. Repeat steps 2 and 3 to complete these fields.
- From the first dropdown, select the operator to use to determine whether a date matches the selection criteria. Your options are:
To use the selector:
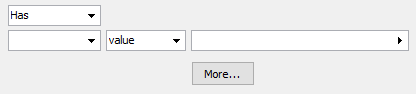
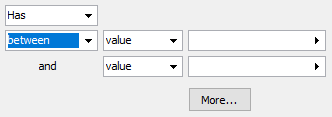
- From the first dropdown, select whether the filter results should have or should not have the specified condition. Your options are:
- Has. The condition should be true for the filter results.
- Does not have. The condition should be false for the filter results.
- From the second dropdown, select the operator to use to determine whether a value matches the selection criteria. Your options are:
- like
- not like
- =
- <> (not equal)
- <
- <=
- >
- >=
- between
- not between
- From the third dropdown, select how to determine the value used to return matches to the filter. Your options are:
- value. Select this option to specify an explicit value.
- parameter. Select this option to allow the user to select a value when the filter is invoked.
- Input in the fourth field depends on whether "value" or "parameter" is selected in the previous field.
- If you selected "value", enter or select the value for the filter to match.
- If you selected "parameter", the field name is auto-filled in the fourth field. The user can select from a list of valid field values when the filter is invoked.
If you selected "between" or "not between" in the first field, two additional fields which mirror the third and fourth fields are added so that a range of values can be specified. Repeat steps 3 and 4 to complete these fields.
If you want to specify additional conditions on the selected entity, click More. A popup window opens with a familiar interface.
Specify conditions in the same manner as you would in the original Selection tab. When you finish, click OK to apply the conditions back in the original window.
- From the first dropdown, select whether the filter results should have or should not have the specified condition. Your options are:
 - Deletes the selected condition(s) and/or grouping(s).
 - When two or more conditions are selected, groups the conditions. (Use Ctrl or Shift selection to highlight multiple items.) Grouping is indicated by (...). When the grouping indicator is selected, options appear in the condition builder tool that allow you to specify how to apply the grouped conditions.
Advanced tab
- String
- Date
- Time
- Reference
- Reference Mask
Usage tab
The Filter Usage pane shows the Filter Usage HD view filtered to show all filter usage records for the selected filter.
Change Logs tab
This tab is visible if the user has "Change Logs" access to the associated data folder resource.
The Change Logs pane shows the Change Logs HD view filtered to show all change logs for the selected entity record.
Double-click a row in the pane to drill down to its record in the Change Log window.
Other tab
Developer tab
This tab is visible only when developer features are enabled.
Automation subtab
This subtab shows field names and values for the current data record. Use the information in the subtab to assist when creating automation objects such as bots and import files. The field names and field values can be copied from the text box and pasted directly into your code or application. To copy content from the text box, highlight the content to copy and press Ctrl+C or right-click your selection and select Copy from the context menu.
Export (XML) subtab
This subtab shows the XML syntax for exporting the selected data record. The syntax can be copied from the text box as an exemplar for creating your own automation objects for bots, import files, ActivWebAPI, etc. To copy content from the text box, highlight the content to copy and press Ctrl+C or right-click your selection and select Copy from the context menu.
Import (XML) subtab
This subtab allows you to select a file for import and shows the XML syntax for importing data records. Use the subtab to explore the XML syntax for importing data records. In particular, you can investigate the syntax which results when using Data.Import and ActivWebAPI data POST and DELETE routes.
Change Log (XML) subtab
This subtab is visible only when the Enable Change Logs option is marked in System Options or Company Options (depending on whether the feature applies at the system or the company level). This is the default setting when developer features are enabled.
This subtab allows you to investigate changes to the current data record. The syntax can be copied for use in bots, dashboards, ActivWebAPI, and other automation. To copy content from the text box, highlight the content to copy and press Ctrl+C or right-click your selection and select Copy from the context menu.
Select Statement (SQL) subtab
This subtab allows you to investigate the SQL select statement used to retrieve the current data record. The syntax can be copied as an exemplar for data sources and other automation. To copy content from the text box, highlight the content to copy and press Ctrl+C or right-click your selection and select Copy from the context menu.
Comparison operators
A comparison operator is a symbol or phrase that indicates how to compare data values. ActivityHD uses comparison operators to construct filter conditions on some fields.
The following table shows the comparison operators available in ActivityHD. The set of operators available in a particular context depends on the data type of the field you are performing comparisons on.
| Operator | Action |
|---|---|
| like | Looks for values that match a specified pattern. Wildcards such as * and ? can be used to designate variable parts of the pattern. |
| not like | Looks for values that do not match a specified pattern. Wildcards such as * and ? can be used to designate variable parts of the pattern. |
| = | Looks for values that are equal to the value specified. |
| <> | Looks for values that are not equal to the value specified. |
| > | Looks for values that are greater than the value specified. |
| >= | Looks for values that are greater than or equal to the value specified. |
| < | Looks for values that are less than the value specified. |
| <= | Looks for values that are less than or equal to the value specified. |
| between | Looks for values that fall between the value specified and another value. |
| not between | Looks for values that do not fall between the value specified and another value. |
Filters security
Common accesses available on filters
| Access | A user with this access can... |
|---|---|
| Change | Use the mass change action on filters. |
| Change Logs | |
| Custom Fields | Create and edit custom fields for filters. |
| Data | Have read-only access to filters from anywhere in the software. |
| Delete | Delete filters. |
| Edit | Edit filter records. |
| Export | Export filter records from ActivityHD. |
| Import | Import filter records into ActivityHD. |
| New | Create new filter records. |
| Read | Have read-only access to filter records. |
| Report | Run reports with filter information. |
| Report Designs | Create and edit report designs with filter information. This access enables the Report Designs button on the Output tab of report dialogs. |
| Shared Answers | Create and edit saved answers related to filters. |
| Shared Filters | Create and edit shared filters on filters. |
| Visible | View the Filters folder in the Navigation pane. |
|
5225 S Loop 289, #207 Lubbock, TX 79424 806.687.8500 | 800.354.7152 |
© 2025 AccountingWare, LLC All rights reserved. |