This document describes how to implement the Self-Serve web portal.
- Physical or virtual server with the following specifications:
- 1 processor, 2Ghz or better, 64-bit architecture
- 4GB RAM
- 50GB system disk
- 25GB data disk (recommended but not required)
- Windows Server 2016, 2019, or 2022 (recommended) or later with Internet Information Services (IIS) enabled
- Stateful inspection firewall and Internet connectivity
- Public static IP address
- Fully-qualified domain name for the website (e.g., selfserve.company.com)
- Secure Sockets Layer (SSL) certificate, preferably through a trusted certificate authority
- Anti-virus software client
- Note: The ActivityHD Self-Serve application can reside on a shared web server, depending on the deployment option selected.
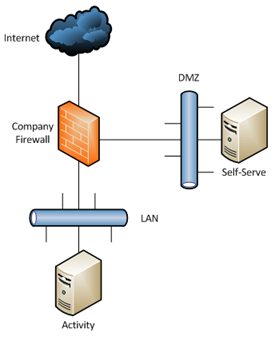
Option 1: DMZ
AccountingWare recommends you deploy the Self-Serve web server on the same network with the ActivityHD server but in a secure DMZ.

Advantages:
- Good responsiveness between Self-Serve site and the ActivityHD server
- Local control of web server and resources
Disadvantage:
- Increased but controlled security exposure to the Internet
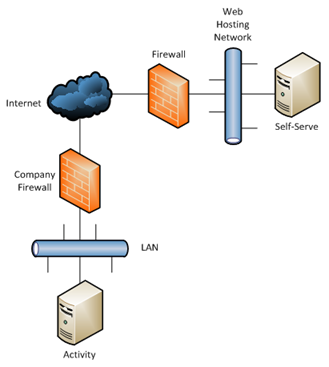
Option 2: Web-hosting provider
Alternatively, you can deploy the Self-Serve web server through a web-hosting provider.

Advantage:
- No server to purchase and maintain
Disadvantages:
- Control over web server may be limited
- Responsiveness may be impacted by Internet usage
- Install the Windows Server operating system (if needed).
- Assign and configure a static IP address.
- Enable the IIS server role.
- Download and install all available Microsoft critical updates. Configure the server to automatically download and install future updates.
- Install an anti-virus client. Configure to automatically download and install future signature updates.
- Open IIS and install Microsoft Web Platform Installer by clicking Get New Web Platform Components.
- Open Web Platform Installer and verify that .NET 4.5 is installed on the webserver. If not, install it with Web Platform Installer.
- Through Web Platform Installer, verify that Web Deploy 3.5 is installed on the webserver. If not, install it with Web Platform Installer.
- Install ASP by navigating to Control Panel > Programs > Turn on or off features > Web Server (IIS) > Web Server > Application Development > ASP.NET 4.6.
- Create the website.
- In the main tree view, right-click on the Sites folder and select Add Website.
- Add a Site name.
- Add a physical path.
- Add an https binding for the website (leave the host name blank for now).
- If a "binding is assigned to another site" message is displayed, click Yes to continue. This will be dealt with in a later step.
- Select the SSL certificate.
- Uncheck Start Website immediately.
- Click OK.
- Verify that the new website's .NET CLR Version is v4.0
- In the main tree view, click Application Pools.
- If the .NET CLR Version is not v4.0, use the .NET CLR version dropdown to select the correct version.
- Install the Self-Serve package.
- Right-click on the new website and hover over Deploy.
- Click Import Application.
- Browse to the location of the ActivityHD selfserve.zip file that contains the asp.net Self-Serve site.
- Click Next until the "Enter application package information" page is displayed. Clear the value in the text box.
- Click Next and the package will be installed.
- Configure ActivityHD company web services.
- Run ActivityHD Explorer.
- Connect to the ActivityHD System Server.
- Highlight the ActivityHD System > Companies folder.
- For each ActivityHD company that will be available through the website, do the following:
In the HD view, right-click the company name and select Autoconfigure Web Services to create a self-signed certificate for the communication between the ActivityHD server and the Self-Serve website. By default, this action creates a certificate with an expiration of 80 years and configures a default port for the Self-Serve website to connect with.
Note
This certificate is only for communication from the Self-Serve website to ActivityHD (not vice versa). Just as a user connecting to a secure website must trust the secure website's certificate, the Self-Serve website must trust the ActivityHD server certificate.
- Open the company record, select the Web Services tab and note the port and certificate settings.
- Save the SSL certificate to a .cer file.
- Select everything in the SSL Certificate box. (For best results, use Ctrl + A)
- Copy the selected text to your clipboard.
- Open Notepad and paste the text you just copied.
- Save as a .cer file. This .cer file will be installed on the web server.
- Restart the ActivityHD company.
Note
If a self-signed certificate is not preferred, it can be replaced with a signed certificate–either signed by an internal CA or a public CA. The certificate and private key must be in a PEM format.
- Install the Activity Company SSL certificate on the webserver.
- Copy the .cer file created in the previous step to the web server.
- On the web server, run MMC.
- Select File > Add > Remove Snap-in.
- Double-click Certificates.
- Choose Computer Account.
- Choose Local Computer.
- Double-click Certificates.
- Right-click Trusted Root Certification Authorities, select All Tasks > Import and go through the Wizard to install.
- Give the newly installed certificate (in the TRCA folder) a user-friendly name for easy identification.
- Create the .config files.
- Create the App.config file by copying app.sample.config(found in the path specified for website physical directory) and then renaming it to App.config.
- In the App.config file, define the following values:
- For a single company:
- ActivityServerURL
- ActivityCompanyName
- ActivityConfig:RowsPerPage
- For multiple companies:
- <subdomain>:ActivityServerURL
- <subdomain>:ActivityCompanyName
- ActivityConfg:RowsPerPage
Replace <subdomain> with the actual subdomain value, and repeat for each company.
- If you want to display your domain name on the login page, uncomment the add key line and enter the value.
- To display your logo on the Self-Serve page, copy the logo file to the website's \Content\Images folder, then replace the default logo filename with your logo filename on the add key line.
- If you want the password reset option available to Self-Serve users, define the following values:
- SMTP:Host
- SMTP:Port
- SMTP:EnableSSL
- SMTP:Username
- SMTP:Password
- SMTP:FromAddress
- SMTP:Contact
- To use Swipeclock authentication, uncomment and provide values for the following:
- SwipeClock:Secret
- SwipeClock:Url
- For a single company:
- Create the Machinekey.config file by copying Machinekey.sample.config (found in the path specified for website physical directory) and renaming it to Machinekey.config.
- To get the values required for the Machinekey.config file, do the following:
- Open the "IIS" application.
- Expand Server > Sites > <new website>.
- Double click on the Machine Key icon.
- Verify that the Validation Method is set to SHA1.
- Verify that the Encryption Method is set to AES.
- Click Generate Keys on the right side of the page.
- Copy the Validation Key into the Machinekey.config "validationKey" value .
- Delete the extra characters ",isolate" at the end of the key, and save prior to copying.
- Copy the Decryption Key into the Machinekey.config "decryptionKey" value.
- Delete the extra characters ",isolate" at the end of the key, and save prior to copying.
- Save the Machinekey.config file.
- Set up the nLog.config file:
- Change nLog.config target to point to "${basedir}/logs/self-serve-log.txt"
- Create a "Logs" folder in the base directory.
- Give Read/Write access to the website profile. The profile name is created by IIS and should match the name of the website.
Note
When setting up multiple companies, the last step of each deployment needs to account for all the domain names that will be used to access the website.
For DMZ deployment
- Modify the company firewall to allow inbound TCP ports 80 and 443 from all Internet addresses to the server in the DMZ.
- Modify the firewall to allow the ActivityHD company ports between the Self-Serve server in the DMZ and the ActivityHD server on the company LAN.
- Create DNS records on the external and internal DNS servers for the Self-Serve website (e.g., selfserve.company.com).
For Web-hosting deployment
- Request that the hosting provider modify their firewall to allow inbound TCP ports 80 and 443 from all Internet addresses to the hosted Self-Serve server.
- Modify the company firewall to allow the ActivityHD company ports between the public IP of the hosted Self-Serve server and the ActivityHD server on the company LAN.
- Create DNS records on external DNS servers for the Self-Serve website (e.g., selfserve.company.com).
|
5225 S Loop 289, #207 Lubbock, TX 79424 806.687.8500 | 800.354.7152 |
© 2025 AccountingWare, LLC All rights reserved. |