Financial designs
Essentially, a financial design is an Excel worksheet that incorporates labels, ActivReporter functions, and Excel formulas to produce a customized financial statement. Because the functions are generalized, you can reuse a financial design from period to period and year to year.
Note
Financial designs always create a file in a certain baseline Excel file format regardless of which version of Excel is installed on your workstation. This means users can generally open and work with financial design worksheets no matter which version of Excel is installed.
Financial design worksheets can be created and stored in ActivReporter or external to it. There are several advantages to maintaining your designs within ActivReporter:
- Worksheets are backed up with the rest of the ActivReporter database.
- It is easy to share your worksheets with other ActivReporter users.
- Worksheets can be secured with standard ActivReporter security.
- Worksheets are versioned so that historical worksheets can be viewed and restored.
Preparing to design a financial statement
Before you start designing a financial, examine your current financial statement. Note that it consists of rows and columns. Each row and each column on the statement has an identifying characteristic or rule that can be associated with the row or column.
Rows typically identify which account or group of accounts appear on that row. In most cases, the group of accounts relates to a rollup code. Rows may also contain formulas which total sections of the report.
Columns usually either contain descriptions of lines, financial data, budget data, or calculations (such as variances and/or percentages). This type of information is retrieved from ActivReporter via financial functions. Often the formula for all cells in a column section is the same so that you can enter a formula in the cell at the top of the column section and drag down to copy the formula to all rows of that section of the financial.
The purpose of the remaining information in this topic is to help you translate your paper statements into generalized designs which can be used today and for years to come.
 Create a financial design record
The procedure which follows describes how to create a design record. Concealed in step 15 of this procedure is the heart of the effort, setting up the design in Excel. This aspect of financial design creation is discussed in the topics on the "Design creation" tab.
- In the Navigation pane, highlight the ActivReporter > Financial Designs folder.
-
Click
 . The New Financial Design window opens.
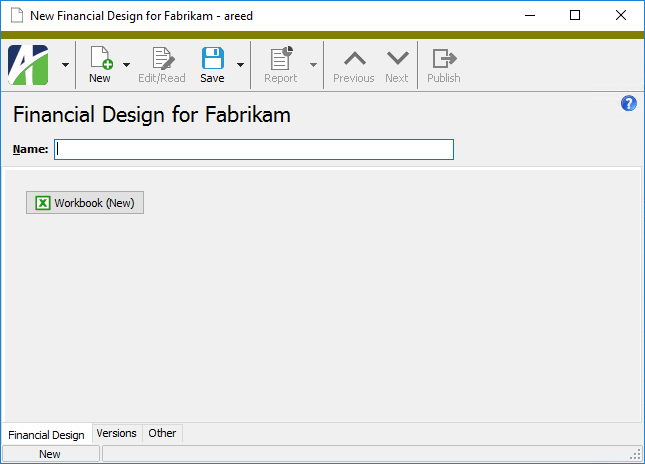
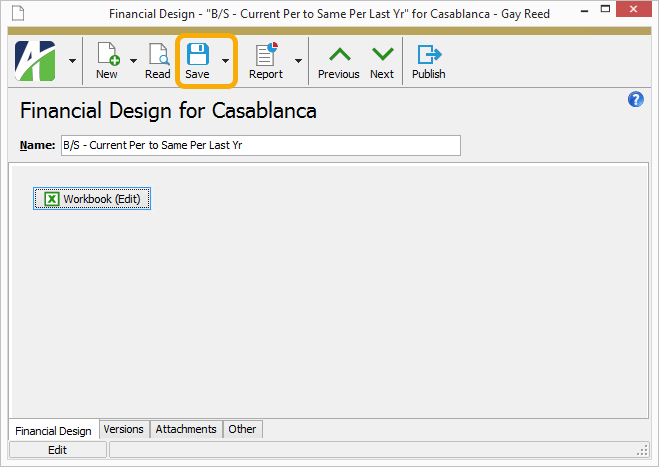
- Enter a unique Name for the financial design. You can use up to 40 characters.
-
Click Workbook. The Financial Options dialog box opens.
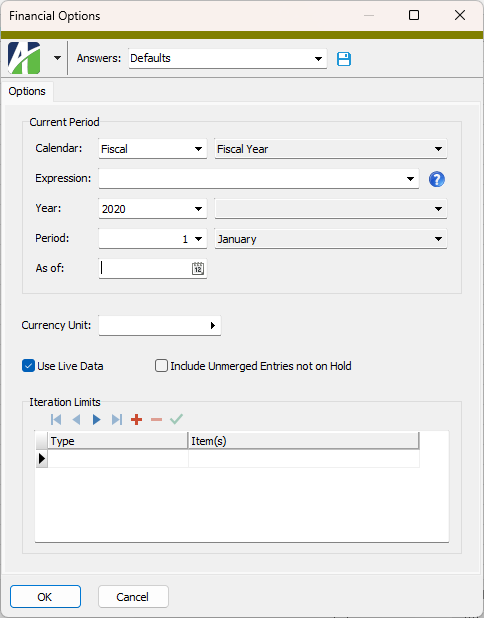
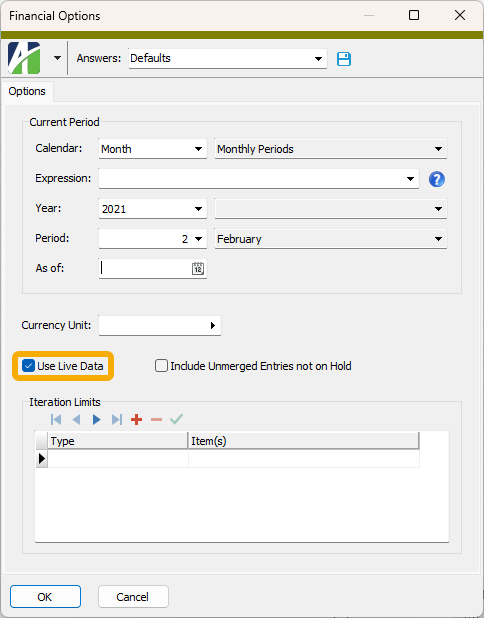
- From the Calendar drop-down list, select the calendar to base the financial statement on.
-
To define the reporting period using a relative expression, select or enter the period expression in the Expression field. (If you prefer to explicitly enter the year and period, skip to step 7.)
You can select from the following common period expressions:
- Current
- Current - 1 period
- Current - 1 year
Alternatively, you can type a valid period expression in the field. For help on period expression syntax, click the help button to the right of the field.
If you select or enter a period expression, ActivReporter adjusts the values in the Year and Period fields accordingly.
If you enter a period expression, skip to step 9.
- From the Year drop-down list, select the year of the period to report on.
- From the Period drop-down list, select the period to report on.
- If you only want the financial report to reflect postings through a particular date, enter the date in the As of field. All postings after the as of date are ignored. The as of date must fall between the current period begin and end dates.
- To report in a different unit than the unit(s) specified on the affected accounts, select the reporting unit in the Currency Unit field; otherwise, leave this field blank. This option is used to perform translation between units. For optimal performance, only use this option when translation is needed.
- If you want to display actual data in your financial design, mark the Use Live Data checkbox; otherwise, the design will show zeros for amounts.
- If you mark the Use Live Data checkbox, the Include Unmerged Entries Not on Hold checkbox is enabled. Mark this checkbox if you want the live data to include unmerged entries which are not flagged as "on hold".
- If needed, use the Iteration Limits table to restrict the data that is reported. To do so, for each limit you want to define:
- In the Type column, select whether to limit by account number, a specific segment, a specific rollup, or a specific attribute.
- In the Item(s) column, specify the mask or value(s) for the account number, segment item, rollup item, or attribute item to limit by.
Note
The Find dialog on the Item(s) field supports multi-select. For example, if you choose "Department" in the Type field, you could use Ctrl and/or Shift selection in the Find dialog on the Item(s) field to select multiple departments for iteration. This feature allows you to create a consolidated financial for a set of items.
- Click OK.
- Set up the financial design in the open Excel worksheet.
- When you finish, save the financial design worksheet in Excel.
- Close Excel.
- In the Financial Design window, save the financial design record.
Tip
After you design a financial statement, consider reusing it as the basis for future financial designs. To copy a design to a new file, use the New Copy feature.
Work with design versions
When you open a financial design for editing, you are opening the most recent version of the design (unless you intentionally select an older version). Financial designs are extracted to a temporary file on your hard drive or network and Excel is launched as an external application in its own process for editing the file. When you save changes to a design, first in Excel and then in ActivReporter, a new version of the design is added to the ActivReporter database and past versions of the design are retained (unless you choose to delete them).
Open a historical version of a financial design
Opening a historical design creates a numbered version of the workbook in your tmp directory. This file is read-only. It is automatically removed from the tmp folder when you close the design unless you save the workbook with a new name or in a new location.
- In the Navigation pane, highlight the ActivReporter > Financial Designs folder.
- In the HD view, locate and double-click the financial design. The record opens in the Financial Design window.
- Select the Versions tab.
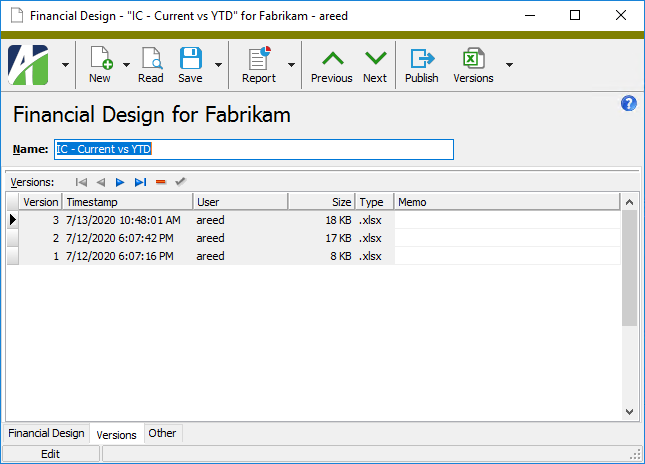
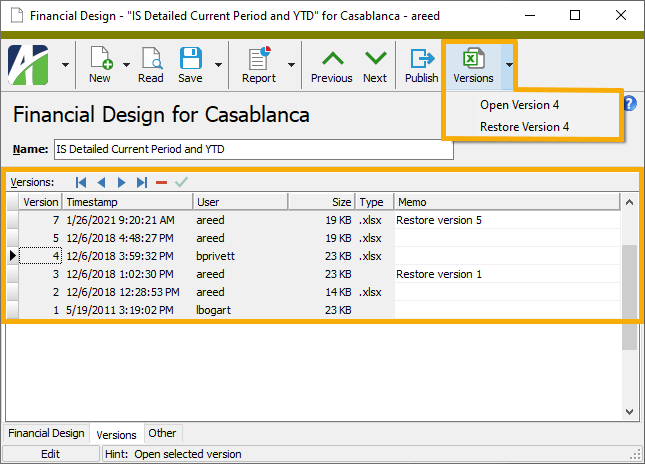
- In the Versions table, right-click in the Version column of the row which contains the financial design version you want to open and select Open Version n, where n is the version number.

The worksheet opens in read-only mode and the Financial Options dialog box opens.
Restore a historical version of a financial design
Restoring a historical design creates a copy of the selected design and makes it the active design.
- In the Navigation pane, highlight the ActivReporter > Financial Designs folder.
- In the HD view, locate and double-click the financial design. The record opens in the Financial Design window.
- Select the Versions tab.
- In the Versions table, right-click in the Version column of the row which contains the financial design version you want to open and select Restore Version n, where n is the version number.
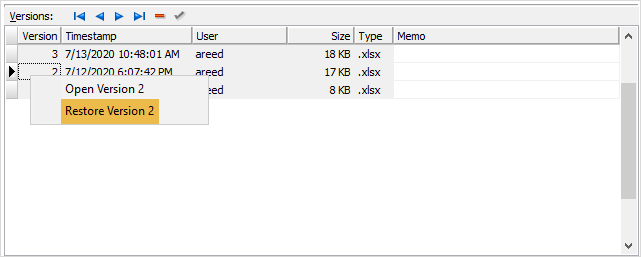
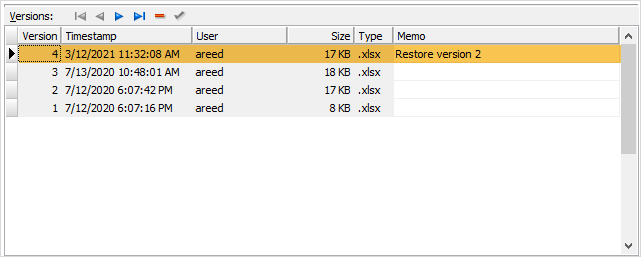
A row is added at the top of the Versions table with a memo of "Restore version n".
Delete a historical version of a financial design
Note
You cannot delete the active version of a financial design.
- In the Navigation pane, highlight the ActivReporter > Financial Designs folder.
- In the HD view, locate and double-click the financial design. The record opens in the Financial Design window.
- Select the Versions tab.
- Click in the row in the Versions table for the version you want to delete.
- In the controls above the table, click
 . You are prompted to confirm that you want to delete the selected version.
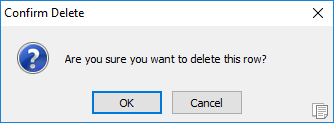
- Click OK. The row is removed.
Load a design from an external location
If you have a financial design saved, for whatever reason, outside of the tmp directory where ActivReporter puts Excel design files for editing, it is possible to load that design for use in ActivReporter. Here's how:
- Create a new financial design record or open an existing design record to add a new version of it.
- From the toolbar, select
 > Tools > Load Workbook from File. The Windows Open dialog opens.
 - Navigate to and select the financial design you want to load.
- Click Open.
- Save the financial design record.
Save a design to an external location
You can save a financial design stored in ActivReporter to an external file. To do so:
- Open the financial design record in ActivReporter.
- From the toolbar, select > Tools > Save Workbook to File. The Windows Save As dialog opens.
- Navigate to and select the location where you want to save the financial design.
- In the File name field, enter a file name for the financial design.
- Click Save.
Delete a financial design record
Financial design records can be deleted with impunity.
To delete a financial design record, highlight it in the HD view and click ![]() , or open the financial design and select
, or open the financial design and select ![]() > Edit > Delete. In either case, ActivReporter prompts you to confirm your action. Click Delete to delete the financial design.
> Edit > Delete. In either case, ActivReporter prompts you to confirm your action. Click Delete to delete the financial design.
Elements of a financial design
Although they can vary in their complexity, all financial designs have the following elements in common:
- Report and column headings. You can enter literal text in any cell of an Excel worksheet to produce report and column headings. At times you may want to retrieve information from ActivReporter to use in headings; e.g., company name, company address, segment item description, period ending date. To retrieve data for headings, use text functions or date functions.
- Literals. You can enter text in any cell of a worksheet. Do not use literal text, however, for row descriptions. Instead, use text functions to retrieve the descriptions of the rollup items for each row.
- Formulas. Formulas retrieve numerical values or text. Formulas often use rules that affect each row or column. Insert rules in the margins of the design.
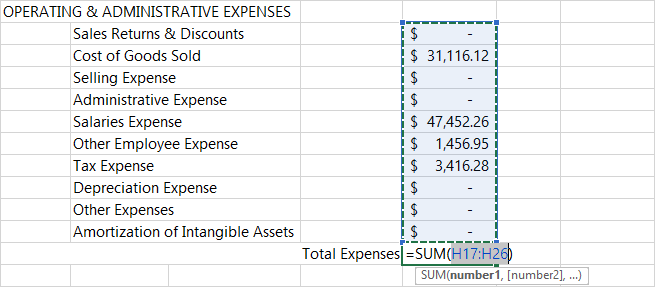
- Totals. Use Excel formulas to calculate totals in your financial designs. Totals are almost always defined using Excel's SUM function.
ActivReporter's extended function library for Excel lets you incorporate information from General Ledger in your financial design. One advantage of financial designs is that you can reorganize your rollups and have the changes immediately reflected in all affected financial designs.
Before you create a financial design, the following preparation is needed:
- Determine how to summarize information. Which accounts do you want to group together and report on a line? Do you have an existing rollup for these report groupings that you can use? If so, skip to step 5.
- Create a rollup that represents the report groupings you need.
- Add rollup items to the rollup that identify each line on the financial statement.
- Activate the rollup.
- Create a new financial design.
Tip
When possible, reuse rollups in multiple financial designs.
Best practices
![]()
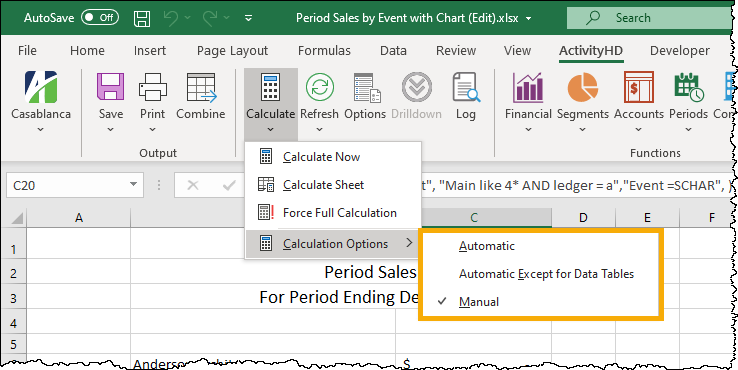
Large workbooks and calculation mode
The default calculation mode for ActivReporter is "Automatic". However, when designing a large workbook, set the calculation mode to "Manual". Then use F9 to recalculate the entire workbook, or Shift+F9 to calculate the current worksheet only.
Workbook storage location
While workbooks can be stored in the Windows file system or internal to the ActivReporter application, AccountingWare recommends that you store workbooks in ActivReporter. The advantages of storing in ActivReporter include:
Versioning
Iteration
Memo
Add free text to describe the workbook design and its use. See who created the design, the last date/time the design was modified, and other information about the workbook.
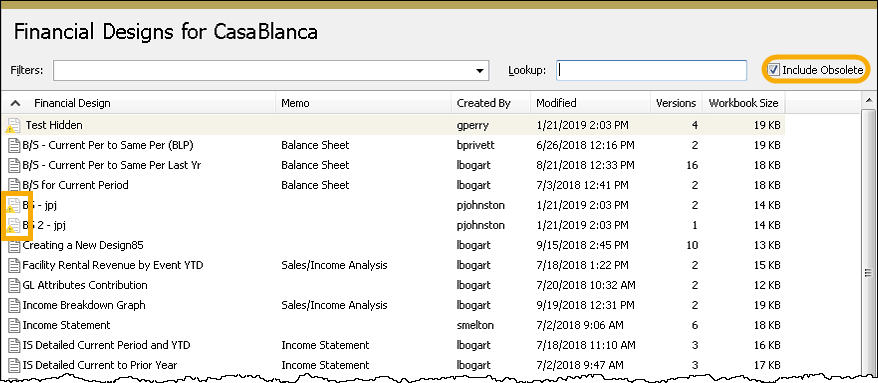
Obsolete workbooks
You can flag a workbook as obsolete while still retaining it for future use. When flagged "Obsolete", workbooks are hidden in the HD view unless you mark the Include Obsolete checkbox.
Attachments
If FileStream is enabled on the ActivReporter database (see your database administrator to get it enabled), you can add attachments to your financial designs. That could mean storing an entire database of published financials based on a design. If you do use attachments to store your published financial library, ActivReporter security will secure access to your financial information.

Note 1: Saving a workbook stored in ActivReporter
When a workbook is stored in ActivReporter, you must save the workbook in two places:
-
In Excel. Close the workbook and save when prompted, select the File tab and then select Save, or click Save in the ActivityHD ribbon.
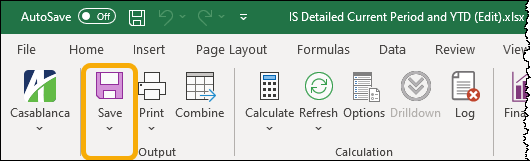
-
In ActivReporter. Save the financial design record.
Note 2: Multi-company financial statements
When you need to create financial statements which combine data from two or more separate companies (i.e., databases), you can choose which ActivReporter company "hosts" the financial design; it does not matter which company you choose. The internal security for each company dictates whether you can access the data stored in the various company databases. Of course, if companies are delineated by using a segment of the chart of accounts, the issue of where to store the financial design is avoided.
Compound formulas in an Excel cell
Compound formulas in Excel workbooks occur when there are two Activity functions in the same cell combined by an addition (+) operator. For example:
=Balance("", "GL.Account=000-1100-00", , "Fabrikam") + Balance("", "GL.Account=000-1100-00", , "Fabrikam")
Avoid this construction because the drilldown feature can only drill down to the first function. To work around this limitation, place the two components in two distinct cells (columns). If you don't want to see these cells in the final output, you can hide them.
Use the ItemExpression function to simplify setting two strings equal
Parameters in a function often require you to set two strings equal to one another. For instance:
GL.Account = 000-1100-00-A
or
GP Balance Sheet = 032
The first example is not problematic. However, the left side of the second example is a string that includes spaces, so we must enclose the string in quotes so that the parameter parser can work properly; in other words:
"GP Balance Sheet" = 032
But this is still a problem because the parameters of a function are strings themselves, so they must likewise be enclosed in quotes. The natural solution seems like:
""GP Balance Sheet" = 032"
However, this still isn't a proper construction since the parser requires you to "escape" quotation marks. Therefore, the proper formulation for the parameter is:
"""GP Balance Sheet"" = 032"
The complexity increases when you use indirect references in cells such as:
GP Balance Sheet = $A7
To be parsed correctly, this must be written as """GP Balance Sheet"" = "&$A7
To avoid this confusion, there is a special ActivReporter ItemExpression function which simplifies equating two strings even if the strings contain spaces.
The function parameters in the examples above can be written as follows using the ItemExpression function:
ItemExpression("GP Balance Sheet", "032") [Note: "032" must be enclosed in quotes so that it is not interpreted as "32".]
ItemExpression("GL.Account", "000-1100-00-A")
ItemExpression("GP Balance Sheet", $A7)
The ItemExpression function can accept an unlimited number of item/value pairs.
ItemExpression(A1,A2,B1,B2,C1,C2,...) equates to "(A1=A2 AND B1=B2 AND C1=C2 AND ...)"
Note
Always quote both string parameters (i.e., "032" and "000-1100-00-A") unless the parameter is a reference to a cell (e.g., $A7) that is formatted as a string in Excel.
Tips for designing HUGE workbooks
ActivReporter can switch between "live data" mode and "non-live data". Live data updates your workbook with the current contents of the database whenever you press F9 in the financial design. You can control which mode ActivReporter is using by marking or clearing the Use Live Data checkbox in the Financial Options dialog. You can access the dialog by clicking Options in the ActivityHD ribbon.
If you are designing a huge workbook of many pages, your user experience may be improved by working with live data turned off. Alternatively, you can use Shift+F9 to update only the current worksheet instead of updating the entire workbook.
Publishing financial designs (workbooks)
There are several ways to publish/print your financial designs including:
- Excel's print function
- Right-click option on ActivReporter's Financial Designs folder
- Account Financial Report augmented with BOTs
Printing in Excel
When a workbook is open in Excel, Excel's print and save features are available. These are the primary ways to "publish" during the design process. Once the design is finalized, however, it is preferable to use another method to publish it since any time you open a workbook you run the risk of making inadvertent changes to the design.
Publish Financials option on the right-click menu of the Financial Designs folder
This method is AccountingWare's recommended method for publishing financial designs. The advantages include:
- Availability of iteration
- Ability to limit results by accounts, account segments, or rollups
- Ability to switch budgets at runtime
- Elimination of accidental changes to the finalized design
Iteration
Using iteration allows you to publish multiple financial statements with a single instantiation of a report. For instance, with one financial design you can use iteration to produce reports for each division/company/department/etc.
Limiting results by account(s), account segment(s), or rollup(s)
You can use the Publish Financial Statements wizard to filter a financial statement to a specific set of accounts, account segments, or rollups.
Switching budgets at runtime
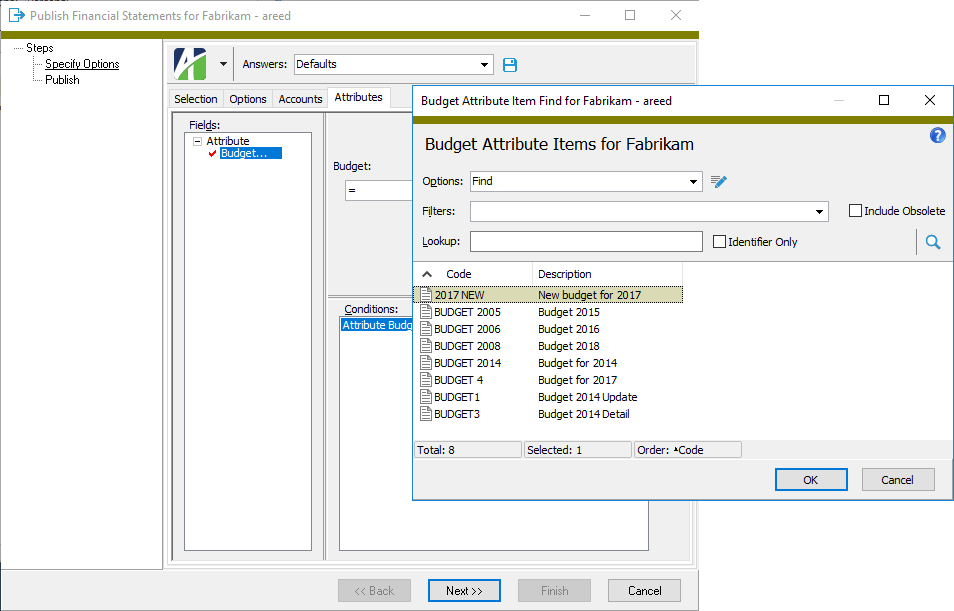
Many companies have multiple budgets active at any given time in Dynamics GP. If the financial statement is designed using the generic budget ledger (B), when it is published the user can select which budget to use in budget comparisons. You can do this by selecting the budget from the Attributes tab in the Publish Financial Statements process.
Account Financial Report augmented with BOTs
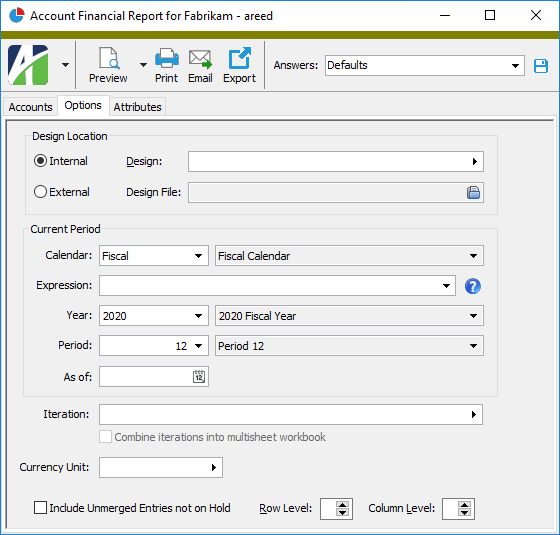
The Account Financial Report is a special report located at ActivReporter > Reports > Account Financial Report or ActivReporter > Chart of Accounts > [right-click] > Select and Report > Account Financial Report. This report is used primarily in conjunction with BOTs in order to automate the process of generating financial reports. BOT creation requires someone skilled in using VBScript or JScript.
BOTs can provide the capability to:
- Produce a set of financial reports
- Email specific financial reports to specific people
- Store specific financial reports in a specific location or library
- Attach specific financial reports to specific financial designs using a naming convention
BOTs are not a standard component of ActivReporter. BOTs are programmed to suit each individual customer's specifications and can be a tremendous time saver when properly designed and deployed.
Financial design presentation
While there are several ways to present your financial designs, the two most common are:
- Excel workbooks with numeric data only (no formulas)
- PDFs
Excel workbooks with numeric data only
If your goal is for the financial statement consumer to investigate the numbers in a financial statement, then disseminating statements as Excel workbooks is a logical choice. Distributing statements in this way retains the drilldown to detail function on financial amounts as well as drillback to Dynamics GP.
PDFs
PDFs are static and suitable for printing or saving to a library in the Windows file system or for attaching to the financial design record itself in ActivReporter.
Iteration hint
If you produce 15 financial reports using iteration and find errors in one or two of them, what should you do? Browse to the folder that contains the financial statement output and delete the statement(s) with errors. When you run the iteration again, you can opt to skip the regeneration of any statements which already exist in the output folder.
Reserving the first three columns and rows of a worksheet for indirect references
ActivReporter does not require any special row or column reservations. Every Excel financial function can be self-contained and free of indirect references.
On the other hand, ActivReporter financial designs can often benefit from the use of indirect references. If you choose to do so, we recommend you use a few of the left-most columns and top-most rows for this purpose. This recommendation is not mandatory; in fact, you can use any rows and columns for indirect references and then hide them in your final presentations. You can even use other worksheets in your workbook to manage indirect references.
Indirect references can be used to refer to ledgers, periods, accounts, rollups, and other items which support the financial design process. Refer to the sample reports to observe how indirect references can be used in financial designs.
Create a financial design from a blank Excel worksheet
The discussion that follows assumes that you have an intermediate knowledge of Microsoft Excel, including Excel functions (like SUM, COUNT, DATE), relative cell referencing, and formatting principles.
In addition, you should have a general knowledge of ActivReporter's extended function library for Excel plus ActivReporter's expression syntax and how to apply it.
Tip
The usual Excel commands are enabled when you are working on financial designs. Notably, the Split and Freeze Panes commands are available on the View ribbon.
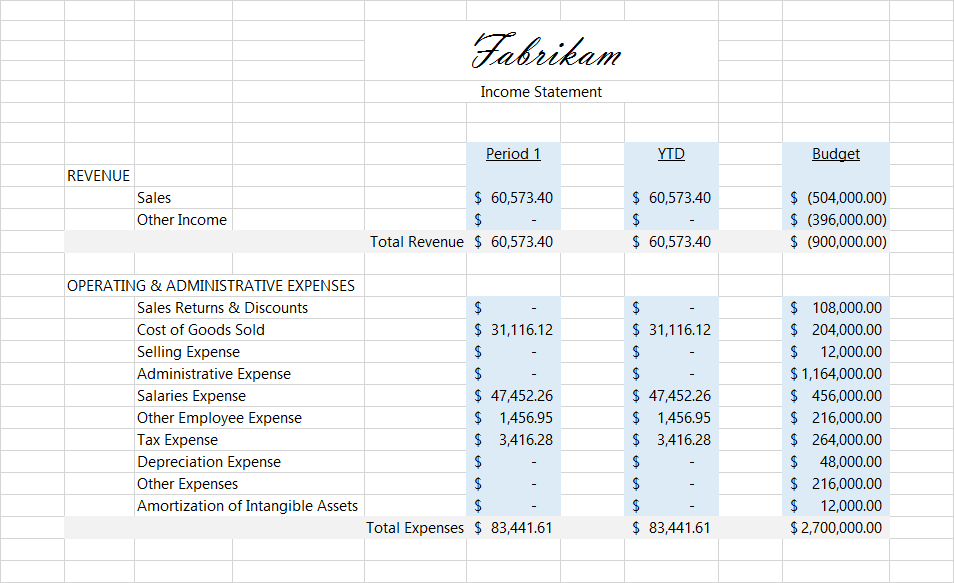
We'll illustrate the basic principles of financial design by creating a simple income statement.
Step 1: Design the financial statement on paper
Ask yourself a few questions:
- What should the general layout look like?
- What information do I want to present?
- How should I organize that information on the statement?
- How will I label the columns and rows on the statement?
- Do I have the rollups I need to group the accounts for reporting?
- Which ActivReporter formulas do I need to pull in the data I want?
- Which Excel functions do I need to summarize the data?
After you've answered the questions and gathered the facts you need, sketch the statement out on paper as a guideline while you implement your design.
Step 2: Create new rollups and rollup items if needed
For an income statement, it would be good to have a rollup representing revenues with rollup items that represent the categories of revenue we want the statement to show. Likewise, we should include a rollup for expenses with rollup items that represent the categories of expenses we want to show.
- Create rollups.
- Add appropriate rollup items to the rollups.
For our example, we are using a rollup called "REVS" for revenues. REVS has the following rollup items:
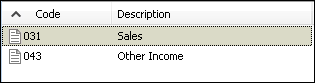
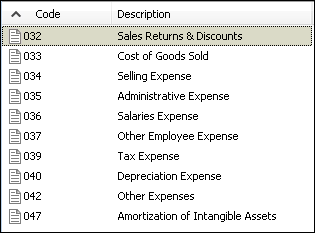
"EXP" is our rollup for expenses. It has the following rollup items:
Note
We could have created one rollup with both the revenue and expense items we need. Indeed, that would simplify our process a bit because it would allow us to make greater use of the fill feature and of copy and paste. However, for this illustration, we'll distinguish between the revenue rollup and the expense rollup.
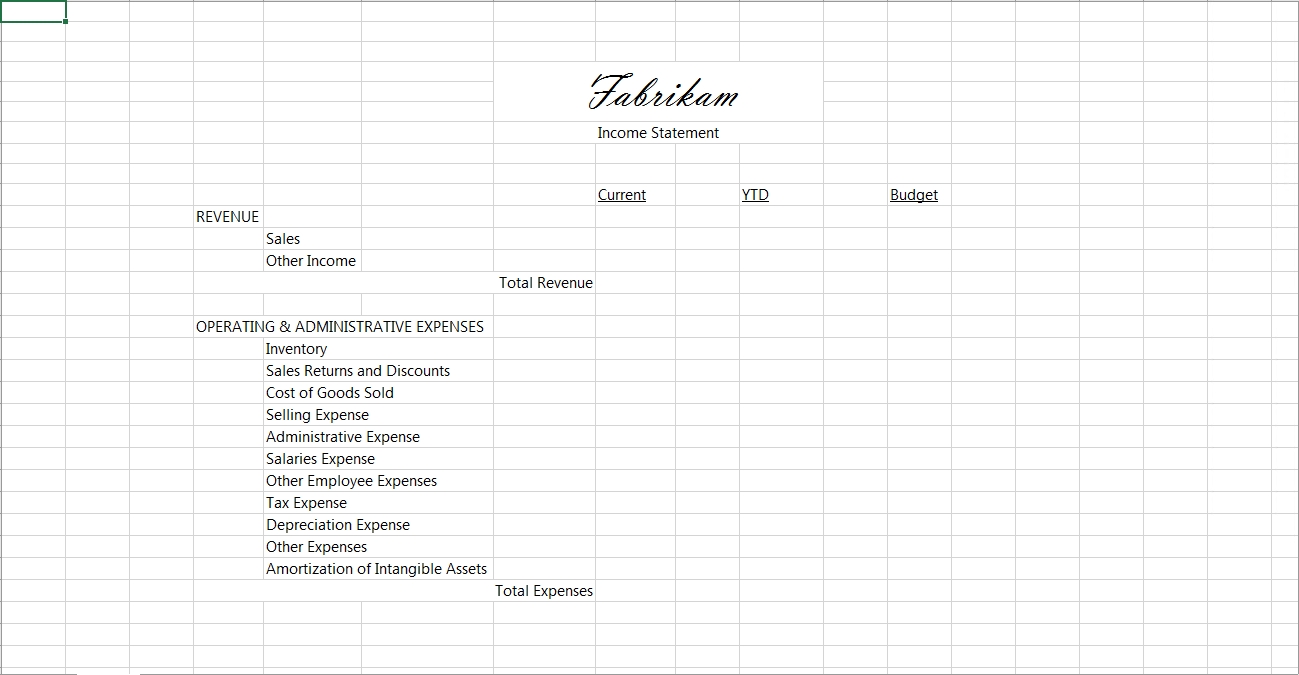
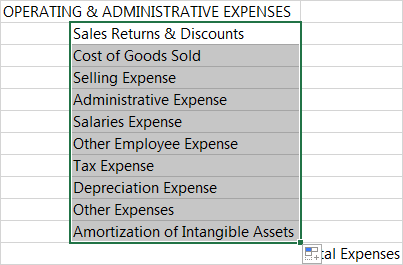
Step 3: Add report headings and labels
Literal text can be entered in any cell of an Excel worksheet.
Enter the headings and labels you need. Some of these, like the report title and column headings may remain static; some we may automate later by replacing the labels with formulas. For now, we'll enter headings and labels to serve as placeholders. You can apply text formatting now or later.
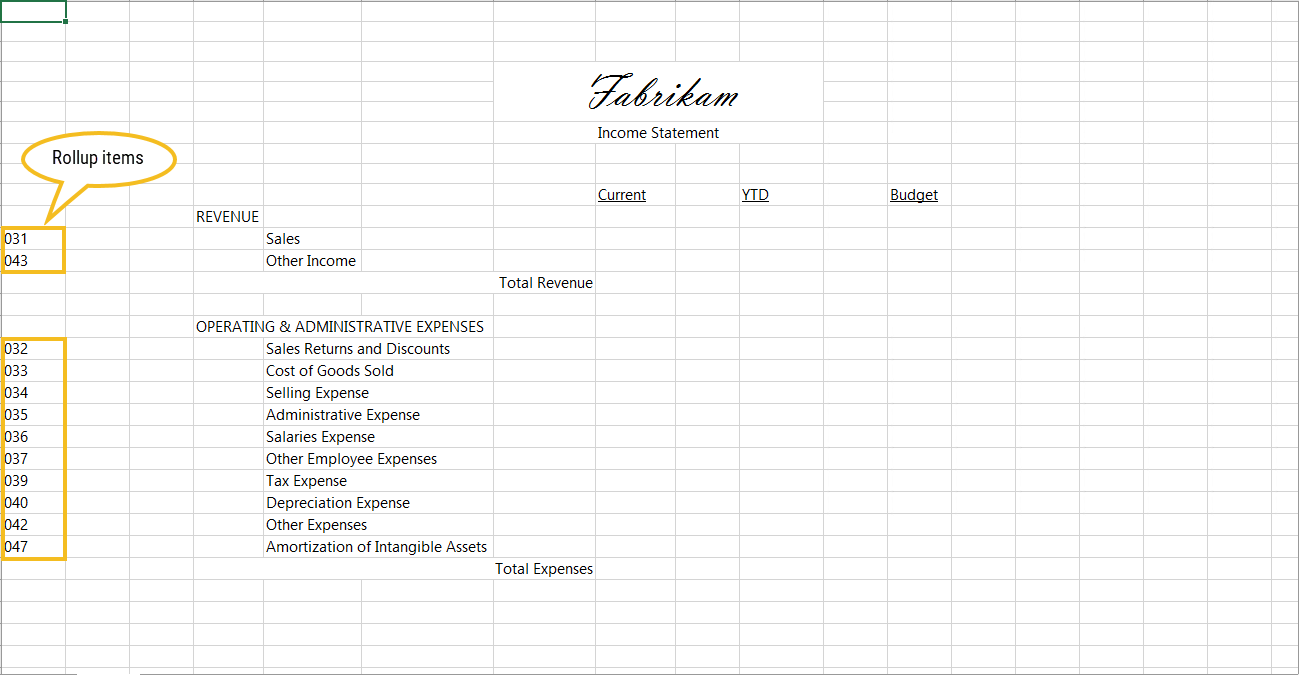
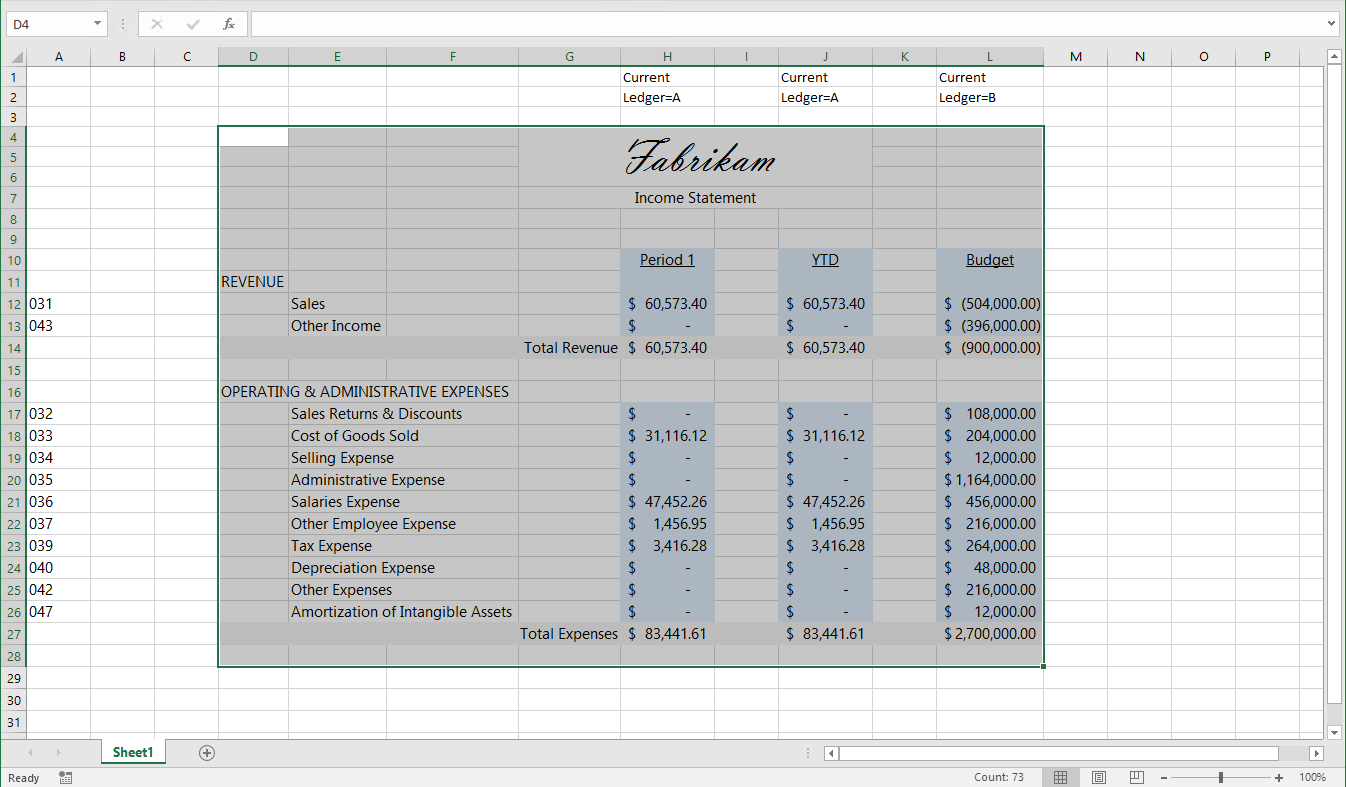
Step 4: Create a "cheat column"
We're going to need to reference the rollup items which correspond to each of the rows in our income statement. In a column to the left of the rows where we need to bring in values from rollup items, type the rollup item codes that correspond to each row.
Step 5: Use ActivReporter functions to pull data into the report
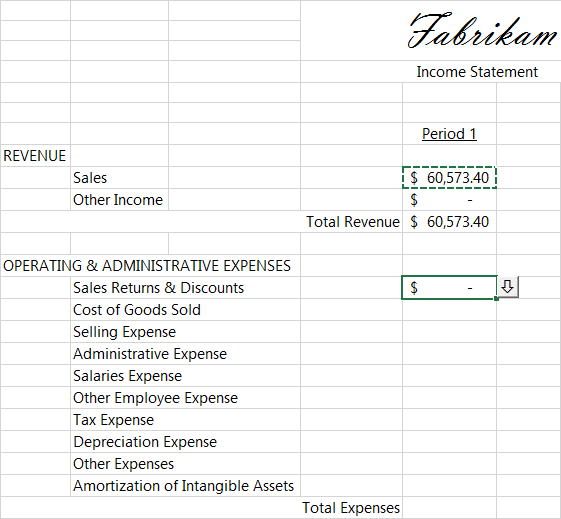
We'll start in the "Current" column of the REVENUE section.
In the case of the our income statement, we want to see the current activity in each of our revenue categories. The function we need to do that is the Activity function. The arguments of the Activity function are Period, Ledger, Account(s), Company, and Unit.
- Place your cursor in the cell where you want to insert a value.
-
In the ActivityHD ribbon in the Functions group, select Financial > Activity. The Function Arguments dialog box opens.
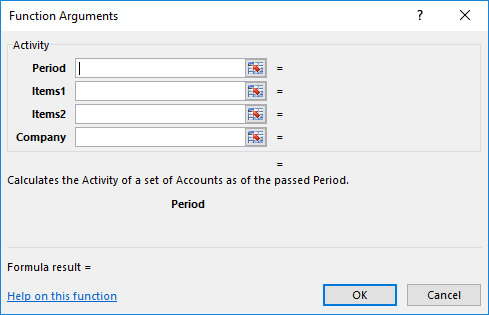
- In the Period field, enter a period expression for the current period such as "Period 1 of 2016".
- In the Items1 field, enter a segment expression for the ledger such as "Ledger=A".
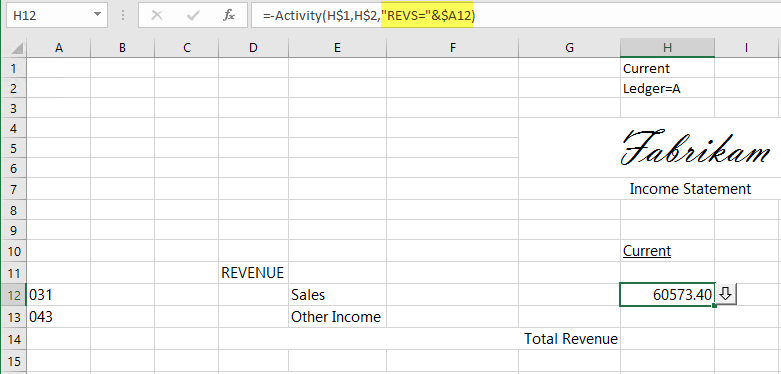
- In the Items2 field, enter a segment expression for the accounts. In this case, we'll use a rollup and designate the rollup item we need; for example, "REVS=031".
- Click OK.
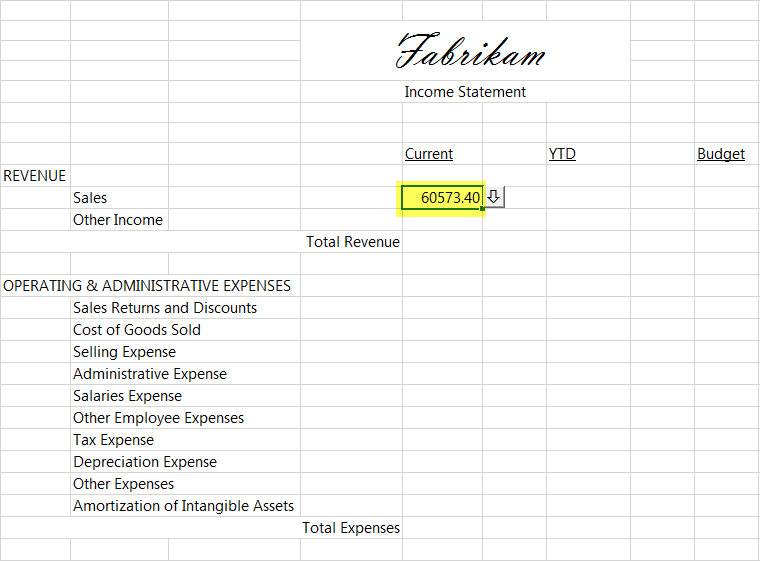
- We need the negative of the calculated activity amount, so in the formula bar, type a minus sign after the equal sign and before the Activity function name.

Notice that the amount for the sales revenue for the current period has been pulled into the design (provided you requested live data when you set up the design).
- We want to generalize the report so that it will work for any period, ledger, or account(s). To do so, we'll use relative cell referencing.
- Instead of specifying a particular "current" period, we want the design to report on whichever "current" period the user specifies when the report is run. To do this, we'll replace the specific period expression with the period expression "Current".

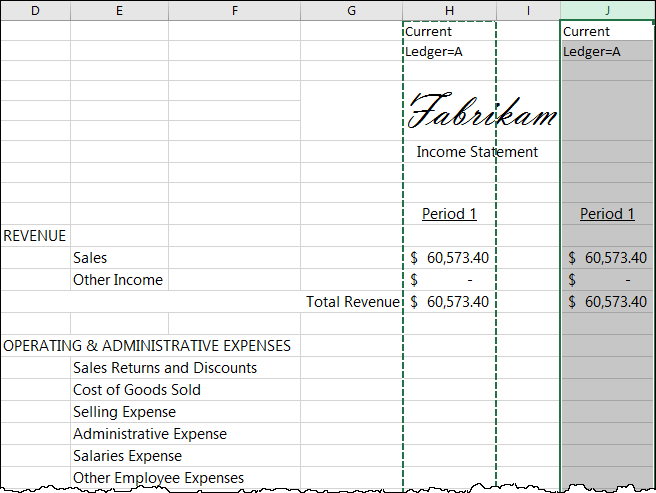
Since we'll be referring to "Current" for every revenue and expense in the "Current" column, let's go a step further and replace it with a relative cell reference. First, type "Current" in a cell somewhere in the rows above the title. Next, select the calculated cell again and go to the formula bar and replace "Current" with the relative cell reference.
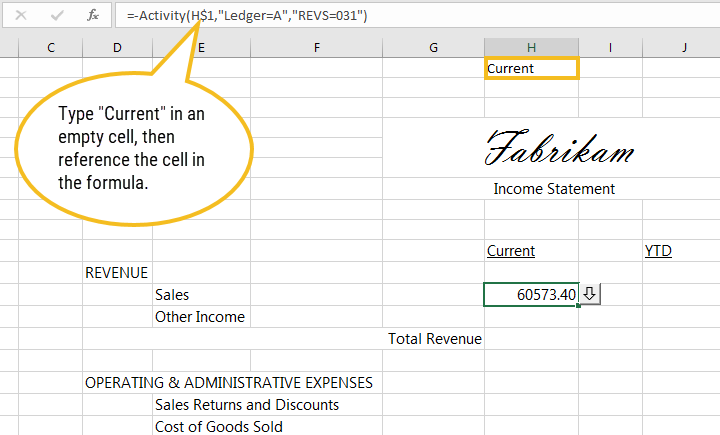
Note
Notice that this cell reference uses a relative column and absolute row.
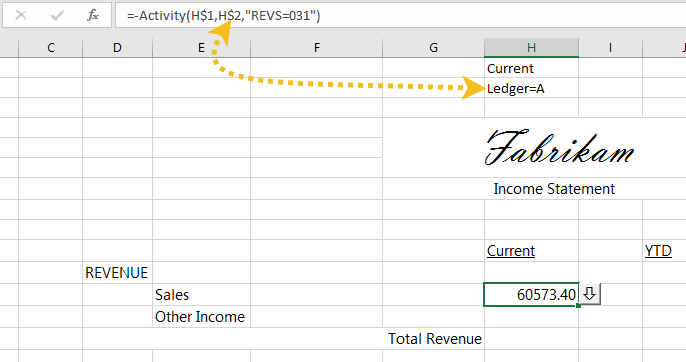
- We'll also be referring to Ledger A for every revenue and expense in the "Current" column, so let's use a relative cell reference for it as well. First, type "Ledger=A" in a cell somewhere above the title. Next, select the calculated cell, go to the formula bar, and replace "Ledger=A" with the relative cell reference.
- Finally, let's generalize the segment expression that refers to the rollup we are using to derive the accounts we need. This is where our "cheat column" comes in. Instead of referencing the service rollup item by name, we can refer to the cell where we stored its name. Select the calculated cell and delete the rollup item name only (leave the closing quotation mark). We're going to concatenate the cell reference to the literal part of the expression, so after the closing quotation mark, type an ampersand (&) followed by the cell reference.
Note
Notice that this cell reference uses an absolute column and relative row.
- Instead of specifying a particular "current" period, we want the design to report on whichever "current" period the user specifies when the report is run. To do this, we'll replace the specific period expression with the period expression "Current".
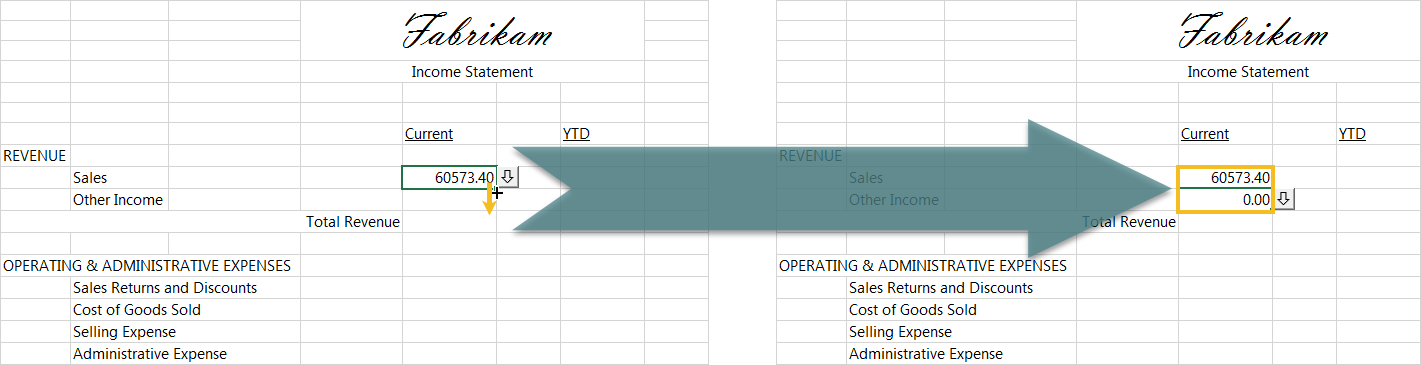
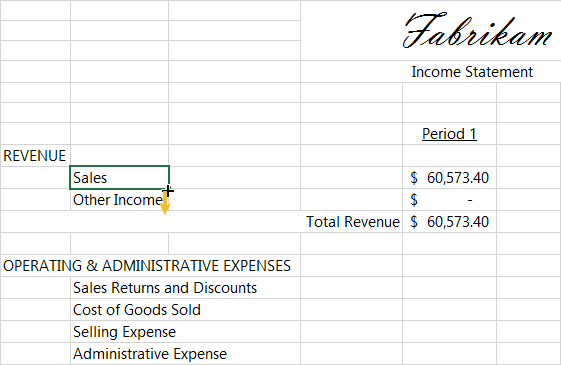
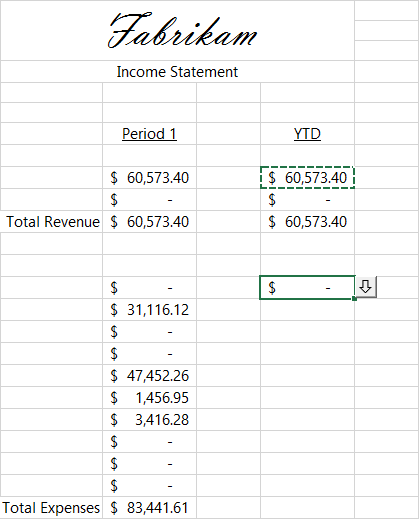
- Next, we'll use the power of Excel to populate the row for the remaining revenue category. Select the cell we've already calculated, then click and drag its fill handle to fill in the value.
- Let's use Excel's SUM function to get a total for the revenue items. Highlight the cell where the Total Revenue row and the Current column meet. On Excel's Home tab in the Editing group, click
 .
.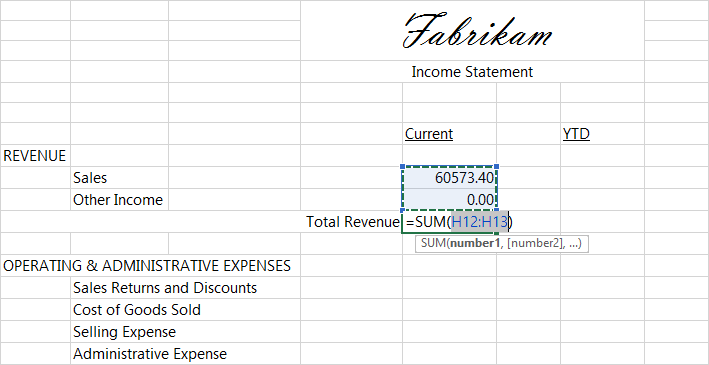
-
Press Enter to accept the highlighted range of cells and insert the sum.
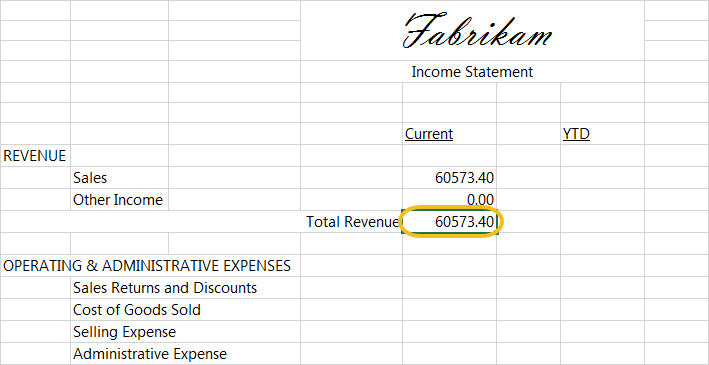
- Select the values in the Current Revenue section and format them as currency.

-
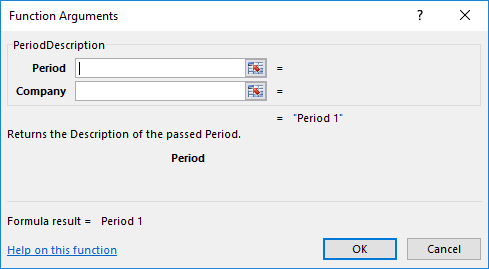
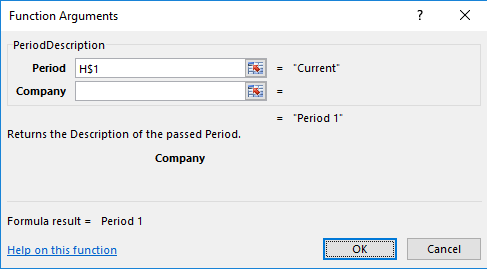
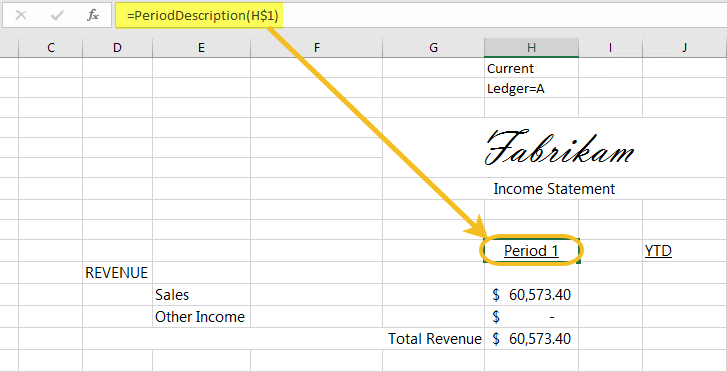
Let's make the label on the Current column dynamic. To do so, highlight the cell with the "Current" label and from the ActivityHD ribbon in the Functions group, select Periods > Period Description. The Function Arguments dialog box opens.
-
In the Period field, reference the field where you stored the text "Current".
-
Click OK.
-
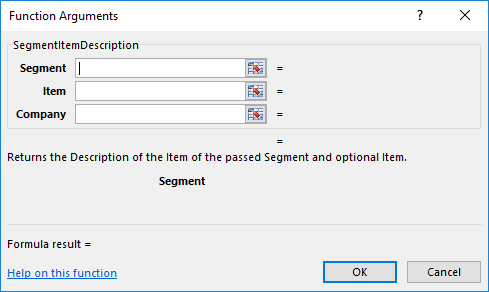
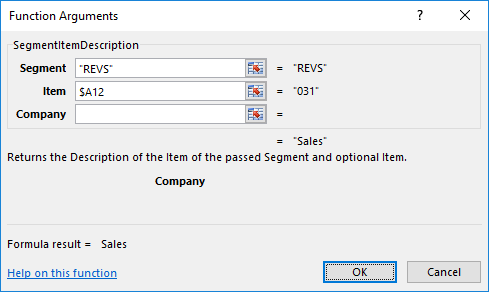
Next, let's make the category labels dynamic as well. Highlight the cell with the first category label and from the ribbon in the Functions group, select Segments > SegmentItemDescription. The Function Arguments dialog box opens.
-
The SegmentItemDescription function has three arguments, Segment (or rollup), Item (segment item or rollup item), and Company. In the Function Arguments dialog box in the Segment field, enter the name of the revenue rollup. In the Item field, enter a relative cell reference to the cell that contains the first rollup item name.
-
Click OK.
-
Finally, drag the fill handle on the first revenue description down to the last revenue description.
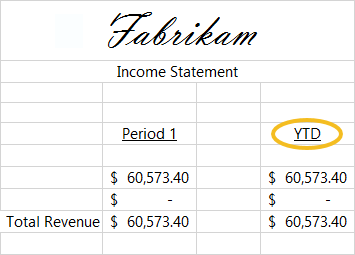
- Select the column formerly known as "Current", copy it, and paste the content into the YTD column.
- Replace the label on the revenue year-to-date column with the literal text "YTD" or some variation thereof.
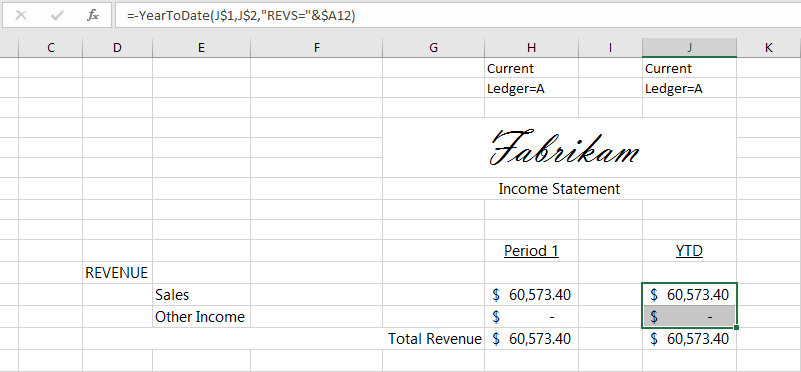
- To show year-to-date amounts, we need a different function. Not surprisingly, that function is called YearToDate. Select the cell for the first category in the YTD column. In the formula bar, replace the function name "Activity" with "YearToDate".
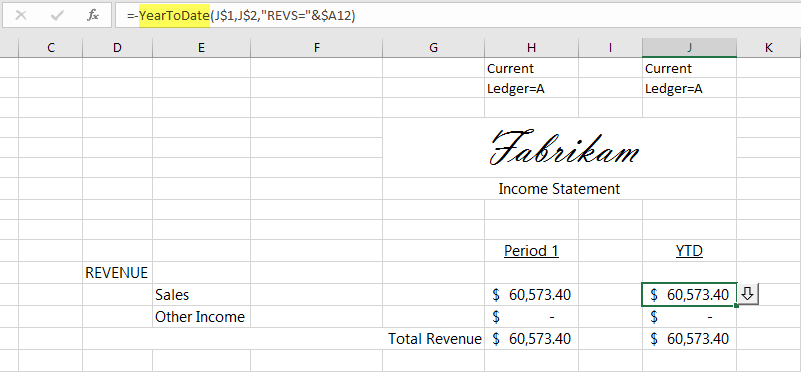
- Drag the fill handle on the cell that contains the amount for the first year-to-date category and drag down through the row for the last category. The formulas for these cells are updated to use the YearToDate function. (The values in our example for the current and year-to-date columns are equal because the current period we selected in the design set-up window is "1".)
- To fill in the budget numbers for the REVENUE section, start by copying the column that contains the year-to-date information to the column reserved for budget information.
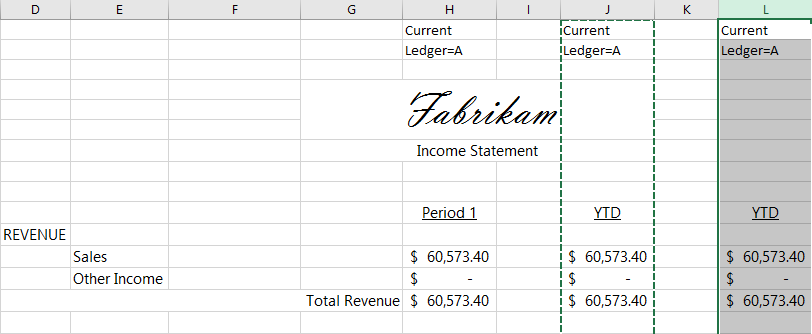
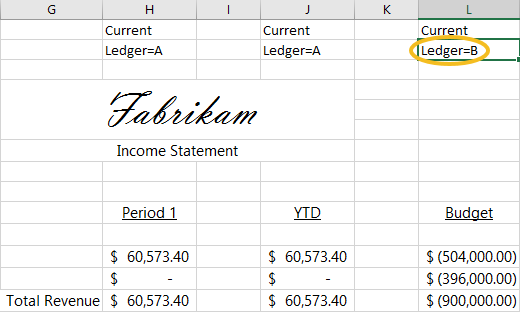
- Replace the "YTD" label in the Budget column with "Budget".
- To arrive at budget numbers, we need to show numbers from the budget ledger, "B". Since we used relative cell referencing for the ledger, we simply need to change the literal text we referenced for the ledger from "Ledger=A" to "Ledger=B".
- Now let's turn our attention to the EXPENSES portion of the report. First, let's make the category names in the EXPENSES section dynamic. Copy the cell in the REVENUE section that contains the first category label and paste it in the cell in the EXPENSES section that contains the first category label. When you paste, use the Paste Special > Formulas option.
- In the formula bar, change the first parameter to refer to the name of the rollup that contains expense rollup items.

- Drag the fill handle on the cell that contains the first category name in the EXPENSES section to the last category name in the EXPENSES section. The labels are updated accordingly.
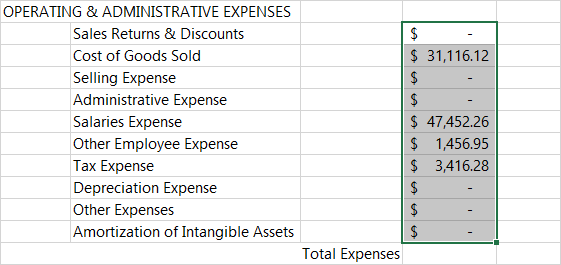
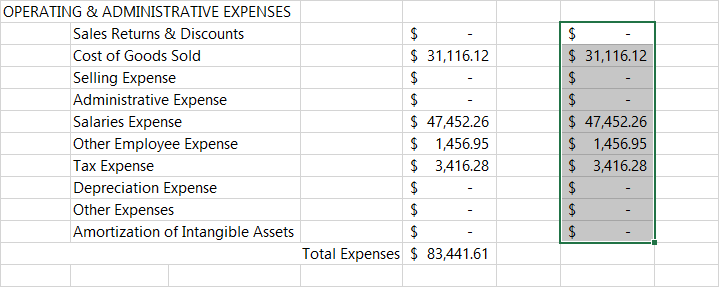
- Copy the cell that contains the current revenue for the first revenue category and paste it in the cell that contains the current expenses for the first expense category.
- The difference in the values we needed for REVENUE and the values we need for EXPENSES lies in the rollup. In the formula bar, change to the rollup name that contains your expense rollup items and remove the negative sign in front of the function name.

- Drag the fill handle on the cell that contains the current expense amount for the first expense category to the last expense category.
- Use the SUM function to calculate total expenses for the current column.
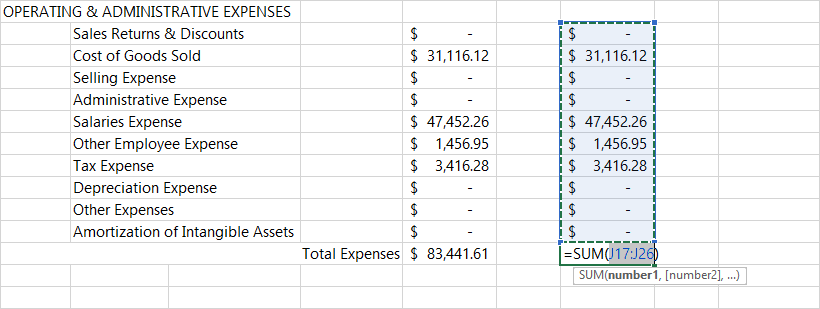
- In the REVENUE section, copy the year-to-date entry for the first revenue category and paste it in the cell that corresponds to the year-to-date entry for the first expense category.
- In the formula bar, change the rollup name to the name of the rollup that contains the expense rollup items and remove the negative sign.

- Drag the fill handle down to the last expense category in the year-to-date column.
- Use the SUM function to calculate total expenses for the year-to-date column.
- Copy the year-to-date values in the EXPENSE section (from the first category through the total expenses) and paste them in the corresponding cells of the Budget column in the EXPENSE section.
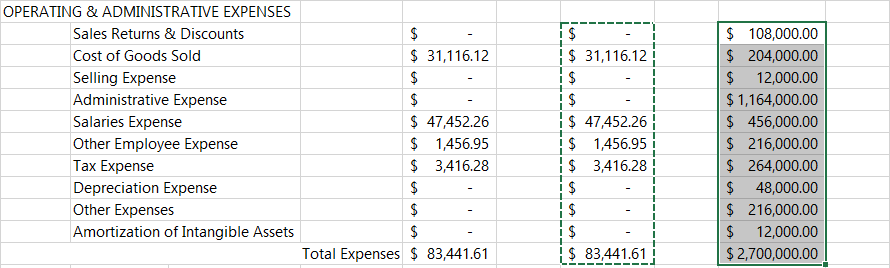
-
Apply any formatting you want to improve the presentation of the report.
-
With Excel open to the design worksheet you want to print, click in the upper leftmost cell you want to print and drag to the bottom rightmost cell you want to print.
- From the ActivityHD ribbon in the Layout group, select Print Area > Set Print Area.
- In the Output group, click Print. The Print dialog opens.
- Select the print options you need, then click OK.
- When you finish, save the Excel workbook and close it.
- Save the financial design record.
Tip: Printing a Financial Design
To print the financial design as it is laid out in Excel:
Insert a function in a financial design
- Open the Excel worksheet you need to add a function to.
- Select the ActivityHD ribbon.
- In the worksheet, select the cell where you want to insert the function.
- In the Functions group on the ribbon, click the button for the function category, then select the function from the drop-down menu. In most cases, the Function Arguments dialog will prompt you to input argument values for the function.
- Respond to the prompts as appropriate.
- When you finish, click OK.
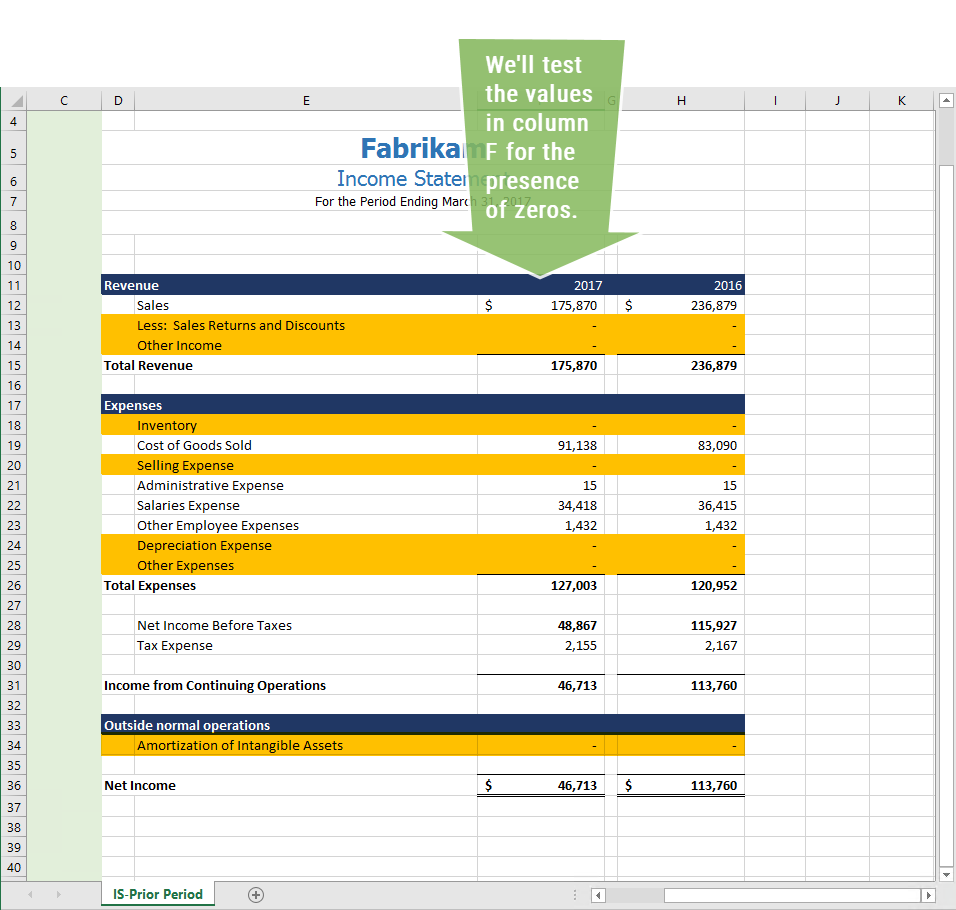
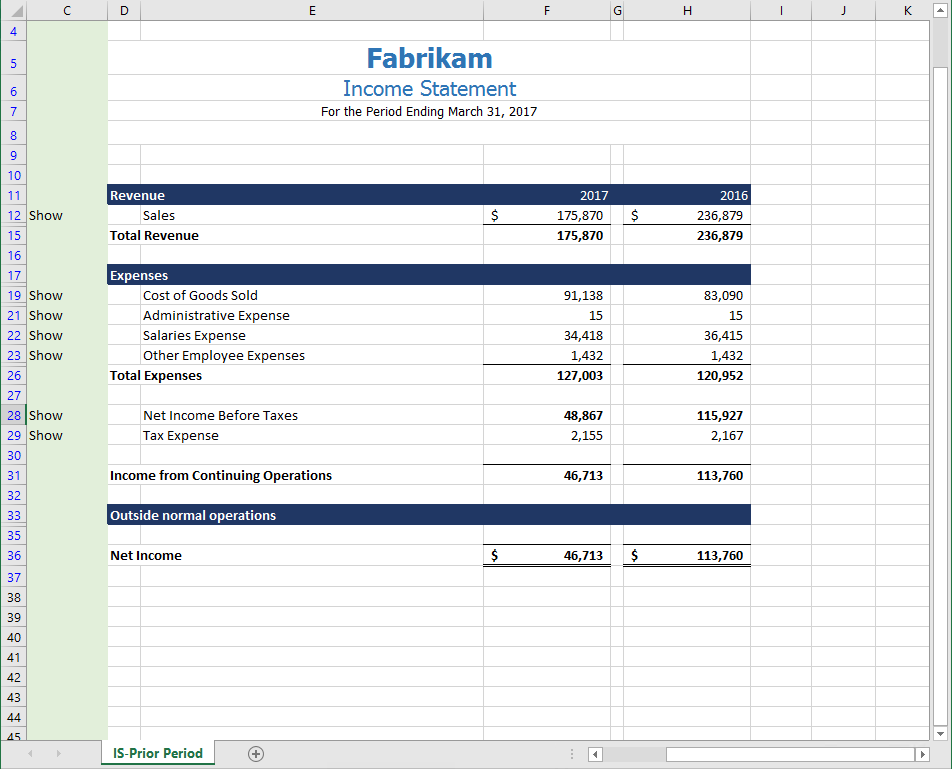
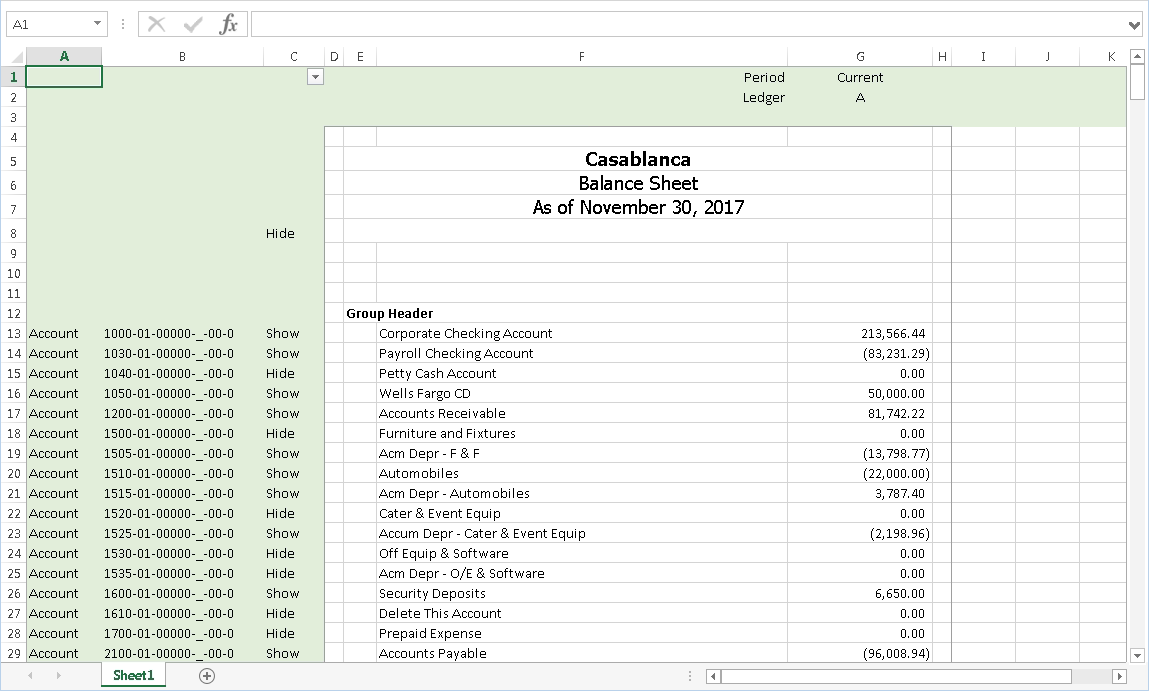
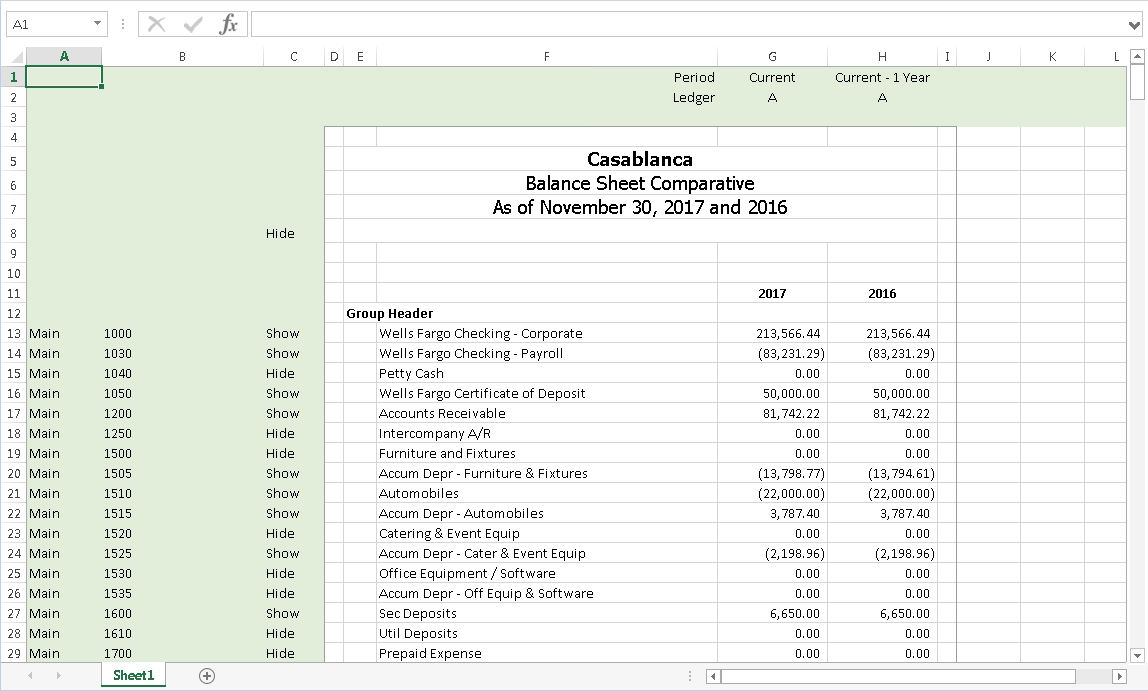
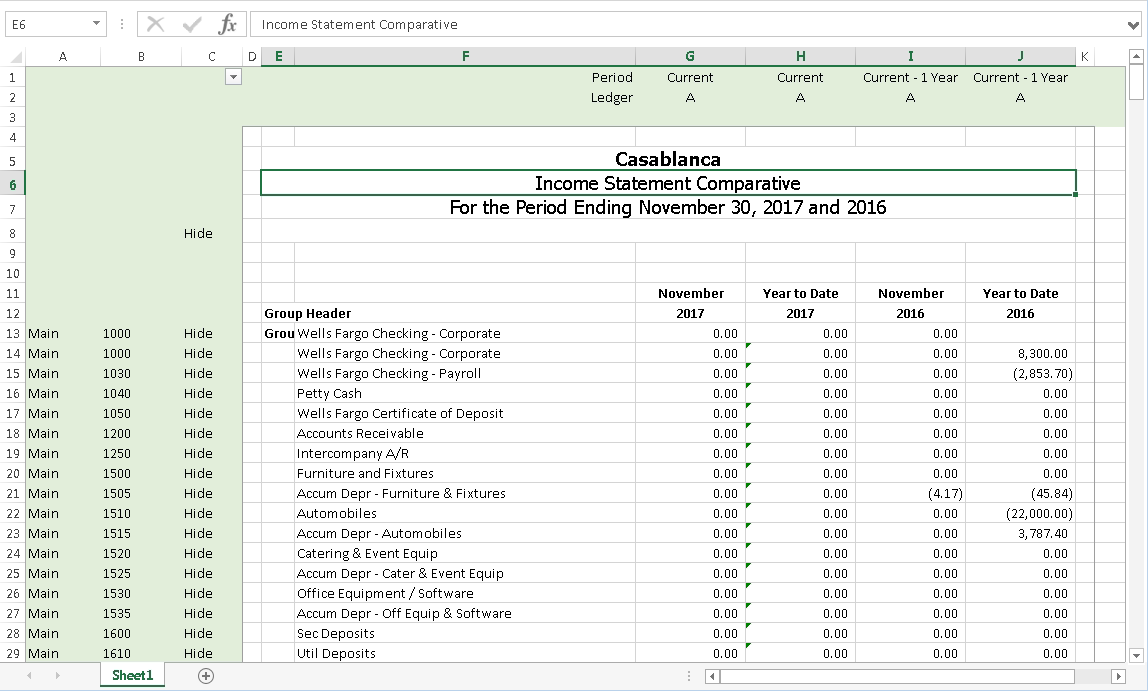
Suppress rows with zero
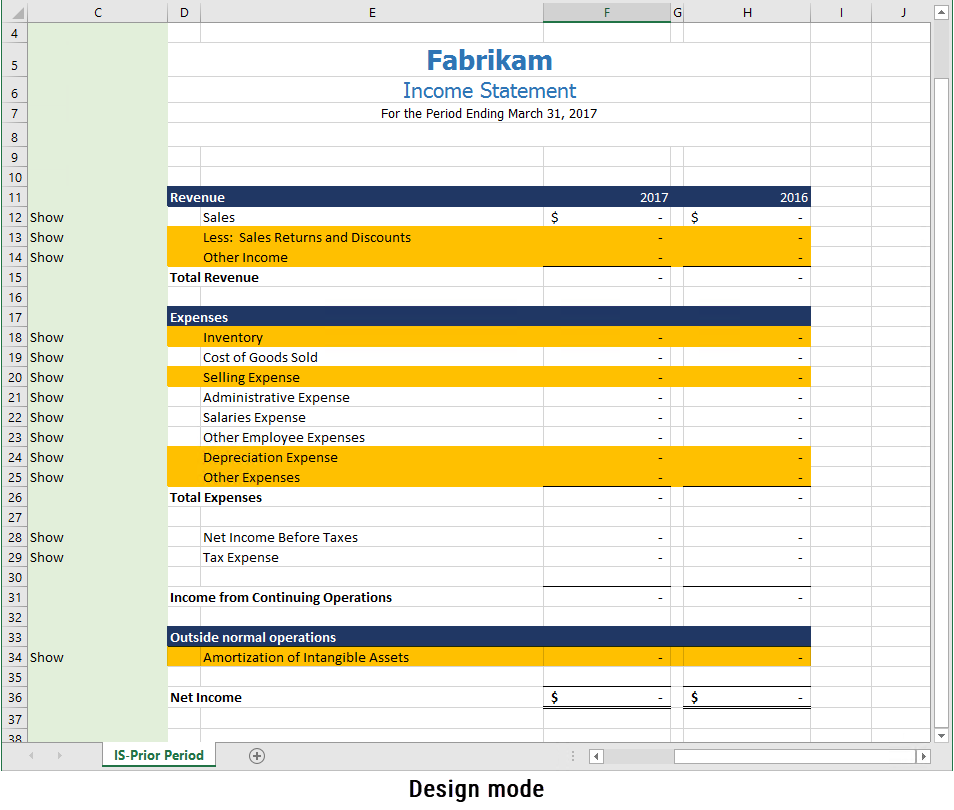
You can suppress rows which contain zeros from your financial statements. In the sample income statement below, notice that the values in rows 13, 14, 18, 20, 24, 25, and 34 are zeros.
Note
The procedures below describe how to perform actions in Excel 2013. Consult Microsoft's online help to learn how to accomplish the same results in your version of Excel.
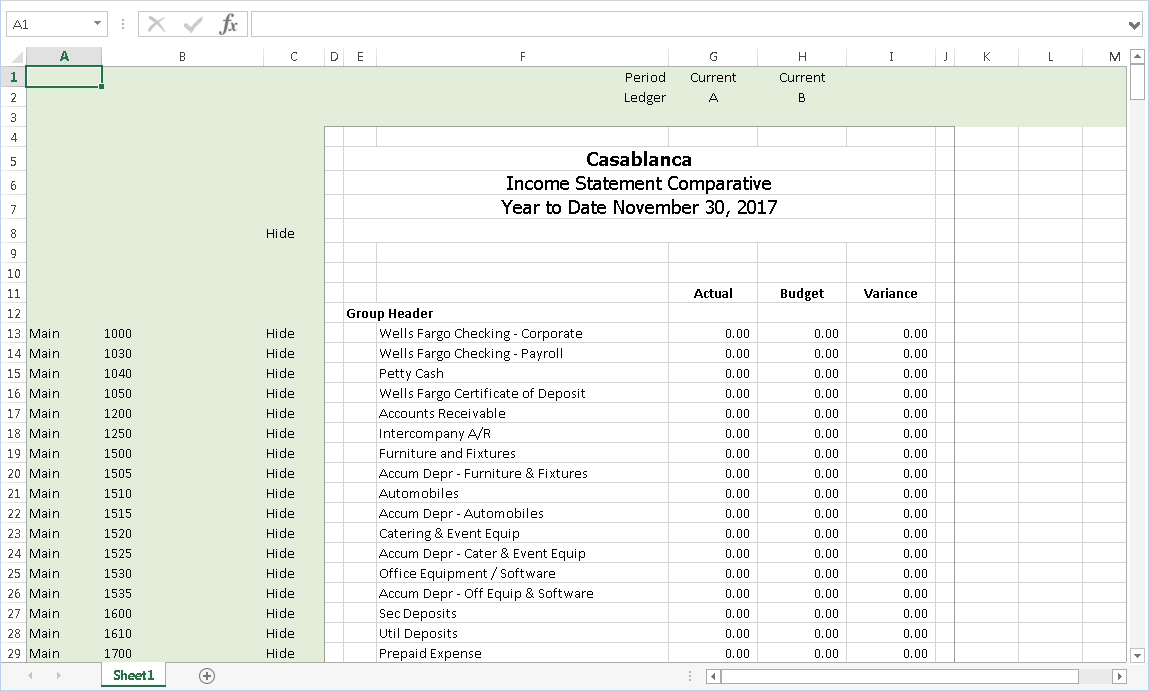
Hidden formula filter method (featuring the IsLiveData function)
This method suppresses rows with zero for printing, but lets those rows show in design mode.
- Open the financial design worksheet, making sure you mark the Use Live Data checkbox in the Financial Options dialog box.
-
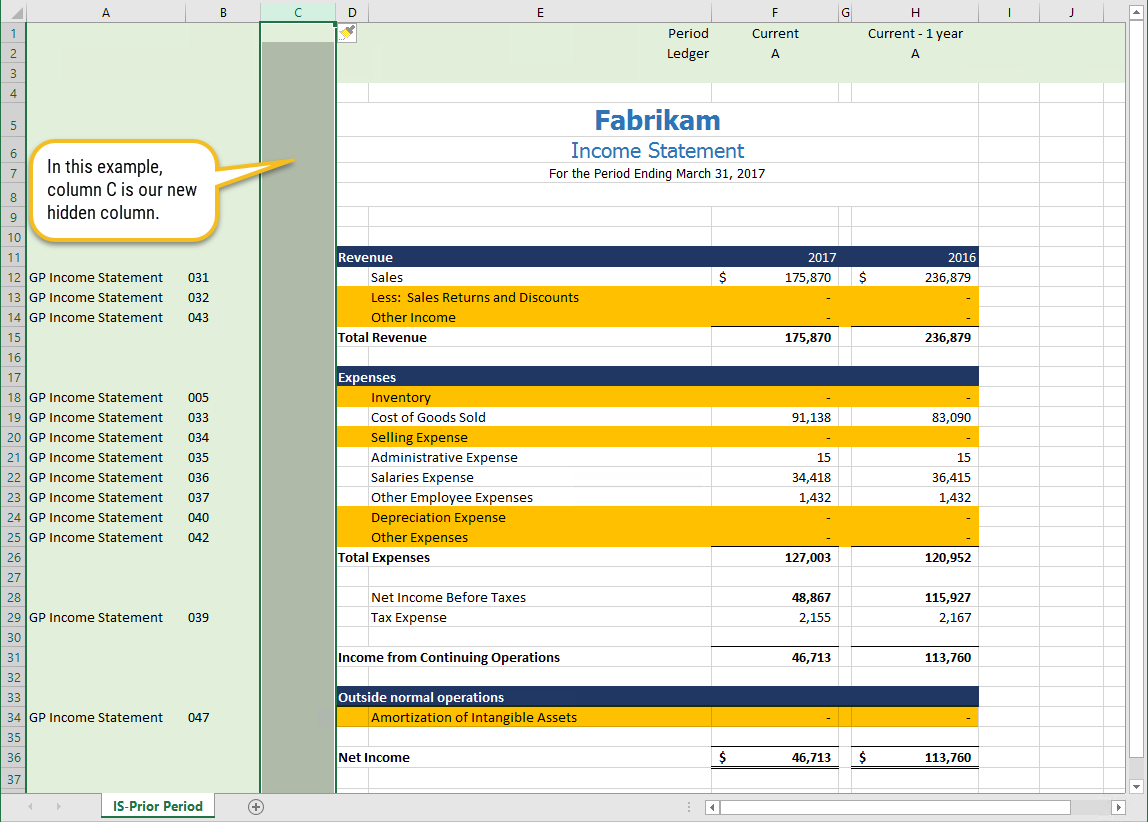
Add a hidden column in your financial design.
-
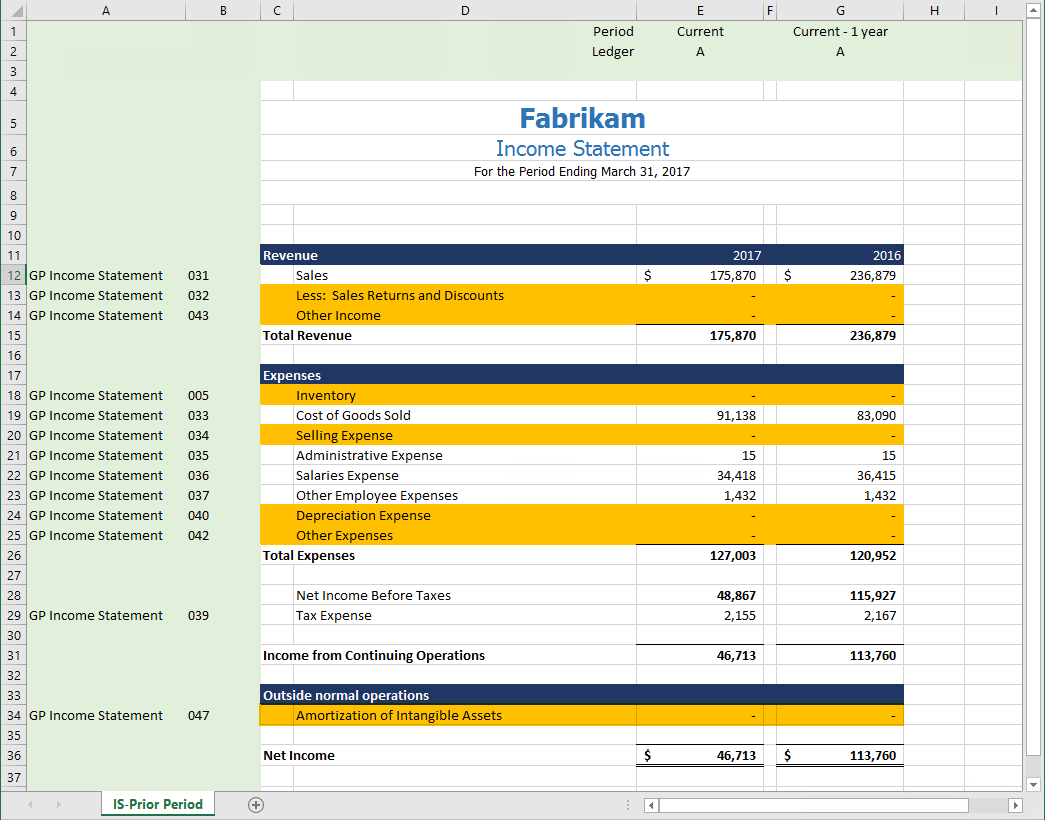
Determine which column to test for the presence of zeros. This will be a column which holds monetary values. (Notice we're moving rows 1-3 and columns A-B out of the view to lessen distraction.)
-
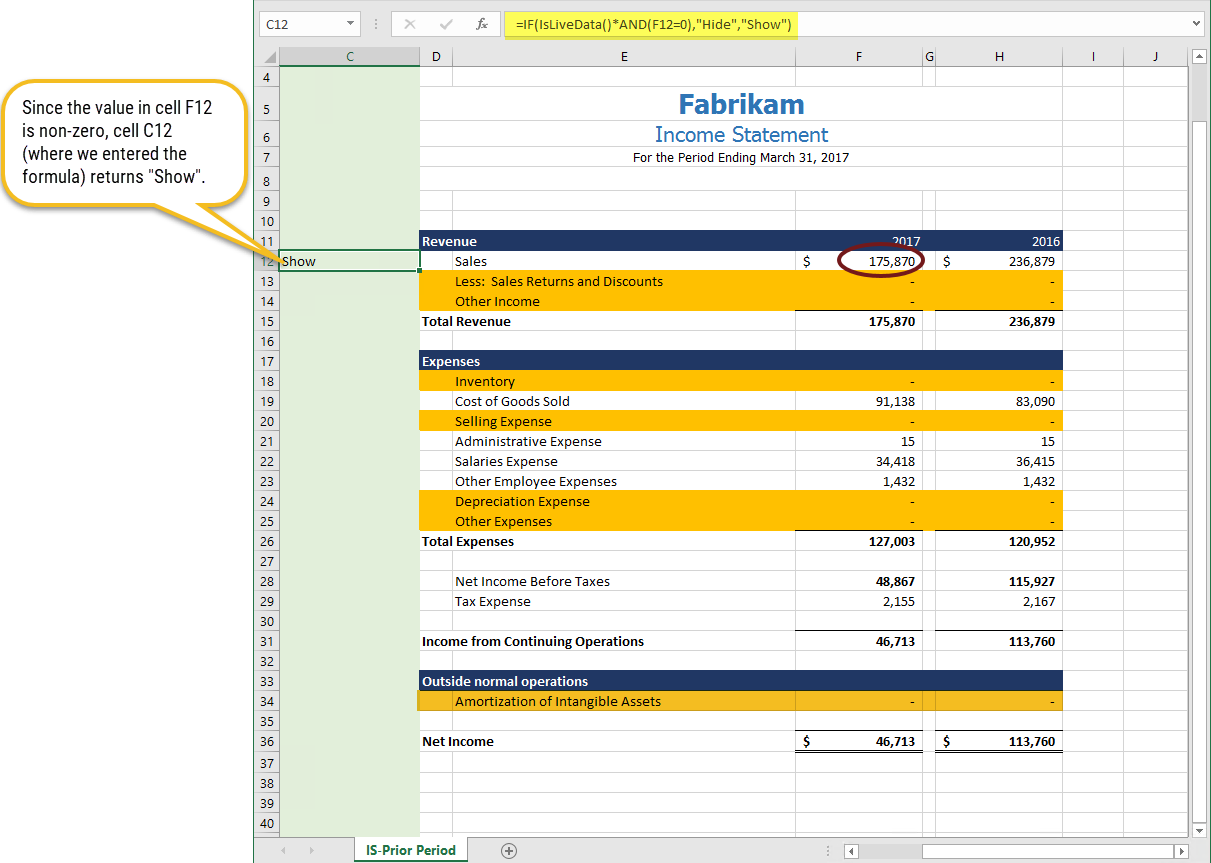
In your hidden column, in the row which corresponds to the first monetary value in the worksheet, enter the following formula, replacing the arbitrary cell position "F12" with the appropriate cell position in your worksheet:
=IF(IsLiveData()*AND(F12=0),"Hide","Show")
-
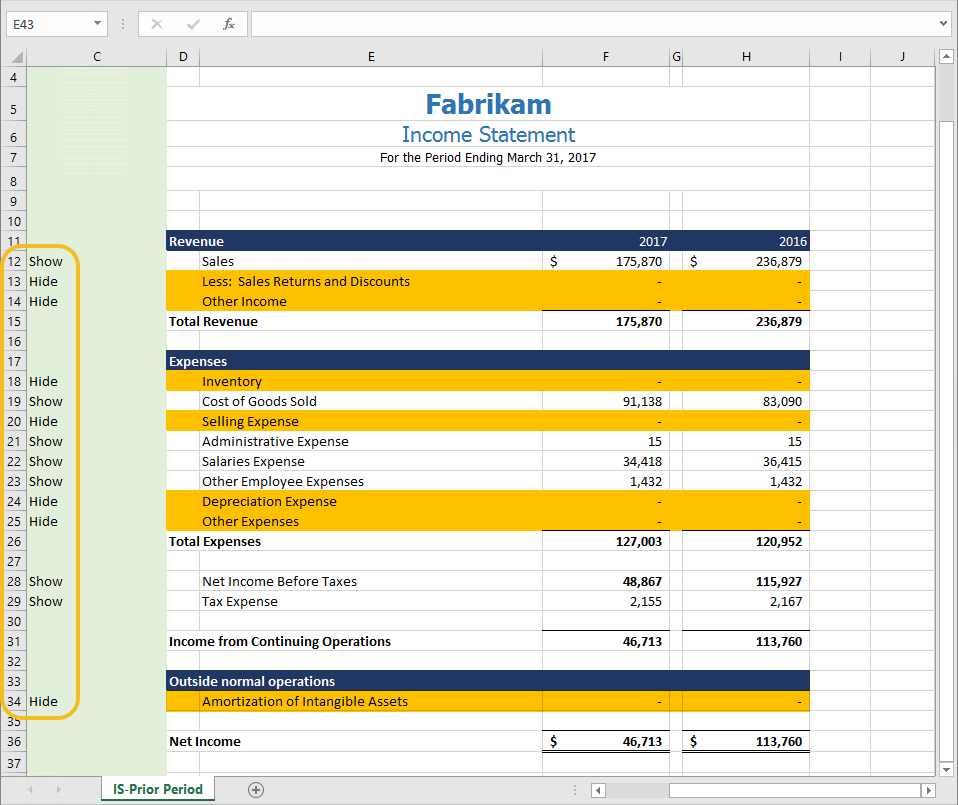
Continue by copying the formula to the cells in the hidden column which correspond to the rows with monetary amounts in the column you are testing, excluding rows with literal text or totals. If necessary, edit the cell references in the formulas to ensure the references in the hidden column and in the column with values correspond.
-
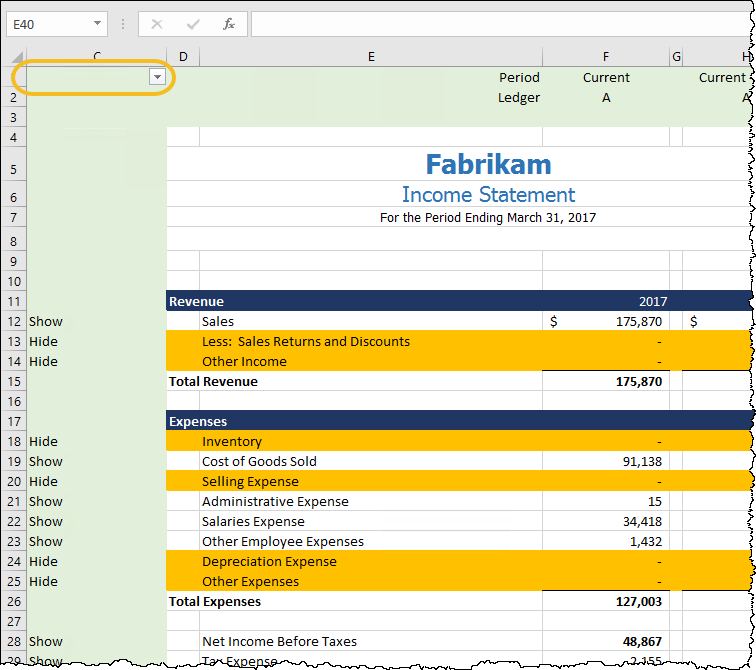
Select the hidden column, then select the Data ribbon and click Filter. A dropdown is added to the first cell in the column.
-
Open the dropdown and select Text Filters > Does Not Equal from the shortcut menu. The Custom AutoFilter dialog box opens with "does not equal" selected in the first Show rows where field.
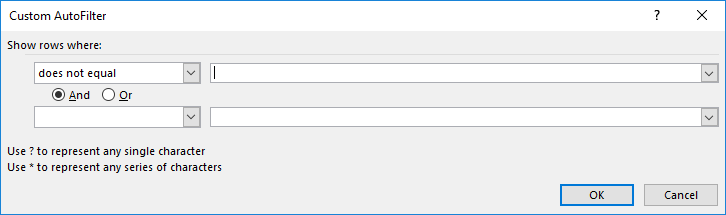
-
From the adjacent drop-down list, select "Hide".

-
Click OK. The rows that contain "Hide" in the hidden column are suppressed.

- Save your changes in Excel.
- Close the worksheet.
- Save your changes in ActivReporter and close the financial design record.
The formula
To test for zeros we will compose a formula which uses Excel's IF function (aka Boolean function) and ActivReporter's IsLiveData function. The IF function evaluates a condition and performs one action if the condition is true and another action if the condition is false. The IsLiveData function refers to the Use Live Data checkbox in the Financial Options dialog box. When you publish a financial statement, live data is used; when the checkbox is marked, you use live data as well.
We want to hide rows with zero when we're using live data and show those rows when we're in design mode (i.e., not using live data). So, in literal terms, if data is live and the monetary cell(s) on the row are equal to zero, we want to return "Hide"; otherwise, we want to return "Show". Written as a formula, this is similar to:
IF(IsLiveData()*AND(F12=0),"Hide","Show")
IsLiveData() evaluates to 1 if TRUE; 0 if FALSE. Similarly, the AND() function evaluates to 1 if TRUE; 0 if FALSE. Therefore, the product of IsLiveData() and AND(F12=0) will be equal to 1 only if both are equal to 1.
Note: In actual practice, replace "F12" with the position of the cell you are testing for zero.
Next, we're going to apply a filter on our hidden column.
Notice that when you reopen the financial design in design mode (i.e., with Use Live Data unmarked) and open the financial design worksheet, all rows in which you added the formula now indicate "Show". This is because Excel detects that live data is not in use. So using this technique, you can see all rows in design mode and only non-zero rows when you print the financial design.
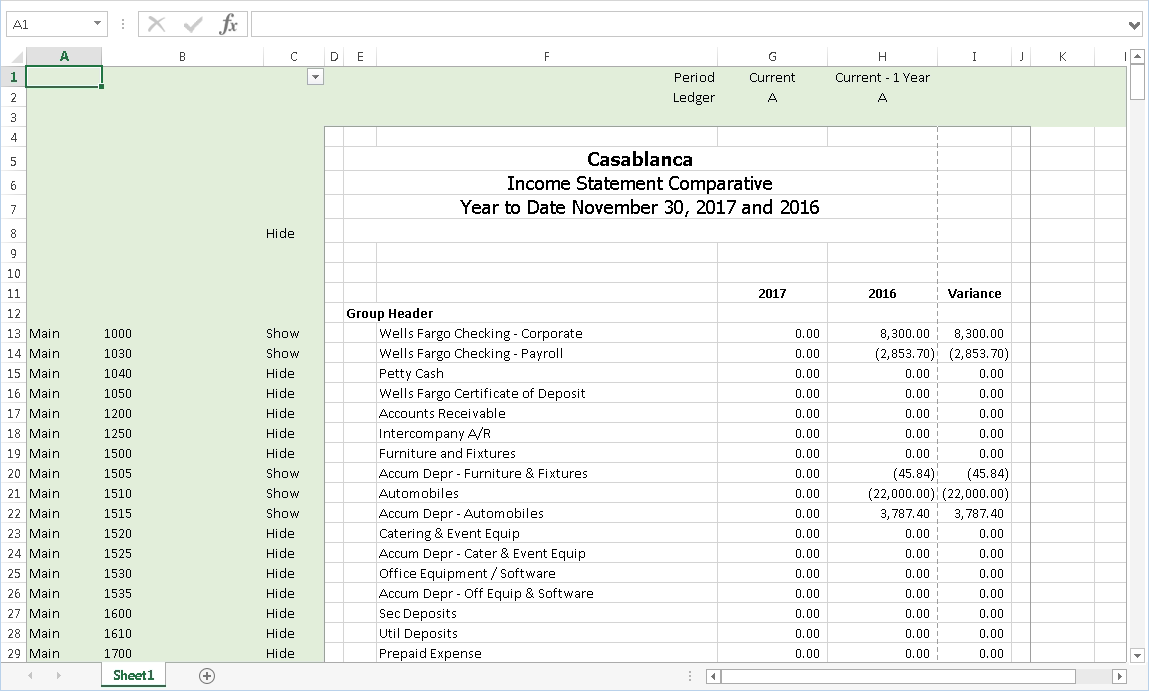
Extending the hidden formula filter method to multiple columns
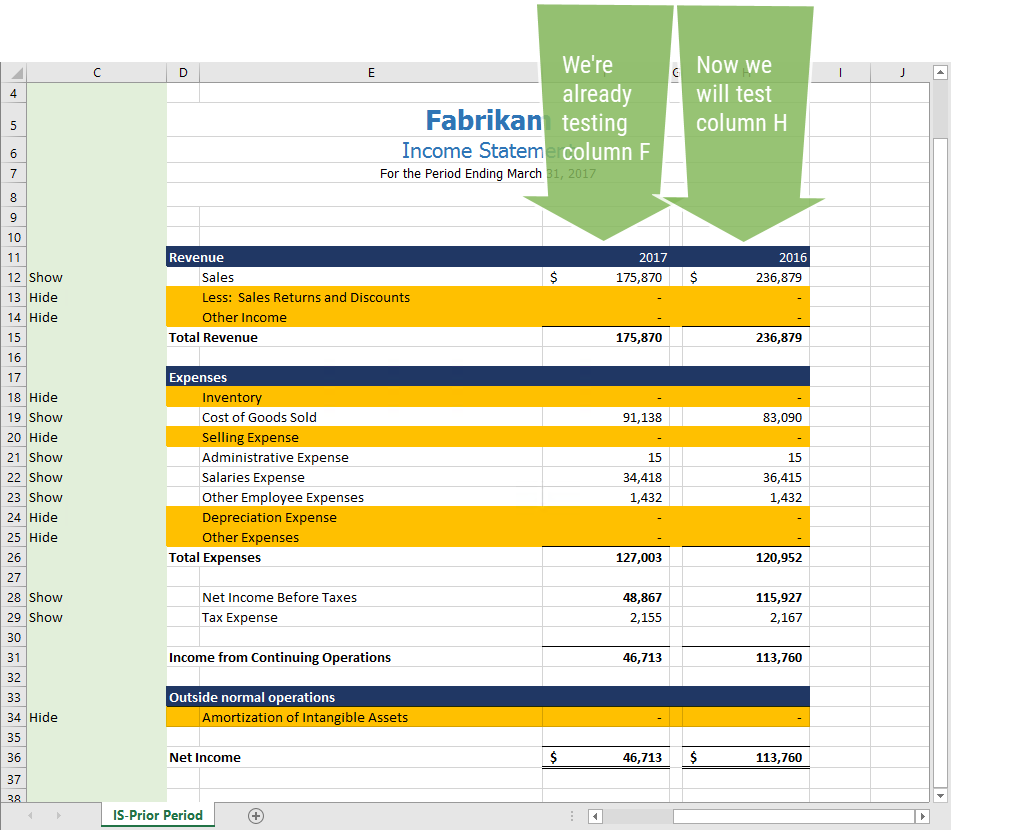
In the previous example, we actually had amounts in two columns, but we suppressed zeros when the first column had zeros. This works great if you have only one column of amounts, but if you have multiple columns of data in your financial design, say amounts by month and year-to-date, or by period and prior year period as above, you will probably only want to suppress rows if every monetary value in the row is zero. To do so, you simply extend the formula discussed in the previous procedure by appending AND expressions to the condition statement. Using AND ensures that all conditions must be true before we hide a row.
We'll pick up where we left off in the prior example.
- Open the financial design worksheet, making sure you mark the Use Live Data checkbox in the Financial Options dialog box.
-
Determine which additional column(s) to test for the presence of zeros.
-
In the hidden column, in the row which corresponds to the first monetary values in the worksheet, enter the following formula, replacing the arbitrary cell positions with the appropriate cell positions in your worksheet.
=IF(IsLiveData()*AND(F12=0)*AND(H12=0),"Hide","Show")
-
Copy the formula to the cells in the hidden column which correspond to the rows with monetary amounts in the columns you are testing, excluding rows with literal text only or totals. Edit the cell references in the formulas to ensure the references in the hidden column and in the columns with values correspond.
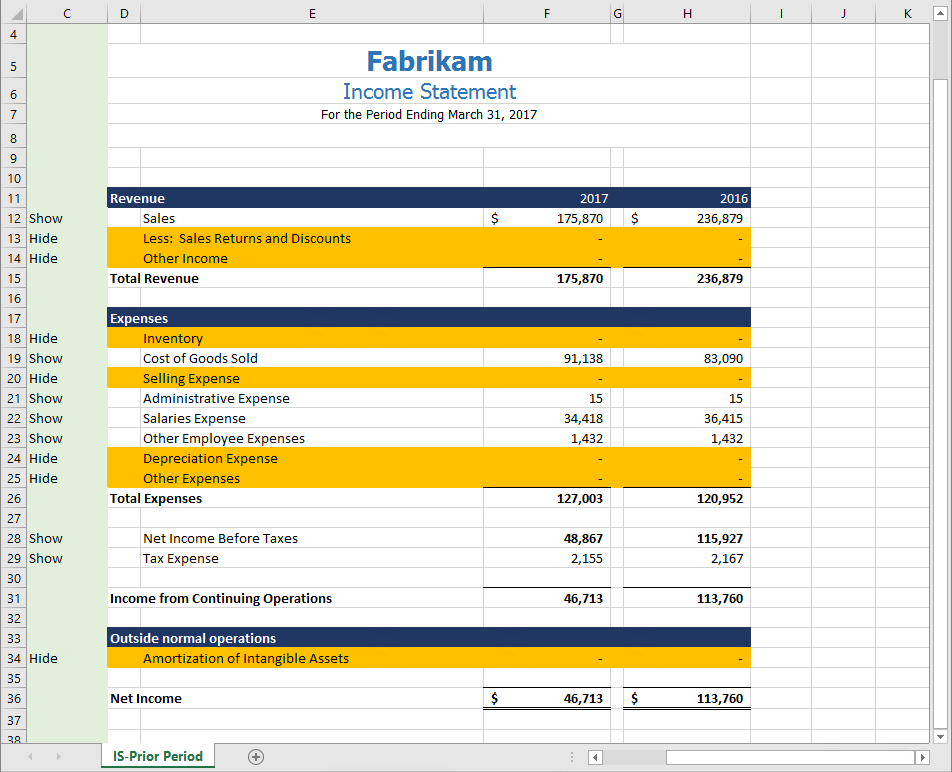
In our example, the results mimic those from the one-column procedure since every row with a zero in column F also has a zero in column H.
-
Now apply the filter on the hidden column, showing everything that does not equal "Hide".
Helpful hints
New Copy
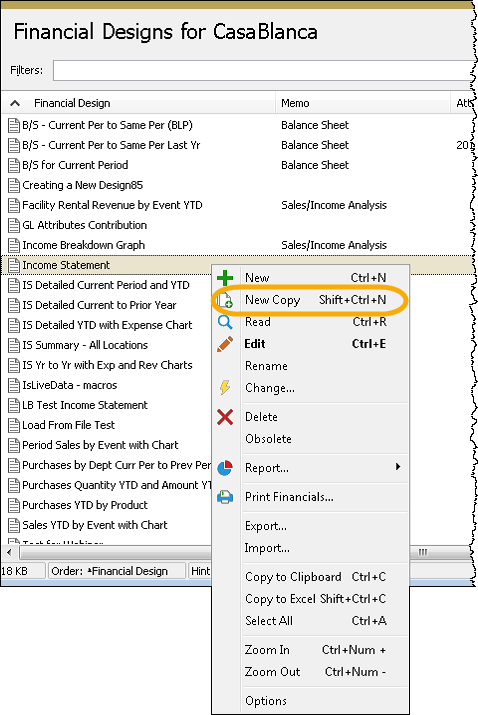
Suppose you have a financial design and want to create another similar design. If your financial designs are stored in the ActivReporter database (best practice), this is a simple operation. In the Financial Designs HD view, highlight the design you want to emulate, right-click, and select New Copy from the menu. Provide a unique name for the new record, and you have the starting point for a new financial design.
You can also use the New Copy feature on the following entities:
- Calendars
- Financial views
Export/Import
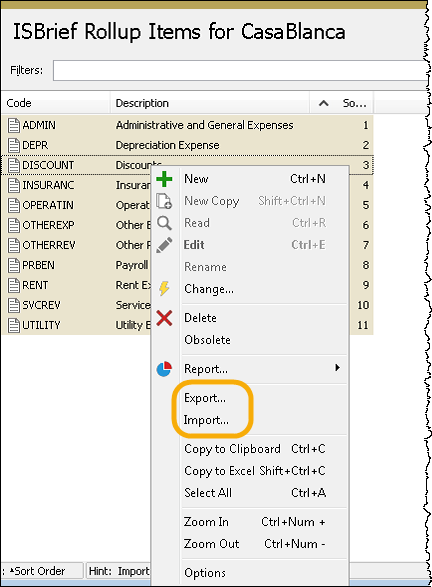
The New Copy feature is not available for rollups; however, there is a method for creating a rollup similar to an existing one. Using the Export command available in the right-click menu of a Rollup Items HD view, export the rollup items to an XML file on the Windows file system. Next, use the Import command to recreate the rollup in the same company with a different name.
Another useful application of Export/Import is to move rollup structures from one company database to another!
The Export and Import commands are also available for:
- Calendars
- Financial views
- Rollups
That means that these entities can also be moved from one company database to another.
Report profiles for convenience and consistency
As you work with ActivReporter, you may find yourself entering the same answers to a dialog full of checkboxes, dates, and options repetitively. To alleviate this tedium, ActivReporter provides a report profile feature which allows you to save oft-used answers for subsequent reuse. The next time you run the dialog and need the same settings as a named report profile, simply load the report profile and ActivReporter fills in the answers for you!
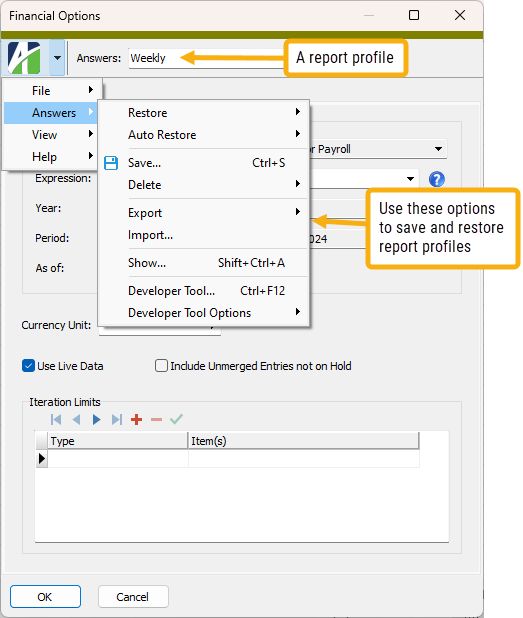
Report profiles are available in the Financial Options dialog of financial designs and on all ActivReporter reports.
Reporting ledgers for intercompany eliminations
The reporting ledgers in Dynamics GP were designed to create journal entries which optionally could be included in financial reporting. These ledgers were for companies needing international reporting (IFRS) as well as reporting in the US (FASB). The ledgers can also be used for posting intercompany elimination entries or for tax reporting (depreciation, meals, etc.).
ActivReporter supports the Dynamics GP reporting ledgers.
Excel's outline feature
Excel includes a special feature called "outlining". Outlining allows you to embed supporting summary items into your Excel workbook details. Outlining can be applied to both rows and columns.
ActivReporter fully supports the Excel outlining feature. In fact, when publishing reports from Excel, you can determine the outline level to use on a "printed" (non-Excel) publication.
Functions
Click a category to learn about the functions in the category.
Drill down on functions in a financial design
Anywhere you insert a financial function in a financial design, you can drill down on the function to see the journal detail behind the amount. When you select a cell with a financial function, a down arrow ![]() displays next to the cell signifying the drilldown capability. Clicking the arrow opens Drilldown Explorer with journal detail loaded. Initially, the journal detail reflects the settings from the Options dialog.
displays next to the cell signifying the drilldown capability. Clicking the arrow opens Drilldown Explorer with journal detail loaded. Initially, the journal detail reflects the settings from the Options dialog.
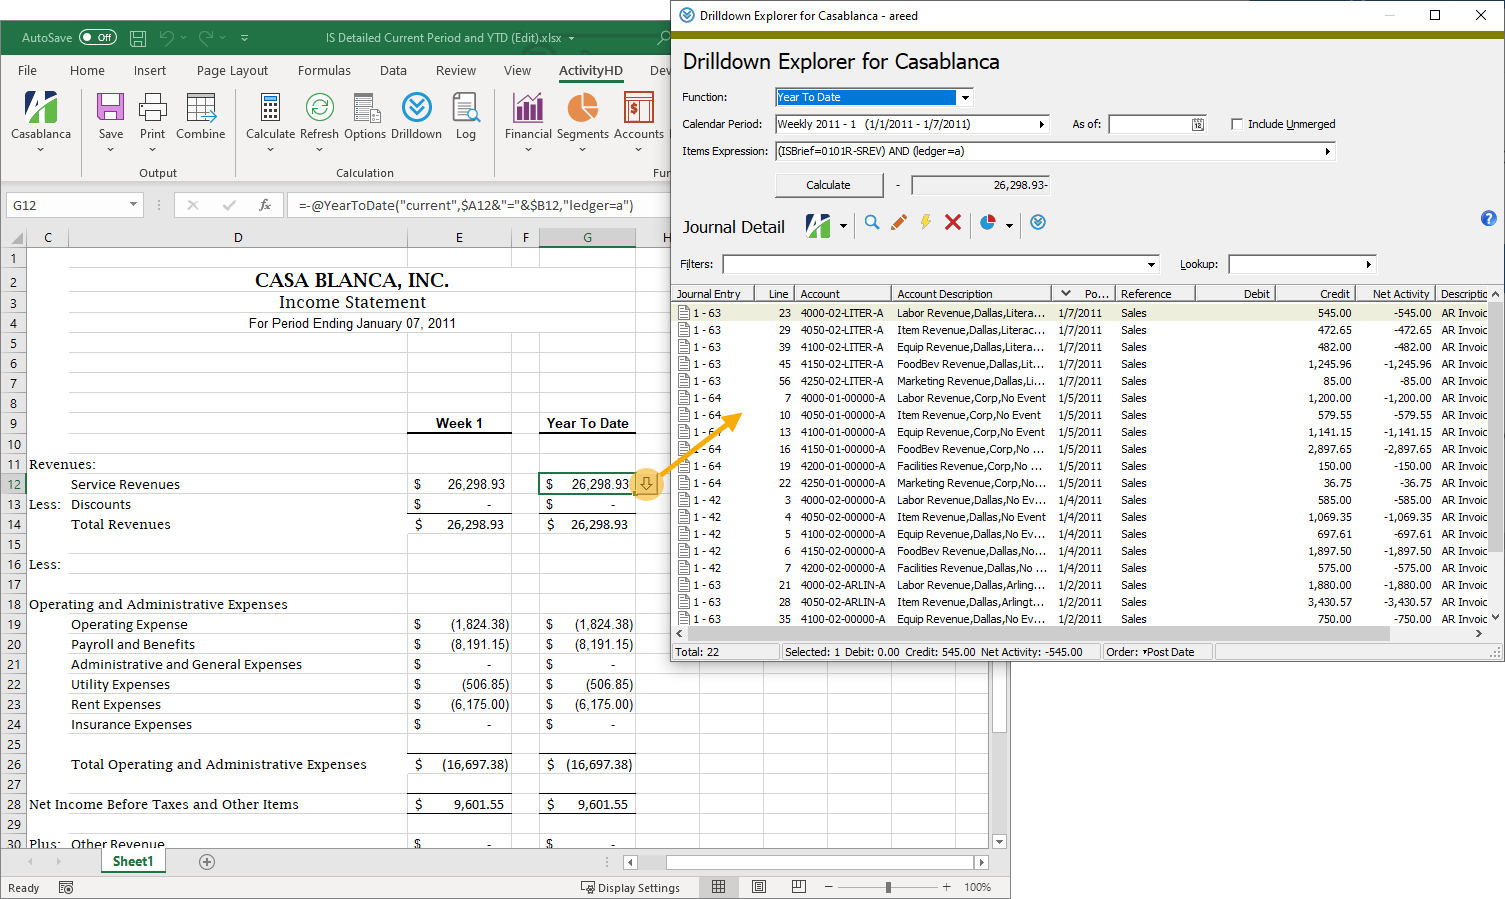
In Drilldown Explorer you have access to more analysis tools.
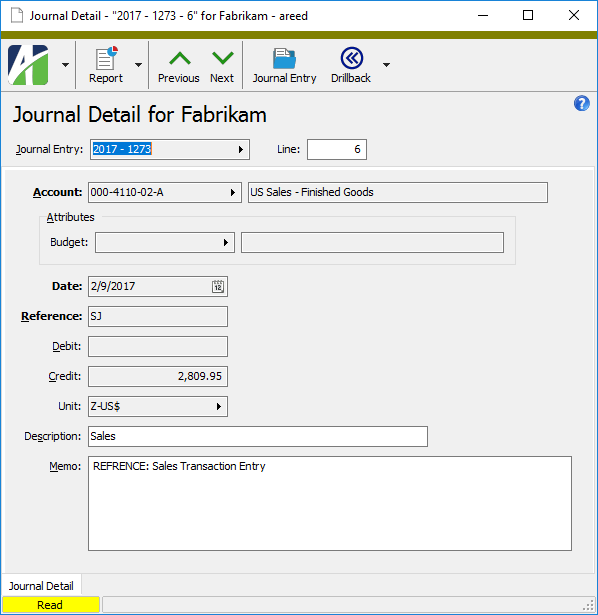
- Double-click a single record in the table, or highlight it and click
 to view the selected detail record in the Journal Detail window.
- Select one or more records in the table, click
 and select Journal Detail Listing to open the Journal Detail Listing report set-up dialog where you can set options and print or preview the report.
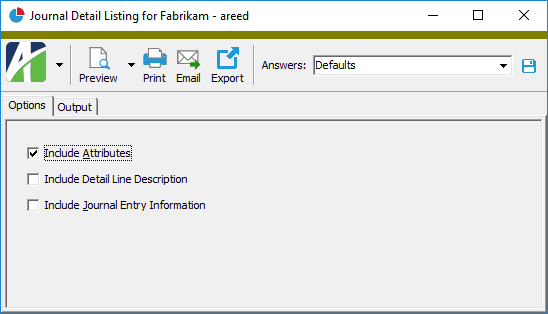
- With focus in the table, click
 . Another instance of the Drilldown Explorer opens.
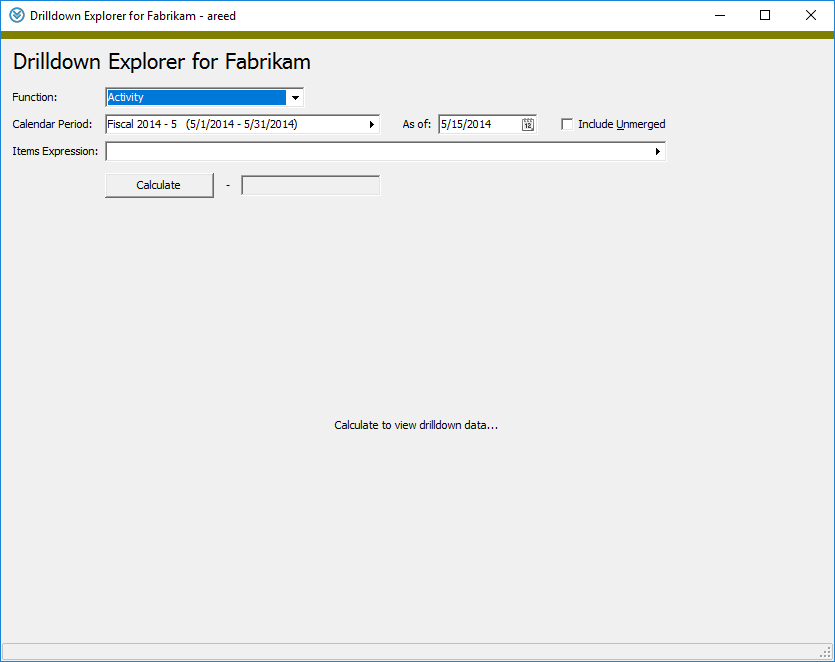
- Highlight a single record in the table and press Ctrl+J or click
 then select Journal Entry Inquiry from the drop-down menu to drill back to the corresponding journal entry record in Dynamics GP. (You must be connected to the Dynamics GP database.)
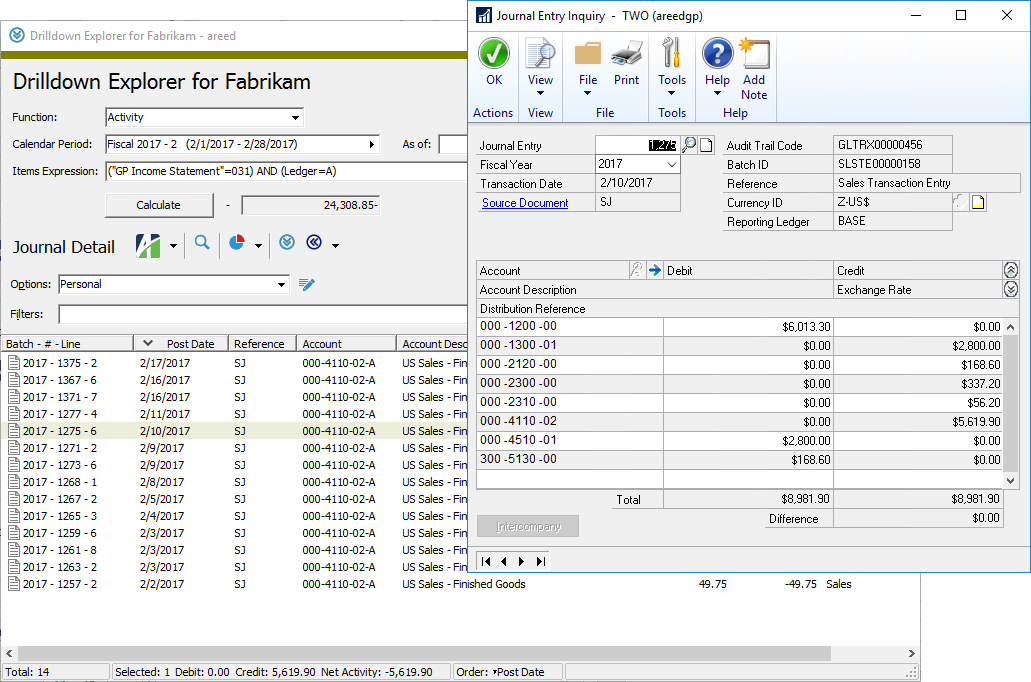
The following XML syntax can be used with the Drilldown action:
FinancialCalculator.Drilldown:
    <Function @Name @Period @Items1 @Items2 @Items3 @Company @Unit/>

Company.RunAction("Drilldown")
    <Function @Value/>
    <CalendarPeriod>
        <Calendar @Value/>
        <Year @Value/>
        <Period @Value/>
        <PeriodContains @Value/@Expression/>
    </CalendarPeriod>
    <IncludeUnmerged @Value(True/False)/>
    <ItemsExpression @Value/>
<Calculate @Value(True/False)/>Period expressions
A period expression describes an accounting period relative to the current period of a calendar.
The most common period expression is "CURRENT" or its equivalent of an empty string "".
Period expressions consist of keywords, numeric constants, string constants, and/or codes strung together using appropriate syntax.
Note
To help you interpret the syntax models that follow, keep these things in mind:
- Brackets "[ ]" indicate that the item enclosed is optional.
- A vertical pipe "|" indicates "or".
- NUMBER represents a numerical constant; it is interpreted as an Excel date number.
- STRING represents a string constant; it is interpreted as a date in SQL Server constant date format.
There are two basic types of period expressions:
- Current. This type of period expression has the following general syntax:
[CURRENT] [PERIOD] [[+/-] NUMBER] [PERIOD | PERIODS | YEAR | YEARS]
Examples
CURRENT
CURRENT PERIOD
CURRENT - 1
PERIOD 1
CURRENT - 1 YEAR
- Literal. This type of period expression starts with the PERIOD keyword in conjunction with either the THROUGH keyword or the CONTAINING keyword and has the following general syntax:
- PERIOD THROUGH
- A numeric constant interpreted as an Excel date number.
- A string constant interpreted as a date in SQL Server constant date format.
- An optional YEAR or PERIOD keyword followed by an optional BEGIN or END keyword followed by an optional CURRENT keyword followed by an optional PERIOD keyword and then optional period offsets all followed by an optional OF CALENDAR.
- PERIOD CONTAINING
- A numeric constant interpreted as an Excel date number.
- A string constant interpreted as a date in SQL Server constant date format.
- An optional YEAR or PERIOD keyword followed by an optional BEGIN or END keyword followed by an optional CURRENT keyword followed by an optional PERIOD keyword and then optional period offsets all followed by an optional OF CALENDAR.
A "period through" expression starts with PERIOD THROUGH keywords and is followed by one of the following:
PERIOD THROUGH [[NUMBER] | [STRING] | [[YEAR | PERIOD] [BEGIN | END] [CURRENT] [PERIOD] [[+/-] NUMBER] [PERIOD | PERIODS | YEAR | YEARS]]] [OF CALENDAR]
Examples
PERIOD THROUGH "2014-10-15"
PERIOD THROUGH YEAR END
PERIOD THROUGH CURRENT + 10
PERIOD THROUGH CURRENT PERIOD + 1 YEAR
A "period containing" expression starts with PERIOD CONTAINING keywords and is followed by one of the following:
PERIOD CONTAINING [[NUMBER] | [STRING] | [[YEAR | PERIOD] [BEGIN | END] [CURRENT] [PERIOD] [[+/-] NUMBER] [PERIOD | PERIODS | YEAR | YEARS]]] [OF CALENDAR]
Examples
PERIOD CONTAINING "2014-10-15"
PERIOD CONTAINING YEAR END
PERIOD CONTAINING CURRENT + 10
PERIOD CONTAINING CURRENT PERIOD + 1 YEAR
These can be condensed to the following general syntax statement:
[PERIOD THROUGH | CONTAINING] [[NUMBER] | [STRING] | [[YEAR | PERIOD] [BEGIN | END] [CURRENT] [PERIOD] [[+/-] NUMBER] [PERIOD | PERIODS | YEAR | YEARS]]] [OF CALENDAR]
Sub-expressions
Sub-expressions can be components of larger expressions. For period expressions, there are two sub-expressions we'll consider: PERIOD NUMBER and OF CALENDAR.
-
PERIOD NUMBER. A PERIOD NUMBER sub-expression has the following general syntax:
-
OF CALENDAR. An OF CALENDAR sub-expression has the following general syntax:
PERIOD NUMBER [OF] [STRING] [OF CALENDAR] [[+/-] NUMBER] [PERIOD | PERIODS | YEAR | YEARS]
Note
The STRING in this syntax statement is a string constant or code that is interpreted as a year code.
Examples
PERIOD 1 OF 2006
PERIOD 12 OF "2008"
PERIOD 4 OF 2008 OF Quarterly
OF STRING
Note
The STRING in this syntax statement is a string constant or code that is interpreted as a calendar name.
Examples
PERIOD THROUGH CURRENT OF "Quarterly"
PERIOD CONTAINING "2014-10-15" OF Daily
Period offsets
Period offsets are additions or subtractions from the base period (typically, from CURRENT). The portion of the syntax examples cited above in red text represent the period offset. Period offsets can be used more than once (see the third example below).
A period offset has the following general syntax:
[+/-] NUMBER [PERIOD | PERIODS | YEAR | YEARS]
Examples
CURRENT - 1
CURRENT - 1 YEAR
CURRENT - 1 PERIOD - 1 YEAR
Note
If no period or year is specified in a period offset statement, PERIOD or PERIODS is assumed.
Segment items expressions
Segment items expressions are sub-expressions which determine a set of accounts based on common segment items in their segment codes or rollups. The general form of a segment items expression is:
[SEGMENT/ROLLUP <operator> ITEM CODE/MASK]
The <operator> is one of the following: =, <>, <, >, <=, >=, LIKE, NOT LIKE.
Examples
Main=1000
Department=100
Ledger=B AND Store=Lubbock
Syntax rules
- Segment items expressions are optional.
- Segment items expressions can be combined with ANDs and ORs as in the third example above.
- Segment items expressions can be grouped using parentheses.
- Segment items expressions can be negated.
Example
(MAIN=1000 AND DEPARTMENT=100) OR MAIN=1100
Example
NOT Main=1000
More examples...explained
| Example | Explanation |
|---|---|
| Main=8733 | Includes all "Main" segments with a segment item equal to "8733". |
| Division<>Store32 | Includes all "Division" segments that do not have a segment item of "Store32". |
| Division LIKE Store | Includes all "Division" segments that have a segment item of "Store". |
| NOT Main=8000 | Includes all "Main" segments with any segment item except "8000". |
| Division=Store AND Main LIKE 8?33 | Includes all "Division" segments with a segment item of "Store" and "Main" segments with a segment item that satisfies the wildcard mask "8?33" (i.e., segment items with "8" in the first position, "3" in both the third and fourth positions, and any character in the second position). |
| "Balance Sheet"=CAP | Includes the "Balance Sheet" rollup with a rollup item equal to "CAP". In the expression, "Balance Sheet" is enclosed in quotes because of the space embedded in the rollup name. |
Connect to data
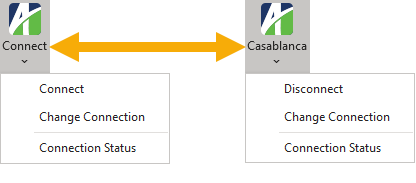
When editing a financial design you can work offline, meaning you are not connected to a dataset, or online, meaning that you are. It's easy to tell your connection status. When you are offline, the connection button is labeled "Connect". When you are online, the button is labeled with the name of the company you're connected to.
Connect to a dataset
By default, when you open a financial design you are immediately connected to the database of the company you are working in. However, you can disconnect to work offline or connect to another company to work with its data if you are in a multi-company environment. If you are not currently connected to a database and want to connect to the database that you were last connected to during the current session, do the following:
-
In the ActivityHD ribbon, click Connect. The Financial Options dialog opens.
- Respond to the dialog as appropriate, then click OK. When the dialog closes, ActivReporter connects to the last database used.
Disconnect from a dataset
- In the ActivityHD ribbon, click the down arrow on the Connect button to open a drop-down menu.
- Select Disconnect. You are immediately disconnected from the company and system.
Change the dataset you are connected to
- In the ActivityHD ribbon, click the down arrow on the Connect button to open a drop-down menu.
-
Select Change Connection. You are prompted for a system connection.
- From the Server Address dropdown, select the ActivityHD System server.
-
Click OK. You are prompted to select a company.
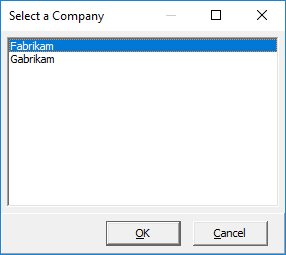
- Highlight the company to connect to and click OK. The new connection is established.
Calculate worksheets
Calculate a worksheet
Click the Calculation button in the ribbon to open a drop-down menu, then select Calculate Sheet to manually recalculate the current worksheet and any charts and chart sheets linked to it.
Calculate all open worksheets immediately
Click the Calculation button in the ribbon to open a drop-down menu, then select Calculate Now to manually recalculate all open worksheets and chart sheets, including any data tables.
Force a full calculation of all open workbooks
Click the Calculation button in the ribbon to open a drop-down menu, then select Force Full Calculation to manually perform a full calculation of the data and rebuild the dependencies for all open workbooks.
Use this action when the other calculation methods are ineffective. For instance, if a calculated cell in a financial design displays '#VALUE!' and the Calculate Now and Calculate Sheet methods fail to fix the problem, try Force Full Calculation. If the formula in the calculated cell is valid and the problem occurs because some cells are dependent on the values of other calculated cells, this option should remedy the situation.
Refresh the view
Some native Excel functions cannot recalculate financial designs sufficiently. For this reason, ActivReporter provides three refresh actions to fill the gap.
Refresh data and filters
Click the Refresh button in the ribbon to open a drop-down menu, then select Refresh All to refresh data and filters in one step. Refresh All is the default behavior of the main Refresh button.
Refresh data
Click the Refresh button in the ribbon to open a drop-down menu, then select Refresh Data to clear the cache of the financial calculator and run Excel's "CalculateFullRebuild" method. This is the same method as Calculate > Force Full Calculation. The addition of cache-clearing causes the financial calculator to relearn the information that was cached before Excel performs its most thorough calculation. As a result, the financial design will reflect the most current information available.
Refresh filters
Click the Refresh button in the ribbon to open a drop-down menu, then select Refresh Filters to refresh filters only without any recalculation or cache-clearing. The Refresh Filters action is useful when the current calculation is adequate or if performing a recalculation of the financial design would be time-consuming. Refresh Filters is particularly useful in resolving show/hide issues.
Print layout
Set a print area
The default print area of a worksheet is denoted by a dashed rectangle. If there are multiple vertical dashed lines across a page, these indicate where the pages will break horizontally when you print. Multiple horizontal dashed lines indicate where the pages will break vertically. You can override these defaults by setting the print area yourself.
- Open the worksheet in Excel.
- Select the cell in the upper left corner of the print region.
- Click and drag diagonally until you reach the lower right corner of the print region.
- Release the mouse to complete the selection.
- From the ActivityHD ribbon, select Print Area > Set Print Area. The print area is bounded on the right and below by solid lines.
Clear the print area
- Open the worksheet in Excel.
- Click anywhere in the worksheet.
- From the ActivityHD ribbon, select Print Area > Clear Print Area.
Expand the print area
There are two ways you can expand the print area of a financial design. Of course, you can clear the print area and then set it again. You can also add to the existing print area.
To add to the existing print area of a financial design:
- Open the worksheet in Excel.
- Select the region adjacent to the current print area that you want to include in the print area.
- From the ActivityHD ribbon, select Print Area > Add to Print Area.
Hide non-printing areas
To view only the part of a financial design that is designated as part of the print area:
- Open the worksheet in Excel.
- From the ActivityHD ribbon, select Print View > Hide Non-Print Areas.
Show non-printing areas
If non-print areas are hidden in a financial design, but you want to view everything:
- Open the worksheet in Excel.
- From the ActivityHD ribbon, select Print View > Show Non-Print Areas.
Filter data
Turn on auto-filtering
- Open the worksheet in Excel.
- Select the range of cells to filter.
- In the ActivityHD ribbon, click
 . A drop-down arrow
  appears on the right side of the topmost cell(s) in your selection.
Apply filtering
- Open the worksheet in Excel.
- Turn on auto-filtering.
-
At the top of the data you want to filter, click
and select Number Filters or Text Filters, depending on the type of data in the selected column, then from the second-level menu select the comparison operator to use to construct the filter.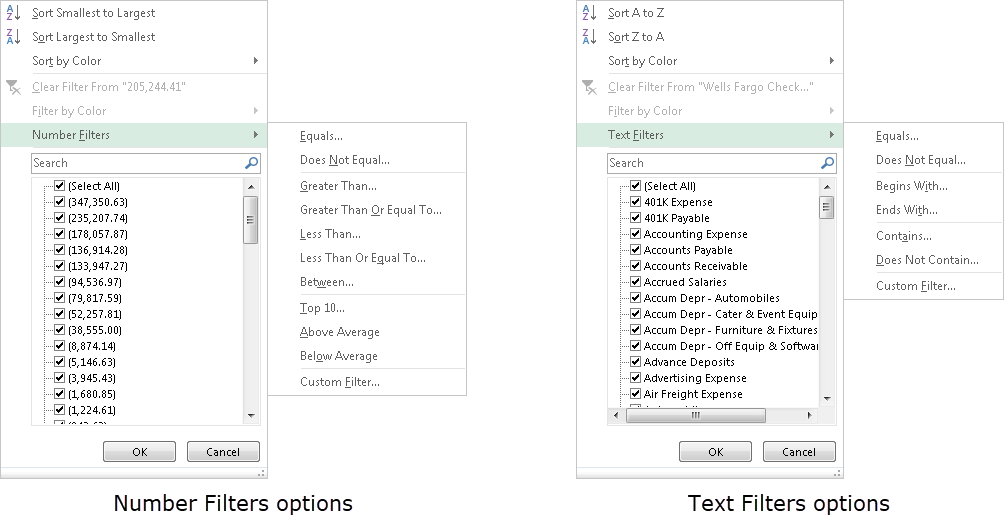
The Custom AutoFilter dialog opens with its first prompt prefilled with the comparison operator you selected.
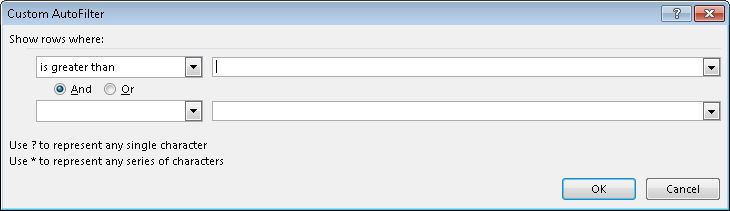
- Respond to the prompts as appropriate.
- Click OK to apply the filter.
Turn off auto-filtering
- Open the worksheet in Excel.
- In the ActivityHD ribbon, click
 . The drop-down arrows are removed.
Clear all filtering
If one or more filters is currently applied, the clear filter icon  is enabled.
- To clear all filters in the financial design, click .
Reapply filtering
When a filter has been applied to data, the drop-down arrow changes from to  and the reapply filter icon
  is enabled.
A few reasons you might want to reapply a filter include:
- Data in the range has been added, modified, or deleted.
- A formula that affects the data has been changed.
- The worksheet has been recalculated.
To reapply a filter:
- Select the filter to reapply.
- From the ActivityHD ribbon, click .
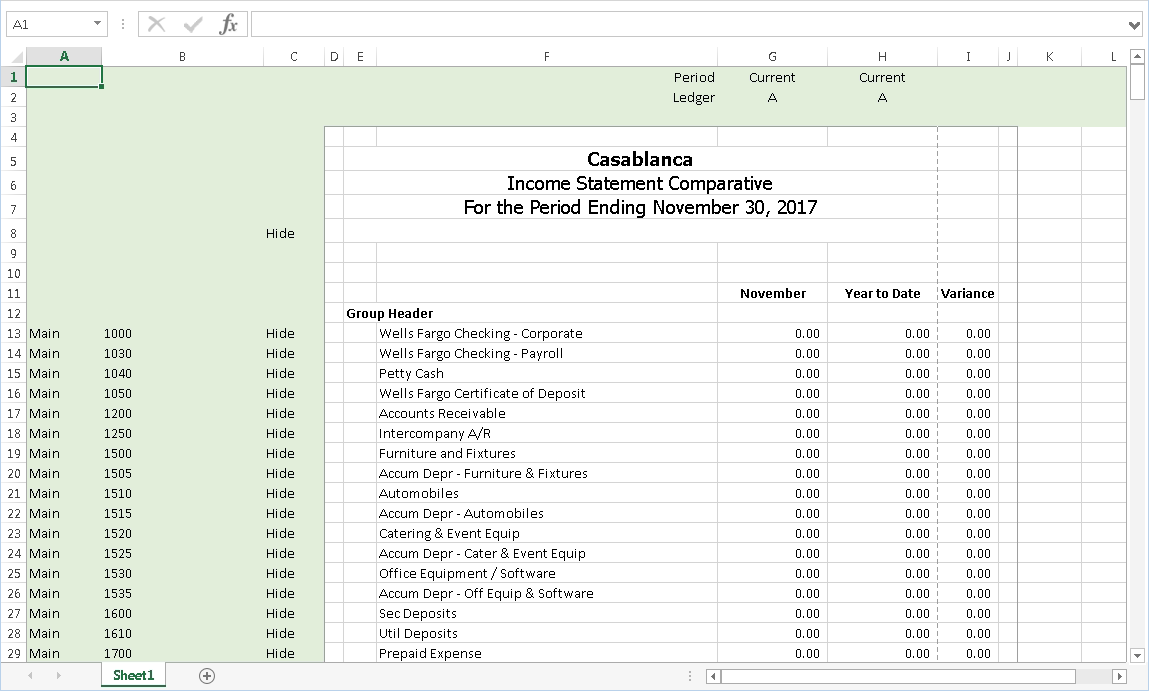
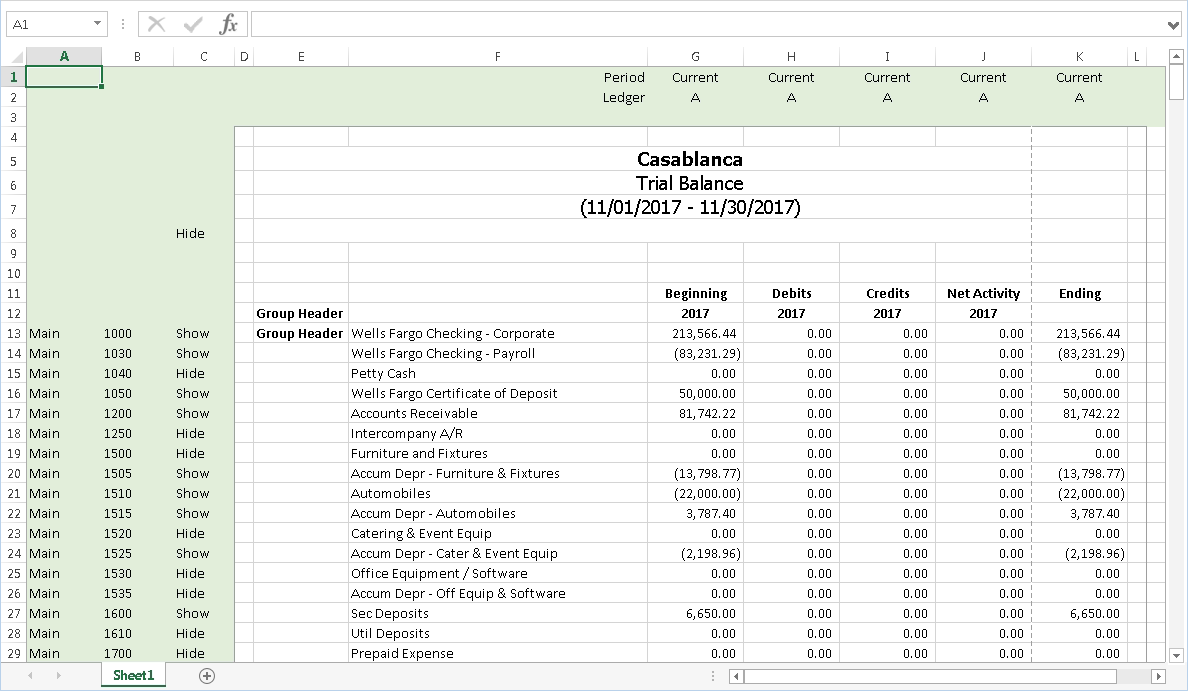
Use a built-in layout
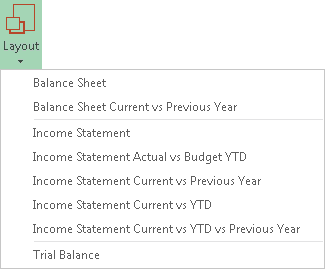
A good way to jumpstart a financial design is to start with a built-in layout. ActivReporter includes layouts for balance sheets, income statements, and a trial balance. Layout designs also include features such as the currency unit description (shows if specified in options) and embedded validation functions (ValidateAccounts, ValidateItems, ErrorsOrWarnings) for ensuring completeness and accuracy.
To load a built-in design:
- Click
 .
. - From the drop-down menu, select the financial design layout to load.
You are prompted whether to overwrite the current worksheet, insert a new worksheet, or cancel out of the process.
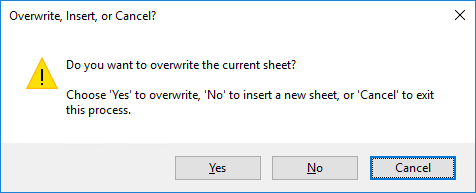
-
Click Yes or No. You are prompted with the opportunity to filter the data for the report.
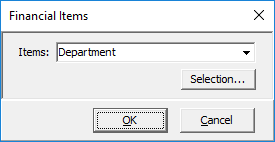
-
If you want to apply selection criteria to the report data, select an account, segment item, rollup item, or attribute item from the Items dropdown, then click OK. The Selection dialog opens.
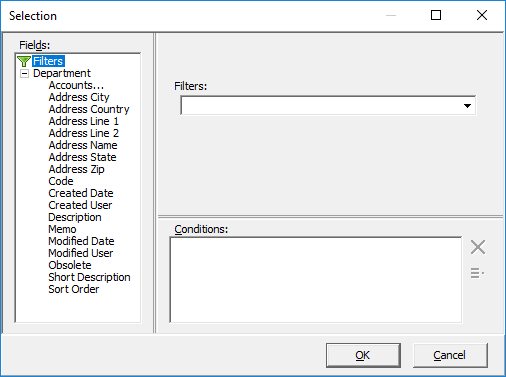
- Define selection criteria for the financial design as needed. When you finish, click OK to close the Selection dialog.
-
Click OK to close the Financial Items prompt. ActivReporter advises you how many rows will be created in the generated output.

-
Click OK. The selected design loads according to your instructions.
Cycle through the carousel below to see what the built-in layouts look like.
- Tweak the design as needed.
- When you finish, save your changes.

Use a sample financial design
Several sample designs are provided so that you can see a variety of techniques for generating financial reports. When ActivReporter is installed, these samples are copied to the user's computer. In most cases, the sample designs are copied to the following folder:
C:\ProgramData\AccountingWare\Activity Explorer\Financial Design Samples\ActivReporter
When you access a sample file, the selected file is copied to a new file so that the original file is not overwritten if you save it. If you choose to save the file, you are prompted for a saving location via the standard Excel Save dialog.
If there are no sample files on your computer, the Samples icon will not be visible in the toolbar.
To access a sample financial design:
- Start Excel.
- Select the ActivityHD ribbon.
- In the Layout group, click Samples. A drop-down menu opens with the list of available samples.
- Select the sample to open. A copy of the sample design loads in Excel.
- Enjoy investigating or modifying the sample!
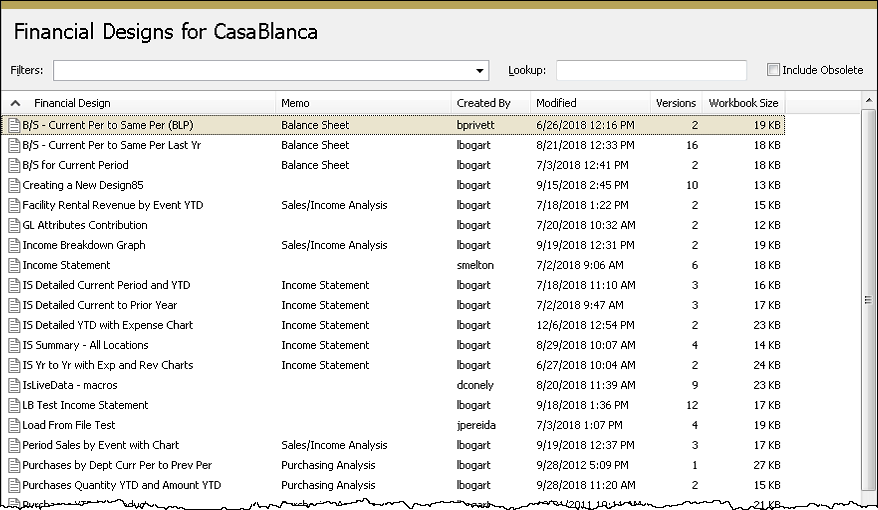
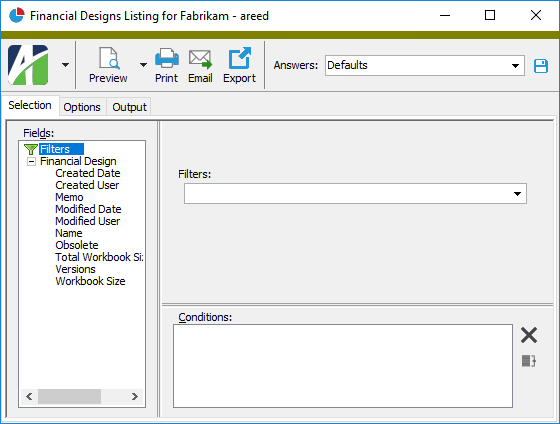
Financial Designs Listing
Purpose
The Financial Designs Listing provides a list of financial designs defined in your system.
Content
The basic report is simply a listing of the financial design names.
In addition, you can include one or more of the following:
- timestamps
- memos
- custom fields.
The following total appears on the report:
- record count.
Print the report
- In the Navigation pane, highlight the ActivReporter > Financial Designs folder.
- Start the report set-up wizard.
- To report on all or a filtered subset of financial designs:
- Right-click the Financial Designs folder and select Select and Report > Financial Designs Listing from the shortcut menu.
- On the Selection tab, define any filters you want to apply to the data.
- To report on specifically selected financial designs:
- In the HD view, select the financial designs to include on the report. You can use Ctrl and/or Shift selection to select multiple records.
- Click
 .
.
- To report on a particular financial design from the Financial Design window:
- In the HD view, locate and double-click the financial design you want to report on. The Financial Design window opens with the financial design loaded.
- Click .
- To report on all or a filtered subset of financial designs:
- Select the Options tab.
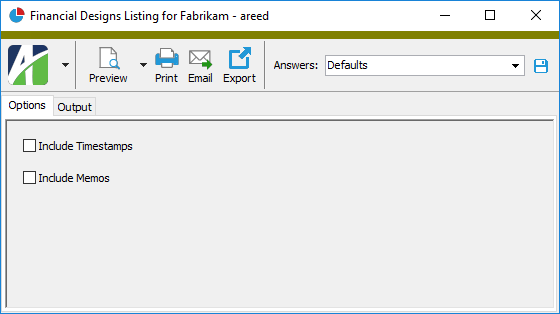
- Mark the checkbox(es) for the additional information to include:
- Timestamps
- Memos
- Custom Fields (only visible if custom fields are set up)
- Select the Output tab.
- In the Design field, look up and select the report design to use.
- In the toolbar, click the icon for the type of output you want:
 - Provides access to two preview options.
- Preview - Click the icon or click the drop-down arrow and select Preview from the drop-down menu to view the report in the Crystal Reports viewer.
- Preview to PDF - Click the drop-down arrow next to the icon and select Preview to PDF to view the report in the PDF reader.
 - Opens the Print dialog so that you can select and configure a printer and then print a paper copy of the report.
 - Opens the Report Email dialog so that you can address and compose an email that the report will be attached to. For best results, ensure your email client is running before you attempt to send a report via email.
 - Opens the Export Report dialog so that you can save the report to a file. File types include Crystal Reports (.rpt), PDF (.pdf), Microsoft Excel (.xls), Microsoft Word (.doc), rich text (.rtf), and XML (.xml).
- From
- The email account from which to send the email. Valid options are:
- Windows user default account. Sends email using the user's Windows default email account. For most users, this is the account configured in Outlook or another email client application.
- Server personal. Sends email using the email configuration for the system or company server and the email address on the current user's authorized user record. The authorized user record must have a confirmed email address.
- Server generic. Sends email using the email configuration and "from" address for the system or company server. This option requires "Send generic" access to the Server Email resource.
- To
- The email address(es) to which to send the email. Separate email addresses with semi-colons.
- CC
- The email addresses to copy on the email. Separate email addresses with semi-colons.
- BCC
- The email addresses to blind copy on the email. Separate email addresses with semi-colons.
- Subject
- The subject line.
- Text box
- The body of the email.
Report Email dialog
Data extensions
The following data extension is available for the report:
- Financial designs
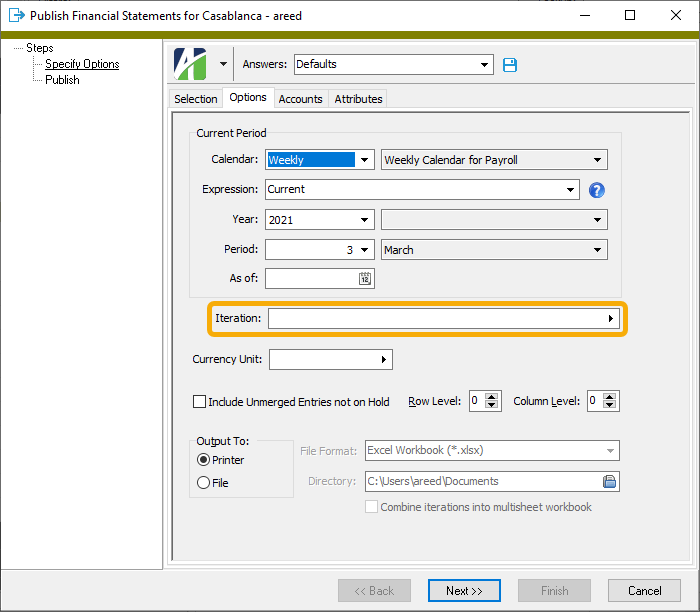
Publish a financial statement
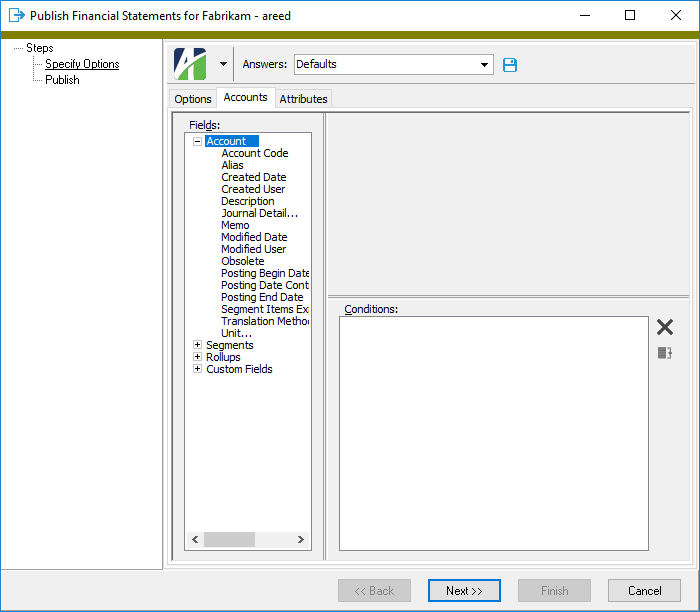
The Publish Financial Statements wizard lets you limit a financial statement to a particular account or set of accounts or to produce iterative financials on a financial design template. After you design a template, you can publish multiple financial statements from the design without having to alter the design.
- In the Navigation pane, highlight the ActivReporter > Financial Designs folder.
- Start the Publish Financial Statements process:
- To publish financial statements for all or a filtered subset of financial designs:
- Right-click and select Select and Publish Financials from the shortcut menu.
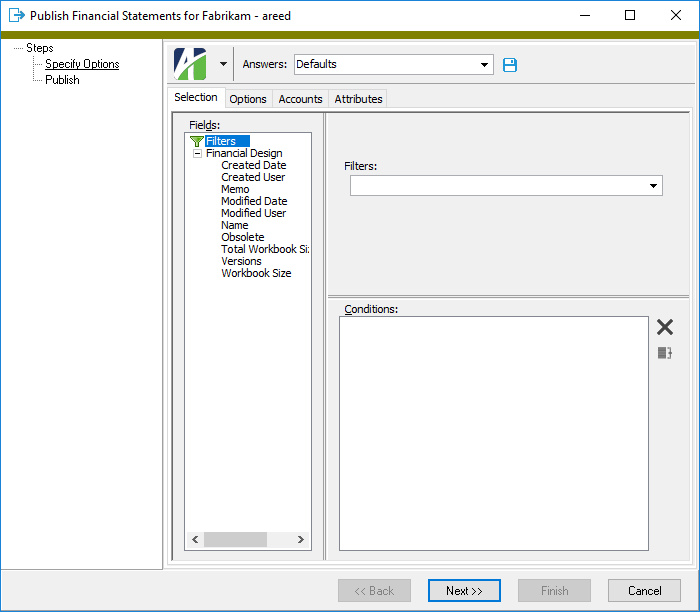
On the Selection tab, define any filters to apply to the data.
Tip
If you frequently run a process with the same settings, or infrequently run the process but want to easily recall the settings you used the last time you ran it, create an action profile. Action profiles "remember" settings you've used to run a process in the past.
- Right-click and select Select and Publish Financials from the shortcut menu.
- To publish financial statements for specifically selected financial designs:
- In the HD view, select the financial designs to publish financial statements for. You can use Ctrl and/or Shift selection to select multiple designs.
- Click
 . The Publish Financial Statements wizard starts.
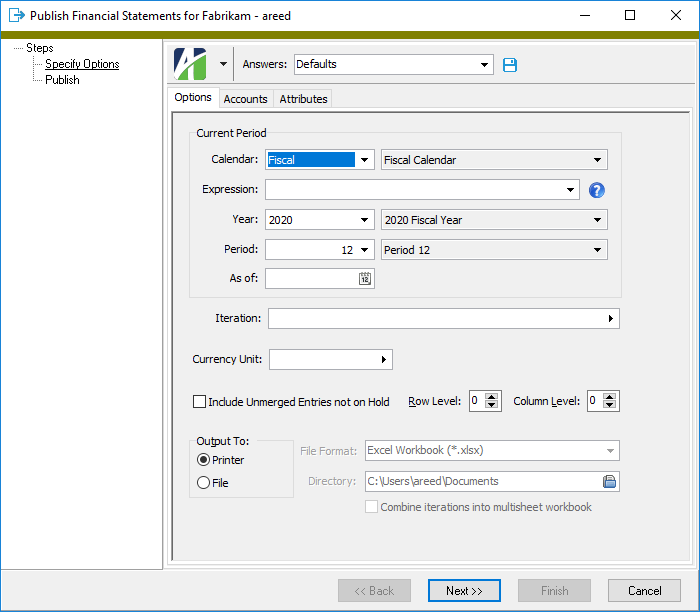
- To publish financial statements for all or a filtered subset of financial designs:
- On the Options tab from the Calendar drop-down list, select the calendar to publish financial statements for.
-
To define the reporting period using a relative expression, select or enter the period expression in the Expression field. If you prefer to explicitly enter the year and period, skip to step 5.
You can select from the following common period expressions:
- Current
- Current - 1 period
- Current - 1 year
Alternatively, you can type a valid period expression in the field. For help on period expression syntax, click the help button to the right of the field.
If you select or enter a period expression, ActivReporter adjusts the values in the Year and Period fields accordingly.
If you enter a period expression, skip to step 7.
- From the Year drop-down list, select the year of the period to publish financial statements for.
- From the Period drop-down list, select the period to publish financial statements for.
- If you only want the financial statement to reflect postings through a particular date, enter the date in the As Of field. All postings after the as of date are ignored. The as of date must fall between the current period begin and end dates.
-
To iterate over segment(s), rollup(s), and/or attribute(s), click the right arrow on the Iteration field to open the Select Iterations popup.
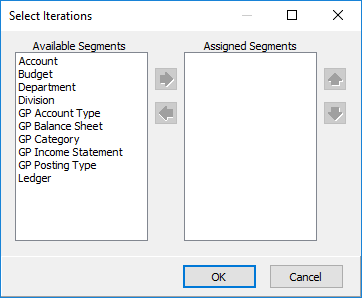
If you do not need to perform iteration, skip to step 13.
- In the Select Iterations popup, highlight the segment(s), rollup(s), and/or attribute(s) to iterate over in the Available Segments list box, then click
 to move your selection(s) to the Assigned Segments list box.
 - If you selected multiple items to iterate over, use
 and
and  to arrange the items in the order you want them applied.
 -
When you finish, click OK.
Note
If you specified segments or rollups in the Iteration field, be sure to use the Accounts tab to specify which accounts, segments, and/or rollups to iterate over. If you specified attributes in the Iteration field, be sure to use the Attributes tab to specify which attributes to iterate over.
- If you selected one or more items to iterate over and select "File" in the Output To field, the Combine iterations into multisheet workbook checkbox is enabled. Mark the checkbox if you want the separate iteration worksheets to be combined in a single workbook.
-
If you selected one or more items to iterate over, the Include consolidated statement checkbox is enabled and marked. If you do not want your output to include a consolidated financial statement, clear the checkbox.
To learn more about consolidated statements, expand this link.
Example
Suppose you have a "Store" account segment with eight items (stores "00" through "07"). You want to generate financial statements for stores 00, 01, 02, and 03 and also generate a consolidated financial statement for those four stores.
- Open the financial design you want to generate and run the Publish Financial Statements process. We'll use "Income Stmt" for this example.
- On the Options tab, respond as indicated to the highlighted selections.

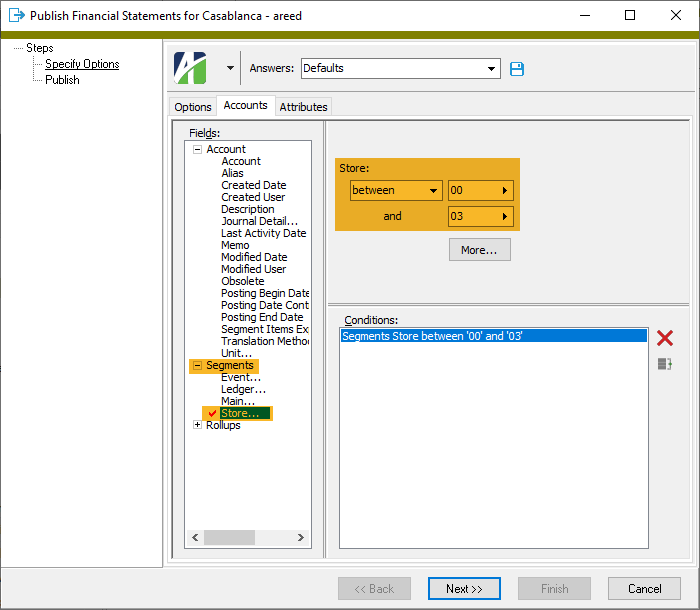
- On the Accounts tab, limit the selection to stores 00, 01, 02, and 03.
- Complete the process.
The process generates a single Excel workbook (Income Stmt.xls) in the file location you designated. The workbook contains five worksheets: one for the consolidated statement and a statement for each of the four stores.

You can use the @IterationDescription() function in your financial design to produce the worksheet title. When you iterate, the function returns "Consolidated" for the consolidated worksheet title and returns the iteration item description for the titles of the individual worksheets. For example:
- Income Stmt Consolidated - "Consolidated"
- Income Stmt 00 - "Corporate Office"
- Income Stmt 01 - "Lubbock"
- Income Stmt 02 - "Dallas"
- Income Stmt 03 - "Houston"
Note
- When you export a consolidated iteration, "Consolidated" is appended to the output filename: <Financial design name> Consolidated.xlsx.
Special note about consolidated statements when iterating over multiple iteration items
To include a consolidated statement when iterating over multiple iteration items (segments, rollups, and/or attributes), DO NOT exclude combinations of those items when creating selection conditions on the Accounts and Attributes tabs of the wizard. The list of iterations to be performed is not simply based on the iteration items matching the selection conditions but the selection conditions are also applied to determine the combinations of iteration items from the specified iteration items. The consolidated statement limits its financial functions to ALL combinations of iteration items from those specified.
Example
Suppose you have two segments, "Store" and "Department", and a rollup, "Performance". Performance is a rollup of Store + Department.
Store Department Performance 01 Apparel High 01 Furniture Low 01 Garden Low 01 Jewelry Medium 02 Apparel Medium 02 Furniture Medium 02 Garden High 02 Jewelry Low 03 Apparel High 03 Furniture Low 03 Garden Medium 03 Jewelry High To generate a financial statement with consolidated financial statement for each of your low-performing departments:
- On the Performance rollup, specify this condition: Performance = "Low"
- Select the following segments for iteration: Store, Department
The result will be a financial statement for the following combination of stores and departments since their Performance rollup value is "Low":
Store Department 01 Furniture 01 Garden 02 Jewelry 03 Furniture However, the consolidated statement will be limited to all combinations of the selected items from Store and Department: Store IN (01,02,03) AND Department IN (Furniture, Garden, Jewelry).
Store Department 01 Furniture 01 Garden 01 Jewelry 02 Furniture 02 Garden 02 Jewelry 03 Furniture 03 Garden 03 Jewelry - In the Currency Unit field, select the unit in which to report amounts. The unit selected must be flagged as a currency unit.
- If you want the statements to reflect unmerged entries that are not on hold, mark the Include Unmerged Entries Not on Hold checkbox.
-
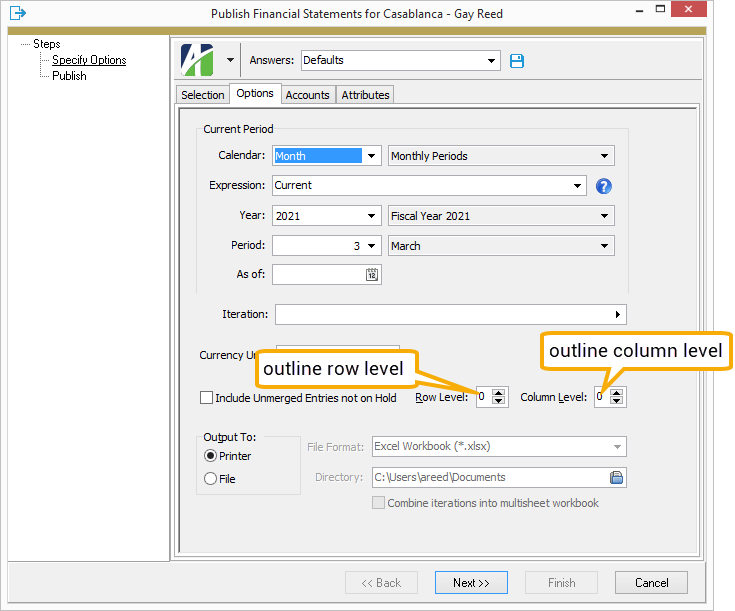
If you need to adjust the print area of the financial statements to start somewhere other than the upper left cell of the worksheet, select the row and column to start at in the Row Level and Column Level fields.
Note
This option is useful if you "outline" your financial statement in the leftmost columns and uppermost rows and want to hide those notations in your final output.
- In the Output To field, select the destination for the financial statements. Your options are:
- Printer
- File. If you select this option, the File Format and Directory fields are enabled.
From the File Format drop-down list, select the type of file to save the financial statement as.
- In the Directory field, enter the file path or click
 and browse to the location where you want to save the file.
-
If you specified segments and/or rollups in the Iteration field, select the Accounts tab. Otherwise, skip to step 20.
- To restrict the financial statements to particular accounts, define any filters to apply to the data.
-
If you specified attributes in the Iteration field, select the Attributes tab. Otherwise, skip to step 22.

- To restrict the financial statements to information for particular attributes, define any filters to apply to the data.
Example
Suppose a rollup attribute called "Project Type" rolls up the "Project" attribute. You can iterate on "Project" and specify a condition on the Attributes tab for Project Type = "Stage". The result would be a separate financial for each project in the "Stage" project type rollup.
- Click Next >>. What happens next depends on the type of output you selected.
- If you selected "Printer", the Print dialog opens.
Set the print options as desired, then click OK. The financial statement(s) are sent to the selected printer.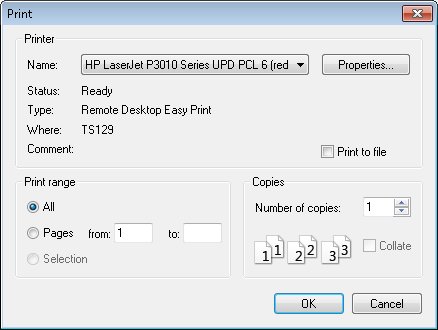
- If you selected "File", ActivReporter may prompt you to confirm that you want to generate the financials. If it does, click Yes. Otherwise, generation of financial statements begins immediately.
- If you selected "Printer", the Print dialog opens.
- After you produce the financial statement(s), click Finish.
Examples
Example 1. Suppose your company has five departments and you need to produce an income statement for each department. If you select the segment that represents your departments to iterate over, ActivReporter will print out an income statement for each department.
Example 2. Suppose you have a GL attribute called "Project" and a financial design that uses financial functions such as "Balance" and "Activity" which limits by other segments, rollups, and attributes. When the financial design is calculated and printed, amounts for ALL projects are summarized in the calculated amount. If instead you iterate over the "Project" attribute, a separate financial is generated for each project and each financial shows only amounts for its project.
Note
Certain file types are not valid for combining iterations into a multisheet workbook: .txt, .csv, .prn, .dif, .slk, .xlam, .xla.
Use the Financial Tree Reporting bot
The Financial Tree Reporting bot helps you automatically publish financial designs, iterate over the branches of your financial tree, and transmit the published financials to the recipients who need them. For example, you can use the bot to publish an income statement financial design, iterate over each department, and email the published financials to your department heads.
The Financial Tree Reporting bot is flexible enough to publish one or several financial designs and to iterate over departments, regions, and locations in one session.
Prerequisites
Before you run the Financial Tree Reporting bot, a few items must be present:
- ActivReporter version 8.15-2 or newer.
- Permissions to the Financial Tree Reporting bot.
- The financial design you want to publish.
- A saved configuration file in Excel.
- To email reports from a generic company email address rather than a personal one, the company email configuration must be set up.
- To report on a financial tree, appropriate segments and rollups are necessary.
Publish financials using the Financial Tree Reporting bot
-
In the Navigation pane, right-click the [Company name] > Financial Designs folder and select Bots > Financial Tree Reporting from the shortcut menu. The Financial Tree Reporting bot starts.
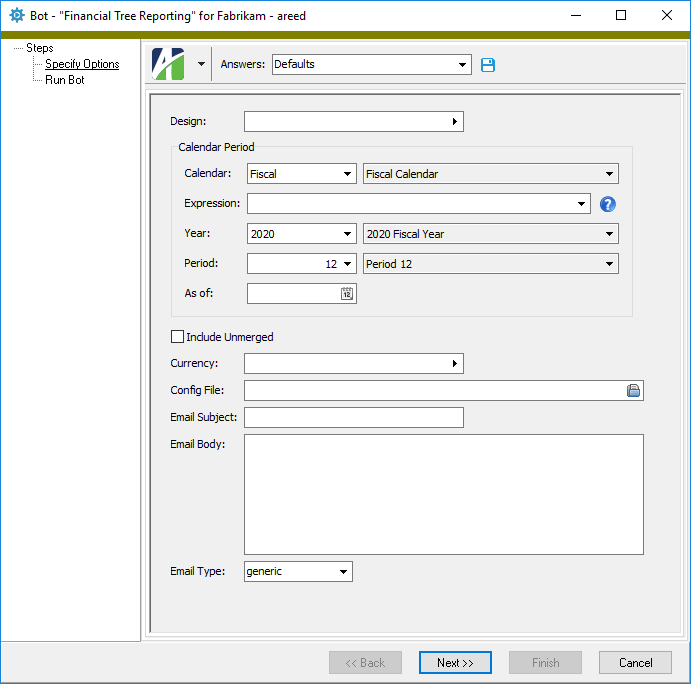
- In the Design field, select the financial design to publish. If the configuration file you select in the Config File field specifies a different design on its "Reports" tab, the design in the configuration file replaces any design specified here.
- From the Calendar dropdown, select the calendar to base the financials on.
-
To define the reporting period using a relative expression, select or enter the period expression in the Expression field. If you prefer to explicitly enter the year and period, skip to step 5.
You can select from the following common period expressions:
- Current
- Current - 1 period
- Current - 1 year
Alternatively, you can type a period expression in the field. For help on period expression syntax, click the help button to the right of the field.
If you select or enter a period expression, ActivReporter adjusts the values in the Year and Period fields accordingly.
If you enter a period expression, skip to step 7.
- From the Year drop-down list, select the year of the period to report on.
- From the Period drop-down list, select the period to report on.
- If you only want the financials to reflect postings through a particular date, enter the date in the As of field. All postings after the as of date are ignored. The as of date must fall between the current period begin and end date.
- To include detail from unmerged entries that are not on hold, mark the Include Unmerged checkbox.
- In the Currency field, select the unit in which to report amounts. The unit selected must be flagged as a currency unit. If the configuration file you select specifies a different currency unit on its "Reports" tab, the currency unit in the configuration file replaces any currency unit specified here.
- In the Config File field, enter the path and file name or click and browse to the location of the Excel configuration file for the financial design. If you do not specify a configuration file, ActivReporter looks for a configuration file attached to the bot record and uses it.
- The default email subject when you publish financials using the bot is "Financial Report". To customize the subject line, enter the subject line in the Email Subject field. Subject lines which are longer than your email application allows are truncated. The maximum length of a subject line in Outlook is 255 characters.
- In the Email Body text box, enter the content of the body of the email to send with the published financials. If you enter nothing here and the configuration file does not specify body content, the email message will be blank. If the configuration file you select specifies email body content on its "Recipients" tab, the email body in the configuration file replaces any email body content specified here.
- From the Email Type drop-down list, select the type of email account from which to send the email. Your options are:
- generic. Sends the email from the account configured on the Email tab of the company record.
- personal. Sends the email from your personal email account.
-
Click Next >>. You are prompted to confirm that you want to publish the financials.
-
Click OK. The Financial Tree Reporting bot reports its results.
- Click Finish.
Tip
|
|
Now is a good time to save your answers to this dialog so that some or all of steps 2-13 do not have to be repeated the next time you publish this financial tree. |
Create a configuration workbook for the Financial Tree Reporting bot
The Financial Tree Reporting bot reads a configuration file to gather the information it needs to produce and distribute financials. The configuration file is an Excel workbook which defines the financial tree, names the reports to be created, and identifies the recipients of the published reports and/or the locations where the reports are to be saved.
A blank configuration workbook named "Financial Tree Reporting Configuration.xlsx" is provided in the ".../Extras/ActivReporter" folder of the distribution. The workbook has the column and tab names preassigned.
To populate the configuration workbook:
-
Open the configuration workbook in Excel and save it with a new name in the desired file location. The name you assign to the workbook is up to you but AccountingWare suggests that it be meaningful so that it is easy to identify in the future.
Examples
As a best practice, assign a name that indicates the purpose of the workbook. For example:
- Comprehensive financials distributed to division managers.xslx
- Period financials for managers.xslx
- Financial Tree Reporting configuration.xslx
- Select the "Reports" worksheet.
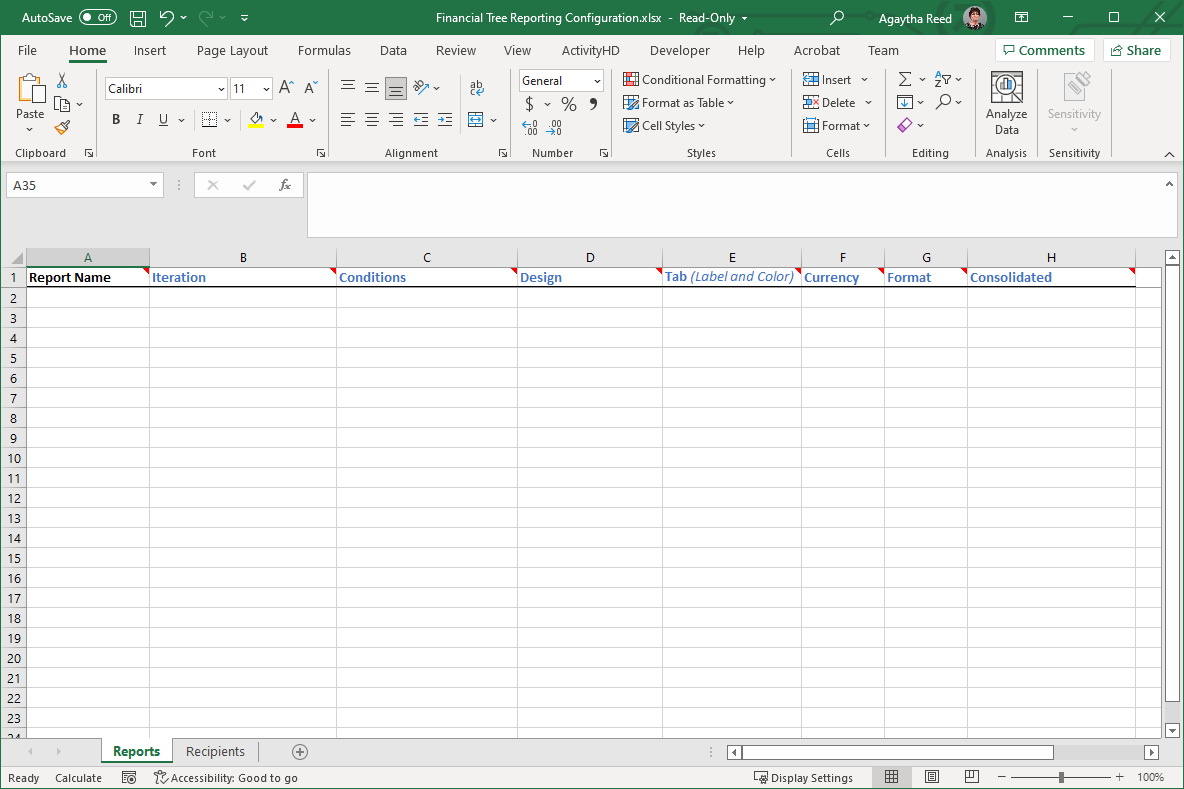
Note
A red triangle
 in the upper-right corner of a column heading indicates a note has been added to provide additional information about the column. Hover your mouse cursor over the red triangle to view the note.
 - Starting in the second row of the worksheet, enter the data that defines the information the published financials should contain. For each row of data, provide the following information:
In the Report Name column, enter a label to identify the name of the file created for a report. Report names can contain spaces but must not exceed 200 characters. As a best practice, make the name meaningful but concise. These names are used in the corresponding "Reports" column of the "Recipients" worksheet.
Each row in the worksheet with a unique report name generates a unique report. If the report name in the next row of the worksheet is blank or the same as the report name on the previous row, those rows are combined into a single Excel workbook where the individual rows represent a worksheet in the workbook.
Note
Do NOT allow entirely blank rows within the definition of the workbook structure.
Expand this link to see a visual depiction of the workbook structure.

In the Iteration column, enter the expression(s) which define the iteration(s) to perform. If you include multiple iteration expressions, separate them with commas. This entry is optional.
Iteration expressions can take one of four forms:
- <blank>. No entry in the column indicates that no iteration is to be performed. The result would be a single workbook not limited by segment, rollup, or attribute. For instance, an income statement financial design published with no iteration would result in an income statement for the entire organization rather than for a single department, division, etc.
- Segments=<segment value>. Specify the segment to iterate over; e.g., Segments=Division.
- Rollups=<rollup value>. Specify the rollup to iterate over; e.g, Rollups=GP Categories.
- Attributes=Budget. "Budget" is the only available attribute.
Examples
- Segment=Division
- Segment=Division,Segment=Department
- Segment=Division,Rollup=Region,Attribute=Budget
In the Conditions column, enter condition expressions to limit the scope of the iteration, if needed. If the value in the Iteration column is blank, this column must remain blank. Conditions are relative to the expression(s) entered in the Iteration column. For example, if the iteration includes "Segment=Division", you could limit by any of the segment items of the "Division" segment.
You can use logical operators such as "AND", "OR", and "LIKE" between condition expressions to more precisely limit the scope of the iteration. Be careful to check the logic of these more complex conditions to ensure they will return the results you expect.
- The Design column is optional. To use the financial design you entered in the Financial Tree Reporting dialog, leave this column blank. To override the design specified in the dialog, enter the name of the financial design to use to produce financials. Only one design can be entered in a cell and the design name must represent a valid design in the Financial Designs folder.
The Tab (Label and Color) column is optional.
To designate the name of the worksheet tab generated by the iteration, enter the name in the column. The maximum length of the tab name is 27 characters. If you enter a name longer than 27 characters, ActivReporter will truncate the name to 27 characters. Worksheet names must be unique in Excel; therefore, if you enter the same name for multiple tabs in a workbook, a number is appended to the worksheet name to make it unique. If you do not designate a tab name, the traditional tab names (Sheet1, Sheet2, etc.) are used.
To designate a color for the worksheet tab, select the cell in this column and apply a fill color.
- The Currency column is optional. To use the currency unit you entered in the Financial Tree Reporting dialog, leave this column blank. To override the specified currency, enter the currency unit to use to produce the financials. Only one unit can be entered in a cell and the unit must represent a valid currency unit in the Units folder.
- The Format column is optional. Specify the report format. The format can be one of the following:
- <blank>. If left blank, the report format defaults to Excel workbook (.xlsx) and only the Excel workbook is attached to the report email.
- pdf. If you specify this option, a pdf version of the report is generated and attached with the Excel workbook to the report email.
- pdf only. If you specify this option, only a pdf version of the report is attached to the report email.
- The Consolidated column is optional. If you leave the cell in this column blank, a consolidated worksheet is not generated. If you enter "yes" in this column and an iteration is specified, a consolidated version of the report is included in the workbook. This column is optional.
Examples
Iteration Conditions Results Segments=Division Division=100 AND Division=200 Empty financial since an account cannot be associated with multiple segment items. Segments=Division Division=100 OR Division=200 Financial contains data for both divisions 100 and 200. Segments=Division Division LIKE 2* AND Division <> 210 Financial contains data for all divisions with a segment item that starts with "2" except for division 210. Expand this link to see an example of a completed "Reports" tab.
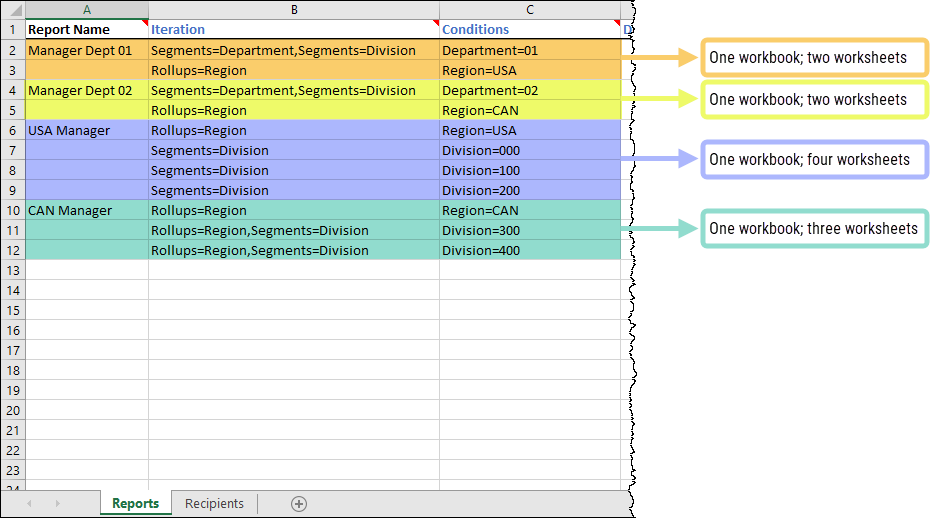
-
Select the "Recipients" tab.
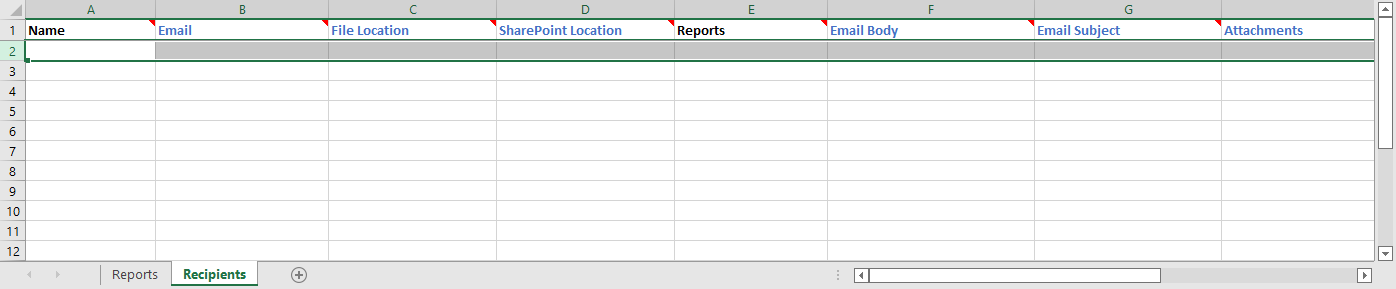
Note
A red triangle
in the upper-right corner of a column heading indicates a note has been added to provide additional information about the column. Hover your mouse cursor over the red triangle to view the note. - Starting in the second row of the worksheet, enter the following data for each recipient of the financials.
- In the Name column, enter the recipient's name. The name shows only in the last step of the Financial Tree Reporting wizard where the reports that were sent (or failed to send) are listed.
- In the Email column, enter the email address of the recipient. This column is optional; however, if neither an email address, a file location, or a SharePoint location is specified for a recipient, no reports are produced for the recipient.
- In the File Location column, enter the file path where the reports are to be saved. This column is optional; however, if neither an email address, a file location, or a SharePoint location is specified for the recipient, no reports are produced for the recipient.
- In the SharePoint Location column, enter the SharePoint folder(s) to which to copy the corresponding report(s). If you enter multiple SharePoint folders, separate them with commas. This column is optional; however, if neither an email address, a file location, or a SharePoint location is specified for the recipient, no reports are produced for the recipient.
- In the Reports column, enter the report(s) to produce for the recipient. If you enter multiple report names, separate them with commas. The names in this column must exactly match the report names assigned on the "Reports" tab.
- If you want to override the content of the email message that you entered in the Financial Tree Reporting dialog, enter the recipient-specific content in the Email Body column. If you leave the entry in this column blank, the message you entered in the dialog is used.
- If you want to override the email subject line that you entered in the Financial Tree Reporting dialog, enter the recipient-specific subject line in the Email Subject column. If you leave the entry in this column blank, the subject line you entered in the dialog is used.
- In the Attachments column, enter the name(s) of the file(s) to attach to the report email for this recipient. If you enter multiple attachment files, separate them with commas.
Expand this link to see an example of a completed "Recipients" tab.
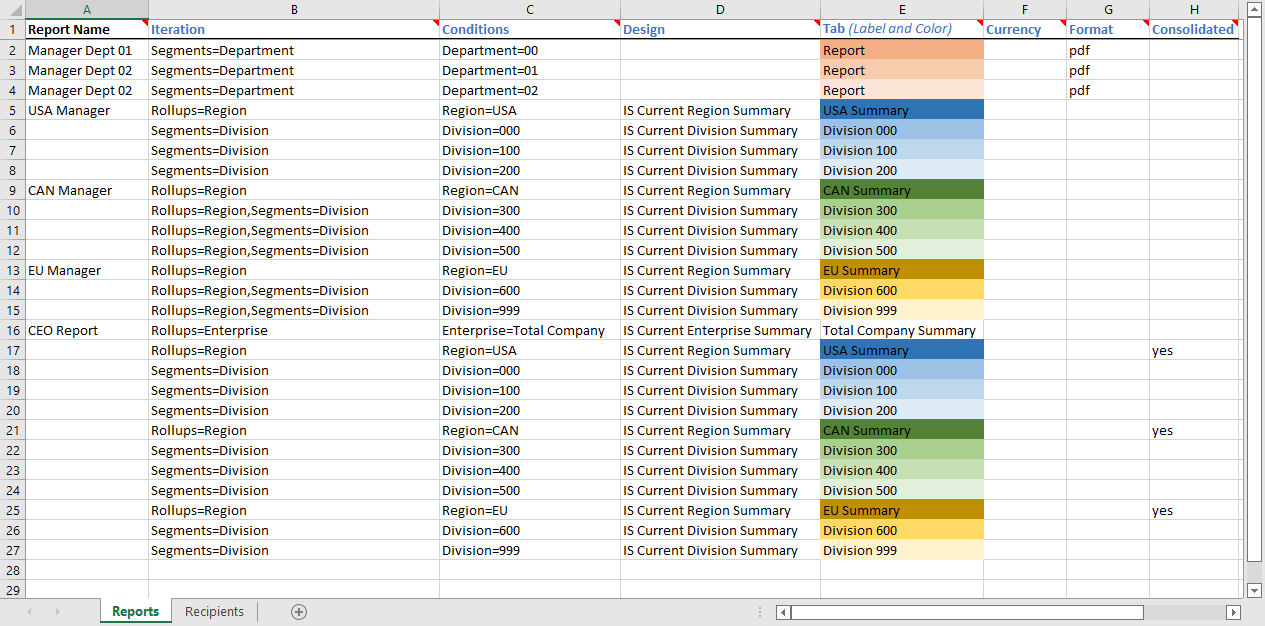
- Save the workbook.
Financial Design Record ID
Financial Design tab
Versions tab
Custom tab
This tab is visible if custom fields exist for the entity. At a minimum, if there are custom fields, a Fields subtab will be present. One or more additional categories of subtabs may also be visible.
Fields subtab
This tab prompts for values for any custom fields set up for entity records of this entity type. Respond to the prompts as appropriate.
References subtab
This tab is visible if other records reference the current record.
Exchange Folder subtab
This tab is visible only if you set up a custom field with a data type of "Exchange Folder". The label on this tab is the name assigned to the custom field.
This tab shows the contents of the specified Exchange folder.
File subtab
This tab is visible only if you set up a custom field with a data type of "File". The label on the tab is the name assigned to the custom field.
This tab renders the contents of the specified file according to its file type.
Internet Address subtab
This tab is visible only if you set up a custom field with a data type of "Internet Address". The label on this tab is the name assigned to the custom field.
This tab shows the contents of the specified web page.
Network Folder subtab
This tab is visible only if you set up a custom field with a data type of "Network Folder". The label on this tab is the name assigned to the custom field.
This tab shows the contents of the specified network folder.
Attachments tab
The Attachments tab is visible if any record for a given entity has an attachment. If the Attachments tab is not visible, this implies that no record of the entity type has an attachment on it; however, once an attachment is added to any record of the entity type, the Attachments tab will become available.
Change Logs tab
This tab is visible if the user has "Change Logs" access to the associated data folder resource.
The Change Logs pane shows the Change Logs HD view filtered to show all change logs for the selected entity record.
Double-click a row in the pane to drill down to its record in the Change Log window.
Other tab
Developer tab
This tab is visible only when developer features are enabled.
Automation subtab
This subtab shows field names and values for the current data record. Use the information in the subtab to assist when creating automation objects such as bots and import files. The field names and field values can be copied from the text box and pasted directly into your code or application. To copy content from the text box, highlight the content to copy and press Ctrl+C or right-click your selection and select Copy from the context menu.
Export (XML) subtab
This subtab shows the XML syntax for exporting the selected data record. The syntax can be copied from the text box as an exemplar for creating your own automation objects for bots, import files, ActivWebAPI, etc. To copy content from the text box, highlight the content to copy and press Ctrl+C or right-click your selection and select Copy from the context menu.
Import (XML) subtab
This subtab allows you to select a file for import and shows the XML syntax for importing data records. Use the subtab to explore the XML syntax for importing data records. In particular, you can investigate the syntax which results when using Data.Import and ActivWebAPI data POST and DELETE routes.
Change Log (XML) subtab
This subtab is visible only when the Enable Change Logs option is marked in System Options or Company Options (depending on whether the feature applies at the system or the company level). This is the default setting when developer features are enabled.
This subtab allows you to investigate changes to the current data record. The syntax can be copied for use in bots, dashboards, ActivWebAPI, and other automation. To copy content from the text box, highlight the content to copy and press Ctrl+C or right-click your selection and select Copy from the context menu.
Select Statement (SQL) subtab
This subtab allows you to investigate the SQL select statement used to retrieve the current data record. The syntax can be copied as an exemplar for data sources and other automation. To copy content from the text box, highlight the content to copy and press Ctrl+C or right-click your selection and select Copy from the context menu.
#VALUE! error
If a cell containing an ActivReporter function indicates #VALUE!, click the Log button in the ActivityHD ribbon for help identifying possible solutions.
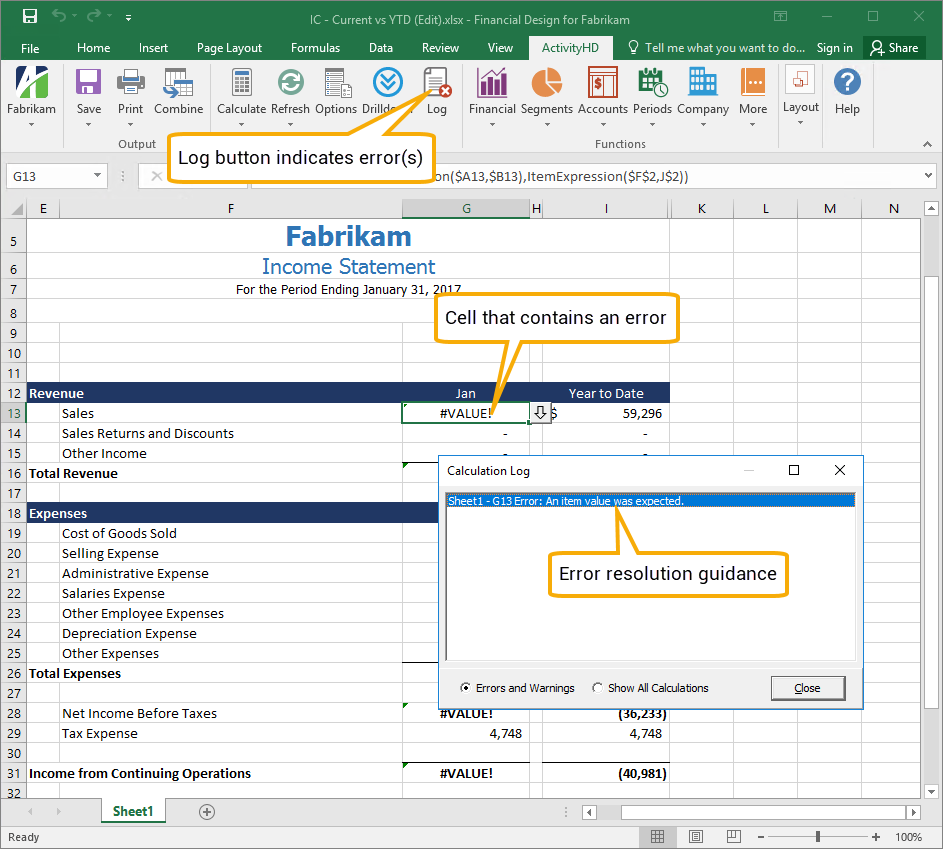
"ActiveX component can't create object" error
This error usually indicates that the bitness of Excel (32-bit vs. 64-bit) does not match the bitness of ActivReporter.
Ensure that the bitness of Excel and ActivReporter is the same. If necessary, uninstall ActivReporter and reinstall the correct bitness of ActivReporter.
ActivReporter database synchronization is not occurring
If changes in Dynamics GP are not being updated in ActivReporter (i.e., the database is not synchronized), check for the following conditions:
-
ActivSync is not enabled on the database. Go to the company dashboard and check the "ActivSync Status" gadget.
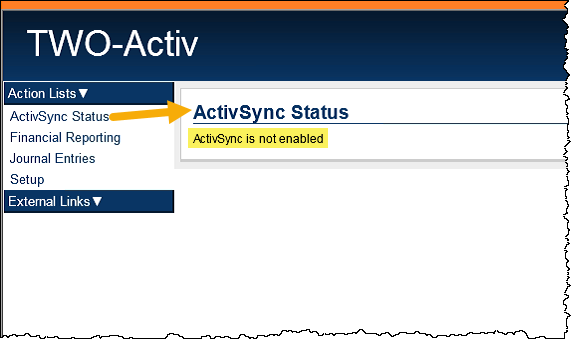
When you configure a company in ActivityHD Manager, you are asked if you want to enable ActivSync. Normally, you would agree to this option. If for some reason you did not, you can rerun the Company Configuration wizard in ActivityHD Manager and enable ActivSync. An already configured company can be reconfigured at any time!
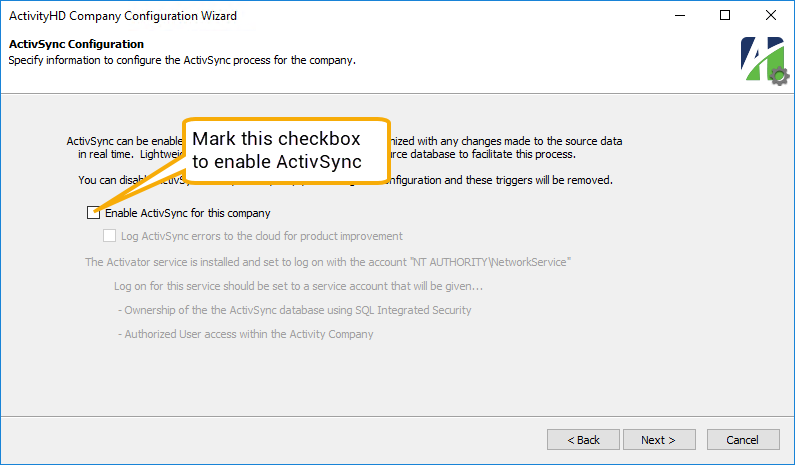
-
The Service Broker External Activator is not running.
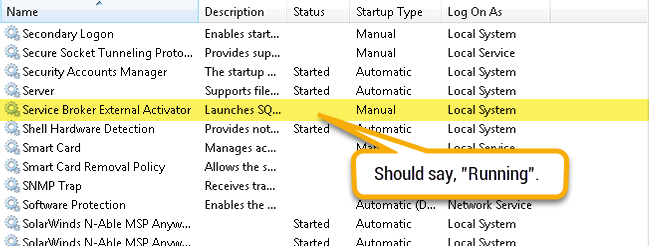
Drillback to Dynamics GP is not working
To use the drillback feature, you must be currently logged into Dynamics GP and you must be logged into the company that you are drilling back to.
If you are not logged into Dynamics GP, or if the company currently in focus is not the company you are attempting to drill back on, the following error is issued:
Excel is unresponsive
If you are working on a financial design and the workbook does not respond to mouse clicks, it is often because a drill-down window is open in the background.
Note
If sound is enabled on your workstation, you will hear a "beep" each time you click in the Excel workbook. If you do not have sound enabled, you will simply notice that clicking your mouse evokes no response.
Drill-down windows are modal and lock Excel from any further operations. Sometimes the modal window is not visible because it is minimized or occluded on the desktop. To recover from this condition, click the Excel icon in the taskbar (or use the Alt+Tab combination to navigate to Excel) to bring Excel and all its companion windows to the foreground. When you do this, the modal drilldown should appear on top of the Excel workbook. Close the modal window and Excel should resume normal function.
Excel suddenly reports "N/A" on all cells containing ActivReporter functions
We see this periodically. Typically, this sudden pockmarking of your worksheet with "N/A" occurs when pasting previously cut cell(s). If you force Excel to re-evaluate all formulas in all cells, the problem generally evaporates. To force Excel to perform a "deep" recalculation, press Ctrl+Alt+Shift+F9.
New rollup does not work
If a new rollup is created while you are editing a financial design, it will not be recognized (and, hence, will not produce results within ActivReporter functions). The delay in availability of the new rollup is because rollup and segment information is cached within the financial design. To remedy this, disconnect and reconnect to the ActivReporter company. This action refreshes the cache and causes the rollups to be recognized and become usable.
Account Conditions
Account Conditions
Enter a SQL condition statement here to exclude or include information from the financial view. Alternatively, you can use the table below to describe the conditions you need and ActivReporter will build and add the conditions to this text box.
Enter a mask for the selected item values when the values you need to select have common characters but are not in a particular order.
Press F3 to look up the value.
If a value is already selected, you can press F4 to open the record in its native editor.
Enter the first value in the range of item values you need to select. Use a range when the values are in a defined order.
Press F3 to look up the value.
If a value is already selected, you can press F4 to open the record in its native editor.
Enter the last value in the range of item values you need to select. Use a range when the values are in a defined order.
Press F3 to look up the value.
If a value is already selected, you can press F4 to open the record in its native editor.
Financial Functions
- Activity
-
Calculates the activity of a set of accounts as of the specified period.
Activity(Period,Items1,Items2,Company,Unit)
Examples
Activity("Current - 1 year", "Inc = Phone", "Ledger=A")
Retrieves the net activity of last year's current month for the phone expense accounts of ledger A.
Activity("Current", "GL.Account=1000-00-A")
Retrieves the net activity of the current month for account 1000-00-A.
-Activity("Current - 1", "Inc=Rev", "Ledger=B")
Retrieves the net activity of the budget for the revenue accounts in the previous period. The minus (-) in front changes the credit sign to positive for printing purposes.
Activity("Current", "Inc=" & $A22, "Ledger=A")
Retrieves the net activity in the current period for expense accounts that match the "Inc" rollup item in cell A22. Only accounts in ledger A are included.
Activity(" ", $A6 & "=" & $B6, "Ledger="D$1)
Retrieves the net activity in the current period for the accounts that match the rollup item specified in cell B6 of the rollup specified in cell A6. Only accounts that contain the ledger item in cell D1 are included.
Activity(" ", "Inc=" & $A6 & " and Dept=12", "Ledger="D$1)
Retrieves the net activity in the current period for the accounts that match the rollup item in cell A6 of "Inc" and also assigned to Dept 12. Only accounts that contain the ledger item in cell D1 are included.
Round(Activity("Current", "Inc=Supply", "Ledger=A"), 2)
Rounds the current activity of the supply expense accounts to even dollars (the two decimal places are rounded). Round is a standard Excel function.
- Balance
-
Calculates the balance of a set of accounts as of the specified period.
Balance(Period,Items1,Items2,Company,Unit)
Examples
Balance("Current", "Bal=CASH", "Ledger=A")
Retrieves the balance of the accounts in the "Bal" rollup with a rollup item of "CASH" as of the ending date of the current period.
-Balance("Period 1 of Year", "Inc=Rev", "Ledger=B")
(Total year's budget amount for a revenue account) Reverses the sign of the balance retrieved for the only period in a "Year" calendar for the accounts with a rollup item of "Rev" in the "Inc" rollup.
- BeginBalance
-
Calculates the beginning balance of a set of accounts as of the specified period.
BeginBalance(Period,Items1,Items2,Company,Unit)
- YearToDate
-
Calculates the year-to-date activity of a set of accounts as of the specified period.
YearToDate(Period,Items1,Items2,Company,Unit)
Examples
YearToDate("Current", "Inc=Supplies", "Ledger=A")
Returns the year-to-date through this month of the office supply expenses.
YearToDate("Period 12", "Inc=Phone", "Ledger=B")
(Alternate method for reporting the total year's budget amount) Retrieves the end-of-year balance of the accounts with the rollup item "Phone" in the "Inc" rollup.
YearToDate("Period 12", "Inc=Phone", "Ledger=B")*PeriodNumber("")/12
(Calculates year-to-date budget amount from total year's budget amount) Retrieves the total year budget, then multiplies it by the period number and divides by 12.
- DebitActivity
-
Calculates the debit activity of a set of accounts as of the specified period.
DebitActivity(Period,Items1,Items2,Company,Unit)
Example
DebitActivity("Period 12 - 1 year", "Inc=Phone", "Ledger=A")
(Debits for the period) Retrieves the debit activity for the previous year's last period of the accounts with a rollup item of "Phone" in the "Inc" rollup. Only accounts in ledger A are included.
- DebitBalance
-
Calculates the debit balance of a set of accounts as of the specified period.
DebitBalance(Period,Items1,Items2,Company,Unit)
- DebitYearToDate
-
Calculates the year-to-date debit activity of a set of accounts as of the specified period.
DebitYearToDate(Period,Items1,Items2,Company,Unit)
- CreditActivity
-
Calculates the credit activity of a set of accounts as of the specified period.
CreditActivity(Period,Items1,Items2,Company,Unit)
- CreditBalance
-
Calculates the credit balance of a set of accounts as of the specified period.
CreditBalance(Period,Items1,Items2,Company,Unit)
- CreditYearToDate
-
Calculates the year-to-date credit activity of a set of accounts as of the specified period.
CreditYearToDate(Period,Items1,Items2,Company,Unit)
Example
CreditActivity("Period 12 - 1 year", "Inc=Phone", "Ledger=A")
(Credits for the period) Retrieves the credit activity for the previous year's last period of the accounts with a rollup item of "Phone" in the "Inc" rollup. Only accounts in ledger A are included.
Segments Functions
- Segment
-
Returns the name of the specified segment.
Segment(SegmentCode,Company)
- SegmentPluralName
-
Returns the plural name of the specified segment.
SegmentPluralName(SegmentCode,Company)
- SegmentMemo
-
Returns the memo of the specified segment.
SegmentMemo(SegmentCode,Company)
- SegmentCustomField
-
Returns the value of a custom field for the specified segment.
SegmentCustomField(CustomField,SegmentCode,Company)
- SegmentItem
-
Returns the segment item of the specified segment and optional item.
SegmentItem(Segment,Item,Company)
- SegmentItemDescription
-
Returns the description of the segment item for the specified segment and optional item.
SegmentItemDescription(Segment,Item,Company)
Examples
SegmentItemDescription("Inc", "REV")
(Line description) Retrieves the description of the "REV" rollup item in the "Inc" rollup.
SegmentItemDescription("Inc", A6)
Retrieves the description of the rollup item in cell A6 of the "Inc" rollup.
- SegmentItemShortDescription
-
Returns the short description of the segment item for the specified segment and optional item.
SegmentItemShortDescription(Segment,Item,Company)
- SegmentItemName
-
Returns the name of the segment item for the specified segment and optional item.
SegmentItemName(Segment,Item,Company)
- SegmentItemAddress1
-
Returns the first address line of the segment item for the specified segment and optional item.
SegmentItemAddress1(Segment,Item,Company)
- SegmentItemAddress2
-
Returns the second address line of the segment item for the specified segment and optional item.
SegmentItemAddress2(Segment,Item,Company)
- SegmentItemCity
-
Returns the city of the segment item for the specified segment and optional item.
SegmentItemCity(Segment,Item,Company)
- SegmentItemState
-
Returns the state of the segment item for the specified segment and optional item.
SegmentItemState(Segment,Item,Company)
- SegmentItemZipCode
-
Returns the Zip Code of the segment item for the specified segment and optional item.
SegmentItemZipCode(Segment,Item,Company)
- SegmentItemCountry
-
Returns the country of the segment item for the specified segment and optional item.
SegmentItemCountry(Segment,Item,Company)
- SegmentItemMemo
-
Returns the memo of the segment item for the specified segment and optional item.
SegmentItemMemo(Segment,Item,Company)
- SegmentItemCustomField
-
Returns the custom field value of the segment item for the specified segment and optional item.
SegmentItemCustomField(CustomField,Segment,Item,Company)
Accounts Functions
- Account
-
Returns the account code of the specified account.
Account(AccountCode,Company)
- AccountDescription
-
Returns the description of the specified account.
AccountDescription(AccountCode,Company)
- AccountMemo
-
Returns the memo for the specified account.
AccountMemo(AccountCode,Company)
- AccountCustomField
-
Returns the value of a custom field for the specified account.
AccountCustomField(Field,AccountCode,Company)
Periods Functions
- As of Period End
-
A hybrid Excel-ActivReporter function which produces a heading which includes the period end date. Uses optional "As of" date if specified.
= "As of " & TEXT(PeriodEnd(), "mmmm dd, yyyy")
- For the N Month(s) Ending
-
A hybrid Excel-ActivReporter function which produces a heading with the number of months ending (Month Day, Year) for the specified period. Uses optional "As of" date if specified.
= "For the " & getdigit(PeriodNumber()) & " Month(s) Ending " & TEXT(PeriodEnd(), "mmmm dd, yyyy")
- For the Period Beginning
-
A hybrid Excel-ActivReporter function which produces a heading which includes period begin date. Uses optional "As of" date if specified.
= "For the Period Beginning " & TEXT(PeriodBegin(), "mmmm dd, yyyy")
- For the Period Ending
-
A hybrid Excel-ActivReporter function which produces a heading which includes the period end date. Uses optional "As of" date if specified.
= "For the Period Ending " & TEXT(PeriodEnd(), "mmmm dd, yyyy")
- For the Period Beginning and Ending
-
A hybrid Excel-ActivReporter function which produces a heading which includes the period begin and end dates. Uses optional "As of" date if specified.
= "For the Period Beginning " & TEXT(PeriodBegin(), "mmmm dd, yyyy") & " and Ending " & TEXT(PeriodEnd(), "mmmm dd, yyyy")
- PeriodNumber
-
Returns the period number of the specified period.
PeriodNumber(Period,Company)
- PeriodDescription
-
Returns the description of the specified period.
PeriodDescription(Period,Company)
- PeriodYear
-
Returns the year of the specified period.
PeriodYear(Period,Company)
Example
PeriodYear("Current")
Prints the year in a column heading.
- PeriodYearDescription
-
Returns the description of the year for the specified period.
PeriodYearDescription(Period,Company)
- PeriodCalendar
-
Returns the calendar of the specified period.
PeriodCalendar(Period,Company)
- PeriodCalendarDescription
-
Returns the description of the calendar for the specified period.
PeriodCalendarDescription(Period,Company)
- PeriodCalendarMemo
-
Returns the memo on the calendar for the specified period.
PeriodCalendarMemo(Period,Company)
- PeriodCalendarCustomField
-
Returns the value of the custom field on the calendar for the specified period.
PeriodCalendarCustomField(CustomField,Period,Company)
- PeriodWorkdays
-
Returns the number of workdays in the specified period.
PeriodWorkdays(Period,Company)
- PeriodBegin
-
Returns the beginning date of the specified period.
PeriodBegin(Period,Company)
- PeriodEnd
-
Returns the ending date of the specified period.
PeriodEnd(Period,Company)
Examples
PeriodEnd("Current")
Retrieves the ending date of the current period.
"As of" & Text(PeriodEnd("Current"), "mmmm dd, yyyy")
Combines Excel formulas and ActivReporter functions to build a heading description like "As of March 31, 2014". The date is the end date of the current period. Text is a standard Excel function.
- PeriodYearBegin
-
Returns the beginning date of the year for the specified period.
PeriodYearBegin(Period,Company)
- PeriodYearEnd
-
Returns the ending date of the year for the specified period.
PeriodYearEnd(Period,Company)
- AsOf
-
Returns the specified "as of" date if specified and 0 if it is not.
AsOf(Date)
Example
IF(AsOf()=0,"","As of "&TEXT(AsOf(),"mm/dd/yyyy"))
Displays "As of <date>" when the as of date is specified and nothing when it is not.
Miscellaneous Functions
- AccountItem
-
Accepts a partial account code and a ledger and returns a full account code.
AccountItem(Account,Ledger)
- AccountExpression
-
Accepts a partial account code and a ledger and returns an expression that can be used to limit a financial function.
AccountExpression(Account,Ledger)
- ItemExpression
-
Accepts an unlimited number of item type and item value pairs and returns an expression that can be used to limit a financial function.
ItemExpression(Item1,Value1,Item2,Value2,Item3,Value3,...)
Example
ItemExpression("Project", "100", "Dept", "01") = "(Project=100 AND Dept=01)"
- Iteration
- IterationItem
-
Accepts no arguments and returns a list of the iteration items that are applied to the financial, or accepts an item type and returns the iteration item of that type.
IterationItem(ItemType,Company)
- IterationDescription
-
Accepts no arguments and returns a list of iteration item descriptions that are applied to the financial, or accepts an item type and returns the iteration item description of that type.
IterationDescription(ItemType,Company)
- IterationShortDescription
-
Accepts no arguments and returns a list of iteration item short descriptions that are applied to the financial, or accepts an item type and returns the iteration item short description of that type.
IterationShortDescription(ItemType,Company)
- Units
- Unit
-
Accepts a unit and returns the code of the unit, or accepts no unit and returns the code of the currency unit from the Financial Options dialog box.
Unit(Unit,Company)
- UnitDescription
-
Accepts a unit and returns the description of the unit, or accepts no unit and returns the description of the currency unit from the Financial Options dialog box.
UnitDescription(Unit,Company)
- UnitMemo
-
Accepts a unit and returns the memo from the unit, or accepts no unit and returns the memo from the currency unit from the Financial Options dialog box.
UnitMemo(Unit,Company)
- UnitCustomField
-
Accepts a unit and returns the custom field value for the specified custom field on the unit, or accepts no unit and returns the custom field value for the specified custom field on the currency unit from the Financial Options dialog box.
Unit(Field,Unit,Company)
- IsLiveData
-
Returns "true" if the data is live; otherwise, returns "false".
IsLiveData(Company)
Company Functions
- CompanyName
-
Returns the name of the optional company.
CompanyName(Company)
- CompanyLegalName
-
Returns the legal name of the optional company.
CompanyLegalName(Company)
- CompanyAddress1
-
Returns the first address line for the optional company.
CompanyAddress1(Company)
- CompanyAddress2
-
Returns the second address line for the optional company.
CompanyAddress2(Company)
- CompanyCity
-
Returns the city for the optional company.
CompanyCity(Company)
- CompanyState
-
Returns the state for the optional company.
CompanyState(Company)
- CompanyZipCode
-
Returns the Zip Code for the optional company.
CompanyZipCode(Company)
- CompanyCountry
-
Returns the country of the optional company.
CompanyCountry(Company)
- CompanyMemo
-
Returns the memo for the optional company.
CompanyMemo(Company)
- CompanyCustomField
-
Returns the value of the custom field for the optional company.
CompanyCustomField(CustomField,Company)
Validate Functions
- ValidateAccounts
-
Returns "true" if all accounts are valid and no missing or duplicate accounts are found. Warnings appear in the calculation log.
ValidateAccounts(CheckMissing,CheckDuplicates,Ledger,Accounts)
- ValidateItems
-
Returns "true" if all items are valid and no missing or duplicate items are found. Warnings appear in the calculation log.
ValidateItems(CheckMissing,CheckDuplicates,ItemType,Values)
- ErrorsOrWarnings
-
Returns a message if there are errors or warnings in the calculation log. The default message is: "Review needed: Calculation Log contains errors or warnings".
ErrorsOrWarnings(Message)
Financial designs security
Common accesses available on financial designs
| Access | A user with this access can... |
|---|---|
| Change | Use the mass change action on financial designs. |
| Change Logs | Access change logs for financial designs. |
| Custom Fields | Create and edit custom fields for financial designs. |
| Data | Have read-only access to financial designs from anywhere in the software (e.g., field validations, filters, date expressions). |
| Delete | Delete financial designs. |
| Edit | Edit financial design records. |
| Export | Export financial design records from ActivReporter. |
| Import | Import financial design records into ActivReporter. |
| New | Create new financial design records. |
| Read | Have read-only access to financial design records. |
| Report | Run reports with financial design information. |
| Report Designs | Create and edit report designs with financial design information. This access enables the Report Designs button on the Output tab of report dialogs. |
| Shared Answers | Create and edit saved answers related to financial designs. |
| Shared Filters | Create and edit shared filters on financial designs. |
| Visible | View the Financial Designs folder in the Navigation pane. |
Special accesses available on financial designs
| Access | A user with this access can... |
|---|---|
| Publish | Publish financial statements. |
Financial Options
Options tab
A period expression which defines a relative reporting period for the financial statement. You can select a period expression from the drop-down list or enter a period expression directly in the field. To explicitly specify a reporting period for the selected calendar, use the Year and Period fields instead.
The dropdown contains the following common period expressions:
- Current
- Current - 1 period
- Current - 1 year
For help with proper period expression syntax, click the help button to the right of the field.
The currency unit to report amounts in if different than the unit(s) specified on the affected accounts. If blank, the units specified on affected accounts are used. This option is used to perform translation between units. For optimal performance, only use this option when translation is needed.
Note
If you are generating a report from a layout template and want the currency unit to display below the main heading, specify the reporting unit to use and ensure that the unit record includes a description.
Note
The Find dialog on the Item(s) field supports multi-select. For example, if you choose "Department" in the Type field, you could use Ctrl and/or Shift selection in the Find dialog on the Item(s) field to select multiple departments for iteration. This feature allows you to create a consolidated financial for a set of items.