ActivityHD Release 8.35
System-wide
-
Bots
Activity System > Administration > Bots
[Company] > Administration > Bots
The version of V8Script has been updated to 1.1.0.29. Version 1.1.0.29 fixes issues with record loop bots.
-
Bots
Activity System > Administration > Bots
[Company] > Administration > Bots
The "V8Script" option has been restored to the Script Engine drop-down list. It had been hidden for awhile while improvements were being made to V8Script. While we cannot ensure that V8Script has no problems or bugs, it is now stable enough for general release.
-
Bots
Activity System > Administration > Bots
[Company] > Administration > Bots
The version of V8Script has been updated to 1.1.0.26. Version 1.1.0.26 provides the correct error messages for exceptions from COM objects.
-
Custom Fields
Export/Import (XML) is now available for custom fields.
-
Export List
In the past, you could only export one record at a time from an entity edit window. Now an Export List feature has been introduced on entities which allows a user to export multiple records. To access the feature, invoke the Show List feature in the entity window (
 File > Show List or Ctrl+L). With the list of records visible, select
  Tools > Export. Two options are available: Current record and List of records. Current record behaves as the original one-at-a-time export behaved. List of records, however, exports the complete list of records. If you want to limit the list of records exported by the List of records action, apply the Show List filters.
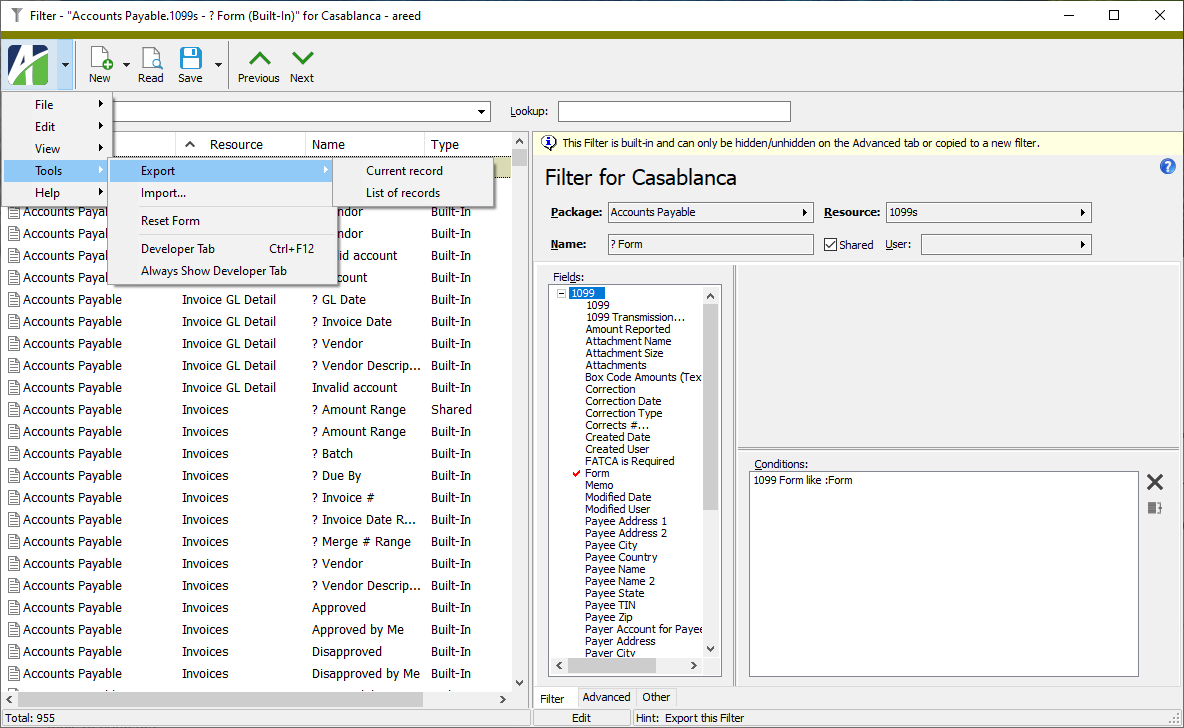
This feature is particularly useful for custom fields, report designs, and filters which are often edited when the Show List feature is active.
Accounts Payable
-
ActivityHD Automation Services (AAS)
In the past, the AP invoice data module would return certain field-level validations during automation. These messages were introduced in version 8.34-0 as part of the change to provide attribute item validation on detail attributes. These messages are meant to be interactive warning messages shown only when editing invoices in the Invoice window. These messages are not appropriate for automation because they require the user to press Enter to continue after each message.
Now the validation messages are only shown when in interactive mode. Other changes which should not be permitted even in automation are detected and prevented.
Furthermore, validation of detail-level attributes is skipped when detail-level attributes are updated due to changes to the corresponding invoice-level attributes. Since the same validations occur when the invoice-level attribute is changed, there's no reason to repeat the validations for the detail-level attributes.
-
ActivityHD Automation Services (AAS)
AP invoices can now be voided using the automation interface or using an XML action.
The Void method takes four parameters: VoidBatch, GLBatch, VoidDate, and GLDate. The method returns the ID of the reversal invoice and any related messages. If no values are passed for the parameters, the reversal invoice that is generated uses the batches and dates referenced on the invoice being voided.
Examples using the XML action
Example 1
The following example does not pass values for batches and dates, so the resulting reversal invoice will use the batches and dates from the voided invoice.
<data Command="Read">
<Actions Content="Complete">
<Void Execute="true" VoidBatch="" GLBatch="" VoidDate="" GLDate=""/>
</Actions>
</data>
Example 2
The following example does pass values for batches and dates, so the resulting reversal invoice will reflect the values passed.
<data Command="Read">
<Actions Content="Complete">
<Void Execute="true" VoidBatch="VoidTest" GLBatch="GLTest" VoidDate="2023-03-15" GLDate="2023-03-15"/>
</Actions>
</data>
-
AP Invoice GL Detail
Accounts Payable > Invoices > Invoice GL Detail
The same Purchasing fields which are available for columns and selection fields on the Invoices folder are now available on the Invoice GL Detail folder:
Column name in View Options Column name in HD view Note Approval Amount Approval Amount Shown by default Approval Buffer Buffer Approval Date (Latest, Date) Approval Date Approval Date (Latest, DateTime) Approval Date Approval Request Approval Request Approval Status Approval Status Approved Approved Shown by default Approved By Approved By Owner Owner Purchase Order Order Purchasing Agent Agent Purchasing Agent Description Agent Description Purchasing Department Dept Shown by default Purchasing Department Description Dept Description Purchasing Order Description Order Description -
Invoice Approval
With ActivityHD version 8.35-0, the invoice approval feature is officially released.
Several of the preliminary components were released previously:
- 8.27-0: New Status field on invoices
- 8.28-0: Automation fields on vendors and invoices supplied by the Purchasing package added
- 8.29-0: New Owner field on invoices and recurring invoices
- 8.32-0: Automation features for invoice Approve and Merge
If you have both the Accounts Payable and Purchasing packages installed, an Invoice Approval checkbox is visible in the Accounts Payable Options dialog. Mark the checkbox to enable invoice approvals.

If invoice approval is enabled, approval is required for all invoices which do not originate from the Purchasing package.
New Dept and Status fields have been added to the Invoice window. A department must be specified before an invoice can be merged. Department approval rules are enforced on invoices.

Valid approval statuses are:
- <blank>. The default value on a new invoice. The status must be set to "Ready" to begin the approval process.
- Hold. Prevents approval and places the invoice on hold.
- Ready. Initiates approval notifications and allows the invoice to be approved.
- Approved. Indicates the invoice is approved. The change to "Approved" status is managed in the approval process. An invoice must be approved before it can be merged.
- Disapproved. Indicates the invoice is disapproved. The change to "Disapproved" status is managed in the approval process. The invoice must be manually reset to "Ready" in order to continue the approval process.
An AP Invoice Approval History tab has been introduced for viewing approved invoices (
Accounts Payable > Invoices > Approval History ).
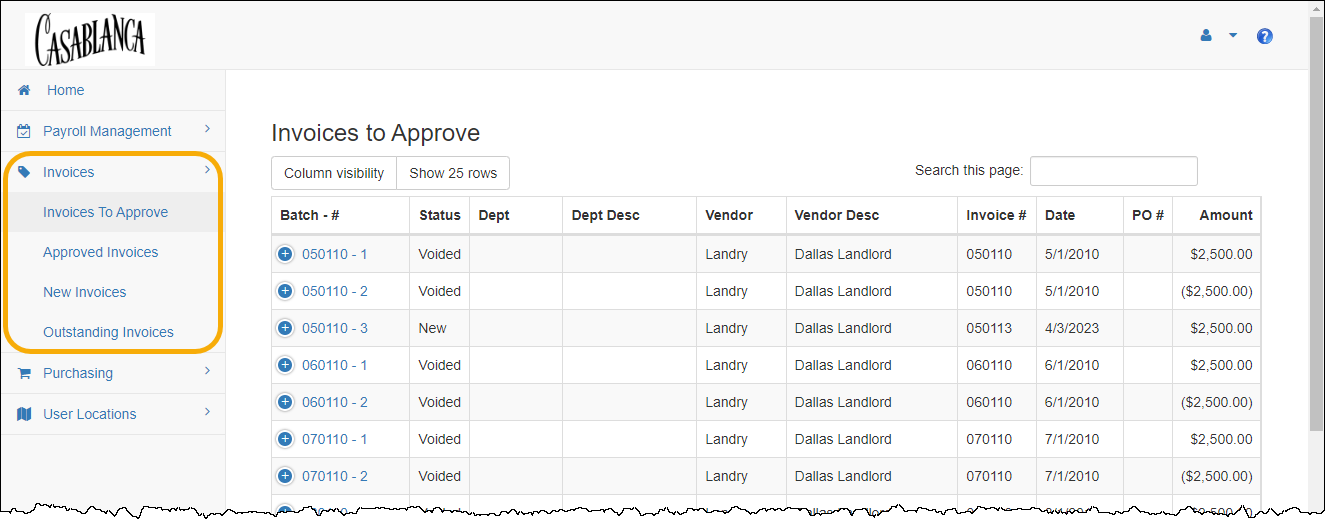
Finally, invoice approval is now available through Self-Serve. Users with access to AP invoices can navigate the following new pages in Self-Serve:
- Invoices to Approve. View and approve invoices.
- Approved Invoices. View invoices that you have approved.
- New Invoices. View all invoices which have not yet been merged.
- Outstanding Invoices. View outstanding invoices.
-
Invoices/Recurring Invoices
Accounts Payable > Invoices
Accounts Payable > Invoices > Recurring
Recently, some fields in the Invoice and Recurring Invoice windows, such as the new Owner and Dept fields, appeared to be editable in Read mode. The affected fields no longer appear editable in Read mode.
-
Notes
Accounts Payable > Notes
You can now specify that a banner appear on certain vendor records by using the new Banner Caption and Banner Type fields on notes. The Banner Caption field can consist of up to 255 characters. The Banner Type options are "Error", "Help", "Information", and "Warning".

When you specify banner information, the banner displays for all vendors referenced on the note. The banner type determines the icon which displays to the left of the banner caption. The default banner type is "Information".

Since banners are note-specific, multiple banners can display on a vendor record.
Click on a banner to access all note information for the banner.
Accounts Receivable
-
ActivityHD Automation Services (AAS)
In the past, the AR invoice data module would return certain field-level validations during automation. These messages were introduced in version 8.35-0 as part of the change to provide attribute item validation on detail attributes. These messages are meant to be interactive warning messages shown only when editing invoices in the Invoice window. These messages are not appropriate for automation because they require the user to press Enter to continue after each message.
Now the validation messages are only shown when in interactive mode. Other changes which should not be permitted even in automation are detected and prevented.
Furthermore, validation of detail-level attributes is skipped when detail-level attributes are updated due to changes to the corresponding invoice-level attributes. Since the same validations occur when the invoice-level attribute is changed, there's no reason to repeat the validations for the detail-level attributes.
-
Invoices
Accounts Receivable > Invoices
ActivityHD version 8.34-0 Merge Invoices was changed to validate the new attribute item posting control dates in all three areas of an invoice which have attributes: Invoice, Detail, Extra GL.
Now these validations are performed interactively in the AR Invoice window. To facilitate rapid data entry, an operator can override a validation error on an unmerged invoice even though the error would prevent the invoice from being merged.
Example
Suppose you have an "Event" attribute for tracking event-level profitability with an event "2205" that is only valid for postings during the first six months of 2022. You could use the following posting date controls on event "2205" to prevent postings outside the date range:
- Begin: 01/01/2022
- End: 06/30/2022
- Control: Error
If an operator attempts to use event "2205" on an unmerged invoice dated 02/23/2023, an error similar to the following is returned:
Invoice Detail Line 3 - Attribute item (Event:2205) is closed to postings for the date (02/23/2023)
This error can be overridden, but the invoice cannot be merged until the issue is resolved.
However, if you edit a merged invoice dated 02/23/2023 and try to change the event from "2305" to "2205", an error similar to the following is returned and the change is not allowed:
Invoice Detail Line 3 - Attribute item (Event:2205) is closed to postings for the date (02/23/2023)
This change is not allowed since the invoice is merged.
In addition to the changes described above, the posting date control validations for calendar period and GL account have been standardized across all areas on the AR invoice:
- Invoice GL date
- Invoice receivables date
- Invoice attributes
- Invoice detail accounts (sales, cost, inventory)
- Invoice detail attributes
- Extra GL dates
- Extra GL attributes
- Initial payment GL date (not yet added)
- Initial payment bank account (not yet added)
-
Notes
Accounts Receivable > Notes
You can now specify that a banner appear on certain customer records by using the new Banner Caption and Banner Type fields on notes. The Banner Caption field can consist of up to 255 characters. The Banner Type options are "Error", "Help", "Information", and "Warning".

When you specify banner information, the banner displays for all customers referenced on the note. The banner type determines the icon which displays to the left of the banner caption. The default banner type is "Information".

Since banners are note-specific, multiple banners can display on a customer record.
Click on a banner to access all note information for the banner.
-
Proof/Merge Receipts
Accounts Receivable > Receipts > [right-click] > Select and Proof
Accounts Receivable > Receipts > [right-click] > Select and Merge
The Proof Receipts and Merge Receipts validation procedures now validate attribute item posting control dates on the following for miscellaneous and unapplied invoices created from receipts: invoice attributes, invoice detail attributes, extra GL attributes.
The attribute item posting control determines if the receipt, as well as invoices created by the receipt, can be merged if invoices it creates violate an attribute item's posting date restrictions:
- Warning. Shows a message but allows the receipt to be merged.
- Error. Shows a message and does not allow the receipt to be merged.
Some examples of attribute item validation messages follow. "Line" denotes the receipt detail line. The invoice is also included in the message. If the message is for an Extra GL attribute, the Extra GL line is also indicated.
Warning: Line 1 - Invoice (AAAA - 2) - Attribute item (Location: Dallas) is closed to postings for the date (1/13/2023)
Error: Line 1 - Invoice (AAAA - 2) - Attribute item (Employee: 4209) is closed to postings for the date (1/13/2023)
Error: Line 1 - Invoice (AAAA - 2) - Invoice Detail Attribute item (Dept: 02) is closed to postings for the date (1/13/2023)
Warning: Line 1 - Invoice (AAAA - 2) Extra GL Line 2 - Attribute item (Employee: Alvarez) is closed to postings for the date (1/19/2023)
Note
Posting date controls on related rollup attribute items are also checked and enforced, allowing date controls to be enforced at the rollup level.
Fixed Assets
-
ActivityHD Automation Services (AAS)
In the past, the asset data module would return certain field-level validations during automation. These messages are meant to be interactive warning messages shown only when editing assets in the Asset window. These messages are not appropriate for automation because they require the user to press Enter to continue after each message. The following messages could occur:
Manual extra depreciation requires the "Manual" depreciation method.
Ledger: xxxxx
Calculation Control: xxxxx
Extra Depreciation Date (xx/xx/xxxx) cannot precede Asset In Service Date (xx/xx/xxxx)
Prior Depreciation Date (xx/xx/xxxx) must precede Asset/Ledger Begin Date (xx/xx/xxxx)
Now under automation these messages are shown as exceptions when the user saves. This allows the messages to be trapped and reported along with other errors which prevent assets from being created or changed.
-
Notes
Fixed Assets > Notes
You can now specify that a banner appear on certain asset records by using the new Banner Caption and Banner Type fields on notes. The Banner Caption field can consist of up to 255 characters. The Banner Type options are "Error", "Help", "Information", and "Warning".
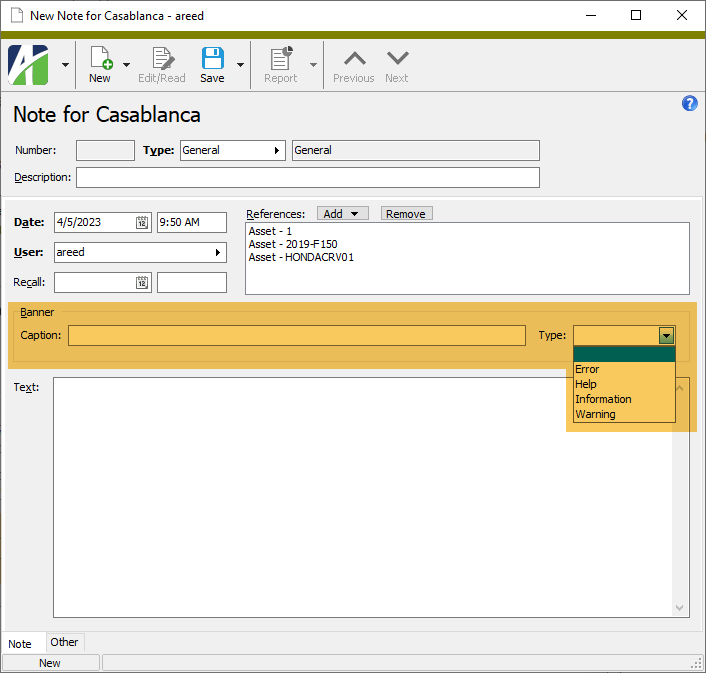
When you specify banner information, the banner displays for all assets referenced on the note. The banner type determines the icon which displays to the left of the banner caption. The default banner type is "Information".

Since banners are note-specific, multiple banners can display on an asset record.
Click on a banner to access all note information for the banner.
-
Post FA to GL
Fixed Assets > Assets > [right-click] > Select and Post to GL
The Post to GL process now validates posting control dates for all fixed asset attributes, including attributes which do not post to GL.
The GL date rather than the FA date is used when validating attribute item posting date controls. If the GL date of the calculated GL detail entry falls outside the posting control date range of any fixed asset attribute, a validation message similar to the following is shown:
Item Message 2023-078 - BookWarning: Attribute item (Location: 07) is closed to postings for the date (1/31/2023)Error: Attribute item (Truck: 1572) is closed to postings for the date (1/31/2023)Validation messages are shown for calculated GL detail lines which will be created or updated.
The attribute item posting control determines if the updates to an asset's GL detail are applied when it violates an attribute item's posting date restrictions:
- Warning. Shows a message and applies updates to GL detail (for the given asset).
- Error. Shows a message and does not apply updates to GL detail (for the given asset).
Note
Posting date controls on related rollup attribute items are also validated and enforced.
General Ledger
-
Financial Designs
General Ledger > Financial Designs
In the past, adding an iteration limit type with spaces in its name to iteration limits in the Workbook Options dialog caused an error in the resulting drilldown items expression. Now iteration limit type names with spaces in them are enclosed in quotation marks to prevent this error from occurring.
-
Publish Financial Statements
General Ledger > Financial Designs > [right-click] > Select and Publish Financials
Until now the Include Consolidated option was simply a checkbox available when using iteration in the Publish Financial Statements process. Now the consolidation option has been expanded to allow a single complex iteration. To use the new feature, select an iteration type and click in the Options field to reveal the new Consolidated Options dialog.

Select a consolidation option and provide a code and description.
Option. Specify the consolidation option. Valid options are:
- Include Consolidated
- Exclude Consolidated
- Consolidated Only
Code. Specify the consolidation code to include in the file name and in the Excel worksheet name. The default value is "Consolidated". This field is disabled if you select "Exclude Consolidated" in the Option field.
Description. Specify the iteration description to use in the report. The default iteration description is "Consolidated". This field is disabled if you select "Exclude Consolidated" in the Option field.
-
Publish Financial Statements
General Ledger > Financial Designs > [right-click] > Select and Publish Financials
In the past, the Combine iterations into multisheet workbook option was not honored when outputting financials to a printer. Now when you opt to combine iterations and print, a single print job is generated.
-
Publish Financial Statements
General Ledger > Financial Designs > [right-click] > Select and Publish Financials
The publishing process now calculates the iteration items set differently. Iteration items are now limited based on existing journal detail postings. So if you choose "Department" as the iteration type, only departments with postings will be included as an iteration or included for the consolidated statement. Iterations based on attributes already behaved this way, now iterations based on segments and rollups do as well.
-
Rollups
General Ledger > Setup > Rollups
Previously, direct rollup values were not always being updated correctly.
Suppose you had the following four rollups:
- AcctCategory - A rules-based rollup on the "Main" segment.
- AcctType - A direct-assignment rollup on the AcctCategory rollup.
- IncomeStatement - A direct-assignment rollup on the AcctCategory rollup.
- BalanceSheet - A direct-assignment rollup on the AcctCategory rollup.
In the past, when you created a new account, the AcctCategory rollup was assigned the appropriate value based on its rules. However, the AcctType, IncomeStatement, and BalanceSheet rollups had a blank value instead of the rollup item which was assigned directly on the corresponding AcctCategory rollup item. Moreover, any other rollup which depended on one of these three rollups also did not update correctly.
Now all rollups on new accounts are set to the appropriate value even on direct-assignment rollups which are assigned on another rollup.
Payroll/Human Resources
-
Export Controls
Payroll/Human Resources > Setup > Export Controls
In ActivityHD version 8.35, the built-in SUTA segment items were changed to calculate total compensation instead of state-specific compensation based on the assumption of one SUTA state per check.
This release provides export controls for creating totals files using the new formula. In addition, the new export controls provide fixes and/or updates to match the current government specifications. This change is comprised of 51 new files (50 states + DC) which can be imported individually as needed.
SETUP
- Navigate to Payroll/Human Resources > Setup > Export Controls.
- Right-click the Export Controls folder and select Import to start the Import Export Controls wizard.
- In the File field, click
 and browse to ...\Extras\Payroll\Export Controls\State Unemployment\2023\ in your distribution area.
 - Select the file to import (e.g., "CA 2023 SUTA.XML").
- Import the selected file.
- Repeat these steps for additional states as needed.
USAGE
- Navigate to Payroll/Human Resources > Employees.
- Right-click the Employees folder and select Select and Create Totals File.
- If you have an appropriate saved answer, load it.
- Select the Standard Options tab.
- In the Export Control field, select the newly imported SUTA export control (e.g., "CA 2023 SUTA.XML").
- If there is an Additional Options tab, select it and verify the answer(s).
- Click Create File.
- Review the results.
- Review CSV files in Excel or in a text editor such as Notepad.
- Review fixed-length files in the Report Totals File report.
- Upload your file.
Note
Some states accept several file formats. Refer to the description on the export control to determine which format is created.
CHANGES
- The export controls use the new export source "SUTA Wages Over Cutoff (Total Comp)". (See the formulas below.)
- Reported hours are no longer state-specific.
- The export control for Washington uses the "SOC" attribute for Standard Occupational Classification codes. (See this note for instructions on how to import SOC codes.)
- The export control for Ohio calculates zero for out-of-state wages. Unlike other states, Ohio's formula is beyond the capabilities of export controls at this time. Employers with employees who work both in Ohio and another state must manually enter the employee's information at the Ohio website.
FORMULAS
Typical reporting amounts are calculated thusly:
- Excess SUTA Wages
- Source: SUTA Wages Over Cutoff (Total Comp)
- Parameter: Tax Entity USA.xx
- Calculation: total Compensation result - total PRUnemployment result - state-specific Unemployment source
- Taxable SUTA Wages
- Source: Group Total
- Parameters: Unemployment source amount; Tax Entity USA.xx
- Gross Wages
- Source: Field Sum
- Parameters: Excess SUTA Wages + Taxable SUTA Wages
- Excess SUTA Wages out-of-state
- Source: SUTA Wages Over Cutoff (Total Comp)
- Parameter: Tax Entity USA.xx (Exclude)
- Taxable SUTA Wages all states
- Source: Group Total
- Parameters: Unemployment source amount; Tax Entity USA (Exclude)
- Taxable SUTA Wages out-of-state
- Source: Field Difference
- Parameters: Taxable SUTA Wages all states - Taxable SUTA Wages
- Gross Wages out-of-state
- Source: Field Sum
- Parameters: Excess SUTA Wages out-of-state + Taxable SUTA Wages out-of-state
-
Print Form 941
Payroll/Human Resources > Government > Form 941 Returns > [right-click] > Select and Print
Previously, the Print Form 941 process printed blank pages beginning with the second quarter of 2023. Now Form 941 prints correctly.
-
Checks
Payroll/Human Resources > Checks
A new "Proof FUTA wages" filter has been introduced on the Checks folder. The filter selects new checks where the YTD FUTA source is less than the FUTA maximum and the "Compensation" result minus the "PreUnemployment" result does not equal the "Unemployment" source for the "USA" tax entity.
Data conversions add the new filter to the built-in Process Payroll dashboard gadget. The filter can also be copied to your custom Payroll dashboard.
-
Notes
Payroll/Human Resources > Notes
You can now specify that a banner appear on certain employee records by using the new Banner Caption and Banner Type fields on notes. The Banner Caption field can consist of up to 255 characters. The Banner Type options are "Error", "Help", "Information", and "Warning".
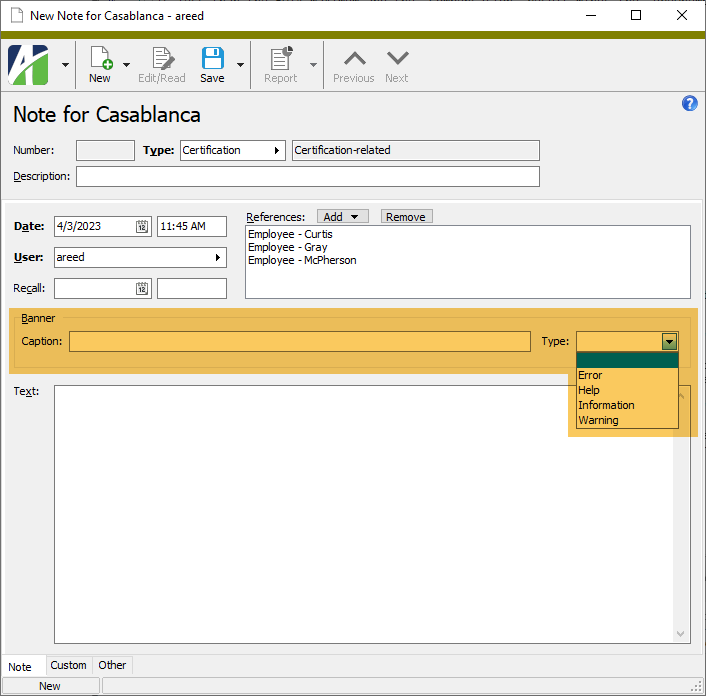
When you specify banner information, the banner displays for all employees referenced on the note. The banner type determines the icon which displays to the left of the banner caption. The default banner type is "Information".

Since banners are note-specific, multiple banners can display on an employee record.
Click on a banner to access all note information for the banner.
-
Process Payroll dashboard gadget
Bolding and highlighting have been added to counts which are greater than zero in the Process Payroll dashboard gadget sample. This improved formatting includes numbers on the following tabs:
- Import Time. Number of unprocessed Time Sheets
- Proof Time. Number of regular and overtime unprocessed Time Sheet lines
- Process Time. Number of unprocessed Time Sheets and new Payroll Checks
- Proof Checks. Number of new checks with various problems
- Merge Checks. Number of new checks, checks ready to print, and checks ready for direct deposit
- Print Checks. Number of checks ready to print
- Direct Deposit. Number of checks ready for direct deposit.
- Post to AP. Number of check lines ready to Post to AP
-
SUTA wages calculation
Note
The feature described below affects users with employees who work in more than one state or who live and work in different states. If all your employees work in the same state they live in, regardless of whether you have employees in multiple states, this change will have no net effect on your SUTA wages calculation.
Before now, the built-in SUTA segment items (TaxSUTA:xx) calculated SUTA wages based on state-specific compensation on the check. However, according to documentation from the American Payroll Association, while employers may have employees who report their income to multiple states, the employer should choose only one state for reporting the employee's unemployment wages. Reporting unemployment wages for multiple states means the employee will have to file for unemployment in each state where they are being reported in order to receive their full wage benefit. This is not necessary and is possibly more costly to employers.
The following changes have been introduced to improve the SUTA wage calculation for employees who work in multiple states or who live and work in different states:
SEGMENT ITEMS
Now the SUTA segment items calculate SUTA wages based on the total compensation on the check rather than on state-specific compensation.
Example 1: Consider an employee who works for the Austin Opera but lives in Georgia. The employee's "direction and control" comes from Austin; therefore, the employer should pay SUTA for Texas. On the other hand, the employee pays Georgia income tax because Georgia's rule for employees who work out-of-state is to pay tax to the state where the employee works unless that state does not have an income tax (like Texas). As a result, the SUTA wages for Texas are $5,000 (total compensation) even though the pay was earned and taxed in Georgia.
PRCode Source (Wages) Pay.Sal.GA 5,000 Tax.State.GA 5,000 Tax.SUTA.TX 5,000 Example 2: Consider an employee who works in multiple states and owes income tax in each of those states. Suppose further that the employer has determined that the employee's SUTA wages should be reported to New Mexico. The SUTA wages, then, for New Mexico are $6,000 (total compensation) even though that pay was earned and taxed in three states.
PRCode Source (Wages) Pay.Reg.CO 1,000 Pay.Reg.OK 2,000 Pay.Reg.NM 3,000 Tax.State.CO 1,000 Tax.State.OK 2,000 Tax.State.NM 3,000 Tax.SUTA.NM 6,000 FILTERS
The calculation on check proofing filters (Proof XX SUTA Wages, where XX = the two-character state identifier) has been changed to match the segment items. The filters find new checks where there is a SUTA check line for the state and the year-to-date SUTA wages for the state is less than the SUTA maximum and total "Compensation" minus total "PreUnemployment" does not equal SUTA wages.
In addition, two new filters have been introduced. These filters indicate when errors exist:
- Proof missing SUTA
- Proof multi-state SUTA (only added if there is more than one non-obsolete SUTA PRCode)
The filters appear on the built-in Process Payroll dashboard gadget and can be copied to your custom Payroll dashboard.
EXPORT CONTROLS
Many of the SUTA export controls provided in the Extras folder of your distribution (...\Extras\Payroll\Export Controls\State Unemployment\) use an export source called "SUTA Wages Over Cutoff". This source is based on state-specific compensation:
State Compensation
- (PreUnemployment * State Compensation / Total Compensation)
- State Unemployment Wages
The preceding export source DOES NOT CHANGE with this new feature so that you can continue to report multi-state unemployment which was calculated using the previous formula. Instead, the new feature introduces the new export source called "SUTA Wages Over Cutoff (Total Comp)" which is calculated based on the following new formula:
Total Compensation - PreUnemployment - State Unemployment Wages
SUTA export controls dated 2023 and beyond will use this new source.
-
Time Sheet Lines
Payroll/Human Resources > Time Sheets > Time Sheet Lines
A new built-in "Unprocessed" filter has been introduced on the Time Sheet Lines HD view. The filter selects time sheet lines which are not yet associated with checks.
In addition, the new filter is now applied on the "Proof Time" tab of the Process Payroll dashboard gadget sample. Previously, the regular and overtime totals included all time sheet lines. Now only lines from unprocessed time sheets are selected.

Purchasing
-
Departments
Purchasing > Setup > Departments
Previously, the Restrict Operators and Restrict Vendors flags on departments were not properly applied when creating and modifying invoices and recurring invoices if invoice approval was enabled. Now these settings are correctly applied.
-
Operators
Purchasing > Setup > Operators
A new "Email, Limit by Department" notification method has been introduced for the "Invoice Approval Completed" and "Order Approval Completed" notification types. The new method only sends disapprovals to operators who are in the department cited on the invoice or order. The notification method only sends "approval completed" notifications to operators in the department referenced on the invoice or order.
The "Email, Assigned Level or Higher (Limited)" methods have been renamed to more precisely reflect their behavior:
- Email, Limit to Invoices Owned by Me
- Email, Limit to Orders Owned by Me
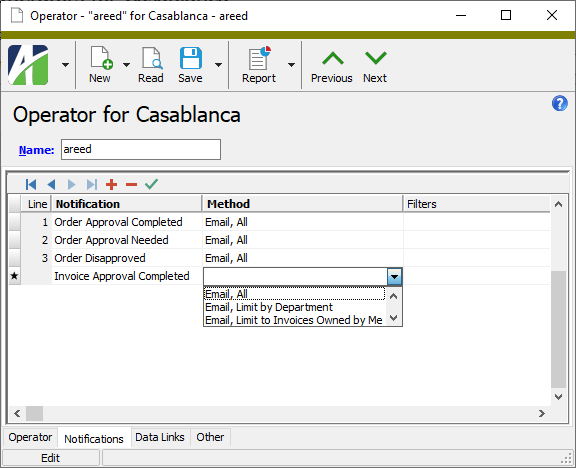
The names of the notification methods are now consistent across notification types.
- Invoice Approval Completed
- Email, All
- Email, Limit by Department
- Email, Limit to Invoices Owned by Me
- Invoice, Approval Needed
- Email, All
- Email, Assigned Level or Higher (Limited)
- Email, Assigned Level Required
- Email, Assigned Level Required and Delayed
- Invoice Disapproved
- Email, All
- Email, Limit by Department
- Order Approval Completed
- Email, All
- Email, Limit by Department
- Email, Limit to Orders Owned by Me
- Order Approval Needed
- Email, All
- Email, Assigned Level or Higher (Limited)
- Email, Assigned Level Required
- Email, Assigned Level Required and Delayed
- Order Disapproved
- Email, All
- Email, Limit by Department
-
Process Purchases, Purchase Order
Purchasing > Orders > [right-click] > Select and Process
Previously, you could not receive products for which the value of Require Receipt was "Never". Now in this situation, receiving is allowed but not required.