ActivityHD Release 8.33
System-wide
- Count
- Item
- Name
- DataType
- ReadOnly
- Required
- Value
- ValueInternal
Advanced Security
In ActivityHD version 8.26-0, a problem was introduced which caused users to receive access violation errors when attempting to open the Bot, Dashboard Gadget, and Data Source edit windows if Advanced Security was not installed.
The problem has been addressed.
Bots
Activity System > Administration > Bots
[Company] > Administration > Bots
The recommended version of VBSEdit has been updated to v23.1.25.5. The installer is available in the distribution folder Extras\VBSEdit.
VBSEdit is an optional and separately installed editor and debugger which can be used for bot creation and maintenance in ActivityHD.
Important!
The VBSEdit installer must be run as an administrator passing the cmd line switch /allusers.
Bots
Activity System > Administration > Bots
[Company] > Administration > Bots
Bot writers now can access more information about bot options through the automation interface.
A new Options property has been introduced for MacroProcess which allows more bot information to be read.
MacroProcess.Options provides the following methods/properties:
The old MacroProcess.OptionsValue property is still available to provide backwards compatibility.
Import
The behavior of ActivityHD when errors occur while using the Import action interactively from an edit window has been improved. Formerly, an error would cause the import to fail completely. Now when the import is attempted and errors occur, the edit window retains any progress made before the error occurred. This should make it easier to investigate failed import attempts.
Accounts Payable
- Warning. Shows a message but allows the invoice to be merged.
- Error. Shows a message and does not allow the invoice to be merged.
Vendors
Accounts Payable > Vendors
A problem was introduced in ActivityHD 6.29-0 which allowed the Federal ID field to show values even for users without "Federal ID" permission access. The problem was introduced when the Vendor window and data module were modernized to implement default attributes.
Security on the Federal ID field now operates properly.
Generate 1099s
Accounts Payable > Vendors > [right-click] > Select and Generate 1099s
In ActivityHD version 8.29-0, the Generate 1099s process was updated for 2022 reporting. However, the value for the processing year was not updated from "2022" to "2023". The problem has been corrected and a database conversion is provided which changes the processing year on existing 1099 transmissions to "2023" for transmissions created in 2023.
There are no ill effects from the processing year on the 1099 transmission being set to 2022 rather than 2023. The processing year is not included in the electronic file which you submit to the IRS. The processing year is only used to identify changes to the electronic file format for the 1099 transmission Proof Report. (This report was introduced in ActivityHD 8.15-0 for the 2021 tax year.) Since no changes occurred to the file layout for the 2023 processing year, the Proof Report is able to parse the electronic file correctly.
The following message displays if you try to proof a 1099 transmission which was created for a processing year prior to 2022, the last year the file layout changed:
Cannot proof 1099 transmission generated before the 2022 processing year.
Invoices
Accounts Payable > Invoices
Attributes with both "AP Invoice" and "AP Invoice Detail" usage appear in both the the main Invoice window and also in the GL Detail table. Attribute items on new detail lines default to the attribute from the invoice. When you change the attribute on the invoice, lines in the GL Detail table which match the old attribute item are automatically updated to the new invoice attribute item value.
In the past, a problem occurred in which the matching values on detail lines did not get updated when the attribute item on the main invoice was changed. This could occur when editing an existing invoice which already had a non-blank invoice attribute and matching detail attributes: detail attributes did not get updated.
Now the detail attributes are updated appropriately when the invoice attribute changes.
Merge Invoices
Accounts Payable > Invoices > [right-click] > Select and Merge
The Merge Invoices validation procedure now validates attribute item posting control dates in all three areas of the invoice with attributes: Invoice, GL Detail, and Extra GL.
The attribute item posting control determines if the invoice can be merged when it violates an attribute item's posting date restrictions:
Some examples of attribute item validation messages:
Warning: Invoice attribute item (Project: 1002) is closed to postings for the date (1/28/2023)
Warning: Invoice Detail Line 2 - Attribute item (Employee: 105) is closed to postings for the date (1/28/2023)
Warning: Invoice Detail Line 3 - Attribute item (Employee: 835) is closed to postings for the date (1/28/2023)
Error: Extra GL Line 1 - Attribute item (CC: 122) is closed to postings for the date (12/31/2022)
Note
Posting date controls on related rollup attribute items are also validated and enforced.
Accounts Receivable
- Change endpoint URL from "Custom/Execute" to "api/Custom/Execute".
- Change the request parameter label from "Parameters" to "ParameterValues".
Tessitura Import
Accounts Receivable > Invoices > [right-click] > Tessitura Import
Version 16 of Tessitura has been released; therefore, the Tessitura Import procedure in ActivityHD has been updated to handle the changes identified in the following Tessitura documentation: Version 16 Help System > What's New in V16.0 > API Updates in V16.
The following changes are outlined in the documentation:
Note that the import from earlier versions of Tessitura will continue to work.
ActivityHD uses the Tessitura REST site's base URL (as defined in the Tessitura Control window) to determine whether the Tessitura site is v16 or earlier. Tessitura v16 base URLs end with "/tessitura/api" rather than "/tessituraservice".
While these changes have been addressed in the current release of ActivityHD, further changes may be required for ActivityHD to work properly with Tessitura v16.
Fixed Assets
Post FA to GL
Fixed Assets > Assets > [right-click] > Select and Post to GL
Since version 8.27, when you tried to enter a date in the Override Depreciation field on the Options tab of the Post FA to GL wizard, the field immediately terminated after entering a single character. If you entered "0", an invalid date error was presented; entering a digit from "1" to "9" resulted in dates from the 1st through the 9th of the current month; entering "T" resulted in today's date.
Now date entry in the Override Depreciation field works correctly.
The problem was introduced with the change to set the default value of the GL Dates for Reversals option to "Calculated Dates" when an override date was entered. Now the default option is not set after the complete date is entered.
Assets
Fixed Assets > Assets
A problem was introduced in ActivityHD version 8.18 with the change to check posted accumulated depreciation during asset retirement. The following error could be returned if you saved an asset with retirement information:
Subquery returned more than 1 value...
The error occurred if there was bonus depreciation on the last period end date before the date of retirement.
The error no longer occurs.
Vehicle depreciation limits
Vehicle depreciation limits have been announced for 2023. The limits for automobiles put in service in 2023 are:
| Tax year | 2023 limit with bonus | 2023 limit without bonus |
|---|---|---|
| 1st tax year | $20,200 | $12,200 |
| 2nd tax year | $19,500 | $19,500 |
| 3rd tax year | $11,700 | $11,700 |
| Each succeeding tax year | $6,960 | $6,960 |
General Ledger
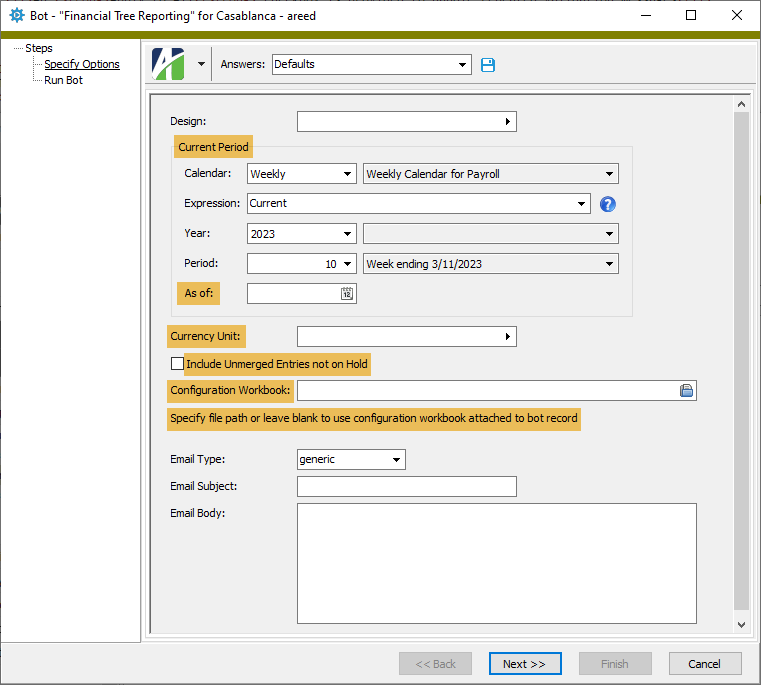
- "Calendar Period" is now "Current Period".
- "As of Date" is now "As of".
- "Currency" is now "Currency Unit".
- "Include Unmerged" is now "Include Unmerged Entries not on Hold".
- "Config File" is now "Configuration Workbook".
- Begin. The earliest posting date for the attribute item. Leave the field blank if you do not want to restrict usage by begin date.
- End. The latest posting date for the attribute item. Leave the field blank if you do not want to restrict usage by end date.
- Control. The severity of the validation. The valid options are:
- Error. Displays a message and prevents merging.
- Warning. Displays a message but permits merging.
- Begin: 09/01/2022
- End: 11/30/2022
- Control: Error
- GL calendar period controls
- GL account posting date controls
- GL attribute item posting date controls
- Account date control and calendar period validations occur when either the account or date changes
- Attribute date control validation occurs when either the attribute item or date changes
- Attribute date control validation also checks rollup items
- Override is allowed if the validation produces a WARNING (both merged and unmerged transactions)
- Override is allowed if the validation produces an ERROR and the transaction is unmerged
- Override is disallowed if the validation produces an ERROR and the transaction is merged (raises an exception)
- Field-level validations are performed so that the exception for "ERROR when merged" aborts the change
- An Apply to All checkbox is provided to handle repeated validation messages
- If the GL entry is merged then:
- GL date is read-only
- Account is read-only
- For attributes which "follow calendar control":
- Item field is read-only if the calendar control value is "Error"
- Validation of the Item field produces a message if the calendar control value is "Warning"
- Merge is allowed if the validation produces a WARNING
- Merge is disallowed if the validation produces an ERROR
Financial Tree Reporting bot
General Ledger > Financial Designs > [right-click] > Bots > Financial Tree Reporting
Several field labels have been changed to make the Financial Tree Reporting bot options easier to understand:
In addition, explanatory text has been added beneath the Configuration Workbook field indicating that if the field is left blank the configuration workbook attached to the bot record will be used to produce the report.
Attribute Items
General Ledger > Setup > Attributes > [Attribute Items]
A new Posting Date section has been added to the Attribute Item window.
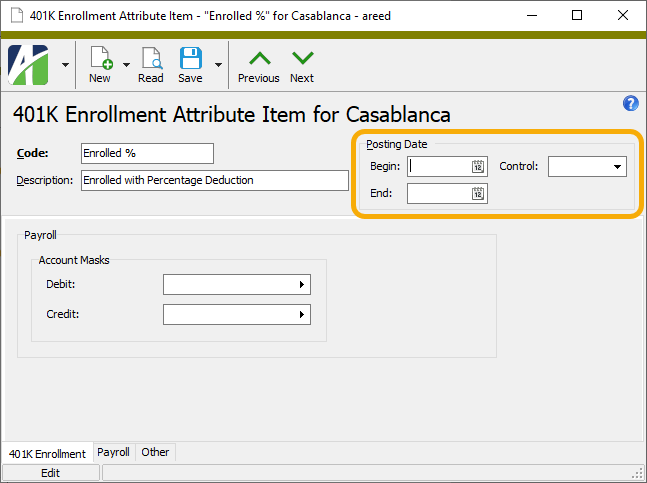
The Posting Date section includes the following settings:
Similar to the posting date controls on GL accounts, the posting date controls on an attribute item allow you to establish an effective date range for the attribute item. If the GL posting date is outside the attribute item's posting control date range, the transaction is not allowed to merge.
In addition, posting control dates on rollup attribute items are applied to the items they summarize.
Example
Consider a direct attribute "Event" and a rollup attribute "Season". Each event item is assigned a season item so that you can analyze event postings by season. Consider a "Season" attribute item "2022Fall" with the following posting date controls:
Given these controls, transactions for any event item that is assigned to the "2022Fall" season rollup item could not be merged if its GL posting date was before 09/01/2022 or after 11/30/2022.
At the present time, attribute item date control validation is performed only in the Journal Entry window and with the GL Merge validations. In future releases, attribute item date control validation will be introduced in all subsidiary packages.
The validation for the following fields will be standardized across all packages:
The following behavior is expected during data entry:
The following behavior is expected during merge:
Financial Tree Reporting bot
General Ledger > Financial Designs > [right-click] > Bots > Financial Tree Reporting
The Financial Tree Reporting bot has been upgraded to version 1.2.1. In this new version, the configuration workbook is checked for appropriate values before the reports are generated. In prior versions, error messages were generated which could be long and made diagnosing the problem difficult.
Payroll/Human Resources
- FamilyLeaveTax. This group is qualified by tax entity and by employee/employer. It is assigned to the employee and employer family leave taxes.
- PreFamilyLeaveTax. This group is assigned to deductions which reduce family leave wages.
- Type:Tax:COFAMLIPercent. CO FAMLI Premium Total Percent. The value as of January 1, 2023 is 0.90. This value is the total premium percent. This percent is split between employers and employees. The percent is set by the state of Colorado and should not be modified.
- Type:Tax:COFAMLIEmployeeShare. CO FAMLI Employee Share Percent. The value as of January 1, 2023 is 50.00. This value is the percent of the total premium which is paid by the employee. Employers can deduct up to 50% of the 0.9% premium from their employees' checks, but no more. Employers are allowed to deduct less than 50%; for example, set the value to 0.00 to offer FAMLI as a benefit to employees.
- TaxState:COFamliEE. Colorado FAMLI Tax - Employee (built-in). Tax Entity = USA.CO.
- Source expression = total Compensation (not just CO) minus Pre-Family Leave Tax deductions, not to exceed the yearly Social Security maximum (in 2023, $160,200) per year.
- Rate expression = Type:Tax:COFAMLIPercent * (Type:Tax:COFAMLIEmployeeShare / 100)
- Result expression = Source * Rate / 100
- TaxState:COFamliER. Colorado FAMLI Tax - Employer (built-in). Tax Entity = USA.CO.
- Source expression = total Compensation (not just CO) minus Pre-Family Leave Tax deductions, not to exceed the yearly Social Security maximum (in 2023, $160,200) per year.
- Rate expression = Type:Tax:COFAMLIPercent * ((100 - Type:Tax:COFAMLIEmployeeShare) / 100)
- Result expression = Source * Rate / 100
- Tax.State.COFamliEE
- Tax.State.COFamliER
- Proof CO FAMLI Wages EE
- Proof CO FAMLI Wages ER
- Segment items. Complete the empty fields as needed (run types, additional groups, check stub item, follows pay group, GL accounts, AP control).
- AP control. Add the AP control for posting FAMLI to AP once a quarter. Set the tax deposit type to "COFAMLI".
- Employee automatics. Add new PRCodes to the automatics of any employees who work in Colorado. See the following website to view a flowchart of employees covered under FAMLI: https://famli.colorado.gov/employers/employer-faqs, "If an employee lives in Colorado but works in another state..."
- Dashboard gadget. Add proofing filters to your custom dashboard gadget.
-
Add a custom field on the Employees folder. Name the custom field "Seasonal" with a data type of "True/False".
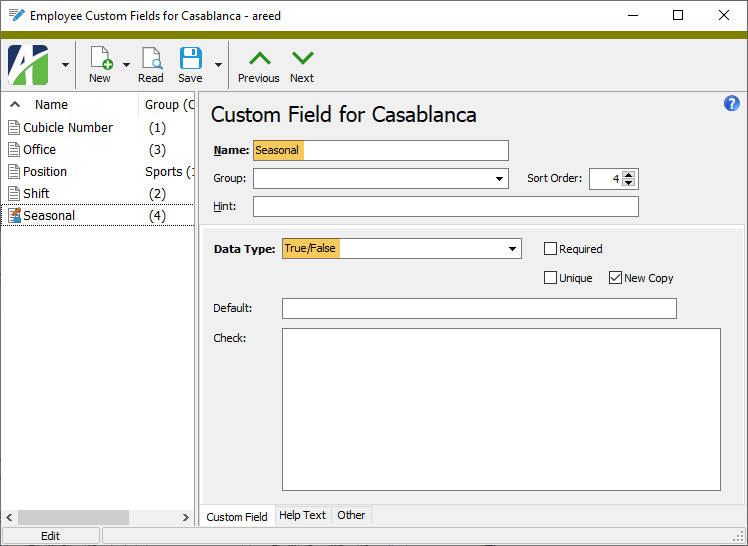
-
Set the "Seasonal" field to "True" or "False" on each of your Colorado employees depending, of course, on their seasonal status.
Note
On the Custom tab of an employee record, the "Seasonal" field is represented by a tri-state checkbox.
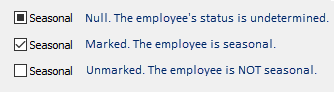
Do not leave the checkbox in a "Null" state. Each employee must be marked or unmarked depending on their seasonal status.
In the Mass Change process the "Seasonal" values are represented as three options: "True", "False", and "Null".
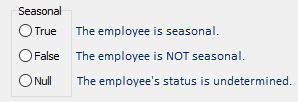
Do not select "Null" if you need to set the seasonal status of employees. Instead select "True" or "False" as it applies to the selected employees.
- Import this file from the distribution: ...\Extras\Payroll\Export Controls\State Taxes\CO FAMLI Export Control.XML.
- Import this file from the distribution: ...\Extras\Payroll\Export Controls\State Taxes\CO FAMLI Export Control (no seasonal).XML.
- Navigate to Payroll/Human Resources > Employees, right-click and select Report Totals File.
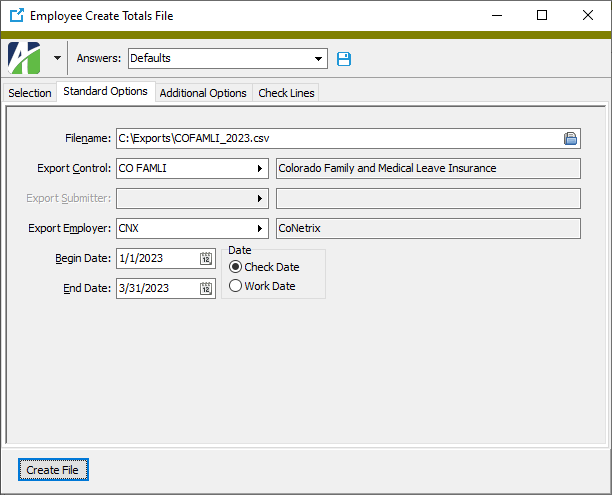
- Select the Standard Options tab. (It is not necessary to filter employees for the process because the export control only selects employees with non-zero Colorado wages.)
- In the Filename field, navigate to the location where you want to save the totals file and enter a file name with a .csv extension.
- In the Export Control field, select the "CO FAMLI" export control that you imported.
- In the Export Employer field, select the applicable export employer. In all likelihood, you can use the same export employer that is set up for tax and/or unemployment.
- In the Begin Date field, enter the date of the first day of the reporting quarter.
- In the End Date field, enter the date of the last day of the reporting quarter.
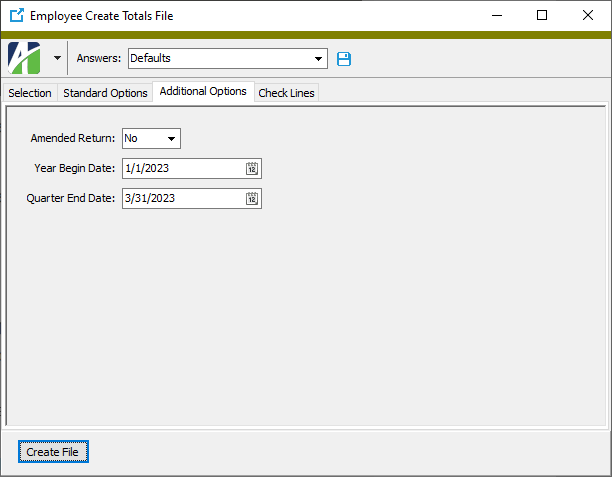
- Select the Additional Options tab.
- From the Amended Return drop-down list, select "Yes" or "No" as appropriate. "Yes" indicates "this is an amended return submission and replaces prior data".
-
In the Year Begin Date field, enter the date of January 1 of the current year.
Tip
Press F2 and enter the date expression "begin of year" based on "Begin Date".
-
In the Quarter End Date field, enter the quarter end date.
Tip
Press F2 and enter the date expression "today" based on "End Date".
- Save your answers for reuse in future quarters.
- Click Create File to generate the report.
- Navigate to Payroll/Human Resources > Employees, right-click and select Select and Create Totals File.
- Select the Standard Options tab.
- In the Filename field, navigate to the location where you want to save the totals file and enter a file name with a .csv extension.
- In the Export Control field, select the "CES Report" export control that you imported.
- In the Begin Date field, enter the date of the first day of the reporting month.
- In the End Date field, enter the date of the last day of the reporting month.
- Click Create File.
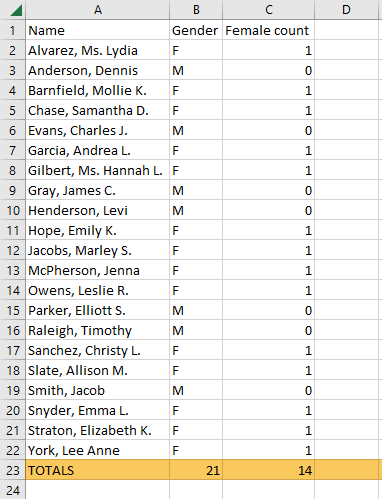
- Name. The employee name.
- Gender. Contains "M" (male), "F" (female), "X" (non-binary), or blank.
- Female count. Shows "1" for employees with Gender=F and "0" for all others.
- Formerly, a "not found" error occurred when the XML file contained references to parameters which did not exist. Now the import process only reports an error if values are associated with the parameter.
- In the past, a "not found" error occurred when one of the segment item expressions referenced a parameter which was being imported. Now the segment item is imported successfully.
Form 941 Returns
Payroll/Human Resources > Government > Form 941 Returns > [right-click] > Generate
Payroll/Human Resources > Government > Form 941 Returns
Changes for Form 941 for quarter 1 of 2023 have been finalized.
There are no changes to the form since 2022 except for the date at the bottom of each page.
As previously, the feature does not change the calculation of Line 5a(i) Qualified sick leave wages or Line 5a(ii) Qualified family leave wages. These values remain the result of check lines in the COVIDQualifiedSick or COVIDQualifiedFamily groups. However, now the totals should only include wages paid in 2023 for "leave taken after March 31, 2020, and before April 1, 2021" according to the IRS. Therefore, if you paid wages for leave taken in any other period, you should be tracking it with a different PRCode that is not in the COVID groups mentioned. Those wages are no longer eligible for the employer social security discount.
The "What's New" section of the Form 941 instructions notes a change to Form 8974 for 2023. The applicable amount from Form 8974 is reported on Form 941 Line 11a. As in the past, enter this amount in the Generate Form 941 dialog. The Line 11a amount cannot be changed in the Form 941 Return window because of its effect on the monthly totals in Line 16 or the daily totals in Schedule B.
Note
The Generate Form 941 process can still produce forms for previous years and quarters. Since quarter 2 of 2020, 26 different COVID fields have been introduced. However, the COVID-19 tab morphs to support each of the different field combinations.
ActivityHD Automation Services (AAS)
Two PRNoteType fields which were previously missing from automation have been added: PluralName and ISPublishedToWeb.
Colorado Family and Medical Leave Insurance (FAMLI)
As of January 1, 2023, Colorado requires employers and employees to contribute to the new state-run FAMLI program (see famli.colorado.gov). With this release of ActivityHD, the segment items and other data which support this requirement are built in.
Groups
The following groups are now built in for all states. If you already have groups with the same names as the new built-ins, the conversion process will hijack the existing groups and make them the built-ins.
The remaining data described below are added by the state-specific installation script (...\Extras\Payroll\PRBuiltInStateData.sql) when "Colorado" is selected.
Parameters
Segment Items
Notes
Note 1: All compensation is included in the calculation of FAMLI wages, not just Colorado compensation.
Note 2: The employee premium is included in the DispDed group to reduce disposable wages for garnishments.
PRCodes
The state-specific installation script pre-installs the following PRCodes:
Tax deposit types
FAMLI tax is remitted separately from income tax and SUTA; therefore, it needs its own tax deposit type. A new "COFAMILI" tax deposit type with a description of "Colorado FAMLI tax" is included in the script. Two fields are defined on the tax deposit type:
| Field Name | Field Description | Group | Employ(EE/ER) | Tax Entity |
|---|---|---|---|---|
| Employee | Employee contribution | FamilyLeaveTax | EE | USA.CO |
| Employer | Employer contribution | FamilyLeaveTax | ER | USA.CO |
Filters
The script adds the following filters to the Checks folder and makes them available to the built-in "Process Payroll" dashboard gadget:
For checks with non-zero Colorado compensation, these filters test whether the total Compensation result amount minus the PreFamilyLeaveTax result amount equals the employee or employer FAMLI tax source amount.
Additional setup
The following setup is left to the user:
Employees
Payroll/Human Resources > Employees
A new built-in "Ready to Prenote" filter has been introduced on the Employees folder.
Employees
Payroll/Human Resources > Employees
Previously, whenever you added an automatic to the Automatics table on the Calculations tab, the automatic was always added to the end of the list when you saved the employee record. Now when you save the employee record, automatics are sorted by Pay/Deduction/Tax/Statistic type and then by their relative order in the table.
Examples
Example 1: If you insert a tax PRCode in the middle of other tax PRCodes, saving leaves the automatic where you inserted it.
Example 2: If you add a deduction automatic at the end of the list of automatics, saving moves it to the end of the deductions section.
Export Controls
Payroll/Human Resources > Setup > Export Controls
An export control dubbed "CO FAMLI" has been introduced to provide reporting for the newly introduced Colorado Family and Medical Insurance (FAMLI). Refer to "An Employer's Guide to FAMLI" for information about submitting your wage reports. The file specifications provide options to submit an XML file or CSV file. The provided export control produces a CSV file which you can review in Excel before submitting.
Setup
If you have seasonal employees, do the following:
If none of your employees is seasonal:
Create Totals File
Generate the totals file using the settings described below:
Field-by-Field
The following table lists each output field from the totals file and how each is derived.
| Output field | Source |
|---|---|
| DocumentCount | Number of employees reported. |
| AmendedReturn | The value of the Amended Return field on the Additional Options tab. |
| FAMLIPremiumStartDate | The value of the Begin Date field on the Standard Options tab. |
| FAMLIPremiumEndDate | The value of the End Date field on the Standard Options tab. |
| PreparerLegalName | Blank |
| PreparerFEIN | Blank |
| Settlement Date | The date and local time that the totals file is generated (e.g., 2023-01-31T16:00:00). |
| ReturnTotalContributionsDue | Total of employee contributions from totals file. |
| EmployerFEIN | The value from the Employer ID field on the USA tax entity record. |
| EmployerFAMLIId | Blank |
| EmployerLegalName | The name of the selected employer. |
| EmployerTaxPayerId | Blank (not a sole proprietor) |
| IndividualName | Blank (not a sole proprietor) |
| FName | Blank (not a sole proprietor) |
| MName | Blank (not a sole proprietor) |
| LName | Blank (not a sole proprietor) |
| BusAdrStreet1 | The delivery address of the selected employer. |
| BusAdrStreet2 | Blank |
| BusAdrStreet3 | Blank |
| BusAdrCity | The city of the selected employer. |
| BusAdrStateCode | The state of the selected employer. |
| BusAdrPostalCode | The zip code of the selected employer. |
| BusAdrCountry | "United States" |
| TotalWagesThisPeriod | Total wages from the totals file. |
| TotalContributionsDue | Total of FAMLI contribution this quarter from the totals file. |
| PaymentAmountTotal | Total of FAMLI contribution this quarter from the totals file. |
| IsFinalReturn | "false". (Assumes that this is not the final return for an employer that has "ceased operations".) |
| EmployeeSSN | Social Security number from the employee record (no dashes). |
| EmployeeFirstName | Employee first name from the employee record. |
| EmployeeMiddleName | Employee middle name from the employee record. |
| EmployeeLastName | Employee last name from the employee record. |
| YearToDateWages | The total source of check lines in the FamilyLeaveTax group (employee only) that have a check date between the dates in the Year Begin Date and Quarter End Date fields specified on the Additional Options tab. |
| GrossWagesThisQtr | The total source of check lines in the FamilyLeaveTax group (employee only) that have a check date between the dates in the Begin Date and End Date fields specified on the Standard Options tab. |
| SubjectWagesThisQtr | Same as gross wages. |
| FAMLIContributionThisQtr | The total result of check lines in the FamilyLeaveTax group (employee and employer) that have a check date between the dates in the Begin Date and End Date fields specified on the Standard Options tab. |
| SeasonalEmployee | If set up for seasonal employees, the value of the Seasonal custom field on employee records; otherwise, always "false". |
Note
"Gross Wages" and "Subject Wages" are the same number. From the instructions for Gross Wages: "This is the same definition of 'total wages' that is used...for the purposes of Unemployment Insurance Compensation. Also referred to as FICA Wages." In ActivityHD, unemployment wages and Social Security (FICA) wages are not necessarily the same numbers. This value is also not total Compensation, because both Unemployment wages and SocialSecurity wages can be reduced by pretax deductions. Therefore, the export control uses the total Source amount of check lines in the FamilyLeaveTax group. The COFAMLI PRCodes calculate the value as Compensation minus deductions in the PreFamilyLeaveTax group. Refer to the "Calculating Wages" section (p. 17ff) of "
Export Controls
Payroll/Human Resources > Setup > Export Controls
Some employers are required to file the "Current Employment Statistics" report to the Bureau of Labor Statistics. This release of ActivityHD introduces an export control to help with that report.
Setup
Import this file from the distribution: ...\Extras\Payroll\Export Controls|Current Employment Statistics.XML.
The export control is named "CES Report".
Running the report
Generate the totals file using the settings described below:

Reading the report
Open the output file in Excel. The worksheet lists employees with non-zero compensation on a check with a pay period date range which includes the 12th of the month.
The worksheet contains three columns:
The TOTALS row shows the total number of employees (Employee Count) and the total number of employees where Female count = 1 (Women Employees). Enter these numbers on your report.
Form 941 Returns
Payroll/Human Resources > Government > Form 941 Returns > [right-click] > Generate
Payroll/Human Resources > Government > Form 941 Returns
Changes for Form 941 for quarter 1 of 2023 have been introduced. These changes are currently based on the DRAFT version of the form so should be used for testing only. The final version will be introduced once the IRS makes it available.
There are no changes to the form since 2022 except for the date at the bottom of each page.
As previously, the feature does not change the calculation of Line 5a(i) Qualified sick leave wages or Line 5a(ii) Qualified family leave wages. These values remain the result of check lines in the COVIDQualifiedSick or COVIDQualifiedFamily groups. However, now the totals should only include wages paid in 2023 for "leave taken after March 31, 2020, and before April 1, 2021" according to the IRS. Therefore, if you paid wages for leave taken in any other period, you should be tracking it with a different PRCode that is not in the COVID groups mentioned. Those wages are no longer eligible for the employer social security discount.
Note
The Generate Form 941 process can still produce forms for previous years and quarters. Since quarter 2 of 2020, 26 different COVID fields have been introduced. However, the COVID-19 tab morphs to support each of the different field combinations.
Generate W-2s
Payroll/Human Resources > Employees > [right-click] > Select and Generate W-2s
The following error could occur if you marked the Limit by State/Local Tax Entity in the Generate W-2s process:
Invalid object 'Tax Totals'
The issue has been corrected.
Import Segment Items
Payroll/Human Resources > Setup > Segment Items > [right-click] > Import
A couple of problems involving importing segment items have been addressed: