ActivityHD Release 7.15
System-wide
-
Data links
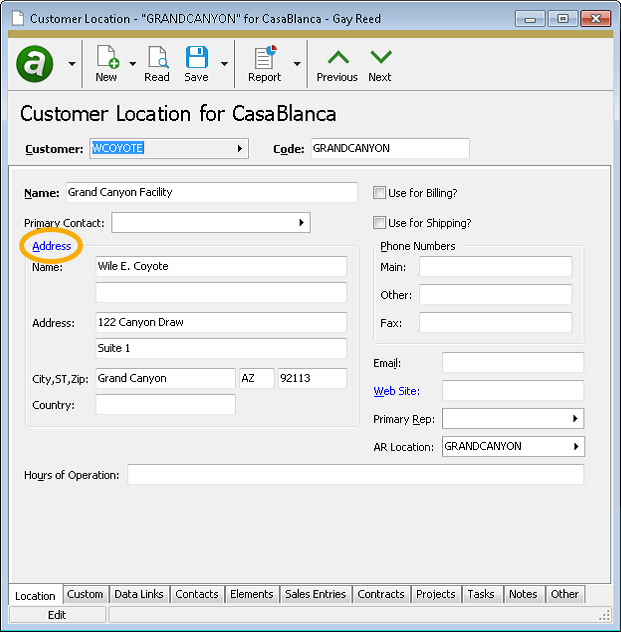
In the past, the captions of some data-linked fields and controls did not correctly display in blue. In particular, some frame labels such as the Address frame in the Sales and Service Customer Location window did not render in blue. These inconsistencies have been corrected.
Accounts Payable
-
1099 Filing
Accounts Payable > Vendors > [right-click] > Government > US 1099 Report > Select and Create File
1099 Filing Deadlines
Refer to the following table for due dates for tax year 2018 filing.
Form Copy B due to recipient by Copy A due to IRS by 1099-MISC
January 31, 2019
February 15, 2019 if reporting payments in Box 8 or Box 14
January 31, 2019 if reporting payments in Box 7
Otherwise:
Paper: February 28, 2019
Electronic: April 1, 2019
1099-INT
January 31, 2019
Paper: February 28, 2019
Electronic: April 1, 2019
1099-DIV
January 31, 2019
Paper: February 28, 2019
Electronic: April 1, 2019
Refer to Publication 1220 and to the "Instructions for Payer" section of each form's instructions for additional details.
Updates are now complete for paper and electronic filing of 1099-MISC, 1099-INT, and 1099-DIV forms for tax year 2018.
New in 2019
-
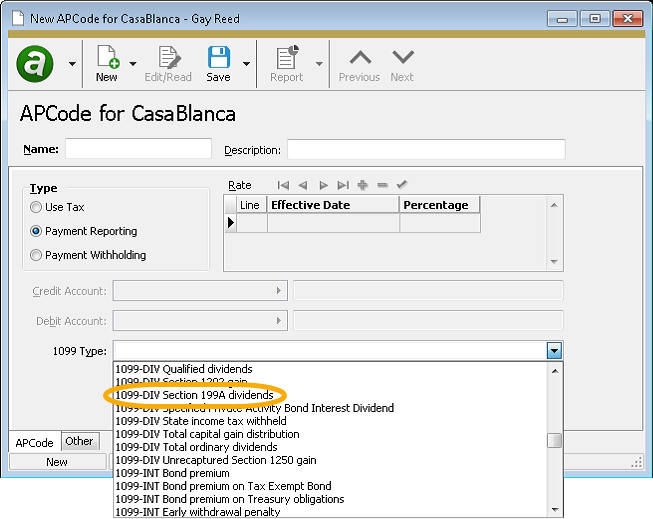
A new 1099 type has been added for Form 1099-DIV. "1099-DIV Section 199A dividends" is available in the 1099 Type dropdown on APCodes. The amount for Section 199A dividends prints in Box 5 of Form 1099-DIV.
- The Copy B built-in form design now replaces the first five digits of the recipient's TIN number with Xs. So, instead of 123-45-6789, the payee's copy now would show XXX-XX-6789. Copies filed with the IRS still show the full TIN number.
For 2018, year-specific report designs have been introduced. The following report designs are now available for 2018:
- 2018 1099 Forms Copy A (built-in) - requires pre-printed forms
- 2018 1099 Forms Copy B (built-in) - the form image and backing are part of the report design
Note
2017 report designs have not been updated with 2018 requirements.
If you attempt to print 1099s using a report design for a year which doesn't match the year specified when you run the wizard, ActivityHD returns a message similar to the following:
The selected report design year is not compatible with the year in the data file.
Report Design Year: 2017
Data Year: 2018
The default report design is now "2018 1099 Forms Copy B (built-in)". This report design uses images to print Copy B of 2018 Forms 1099-MISC, 1099-INT, and 1099-DIV, with instructions. Because the report design uses images, "Data" access to the Images folder is required.
-
-
Attributes
General Ledger > Setup > Attributes
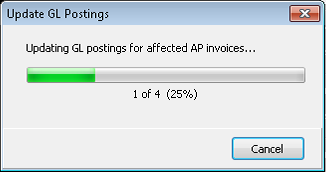
Now when you make a change to the Post to GL setting for attributes with Accounts Payable usage which would result in updates to existing GL postings, a dialog displays to show the progress. The dialog also gives you the ability to cancel out of the update process.
Bank Reconciliation
-
Statements
Bank Reconciliation > Statements
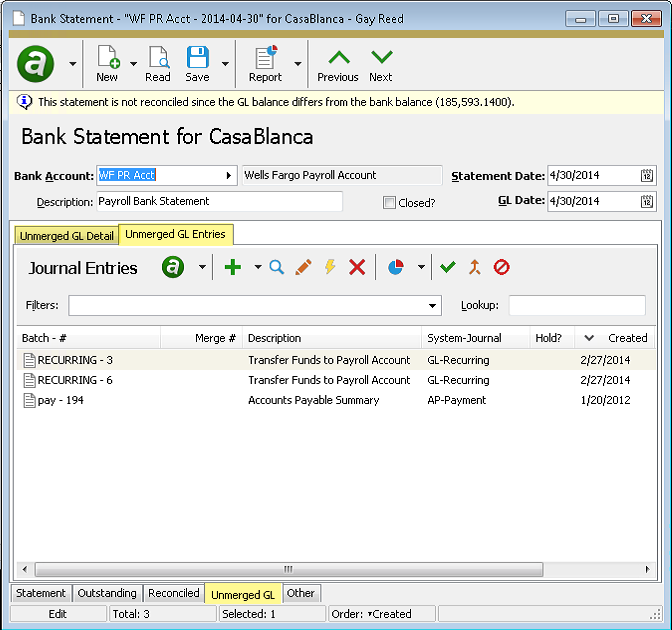
The tab formerly labeled "Unmerged GL Detail" is now named "Unmerged GL". The information from the former Unmerged GL Detail tab is now on a subtab duly named "Unmerged GL Detail". A second Unmerged GL Entries subtab has been added to show a record for all journal detail rows in the Unmerged GL Detail subtab. The new view makes it easy to accomplish the following actions directly from a bank statement:
- Merge existing journal entries so that specific transactions are available for reconciliation.
- Create new journal entries for missing transactions such as transfers, fees, interest, and adjustments which can be immediately merged and made available for reconciliation.
Fixed Assets
-
Asset GL History Report*
Fixed Assets > Assets > [right-click] > Select and Report > Asset GL History Report
In version 7.13, attributes were introduced in Fixed Assets; in version 7.14, the option to post attributes to GL became available. Now you can report the posted attributes in the Asset GL History Report.
In support of this change, a new Show Detail Attributes option has been added to the Reported Information section of the Options tab of the report set-up process.
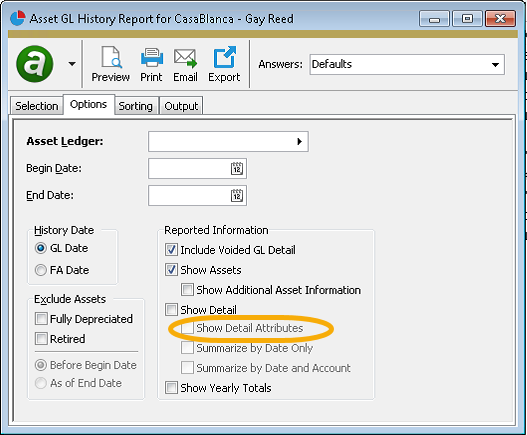
If the Show Detail checkbox is marked, the Show Detail Attributes checkbox is enabled along with the Summarize by Date Only and Summarize by Date and Account checkboxes. If you mark Show Detail Attributes, the summarize checkboxes become disabled. When the Show Detail Attributes checkbox is clear, you can select one of the summarize checkboxes, but not both.
If you select the Show Detail Attributes checkbox, the posted GL attributes show on a second line of detail below the accounts.
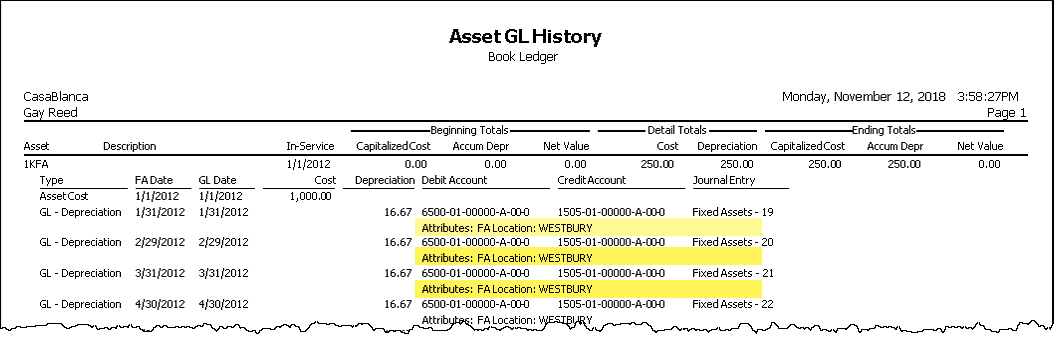
Although the detail only shows the attributes which are posted to GL, you can sort the report by any active attribute that is marked for asset usage, or by any rollup of those attributes. Date-driven attributes are sorted by the attribute item in effect as of the report ending date (or by the latest assignment if no end date is specified). It is possible to not match the detail if (a) there was a change in attribute assignment over the life of the asset, or (b) the GL detail was not updated using Post to GL after a change to attribute assignments was made.
* The Asset GL History Report was formerly referred to in the menu as the "GL History Report"; however, the report heading always called the report by its full name. Now the menu name and heading name match. The name reflects that the report is sorted first by asset, not by GL detail, and that other types of history in addition to GL detail are reported (cost, prior depreciation, retirement).
-
Reports
Fixed Assets > Assets > [right-click] > Asset Retirement Report/Bonus Depreciation Report/Depreciation Schedule
Beginning in version 7.13, the Asset Retirement Report, the Bonus Depreciation Report, and the Depreciation Schedule can be sorted by an attribute assigned to the asset. For date-driven attributes such as FA Location, the reports are sorted by the attribute item in effect as of the ending date specified in the report set-up wizard. Before the current version, the attribute as-of selection was skewed by two days. For instance, if the report was run with an ending date of 4/30/2018, the report was sorted by the attribute item in effect as of 5/2/2018. This difference did not affect the report otherwise; it simply affected the attribute item assigned to the asset for sorting. Now sorting for assets with date-driven attributes behaves correctly.
General Ledger
-
Excel add-ins
Prior to this version of ActivityHD, you needed to register Activity.xla and ActivityRibbon.xlam as add-ins in Excel. It could be difficult to ensure that the add-ins registered in the correct order. Now the add-ins have been combined into a single xlam: Activity.xlam.
You can use the ActivityHD Excel Add-in tool to unregister the old add-ins and to register the new add-in. The Add-in tool runs automatically during product installation, but it needs to be run for each user.
You will also need to update links in existing financial designs to reference Activity.xlam instead of Activity.xla. This happens automatically when a design is opened in Excel, but each design will need to be edited and saved once to apply the change. You can use the Excel Data > Edit Links menu option to resolve any link problems.
-
Financial designs
General Ledger > Financial Designs
Before now it could be confusing to use the Save As with Values action while editing a financial design since the action would default to the same file name as the file being edited. If you tried to save without changing the name, Excel would do nothing. Now the name of the file you are editing will default to the file name with " (Edit)" appended, and the Save As name will default to the design name without " (Edit)" appended.
-
Financial designs
General Ledger > Financial Designs
General Ledger > Financial Designs > [right-click] > Select and Print Financials
General Ledger > Chart of Accounts > [right-click] > Select and Report > Account Financial Report
In the past, users could experience instability when ActivityHD attempted to interact with Excel during editing or printing of financial designs. This instability could manifest itself in several ways:
- Error messages such as:
- Call rejected by callee
- Not enough memory
- Method 'Container' of object '_Workbook' failed
- Application busy
- This workbook is currently referenced by another workbook and cannot be closed
- The message filter indicated that the application is busy
- System call failed
- rpc_server failed
- ole error
- A blank Excel window
- A "ghost" Excel process running without any window visible on the monitor ("ghost" process detected in Task Manager)
- Excel and ActivityHD hanging
- An access violation in Print Financials during iteration.
These issues often arose when multiple Excel workbooks were running in the same Excel process. By default, Excel uses the same process for multiple workbooks in order to minimize resource requirements, enable cross-workbook references, and accommodate copying of large amounts of data from one workbook to another. Unfortunately, this can cause issues when ActivityHD attempts to communicate with Excel while a user is interactively editing a workbook in the same process.
To mitigate these problems, a new Excel process is now always created when ActivityHD launches Excel. In addition, ActivityHD manipulates the Ignore other applications that use Dynamic Data Exchange (DDE) property in Excel options to temporarily turn it on whenever attempts are made to open or create another Excel workbook. (The property is available in the Excel Options dialog on the Advanced tab in the "General" section.) ActivityHD restores the original value of the property before releasing Excel.
- Error messages such as:
-
Generate and Print Financials
General Ledger > Financial Designs > Select and Print Financials
Before this version of ActivityHD, if a file conflict occurred during Generate and Print Financials, the user was prompted about how to resolve the conflict for each statement. With this version, the user is prompted whether to replace or skip any existing files, and there is an Apply to All option when printing multiple statements or using iteration.
Payroll/Human Resources
-
2019 tax updates
Tax updates for 2019 have been incorporated for the following states:
- Kentucky - The standard deduction increased to $2,590.
- Maine - The exemption amount increased to $4,200, and the tax brackets were adjusted.
- New York - The tax brackets were adjusted.
- Ohio - The multiplier used in the tax calculation was decreased to 1.075.
A spreadsheet model of the new tax functions can be found in "...\Extras\Payroll\Tax\Test Tax functions.xls".
-
Attributes
General Ledger > Setup > Attributes
Now when you make a change to the Post to GL setting for attributes with Payroll usage which would result in updates to existing GL postings, a dialog displays to show the progress. The dialog also gives you the ability to cancel out of the update process.
-
Check GL Detail Report
Payroll/Human Resources > Checks > [right-click] > Select and Report > Check GL Detail Report
Since version 6.23 of ActivityHD, attributes on check line distributions can be posted to GL (provided the attributes are flagged to Post to GL). These attributes are automatically copied to journal detail lines when a check is merged, and even after merging if the attributes are modified.
Now these attributes which are flagged to post to GL can be included on the Check GL Detail Report. The Check GL Detail Report and the Checks GL Summary Report let you see the effects of payroll checks on journal detail; showing the attributes on them provides a more complete picture.
To show attributes in the detail and grand totals sections of the Check GL Detail Report, mark the Include Attributes that Post to GL checkbox on the Options tab.

-
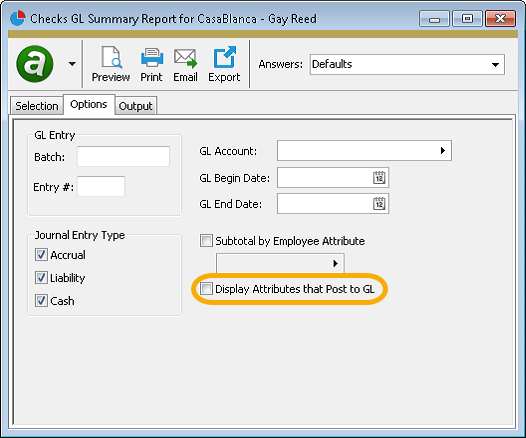
Checks GL Summary Report
Payroll/Human Resources > Checks > [right-click] > Select and Report > Checks GL Summary Report
Since version 6.23 of ActivityHD, attributes on check line distributions can be posted to GL (provided the attributes are flagged to Post to GL). These attributes are automatically copied to journal detail lines when a check is merged, and even after merging if the attributes are modified.
Now these attributes which are flagged to post to GL can be included on the Checks GL Summary Report. The Check GL Detail Report and the Checks GL Summary Report let you see the effects of payroll checks on journal detail; showing the attributes on them provides a more complete picture.
To show attributes on the Checks GL Summary Report, mark the Display Attributes that Post to GL checkbox on the Options tab.
-
Connecticut tax function
In earlier versions of ActivityHD, the CT tax function could calculate negative values in some cases. This problem has been addressed, and ..\Extras\Payroll\Tax\Test Tax Functions.xlsx has been updated.
-
Create IRS 1095-C Transmission
Payroll/Human Resources > Employees > [right-click] > ACA Processing > Select and Create IRS 1095-C Transmission
You can now generate 1094-C and 1095-C XML files for tax year 2018 as well as XML files for tax years 2015-2017.
The 2018 XML schema validation files, as well as the test transmission files which are needed for the submission test when you initially apply for a transmitter control code (TCC), are available in the "..\PayrollACA\2018" installation folder.
-
Export Controls
Payroll/Human Resources > Setup > Export Controls
The export control for reporting USA 2018 W-2 forms electronically in EFW2 format is now available. Money fields for the new Box 12 codes "GG" and "HH" have been added.
The money field for new Box 12 code "GG", Income from Qualified Equity Grants Under Section 83(i), has been added to:
- RO (Employee Optional) Record, positions 122-132
- RU (Total Optional) Record, positions 160-174
The money field for new Box 12 code "HH", Aggregate Deferrals Under Section 83(i) Elections as of the Close of the Calendar Year, has been added to:
- RO (Employee Optional) Record, positions 133-143
- RU (Total Optional) Record, positions 175-189
Because the export control references new built-in groups called "Section83iIncome" and "Section83iDeferral, version 7.15 or later of ActivityHD is required for 2018 W-2 electronic filing.
Note
The Social Security Administration strongly suggests that you use AccuWage Online to test your files. You can access AccuWage Online using your Business Services Online login. AccuWage Download is no longer available.
-
Form 940 Returns
Payroll/Human Resources > Government > Form 940 Returns
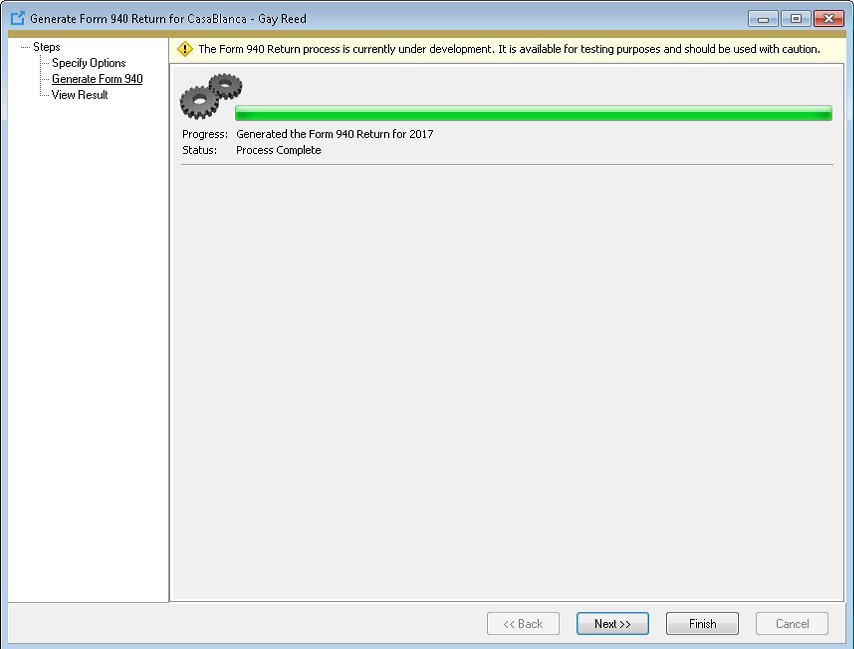
This release of ActivityHD introduces the beta version of the Form 940 Returns process. As a beta release, please understand that the process is suitable for testing purposes, but using the process for creating actual submissions should be done with caution and careful verification. Prior to this release, Form 940 was submitted online. The numbers for the form were determined from Payroll Group Analysis. Now the form can be generated and printed from ActivityHD, similar to how Form 941 and other forms are handled.
Setup
Ideally the following items should be in place before attempting 940 generation:
- Export employer. Review the name and address fields for the export employer you will use with Form 940. It is likely that the export employer you use for Form 941 will also be appropriate for Form 940.
- Tax deposits. It has been possible to record tax deposits for unemployment payments for quite some time. Now recording tax deposits for unemployment payments is required for Form 940 generation in order to calculate Line 13, "FUTA tax deposited for the year" (unless you haven't made any tax deposits and are paying all FUTA taxes when you submit Form 940). Although you can create the tax deposits manually based on information from the Payroll Group Analysis report, nQativ suggests you create them automatically as follows:
- In Payroll, create an AP control with the built-in tax deposit type of "USA 940".
- Add the AP control to the appropriate PRCode (such as "Tax.FUTA").
- Post Tax.FUTA check lines to AP invoices.
- Merge and pay the AP invoices.
- Create the tax deposit by merging the AP payment.
- Mark the tax deposit as "Paid".
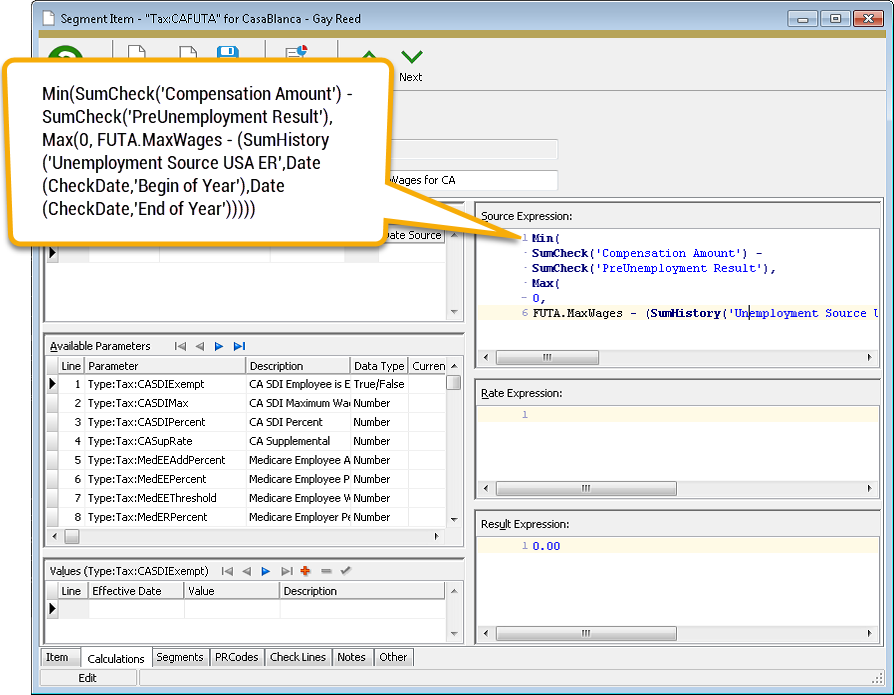
- FUTA wages. You should have a PRCode for tracking FUTA taxes for each employee (commonly "Tax.FUTA" or "Tax.FUI"). This PRCode must be assigned to the "Unemployment" group and have a tax entity of "USA". nQativ also recommends that you delete your parameters for FUTA rate and maximum FUTA wages (e.g., "Tax:FUTA:Percent" and "Tax:FUTA:Max") and start using the new built-in calculator functions which are automatically updated each year.
Example
Source Expression: Min(SumCheck('Compensation Amount'), Max(0, FUTA.MaxWages - SumYTD('Unemployment Wages USA')))
Rate Expression: FUTA.Rate
Result Expression: Source * Rate
- SUTA wages. Multi-state employers must also file Form 940, Schedule A. On Schedule A you must mark the checkbox for every state in which you were required to pay state unemployment during the reporting year. ActivityHD determines which boxes to mark based on whether there are check lines in the reporting year with a PRCode which belongs to the "Unemployment" group and with a particular state's tax entity. These check lines should have already been created with the initial implementation of Payroll. However, nQativ recommends you start using the new built-in parameters for SUTA rate, "Type:Tax:SUTAxxRate", where xx is the state postal code. These parameters are required for calculating Line 10 of Form 940 ("If SOME of the taxable FUTA wages you paid were excluded from state unemployment tax, OR you paid ANY state unemployment tax late").
-
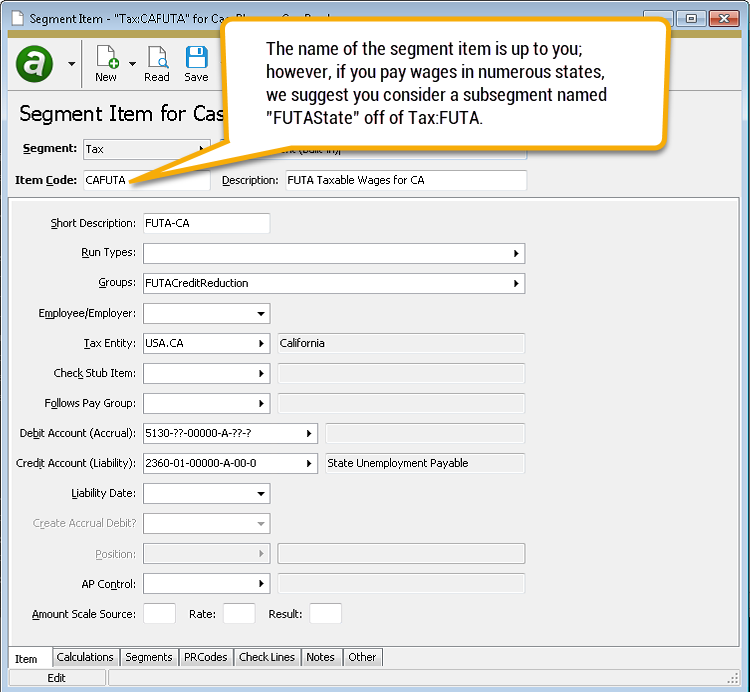
FUTA wages by state. Schedule A also requires multi-state employers to report FUTA wages by state for states with a credit reduction rate greater than zero. Fortunately, in 2018 the only credit reduction "state" is the Virgin Islands. So, unless you have employees in the Virgin Islands, this step is not necessary for 2018. Note: FUTA wages are not the same as SUTA wages which can have a different cutoff threshold than FUTA wages.
Credit reductions only apply when a state has fallen into arrears with the federal government with respect to unemployment payments. Since this is unpredictable from year to year, you should be prepared to collect this information. California, for instance, had a credit reduction for several years running.
Tracking total FUTA wages by state requires a new PRCode for each state where you pay unemployment. If you choose to be proactive, you can add the new PRCodes to your employee automatics starting in 2019 so that you can track FUTA wages by state all year. Alternatively, you can wait until years' end to find out if your states have a credit reduction and import the needed check lines at that time.
FUTA wages by state - Setup Example
Data Sources Line-By-Line
Field from Form 940 Source Employer identification number (EIN) The Employer ID from the "USA" tax entity. The EIN is a 9-digit number in ##-####### format. Name (not your trade name) The Address: Name from the appropriate export employer record. Trade name (if any) <blank> [May be provided later] Address The address fields from the appropriate export employer record. Foreign country name The name of the country associated with the two- or three-letter country code from the appropriate export employer record. Type of Return The type of return this return represents. Valid types are: - Amended
- Successor employer
- No payments to employees in 2018
- Final: Business closed or stopped paying wages
This selection is input on the Options tab of the Generate Form 940 Return process.
Part 1 Line 1a: If you had to pay state unemployment in one state only, enter the state abbreviation The two-digit abbreviation of the state in which you paid unemployment tax, provided you only paid tax in one state; i.e., if all check lines on merged checks dated in the reporting year that are associated with the "Unemployment" group and that have a USA state tax entity are all for the same state. Line 1b: If you had to pay state unemployment tax in more than one state, you are a multi-state employer Mark the checkbox if you are a multi-state employer; i.e., if check lines on merged checks dated in the reporting year that are associated with the "Unemployment" group are assigned to more than one US state. Line 2: If you paid wages in a state that is subject to CREDIT REDUCTION Mark the checkbox if you paid wages to a credit reduction state; i.e., if merged checks dated in the reporting year contain at least one check line which is associated with the "Unemployment" group and is assigned to a US state with a built-in credit reduction rate that is greater than zero. Part 2 Line 3: Total payments to all employees The total result of check lines on merged checks which are dated in the reporting year and associated with the "Compensation" group. Line 4: Payments exempt from FUTA tax The total result of check lines on merged checks which are dated in the reporting year and associated with the "PreUnemployment" group. Line 4a: Fringe benefits This selection is input on the Options tab of the Generate Form 940 Return process. Line 4b: Group-term life insurance This selection is input on the Options tab of the Generate Form 940 Return process. Line 4c: Retirement/Pension This selection is input on the Options tab of the Generate Form 940 Return process. Line 4d: Dependent care This selection is input on the Options tab of the Generate Form 940 Return process. Line 4e: Other This selection is input on the Options tab of the Generate Form 940 Return process. Line 5: Total of payments made to each employee in excess of $7,000 The sum for all employees with payments in excess of $7,000 for the reporting year of the total payments to each employee minus $7,000 per employee. Line 6: Subtotal Line 4 + Line 5 Line 7: Total taxable FUTA wages Line 3 - Line 6; i.e., the total source on check lines from merged checks dated in the reporting year which are associated with the "Unemployment" group and with the "USA" tax entity. Line 8: FUTA tax before adjustments Line 7 times the built-in FUTA rate for the reporting year; for 2018, 7 x 0.006. Part 3 Line 9: If ALL of the taxable FUTA wages you paid were excluded from state unemployment tax, multiply line 7 by 0.054 (for 2018) If the total "Unemployment" Source for all US states is zero, Line 7 times the built-in FUTA adjustment rate; otherwise, blank. Line 10: If SOME of the taxable FUTA wages you paid were excluded from state unemployment tax, OR you paid ANY state unemployment tax late Line 7 from the "Line 10 Worksheet" Line 11: If credit reduction applies The total from Form 940, Schedule A. Part 4 Line 12: Total FUTA tax after adjustments Line 8 + Line 9 + Line 10 + Line 11 Line 13: FUTA tax deposited for the year, including any overpayment applied from a prior year The total amount of all tax deposits marked "Paid" with a deposit type of "USA 940" and a liability date in the reporting year. Line 14: Balance due If Line 12 is greater than or equal to Line 13, Line 12 - Line 13; otherwise, blank. Line 15: Overpayment If Line 13 is greater than Line 12, Line 13 - Line 12; otherwise, blank. If there is a value in this field, the disposition of the overpayment is indicated. The options are "Apply to next return" and "Send a refund". This selection is input on the Options tab of the Generate Form 940 Return process. Part 5 Line 16: Report the amount of your FUTA tax liability for each quarter; do NOT enter the amount you deposited. If you had no liability for a quarter, leave the line blank. Line 16a: 1st quarter (January 1 - March 31) The total result of check lines on merged checks in the first quarter of the reporting year which are associated with the "Unemployment" group and with the "USA" tax entity. Line 16b: 2nd quarter (April 1 - June 30) The total result of check lines on merged checks in the second quarter of the reporting year which are associated with the "Unemployment" group and with the "USA" tax entity. Line 16c: 3rd quarter (July 1 - September 30 The total result of check lines on merged checks in the third quarter of the reporting year which are associated with the "Unemployment" group and with the "USA" tax entity. Line 16d: 4th quarter (October 1 - December 31) Line 12 - Line 16a - Line 16b - Line 16c Line 17: Total tax liability for the year (16a + 16b + 16c + 16d = line 17) Line 12 Part 6 May we speak with with your third-party designee? The values in Part 6 are input on the Options tab of the Generate Form 940 Return process. Part 7 Sign here. You MUST complete both pages of this form and SIGN it. The Sign your name here and Date blocks require handwritten responses. The remaining fields are populated from the Form 940 record.
Field from Line 10 Worksheet Source Line 1: Maximum allowable credit Line 7 (Form 940) times the built-in FUTA adjustment rate; for 2018, 7 x 0.054. Line 2: Credit for timely state unemployment tax payments--How much did you pay on time? [Currently under development] Line 3: Additional credit--Were ALL of your assigned experience rates 5.4% or more? The total for all states where the assigned experience rate is less than the FUTA adjustment rate (.054 for 2018). For each state with an experience rate less than 5.4%, multiply the computation rate times the taxable state unemployment wages at the assigned experience rate to arrive at the amount of additional credit for that state. The computation rate is the difference between 5.4% and your assigned experience rate ("Type:Tax:SUTAxxRate" for state xx). Finally, total the additional credits for the states with an experience rate less than 5.4%. Line 4: Subtotal Worksheet Line 2 + Worksheet Line 3 Line 5: Credit for paying state unemployment taxes late: Line 5a: What is your remaining allowable credit? Worksheet Line 1 - Worksheet Line 4 Line 5b: How much state unemployment tax did you pay late? This value is input on the Options tab of the Generate Form 940 Return process. Line 5c: Which is smaller, line 5a or line 5b? The smaller amount of Worksheet Line 5a or Worksheet Line 5b. Line 5d: Your allowable credit for paying state unemployment taxes late The value on Worksheet Line 5c times the built-in late rate (0.900 for 2018). Line 6: Your FUTA credit Worksheet Line 4 + Worksheet Line 5d Your adjustment Worksheet Line 1 - Worksheet Line 6
Column from Schedule A Source Postal Abbreviation State boxes are marked if there are check lines in the reporting year with the "Unemployment" group and with the corresponding state tax entity. FUTA Taxable Wages The total of check lines for the reporting year with the "FUTACreditReduction" group and with a matching tax entity. Reduction Rate This is a built-in value in ActivityHD. Credit Reduction FUTA taxable wages times the credit reduction rate Total Credit Reduction Total credit reduction for all states. Entered on Form 940, Line 11. Generating Form 940
- In the Navigation pane, highlight the Payroll/Human Resources > Government > Form 940 Returns folder.
-
Click
 . The Generate Form 940 Return process window opens.
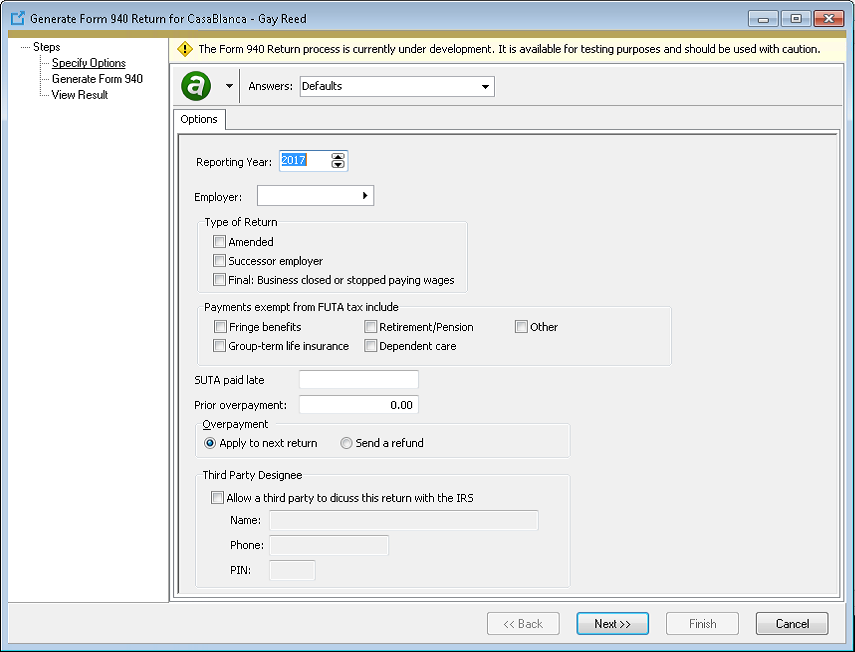
- Select the Reporting Year.
- In the Employer field, select the export employer to generate the 940 form for.
-
In the Type of Return section, if this is other than a regular return, mark the checkbox which describes the return type. Valid types are:
- Amended
- Successor employer
- Final: Business closed or stopped paying wages
See the "Instructions for Form 940" for more information.
-
In the Payments exempt from FUTA tax include section, mark the types of exempt payments which will be reported in the amount on Line 4. Valid exempt payments include:
- Fringe benefits
- Group-term life insurance
- Retirement/Pension
- Dependent care
- Other
See the "Instructions for Form 940" for more information.
-
In the SUTA paid late field, enter the amount of state unemployment tax you paid late, if any. This amount is used in the Line 10 Worksheet in the computation of the adjustment amount.
See the "Instructions for Form 940" for more information.
- In the Prior overpayment field, enter any overpayment from a prior year to apply to this year's payment.
- In the Overpayment field, select how to handle any overpayment on this return. Your options are:
- Apply to next return
- Send a refund
-
In the Third Party Designee section, mark the Allow a third party to discuss this return with the IRS checkbox if you grant permission for the IRS to speak with a third party about the Form 940 return. If you mark the checkbox, specify the third party's Name and Phone, and assign a five-digit PIN.
See the "Instructions for Form 940" for more information.
-
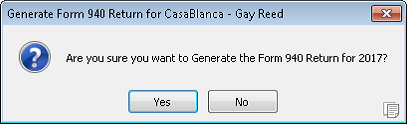
Click Next > >. You are prompted to confirm you want to generate the return.
-
Click Yes. The return is generated.
-
Click Next > >.
-
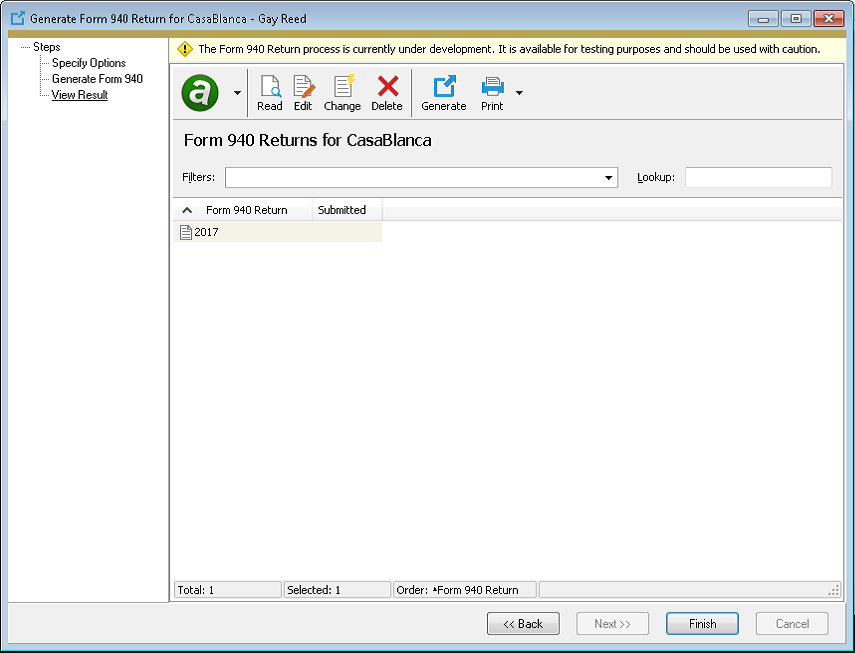
Double-click the Form 940 Return object to open the record in the Form 940 Return window.
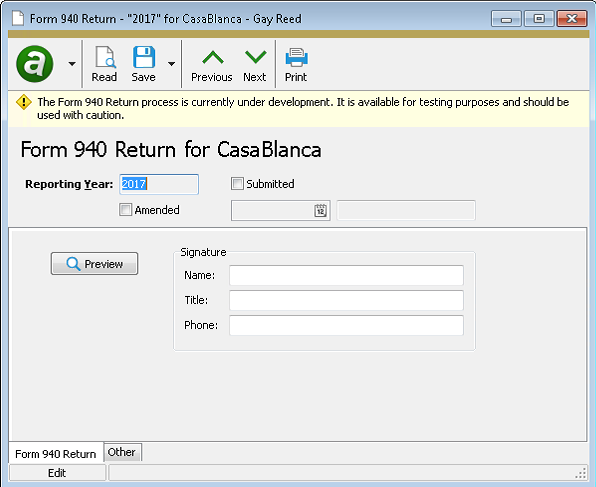
- In the Signature section, enter the Name, Title, and Phone of the responsible party.
- Save your changes and close the Form 940 Return window.
-
Click
 . The Print Form 940 Returns process window opens and the form is validated to verify it is ready for printing.
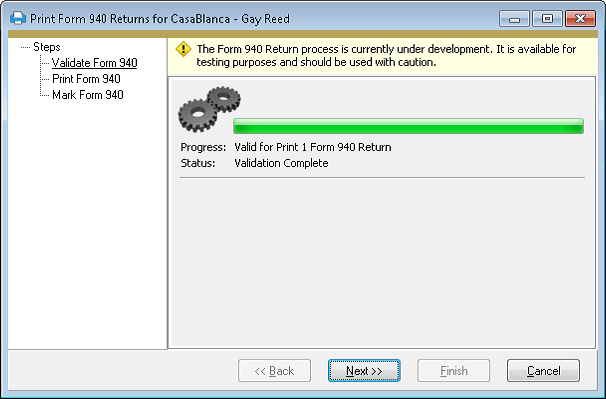
-
Click Next > >.
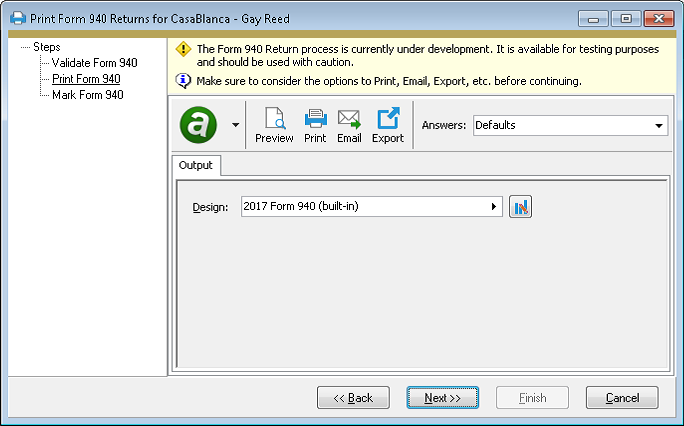
- In the Design field, select the design to use to print Form 940.
-
Click
 , ,
, ,  , or
, or  to view or print the form.
Note
If the form is incorrect, you can click Cancel at this step, delete the form record, make corrections, and regenerate the form.
-
When you finish, click Next > >.
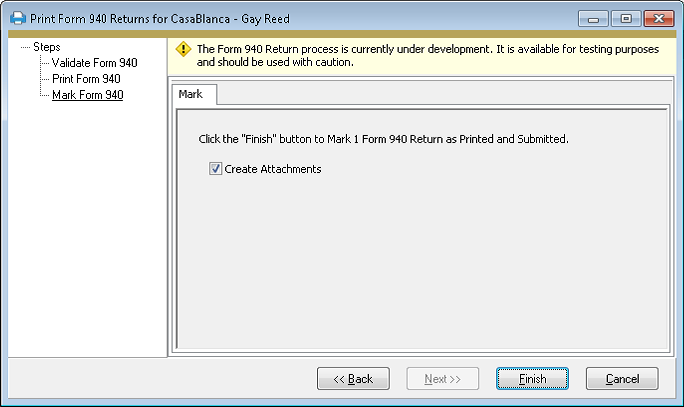
- To mark the return as printed and submitted, click Finish.
-
Generate W-2s
Payroll/Human Resources > Employees > [right-click] > Select and Generate W-2s
Changes have been made to support calculation of W-2 forms and W-3 report totals for 2018.
The process now includes calculations for two new Box 12 codes. These calculations use the new groups cited below.
- Code GG. Uses the built-in group "Section83iIncome" to calculate income from qualified equity grants under section 83(i). This is the amount includible in gross income from qualified equity grants for the calendar year under Section 83(i)(1)(A).
- Code HH. Uses the built-in group "Section83iDeferral" to calculate aggregate deferrals under section 83(i) elections. This is the aggregate amount of income deferred under section 83(i) elections as of the close of the calendar year.
The W-3 report has also been updated to include totals for the new Box 12 codes.
The following forms have been updated:
- W-2 Forms - L4UP Blank Paper (built-in)
- W-2 Forms - Copy A 5201 (built-in)
The EFW2 electronic submission process (which we recommend even for companies with fewer than 250 employees), will be updated in the near future.
Note
If you provide W-2s to your employees electronically, see Publication 15-A, Employer's Supplemental Tax Guide, "Furnishing Form W-2 to employees electronically" for more information about consent and disclosure requirements.
-
Groups
Payroll/Human Resources > Setup > Groups
Two built-in groups have been added for reporting new information in Box 12, Form W-2, and for electronically filing Copy A (EFW2) with the Social Security Administration.
- Section83iIncome. Use this group to report income from qualified equity grants under section 83(i) using code GG. Report the amount includible in gross income from qualified equity grants under section 83(i)(1)(A) for the calendar year.
- Section83iDeferral. Use this group to report aggregate deferrals under section 83(i) elections using code HH. Report the aggregate amount of income deferred under section 83(i) elections as of the close of the calendar year.
Excerpt from the 2018 General Instructions for Forms W-2 and W-3:
The Tax Cuts and Jobs Act added section 83(i) for "qualified equity grants." The law also added new Form W-2 reporting requirements for these grants. Employers with employees who have qualified equity grants must report the amount includible in gross income under section 83(i) for an event which occurs in the calendar year in box 12 using code GG. Also, employers must report the aggregate amount of income which employees elect to defer under section 83(i) as of the close of the calendar year in box 12 using code HH. See P.L. 115-97, section 13603 for more information.
-
Massachusetts tax function
In earlier versions of ActivityHD, the MA tax function had two discrepancies:
- The Social Security/Medicare exemption should have been subtracted before annualizing wages, but it was being subtracted afterwards.
- The exemption factor was being multiplied by the second and greater exemptions rather than by all exemptions.
These issues have been addressed, and the Massachusetts worksheet in ..\Extras\Payroll\Tax\Test Tax Functions.xlsx has been revised to more closely match the instructions.
-
Print Employee/IRS 1095-Cs
Payroll/Human Resources > Employees > [right-click] > ACA Processing > Select and Print Employee 1095-Cs | Select and Print IRS 1095-Cs
The built-in report designs for Forms 1094-C and 1095-C for reporting year 2018 have been introduced to ActivityHD. These report designs can only be used to print 2018 information returns.
The most notable change to Form 1095-C over last year's form is that the employee name in Part I and the covered individual names in Part III are now separated into three parts: First Name, Middle Initial, and Last Name.
Note
"Data" access to the Images folder is required to print 1094-C and 1095-C information returns. The report designs use images of the respective forms as the report background, so unless a user has "Data" access, the image will not display on the report.
Purchasing
-
Attributes
General Ledger > Setup > Attributes
Now when you make a change to the Post to AP setting for attributes with PO usage which would result in updates to existing GL postings, a dialog displays to show the progress. The dialog also gives you the ability to cancel out of the update process.
-
Purchase orders
Purchasing > Orders
Previously, the Purchase Order Approval dialog was not tall enough to show more than two approval levels. This could be disconcerting if your site requires three or four levels of approval. The dialog has been modified to show 1 to 4 approval levels.