Authorized users
An authorized user is a user who has been granted some form of access to the ActivReporter system.
Authorized users are set up at the system level (Activity System > Administration > Authorized Users). Company-specific settings are managed at the company level ([Company] > Administration > Authorized Users). A user must first be designated as a system authorized user and then can be set up as a company authorized user.
Typically, the system administrator creates authorized users and assigns permissions and security views when users are hired or given access to the system. Permissions and security views can be changed as needed.
Authorized users are assigned access control levels at both the system and company levels which determine the scope of information that is available to them. If availability needs to be restricted, the administrator can do so by assigning permissions or creating security views.
 Create a system authorized user
- In the Navigation pane, highlight the Activity System > Administration > Authorized Users folder.
- Click
 . The New Authorized User window opens.
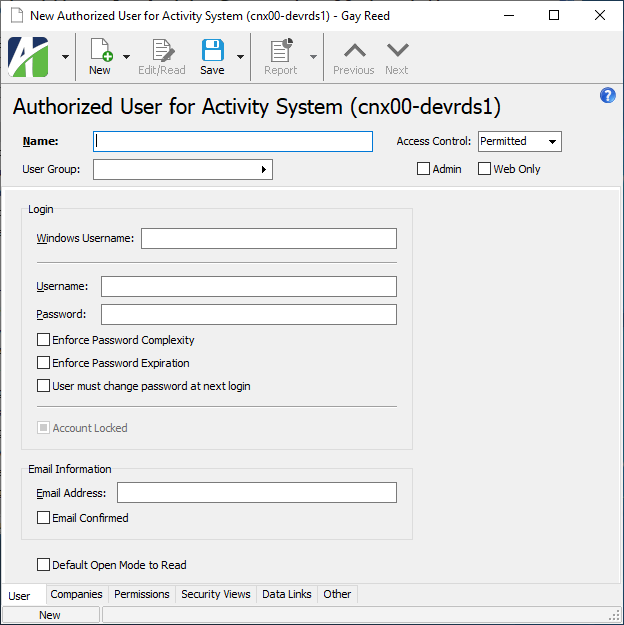
- Enter the user's Name as you want it to display in ActivReporter. You can use up to 40 characters. The user name must be unique within its user group.
- To associate a user with a particular system user group, select the User Group.
- From the Access Control drop-down list, select the authorized user's system-level access. The selection in this field is synchronized with the Access Control options on the Permissions tab. Valid options are:
- All. The user has full access to system resources. (Permissions can be restricted at other levels even if the user has "All" permission at the system level.)
- Permitted. The user has access to the system resources he/she is assigned permissions for.
- Unpermitted. The user only has access to the system resources which do not require permissions.
- None. The user has no access at all, not even to log in.
- If the authorized user should have privileges to start and stop the system and company servers and to disconnect users (i.e., a system administrator), mark the Admin checkbox.
- If the authorized user cannot log in from any other source except the web, mark the Web Only checkbox.
- In the Login section, specify details for the method(s) by which the authorized user can access the system. Valid methods are:
- Windows credentials.
In the Windows Username field, enter the user's Windows user name including the domain name. When a user logs in, ActivReporter matches the Windows login name to the authorized user's Windows username to determine which permissions to allow.
Example
If USER1's domain is "mydomain", enter "mydomain\USER1".
Username and password. Users who use ActivReporter credentials to log in are prompted for their password each time they connect. Provide ActivReporter credentials in the following fields:
- In the Username field, enter the user's ActivReporter login name.
- In the Password field, enter the user's initial ActivReporter password.
- If you want to ensure that the user's password is not easily guessed, mark the Enforce Password Complexity checkbox.
- If you want to require the user to change the password at regular intervals, mark the Enforce Password Expiration checkbox.
- If you marked the Enforce Password Expiration checkbox, the User must change password at next login checkbox is enabled. Mark this checkbox if you want the user to set a new password at the next login.
- Windows credentials.
- Enter the user's Email Address. Once confirmed, this email address can be used for certain administrative functions such as password reset.
- If you want data entry windows to open in read mode for this user, mark the Default Open Mode to Read checkbox.
- Save the new authorized user record.
 Grant company access to an authorized user
Use the Companies tab to provide a user with access to one or more companies.
- Open the authorized user record for which to provide company access.
- Select the Companies tab.
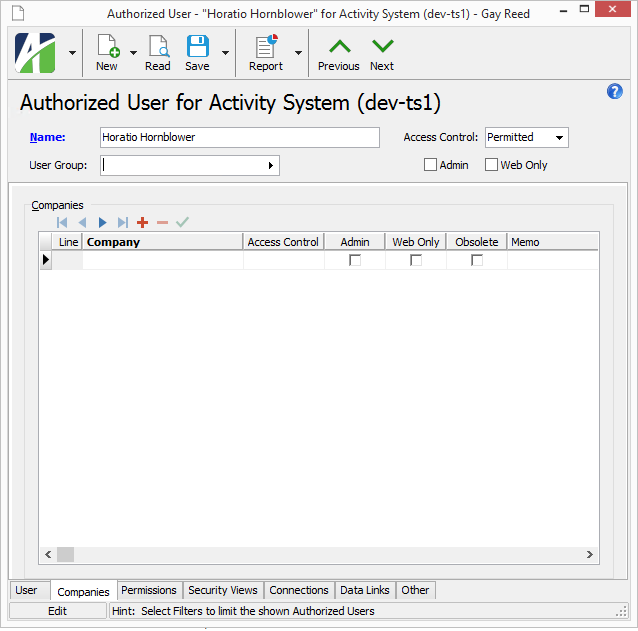
- In the Company column, select the company to provide the authorized user access to.
Tip
The Find dialog (F3) on the Company field allows you to select multiple companies at one time. Use Ctrl and/or Shift selection to select multiple companies. When you click OK, the Companies table is populated with every valid company you selected.
- From the Access Control drop-down list, select the level of company access to assign to the user. The selection in this field is synchronized with the Access Control drop-down list on the company record and with the Access Control options on the Permissions tab of the company record. Your options are:
- All. The user has full access to the company.
- Permitted. The user has access to the company resources he/she is assigned permissions for.
- Unpermitted. The user only has access to the company resources which do not require permissions.
- None. The user has no access to the company.
- If the authorized user should have privileges to start and stop the company server and to disconnect users from the company (i.e., a company administrator), mark the Admin checkbox.
- If the authorized user cannot log in from any other source except the web, mark the Web Only checkbox.
- If desired, enter a Memo about the authorized user's access to the specified company.
- Repeat steps 3-7 for each company the user needs access to.
- When you finish, save your changes.
 Assign permissions to an authorized user
System permissions, set from the Activity System node, control access to data folders, reports, and companies.
- Open the authorized user record for which to assign permissions.
- Select the Permissions tab.
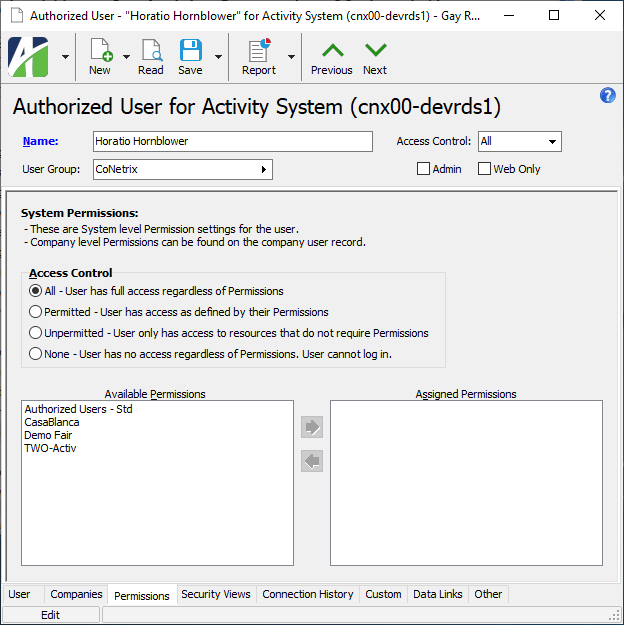
- If the correct option is specified in the Access Control drop-down list at the top of the window and anything except "Permitted" is selected, skip to step 5. If "Permitted" is selected and it is the correct option, skip to step 4. Otherwise, in the Access Control field, select the level of access to assign to the user. Your options are:
- All. The user has full access to everything. (Permissions can be restricted at other levels even if the user has "All" permission at the system level.) Skip to step 5.
- Permitted. The user has access to the items he/she is assigned permissions for. Continue at step 4.
- Unpermitted. The user only has access to the resources which do not require permissions. Skip to step 5.
- None. The user has no access at all, not even to log in. Skip to step 5.
- If the selected access control option is "Permitted", specify the following:
In the Available Permissions list box, highlight the permissions to assign to the user. You can use Ctrl and/or Shift selection to select multiple permissions.
Permissions that are flagged as "Obsolete" are not visible in the list box.
Click
 to move your selection(s) to the Assigned Permissions list box.
Permissions previously assigned to an authorized user and subsequently flagged as "Obsolete" are visible in the list box.
- Save your changes.
 Assign security views to an authorized user
Security views define the conditions under which a user can access a particular resource.
- Open the authorized user record for which to assign security views.
- Select the Security Views tab.
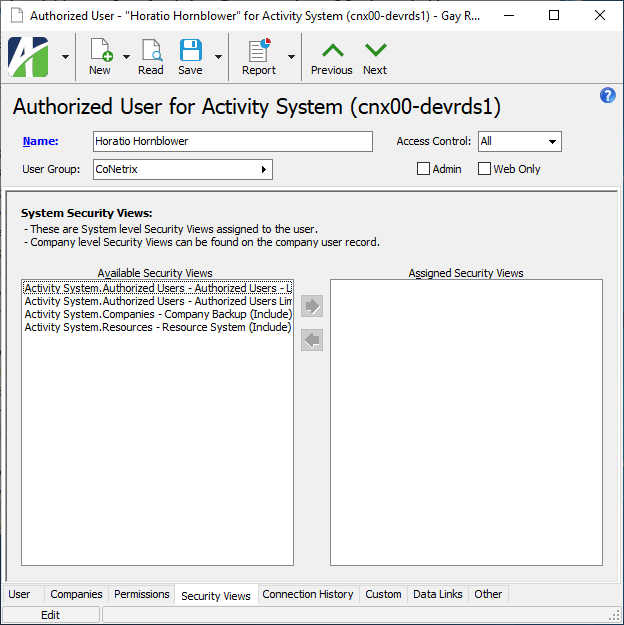
- In the Available Security Views list box, highlight the security views to assign to the user. You can use Ctrl and/or Shift selection to select multiple security views.
- Click
 to move your selection(s) to the Assigned Security Views list box.
 - Save your changes.
 Lock an authorized user account
Important!
Administrator access is required to perform this procedure.
- Open the authorized user record you need to lock.
- On the Users tab, mark the Account Locked checkbox.
- Save your changes.
 Disconnect an authorized user account
On occasion, a user may leave their workstation for a day, a week, or more, and fail to disconnect from ActivityHD Explorer, possibly leaving resources locked which other users need to access. The Disconnect command was introduced to handle just such a circumstance without the need to disconnect other users or to perform an arduous and arcane workaround. Fortunately, disconnecting a user does not interfere with other users' ability to connect to ActivReporter or to perform other operations.
Using the Disconnect command requires "Admin" access. AccountingWare suggests that only system administrators be afforded this privilege.
When an authorized user is disconnected, any of the user's unsaved changes are lost; therefore, exercise the power to disconnect judiciously.
To disconnect an authorized user:
- In the Navigation pane, highlight the Activity System > Administration > Authorized Users folder.
-
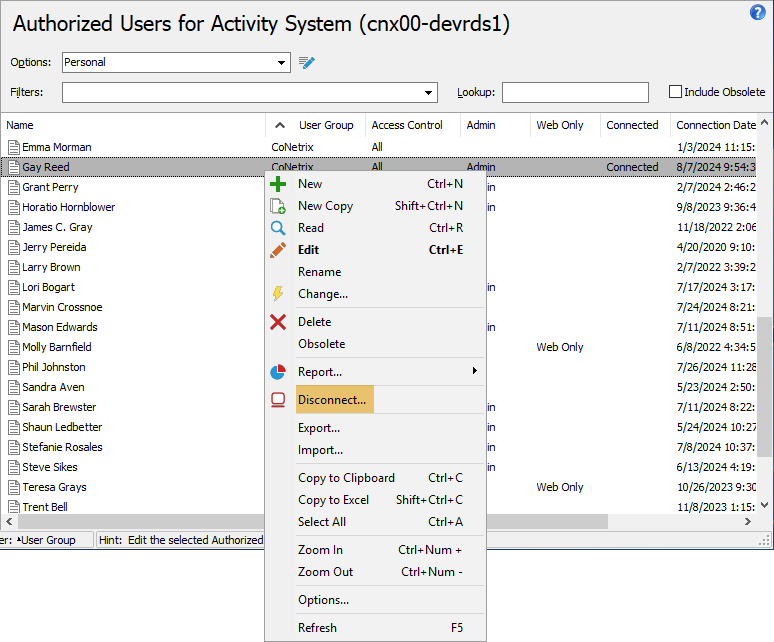
In the HD pane, select the authorized user to disconnect and right-click to open a shortcut menu.
-
From the shortcut menu, select Disconnect. You are prompted to confirm that you want to disconnect all connections for the selected user.

- Click Yes. The selected authorized user is disconnected. When the user returns to their workstation, they are notified of the disconnection.
Note
When a user is manually disconnected, the Connected column of the corresponding row in the Authorized Users HD view shows "Disconnecting" for the duration of the disconnection process. Typically, disconnection time is very brief; however, if the disconnection takes a while, "Disconnecting" shows until disconnection completes.
 Flag an authorized user's access to a company as obsolete
- Open the authorized user record for which to change company access.
- Select the Companies tab.
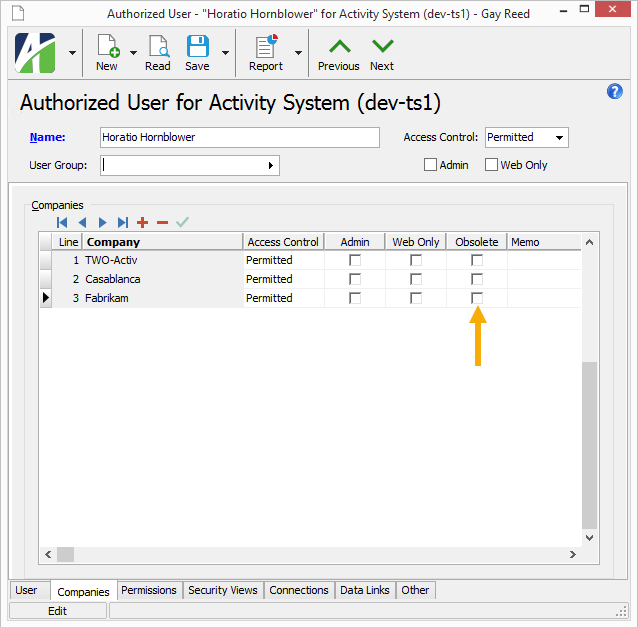
- Find the row for the company you need to remove the user's access to and mark the Obsolete checkbox.
- Save your changes.
 Authorized Users Listing
Purpose
The Authorized Users Listing provides a list of users who have access to ActivReporter.
Content
For each authorized user included on the report, the listing shows:
- name
- Windows username
- username
- web only indicator
- access control level.
In addition, you can include one or more of the following:
- permissions
- security levels
- timestamps
- memos
- custom fields.
The following total appears on the report:
- record count.
Print the report
- In the Navigation pane, highlight the Activity System > Administration > Authorized Users folder.
- Start the report set-up wizard.
- To report on all or a filtered subset of authorized users:
- Right-click the Authorized Users folder and select Select and Report > Authorized Users Listing from the shortcut menu.
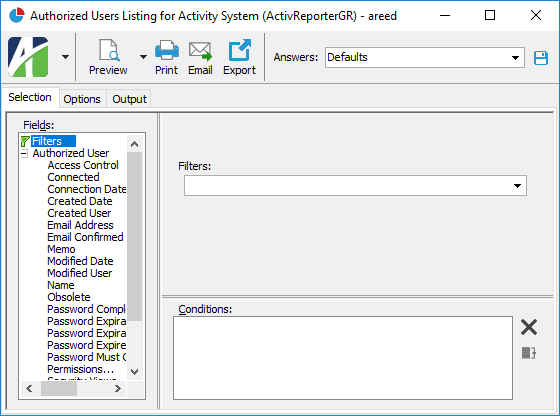
- On the Selection tab, define any filters you want to apply to the data.
- To report on specifically selected authorized users:
- In the HD view, select the authorized users to include on the report. You can use Ctrl and/or Shift selection to select multiple records.
- Click
 and select Authorized Users Listing from the drop-down menu.
- To report on a particular authorized user from the Authorized User window:
- In the HD view, locate and double-click the authorized user you want to report on. The Authorized User window opens with the authorized user loaded.
- Click
 and select Authorized Users Listing from the drop-down menu.
- To report on all or a filtered subset of authorized users:
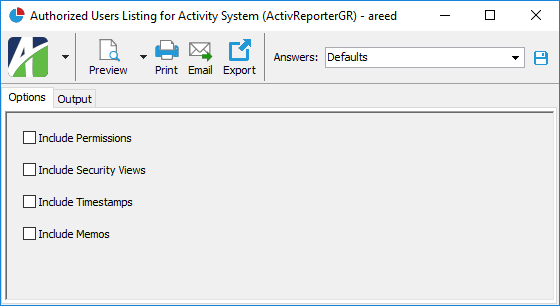
- On the Options tab, mark the checkbox(es) for the additional information to include:
- Permissions
- Security Views
- Timestamps
- Memos
- Custom Fields (only visible if custom fields are set up)
- Select the Output tab.
- In the Design field, look up and select the report design to use.
There are two built-in report designs for the Authorized Users Listing:
- Authorized Users - Shows name, Windows username, username, email, and web only indicator for each authorized user.
- Advanced Authorized Users - Shows name, Windows username, username, email, web only indicator, and access control level for each authorized user.
- In the toolbar, click the icon for the type of output you want:
 - Provides access to two preview options.
- Preview - Click the icon or click the drop-down arrow and select Preview from the drop-down menu to view the report in the Crystal Reports viewer.
- Preview to PDF - Click the drop-down arrow next to the icon and select Preview to PDF to view the report in the PDF reader.
 - Opens the Print dialog so that you can select and configure a printer and then print a paper copy of the report.
 - Opens the Report Email dialog so that you can address and compose an email that the report will be attached to. For best results, ensure your email client is running before you attempt to send a report via email.
 - Opens the Export Report dialog so that you can save the report to a file. File types include Crystal Reports (.rpt), PDF (.pdf), Microsoft Excel (.xls), Microsoft Word (.doc), rich text (.rtf), and XML (.xml).
- From
- The email account from which to send the email. Valid options are:
- Windows user default account. Sends email using the user's Windows default email account. For most users, this is the account configured in Outlook or another email client application.
- Server personal. Sends email using the email configuration for the system or company server and the email address on the current user's authorized user record. The authorized user record must have a confirmed email address.
- Server generic. Sends email using the email configuration and "from" address for the system or company server. This option requires "Send generic" access to the Server Email resource.
- To
- The email address(es) to which to send the email. Separate email addresses with semi-colons.
- CC
- The email addresses to copy on the email. Separate email addresses with semi-colons.
- BCC
- The email addresses to blind copy on the email. Separate email addresses with semi-colons.
- Subject
- The subject line.
- Text box
- The body of the email.
Report Email dialog
Data extensions
The following data extensions are available for the report:
- Authorized users
- Permissions
- Security views
 User Resources Analysis
Purpose
The User Resources Analysis provides a list of authorized users, the resources assigned to each user, and the types of access assigned for each resource.
Content
For each authorized user included on the report, the report shows:
- name
- access control level (All/Permitted/Unpermitted/None)
- resources and the type(s) of access the user has to each resource.
In addition, you can include one or more of the following:
- authorized users with no resources
- permissions
- timestamps
- memos
- custom fields.
The following total appears on the report:
- record count.
Print the report
- In the Navigation pane, highlight the Activity System > Administration > Authorized Users folder.
- Start the report set-up wizard.
- To report on all or a filtered subset of authorized users:
- Right-click the Authorized Users folder and select Select and Report > User Resources Analysis from the shortcut menu.
- On the Selection tab, define any filters you want to apply to the data.
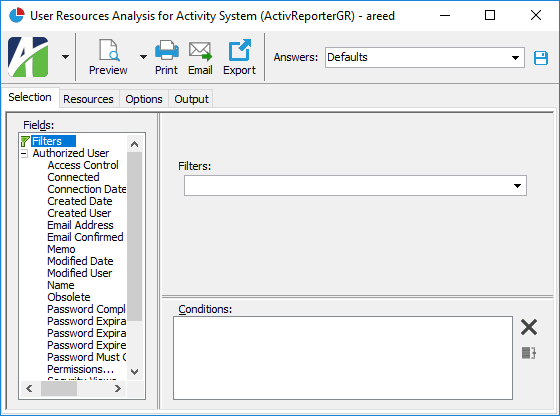
- To report on specifically selected authorized users:
- In the HD view, select the authorized users to include on the report. You can use Ctrl and/or Shift selection to select multiple records.
- Click
 and select User Resources Analysis from the drop-down menu.
- To report on a particular authorized user from the Authorized User window:
- In the HD view, locate and double-click the authorized user you want to report on. The Authorized User window opens with the authorized user loaded.
- Click
 and select User Resources Analysis from the drop-down menu.
- To report on all or a filtered subset of authorized users:
- Select the Resources tab.
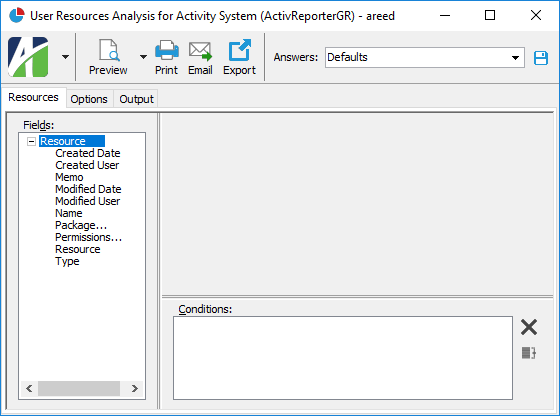
- Define any filters you want to apply on resources.
- Select the Options tab.
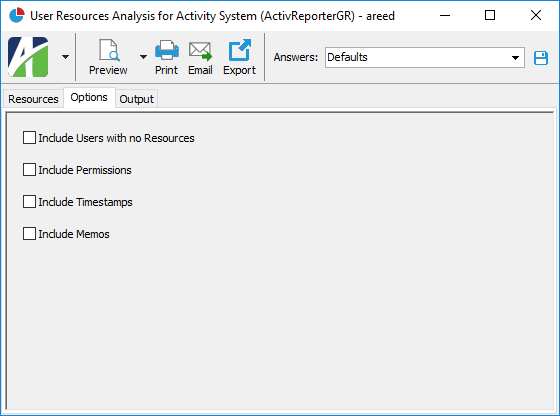
- Mark the checkbox(es) for the additional information to include:
- Users with No Resources
- Permissions
- Timestamps
- Memos
- Custom Fields (only visible if custom fields are set up)
- Select the Output tab.
- In the Design field, look up and select the report design to use.
- In the toolbar, click the icon for the type of output you want:
 - Provides access to two preview options.
- Preview - Click the icon or click the drop-down arrow and select Preview from the drop-down menu to view the report in the Crystal Reports viewer.
- Preview to PDF - Click the drop-down arrow next to the icon and select Preview to PDF to view the report in the PDF reader.
 - Opens the Print dialog so that you can select and configure a printer and then print a paper copy of the report.
 - Opens the dialog so that you can address and compose an e-mail that the report will be attached to.
 - Opens the Export Report dialog so that you can save the report to a file. File types include Crystal Reports (.rpt), PDF (.pdf), Microsoft Excel (.xls), Microsoft Word (.doc), rich text (.rtf), and XML (.xml).
- From
- The email account from which to send the email. Valid options are:
- Windows user default account. Sends email using the user's Windows default email account. For most users, this is the account configured in Outlook or another email client application.
- Server personal. Sends email using the email configuration for the system or company server and the email address on the current user's authorized user record. The authorized user record must have a confirmed email address.
- Server generic. Sends email using the email configuration and "from" address for the system or company server. This option requires "Send generic" access to the Server Email resource.
- To
- The email address(es) to which to send the email. Separate email addresses with semi-colons.
- CC
- The email addresses to copy on the email. Separate email addresses with semi-colons.
- BCC
- The email addresses to blind copy on the email. Separate email addresses with semi-colons.
- Subject
- The subject line.
- Text box
- The body of the email.
Report Email dialog
Data extensions
The following data extensions are available for the report:
- Authorized users
- Permissions
- Resources
Authorized User Record ID
Press F3 to look up the value.
If a value is already selected, you can press F4 to open the record in its native editor.
- All. The user has full access to system resources. (Permissions can be restricted at other levels even if the user has "All" permission at the system level.)
- Permitted. The user has access to the system resources he/she is assigned permissions for.
- Unpermitted. The user only has access to the system resources which do not require permissions.
- None. The user has no access at all, not even to log in.
User tab
The user's domain name followed by their Windows user name. When a user logs in, ActivReporter matches the Windows login name to the authorized user's Windows username to determine which permissions to allow.
Example
If the user's name is "User1" and the domain is "my domain", enter mydomain\User1.
Users can also log in by providing their ActivReporter username and password. Users who use ActivReporter credentials to log in are prompted for their password each time they connect. The next five fields pertain to ActivReporter credentials.
Companies tab
A company the authorized user is assigned access to.
Tips
Press F4 in the Company field to open the associated company record.
Press Shift+F4 in the Company field to open the associated company authorized user record.
- All. The user has full access to the company.
- Permitted. The user has access to the company resources he/she is assigned permissions for.
- Unpermitted. The user only has access to the company resources which do not require permissions.
- None. The user has no access to the company.
Permissions tab
- All. The user has full access to everything. (Permissions can be restricted at other levels even if the user has "All" permission at the system level.)
- Permitted. The user has access to the items he/she is assigned permissions for. If you select this option, specify which permissions to assign to the user.
- Unpermitted. The user only has access to the resources which do not require permissions.
- None. The user has no access at all, not even to log in.
The list box shows the permissions available for assignment to the authorized user. Permissions that are flagged as "Obsolete" are not visible in the list box.
To assign a permission to the user, double-click the permission to move it to the Assigned Permissions list box or highlight it and click ![]() to move it to the Assigned Permissions list box.
to move it to the Assigned Permissions list box.
To view a permission record, highlight the permission in the list box and press F4 or right-click and select Open from the context menu.
The list box shows the permissions currently assigned to the authorized user. Permissions previously assigned to an authorized user and subsequently flagged as "Obsolete" are visible in the list box.
To unassign a permission, double-click the permission to move it to the Available Permissions list box or highlight it and click ![]() to move it to the Available Permissions list box.
to move it to the Available Permissions list box.
To view a permission record, highlight the permission in the list box and press F4 or right-click and select Open from the context menu.
Security Views tab
Security views control the type of information available to an authorized user within each resource.
The list box shows the security views available for assignment to the authorized user. Security views that are flagged as "Obsolete" are not visible in the list box.
To assign a security view to the user, double-click the security view to move it to the Assigned Security Views list box or highlight it and click ![]() to move it to the Assigned Security Views list box.
to move it to the Assigned Security Views list box.
To view a security view record, highlight the security view in the list box and press F4 or right-click and select Open from the context menu.
The list box shows the security views currently assigned to the authorized user. Security views previously assigned to an authorized user and subsequently flagged as "Obsolete" are visible in the list box.
To unassign a security view, double-click the security view to move it to the Available Security Views list box or highlight it and click ![]() to move it to the Available Security Views list box.
to move it to the Available Security Views list box.
To view a security view record, highlight the security view in the list box and press F4 or right-click and select Open from the context menu.
Connection History tab
The Connection History pane shows the Connection History HD view filtered to show connection history for the selected company authorized user.
Custom tab
This tab is visible if custom fields exist for the entity. At a minimum, if there are custom fields, a Fields subtab will be present. One or more additional categories of subtabs may also be visible.
Fields subtab
This tab prompts for values for any custom fields set up for entity records of this entity type. Respond to the prompts as appropriate.
References subtab
This tab is visible if other records reference the current record.
Exchange Folder subtab
This tab is visible only if you set up a custom field with a data type of "Exchange Folder". The label on this tab is the name assigned to the custom field.
This tab shows the contents of the specified Exchange folder.
File subtab
This tab is visible only if you set up a custom field with a data type of "File". The label on the tab is the name assigned to the custom field.
This tab renders the contents of the specified file according to its file type.
Internet Address subtab
This tab is visible only if you set up a custom field with a data type of "Internet Address". The label on this tab is the name assigned to the custom field.
This tab shows the contents of the specified web page.
Network Folder subtab
This tab is visible only if you set up a custom field with a data type of "Network Folder". The label on this tab is the name assigned to the custom field.
This tab shows the contents of the specified network folder.
Data Links tab
See "".
Attachments tab
The Attachments tab is visible if any record for a given entity has an attachment. If the Attachments tab is not visible, this implies that no record of the entity type has an attachment on it; however, once an attachment is added to any record of the entity type, the Attachments tab will become available.
Other tab
Data Links
Data links are associations you make between related records that help keep the records up to date. Data links should only be created when data on two or more records represents the same entity. For example, if you have an AP vendor who is also an AR customer, you can create a data link between them and designate the data that you want to keep automatically updated. If the data is changed on one record, it immediately updates on the other record. For instance, suppose the address fields on a vendor and a customer record are linked. If the address on the customer record is changed, the vendor record is also updated.
The following record types are eligible for data linking: authorized users; AP vendors, contacts, and locations; AR customers, contacts, salespersons, and locations; banks and bank contacts; employees and HR contacts; and PO agents, operators, departments, and shipping addresses.
Linked data is indicated on data records by blue field labels.
 Create a data link
- Open the record you want to link to another record.
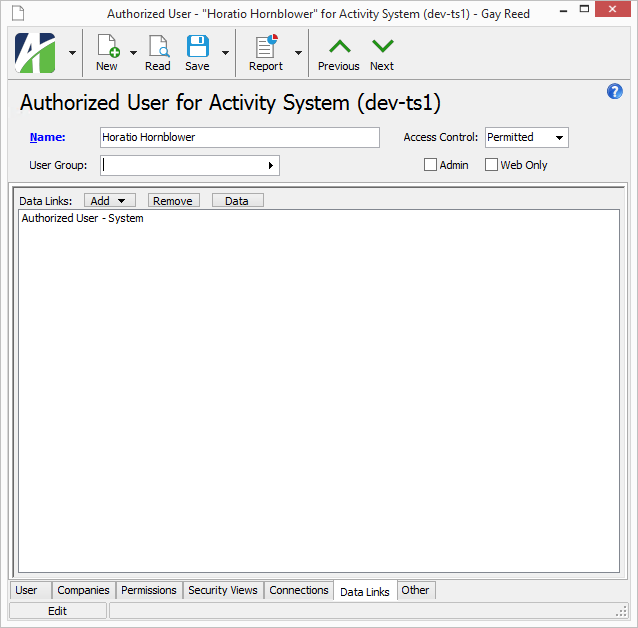
- Select the Data Links tab.
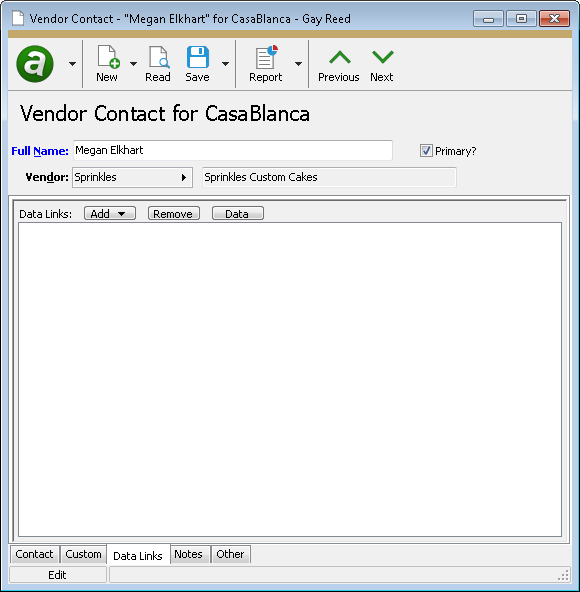
- Click Add. The list of record types that the current record can be linked to opens.
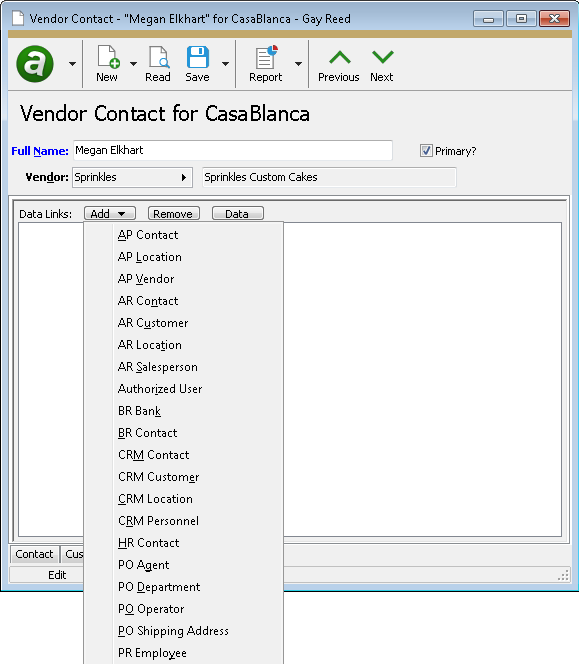
- Select the type of record to link to. The Find dialog for that record type opens.
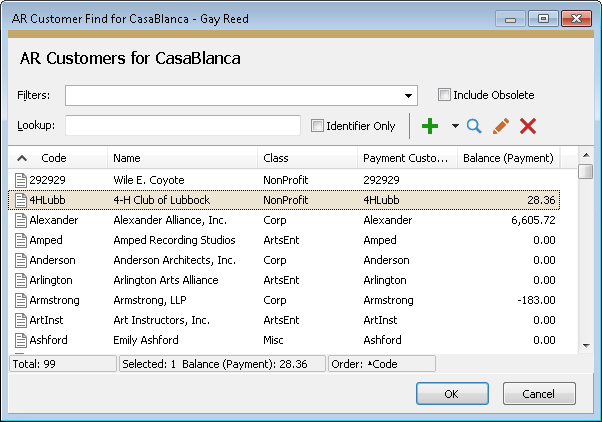
- Locate the record to link to, highlight it, and click OK.
- If there are no data conflicts, ActivReporter creates default links for you.
If you want to accept the links that ActivReporter added automatically, you can skip to the last step. If you want to manage the links yourself or if the system warned you of data differences, continue with the next step.
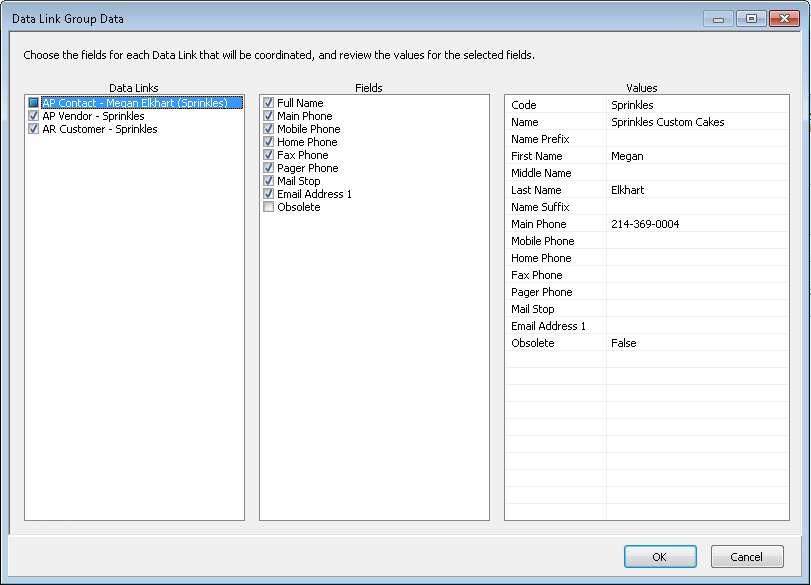
- Click Data. The Data Link Group Data dialog box opens.
- A clear checkbox means that none of the fields for the data link is selected for sharing. Clicking a clear checkbox selects all fields for sharing.
- A gray checkmark means that some of the fields for the data link are selected for sharing. Clicking a checkbox with a gray checkmark selects all fields for sharing.
- A black checkmark means that all of the fields for the data link are selected for sharing. Clicking a checkbox with a black checkmark deselects all fields.
- A clear checkbox means the field is not shared. Clicking a clear checkbox selects the field for sharing.
- A black checkmark means the field is selected for sharing. Clicking a checkbox with a black checkmark deselects the field.
- A clear checkbox means the field is not selected for sharing for any of the selected data links. Clicking the checkbox selects the field for sharing by all selected data links.
- A gray checkmark means the field is selected for sharing for at least one but not all of the selected data links. Clicking the checkbox selects the field for sharing by all selected data links.
- A black checkmark means the field is selected for sharing. Clicking a checkbox with a black checkmark deselects the field for all selected data links.
- For each data link you need to manage data sharing for, select the link in the Data Links list box, then select or deselect the fields for linking in the Fields list box.
- When you finish selecting fields, examine the data in the Values section. Make any necessary changes. In particular, ensure that conflicts indicated in bold are resolved.
- Click OK.
- Save your changes to the record.
The Data Link Group Data dialog box is divided into three sections: Data Links, Fields, and Values.
The Data Links list box shows the records that are linked to the current record. The checkbox next to a data link can be in one of three states:
The Fields list box shows the fields eligible for linking for the record that is selected in the Data Links list box. If multiple records are selected, the Fields list box shows the combined list of fields for the selected records.
If only one data link is selected:
If two or more data links are selected:
The Values section shows the current values for all selected fields. Discrepancies in linked records are indicated in bold to signal that your attention is needed. You can edit or deselect values directly in the Values section.
 Link a new record to existing records
The following procedure can be used to create new entity records from existing entity records of a different type.
- In the Navigation pane, highlight the folder for the type of entity record you need to create.
- Click
 . The data entry window opens.
 - Select the Data Links tab.
- Click Add. The list of record types opens.
- Select the type of record to link to. The Find dialog for that record type opens.
- Locate the record to link to, highlight it, and click OK.
- Click Data. The Data Link Group Data dialog box opens.
- Using the principles in "Create a data link" above, establish the desired links and verify data values. The linked data from record(s) you linked to is pulled into the new record.
- Finish creating the record.
- When you finish, save the new record.
 Remove a data link
- Open the record to remove a data link from.
- Select the Data Links tab.
- In the Data Links list box, select the link to remove.
- Click Remove.
- Save the record.
Authorized user security
Common accesses available on authorized users
| Access | A user with this access can... |
|---|---|
| Change | Use the mass change action on authorized users. |
| Change Logs | Access change logs for authorized users. |
| Custom Fields | Create and edit custom fields for authorized users. |
| Data | Have read-only access to authorized users from anywhere in the software (e.g., field validations, filters, date expressions). |
| Delete | Delete authorized users. |
| Edit | Edit authorized user records. |
| Export | Export authorized user records from ActivReporter. |
| Import | Import authorized user records into ActivReporter. |
| New | Create new authorized user records. |
| Read | Have read-only access to authorized user records. |
| Report | Run reports with authorized user information. |
| Report Designs | Create and edit report designs with authorized user information. This access enables the Report Designs button on the Output tab of report dialogs. |
| Shared Answers | Create and edit saved answers related to authorized users. |
| Shared Filters | Create and edit shared filters on authorized users. |
| Visible | View the Authorized Users folder in the Navigation pane. |